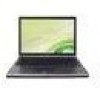
User Guide
Page 2
... 9 Getting Started 11 Locating Controls and Ports 12 About the Indicator Lights 19 Connecting a Power Source 20 Using the Battery Pack 21 Shutting Down Your Computer Safely 28 Updating Your Computer 29 Using Your VAIO Computer 30 Using the Keyboard 31 Using the Touch Pad 33 Using the Switch Function 34 Using the Built-in Camera 35 Using the Optical Disc Drive 36 Using the Memory Stick 43 Using Other Modules / Memory Cards 48 Using the Internet 54 Using the Network (LAN 56 Using the Wireless LAN 58 Using the Bluetooth Function 62 Using Fingerprint...
... 9 Getting Started 11 Locating Controls and Ports 12 About the Indicator Lights 19 Connecting a Power Source 20 Using the Battery Pack 21 Shutting Down Your Computer Safely 28 Updating Your Computer 29 Using Your VAIO Computer 30 Using the Keyboard 31 Using the Touch Pad 33 Using the Switch Function 34 Using the Built-in Camera 35 Using the Optical Disc Drive 36 Using the Memory Stick 43 Using Other Modules / Memory Cards 48 Using the Internet 54 Using the Network (LAN 56 Using the Wireless LAN 58 Using the Bluetooth Function 62 Using Fingerprint...

User Guide
Page 5
... with Internet and wireless setup, security setup, personalizing your VAIO computer, and creating recovery discs and more. Software Information Troubleshoot my VAIO Maintain and troubleshoot your VAIO computer with my VAIO Get help in storage device to articles, the VAIO technology page, specifications, and system and software information. Before Use > Finding More about Your VAIO Computer n5 N Finding More about Your VAIO Computer This section provides support information about restoring individual software programs, hardware drivers, and drive partition...
... with Internet and wireless setup, security setup, personalizing your VAIO computer, and creating recovery discs and more. Software Information Troubleshoot my VAIO Maintain and troubleshoot your VAIO computer with my VAIO Get help in storage device to articles, the VAIO technology page, specifications, and system and software information. Before Use > Finding More about Your VAIO Computer n5 N Finding More about Your VAIO Computer This section provides support information about restoring individual software programs, hardware drivers, and drive partition...

User Guide
Page 8
... computer's serial number You can assist with the set up of your new VAIO PC, system optimization, data rescue, and any repair service you might need. Before Use > Finding More about Your VAIO Computer n8 N 4. You can find it at a U.S. In Store Service & Support (available in USA only) Make an appointment with a Sony certified technician at the lower right corner of the display on the...
... computer's serial number You can assist with the set up of your new VAIO PC, system optimization, data rescue, and any repair service you might need. Before Use > Finding More about Your VAIO Computer n8 N 4. You can find it at a U.S. In Store Service & Support (available in USA only) Make an appointment with a Sony certified technician at the lower right corner of the display on the...
User Guide
Page 19
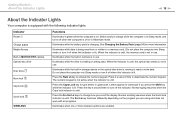
... numeric keypad. See Charging the Battery Pack (page 24) for more wireless options are using and does not work with the following indicator lights: Indicator Power 1 Charge Media Access Built-in MOTION EYE camera Optical disc drive Disc drive Num lock Caps lock Scroll lock WIRELESS Functions Illuminates in green when the computer is on the program you are enabled. The numeric keypad is not active when the indicator is charging. Press the Caps Lock key to activate the numeric keypad...
... numeric keypad. See Charging the Battery Pack (page 24) for more wireless options are using and does not work with the following indicator lights: Indicator Power 1 Charge Media Access Built-in MOTION EYE camera Optical disc drive Disc drive Num lock Caps lock Scroll lock WIRELESS Functions Illuminates in green when the computer is on the program you are enabled. The numeric keypad is not active when the indicator is charging. Press the Caps Lock key to activate the numeric keypad...

User Guide
Page 49
n 49 N Using Your VAIO Computer > Using Other Modules / Memory Cards To remove an ExpressCard module ✍ To remove the ExpressCard module when your computer is off, skip steps 1 to 4. 1 Double-click the Safely Remove Hardware icon on the taskbar. 2 Select the hardware you want to unplug. 3 Click Stop. 4 Follow the on-screen instructions to remove the ExpressCard module. 5 Push in the ExpressCard module toward the computer so that the module pops out. 6 Gently take hold of the ExpressCard module and pull it out of the slot.
n 49 N Using Your VAIO Computer > Using Other Modules / Memory Cards To remove an ExpressCard module ✍ To remove the ExpressCard module when your computer is off, skip steps 1 to 4. 1 Double-click the Safely Remove Hardware icon on the taskbar. 2 Select the hardware you want to unplug. 3 Click Stop. 4 Follow the on-screen instructions to remove the ExpressCard module. 5 Push in the ExpressCard module toward the computer so that the module pops out. 6 Gently take hold of the ExpressCard module and pull it out of the slot.

User Guide
Page 54
... Internet. Using Your VAIO Computer > Using the Internet n 54 N Using the Internet Before using the Internet, you need to sign up with an Internet Service Provider (ISP) and set up For detailed information on connection setups and modem configuration, see the manual that came with a built-in modem, you need to connect an external modem device, for example a USB telephone modem, a DSL modem, or a cable modem, to the Internet, ask your ISP. ✍ To connect...
... Internet. Using Your VAIO Computer > Using the Internet n 54 N Using the Internet Before using the Internet, you need to sign up with an Internet Service Provider (ISP) and set up For detailed information on connection setups and modem configuration, see the manual that came with a built-in modem, you need to connect an external modem device, for example a USB telephone modem, a DSL modem, or a cable modem, to the Internet, ask your ISP. ✍ To connect...

User Guide
Page 60
... also designed to find out about the configuration of data protection and access control for existing Wi-Fi networks. The IEEE 802.11n draft standard is also used by wireless LAN compatible devices is a wireless LAN standard, using WLAN products may cause lower communication speed, narrower communication range, or broken wireless connections. Therefore, before activating the WLAN function, read the Safety Information carefully. Besides that...
... also designed to find out about the configuration of data protection and access control for existing Wi-Fi networks. The IEEE 802.11n draft standard is also used by wireless LAN compatible devices is a wireless LAN standard, using WLAN products may cause lower communication speed, narrower communication range, or broken wireless connections. Therefore, before activating the WLAN function, read the Safety Information carefully. Besides that...

User Guide
Page 79
.... ! To install this package, you will not be carried out at your data maintenance and management. The maintenance and management of your own risk. Without these passwords, you must be able to write down the passwords and keep them safe and private from other people. To open the documentation, click Start, All Programs, Infineon Security Platform Solution, and Help. ! Sony assumes...
.... ! To install this package, you will not be carried out at your data maintenance and management. The maintenance and management of your own risk. Without these passwords, you must be able to write down the passwords and keep them safe and private from other people. To open the documentation, click Start, All Programs, Infineon Security Platform Solution, and Help. ! Sony assumes...
User Guide
Page 81
... Windows Help and Support to enable BitLocker Drive Encryption. 11 Save the recovery password to the USB flash memory device in the BIOS setup screen: 1 Turn on -screen instructions. You need to move Internal Optical Drive to the top of the list to recover the computer system using your recovery discs. 8 Press the < or , key to select Exit, select Exit Setup, and then press the Enter key. 9 After your computer. 2 Press the F2 key when the VAIO logo appears. The BIOS setup screen...
... Windows Help and Support to enable BitLocker Drive Encryption. 11 Save the recovery password to the USB flash memory device in the BIOS setup screen: 1 Turn on -screen instructions. You need to move Internal Optical Drive to the top of the list to recover the computer system using your recovery discs. 8 Press the < or , key to select Exit, select Exit Setup, and then press the Enter key. 9 After your computer. 2 Press the F2 key when the VAIO logo appears. The BIOS setup screen...

User Guide
Page 102
... video controller 1 Click Start and Control Panel. 2 Click Additional Options. 3 Click NVIDIA Control Panel. 4 Select the display setup option under Display. 5 Follow the on the type of your computer screen and the external display or projector at the same time, depending on -screen instructions to change the settings. ❑ On models with the Intel Graphics Media Accelerator 1 Right-click on the desktop and select Personalize. 2 Click Display Settings. 3 Follow the on-screen instructions to change the settings. The monitor port...
... video controller 1 Click Start and Control Panel. 2 Click Additional Options. 3 Click NVIDIA Control Panel. 4 Select the display setup option under Display. 5 Follow the on the type of your computer screen and the external display or projector at the same time, depending on -screen instructions to change the settings. ❑ On models with the Intel Graphics Media Accelerator 1 Right-click on the desktop and select Personalize. 2 Click Display Settings. 3 Follow the on-screen instructions to change the settings. The monitor port...

User Guide
Page 112
... first set the power-on password in conjunction with administrative rights on password is removed from unauthorized access. The hard disk password provides additional security for changing some of the BIOS setup options, as well as to start your computer and is installed in storage device is provided to change all the setup options in storage device. For more information, see Using Fingerprint Authentication (page 67). Adding the Power-on Password The power-on...
... first set the power-on password in conjunction with administrative rights on password is removed from unauthorized access. The hard disk password provides additional security for changing some of the BIOS setup options, as well as to start your computer and is installed in storage device is provided to change all the setup options in storage device. For more information, see Using Fingerprint Authentication (page 67). Adding the Power-on Password The power-on...
User Guide
Page 116
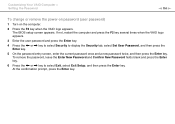
... prompt, press the Enter key. To remove the password, leave the Enter New Password and Confirm New Password fields blank and press the Enter key. 6 Press the < or , key to display the Security tab, select Set User Password, and then press the Enter key. 5 On the password entry screen, enter the current password once and a new password twice, and then press the Enter key. Customizing Your VAIO Computer > Setting the Password n 116 N To change or remove the power-on password (user password) 1 Turn on the computer...
... prompt, press the Enter key. To remove the password, leave the Enter New Password and Confirm New Password fields blank and press the Enter key. 6 Press the < or , key to display the Security tab, select Set User Password, and then press the Enter key. 5 On the password entry screen, enter the current password once and a new password twice, and then press the Enter key. Customizing Your VAIO Computer > Setting the Password n 116 N To change or remove the power-on password (user password) 1 Turn on the computer...
User Guide
Page 119
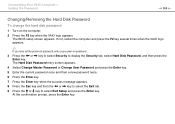
Customizing Your VAIO Computer > Setting the Password n 119 N Changing/Removing the Hard Disk Password To change the hard disk password 1 Turn on password. 3 Press the < or , key to select Security to select Exit Setup and press the Enter key. At the confirmation prompt, press the Enter key. The Hard Disk Password entry screen appears. 4 Select Change Master Password or Change User Password and press the Enter key. 5 Enter the current password once and then a new password twice. 6 Press the Enter key. 7 Press the Enter key when the success message appears...
Customizing Your VAIO Computer > Setting the Password n 119 N Changing/Removing the Hard Disk Password To change the hard disk password 1 Turn on password. 3 Press the < or , key to select Security to select Exit Setup and press the Enter key. At the confirmation prompt, press the Enter key. The Hard Disk Password entry screen appears. 4 Select Change Master Password or Change User Password and press the Enter key. 5 Enter the current password once and then a new password twice. 6 Press the Enter key. 7 Press the Enter key when the success message appears...

User Guide
Page 120
... Enter key. Customizing Your VAIO Computer > Setting the Password n 120 N To remove the hard disk password 1 Turn on password. 3 Press the < or , key to select Security to select Exit Setup and press the Enter key. If not, restart the computer and press the F2 key several times when the VAIO logo appears. ✍ If you have set the power-on password, enter your power-on the computer. 2 Press the F2 key when the VAIO...
... Enter key. Customizing Your VAIO Computer > Setting the Password n 120 N To remove the hard disk password 1 Turn on password. 3 Press the < or , key to select Security to select Exit Setup and press the Enter key. If not, restart the computer and press the F2 key several times when the VAIO logo appears. ✍ If you have set the power-on password, enter your power-on the computer. 2 Press the F2 key when the VAIO...

User Guide
Page 131
... included in the scope of the VAIO HDD Protection utility. Be aware that the solid state drive is designed to minimize possibilities of your hard disk drive against shock hazards. Customizing Your VAIO Computer > Protecting the Hard Disk n 131 N Protecting the Hard Disk If your computer is disabled before Windows launches, and during a shift to Hibernate or Sleep mode, system recovery, and system shutdown. For more information...
... included in the scope of the VAIO HDD Protection utility. Be aware that the solid state drive is designed to minimize possibilities of your hard disk drive against shock hazards. Customizing Your VAIO Computer > Protecting the Hard Disk n 131 N Protecting the Hard Disk If your computer is disabled before Windows launches, and during a shift to Hibernate or Sleep mode, system recovery, and system shutdown. For more information...

User Guide
Page 132
... may differ depending on the model you are not familiar with upgrading memory on your computer. For assistance, contact an authorized Sony Service Center. To find out about Your VAIO Computer (page 5). See the specifications to install a new memory module. ❑ You should not touch the connectors or open the memory module compartment cover. Upgrading Your VAIO Computer > n 132 N Upgrading Your VAIO Computer Your VAIO computer and memory modules use high precision components and...
... may differ depending on the model you are not familiar with upgrading memory on your computer. For assistance, contact an authorized Sony Service Center. To find out about Your VAIO Computer (page 5). See the specifications to install a new memory module. ❑ You should not touch the connectors or open the memory module compartment cover. Upgrading Your VAIO Computer > n 132 N Upgrading Your VAIO Computer Your VAIO computer and memory modules use high precision components and...
User Guide
Page 159
... the installed battery pack is changed before the computer completely enters Sleep or Hibernate mode. To restore your computer to Normal mode 1 Close all open programs. 2 Click Start, the arrow next to the Lock button, and Restart. 3 If your computer does not restart, press the Ctrl+Alt+Delete keys and click the arrow next to the Shut down button and Restart. 4 If this problem, turn off...
... the installed battery pack is changed before the computer completely enters Sleep or Hibernate mode. To restore your computer to Normal mode 1 Close all open programs. 2 Click Start, the arrow next to the Lock button, and Restart. 3 If your computer does not restart, press the Ctrl+Alt+Delete keys and click the arrow next to the Shut down button and Restart. 4 If this problem, turn off...

User Guide
Page 161
... the system. If you have installed the latest video driver software. ❑ On some VAIO models, the graphics memory is not guaranteed. Why doesn't my screen turn off after the automatic turn off time has passed? The VAIO original screen saver disables the timer setting, which you can select using the Windows power options, for your screen to download. ❑ Make sure you have forgotten the power-on password? To find the nearest...
... the system. If you have installed the latest video driver software. ❑ On some VAIO models, the graphics memory is not guaranteed. Why doesn't my screen turn off after the automatic turn off time has passed? The VAIO original screen saver disables the timer setting, which you can select using the Windows power options, for your screen to download. ❑ Make sure you have forgotten the power-on password? To find the nearest...

User Guide
Page 188
... bidirectional communication functions are provided with the Windows operating system installed on your computer may need to install the printer driver software before you use your printer is connected to the optional docking station, check to see if the docking station is connected to cancel the Enable bidirectional support check box. 6 Click OK. Follow these steps: 1 Click Start and Control Panel. 2 Click Printer under Hardware and Sound. 3 Right-click...
... bidirectional communication functions are provided with the Windows operating system installed on your computer may need to install the printer driver software before you use your printer is connected to the optional docking station, check to see if the docking station is connected to cancel the Enable bidirectional support check box. 6 Click OK. Follow these steps: 1 Click Start and Control Panel. 2 Click Printer under Hardware and Sound. 3 Right-click...
User Guide
Page 191
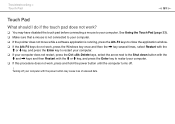
... then Restart with the power button may have disabled the touch pad before connecting a mouse to restart your computer. Turning off your computer with the M or m key, and press the Enter key to your computer. ❑ If this procedure does not work ? ❑ You may cause loss of unsaved data. See Using the Touch Pad (page 33). ❑ Make sure that a mouse is not connected to your computer...
... then Restart with the power button may have disabled the touch pad before connecting a mouse to restart your computer. Turning off your computer with the M or m key, and press the Enter key to your computer. ❑ If this procedure does not work ? ❑ You may cause loss of unsaved data. See Using the Touch Pad (page 33). ❑ Make sure that a mouse is not connected to your computer...


