User Guide
Page 3
... Selecting Display Modes...97 Using the Multiple Monitors Function ...98 Connecting an External Microphone ...100 Connecting a Universal Serial Bus (USB) Device...101 Connecting a Printer ...104 Connecting an i.LINK Device ...105 Connecting to a Network (LAN) ...107 Customizing Your VAIO Computer ...109 Setting the Password ...110 Using Fingerprint Authentication ...122 Using Trusted Platform Module (TPM)...130 Setting Up Your Computer with VAIO Control Center 137 Using VAIO Status Monitor ...138 Using the Power Saving Modes ...139 Managing Power with VAIO Power Management ...144 Changing the...
... Selecting Display Modes...97 Using the Multiple Monitors Function ...98 Connecting an External Microphone ...100 Connecting a Universal Serial Bus (USB) Device...101 Connecting a Printer ...104 Connecting an i.LINK Device ...105 Connecting to a Network (LAN) ...107 Customizing Your VAIO Computer ...109 Setting the Password ...110 Using Fingerprint Authentication ...122 Using Trusted Platform Module (TPM)...130 Setting Up Your Computer with VAIO Control Center 137 Using VAIO Status Monitor ...138 Using the Power Saving Modes ...139 Managing Power with VAIO Power Management ...144 Changing the...

User Guide
Page 9
....sony.com/ES/VAIO/BR/ for customers in this manual) - To access this on solving common problems. ✍ To go to Web sites described in Brazil ❑ VAIO Recovery Center User Guide - Explains features of your VAIO computer. The online specifications describe the hardware and software configurations of your computer. To view the online specifications: 1 Connect to the Internet. 2 Go to the original factory installed settings. Provides information about the software...
....sony.com/ES/VAIO/BR/ for customers in this manual) - To access this on solving common problems. ✍ To go to Web sites described in Brazil ❑ VAIO Recovery Center User Guide - Explains features of your VAIO computer. The online specifications describe the hardware and software configurations of your computer. To view the online specifications: 1 Connect to the Internet. 2 Go to the original factory installed settings. Provides information about the software...
User Guide
Page 11
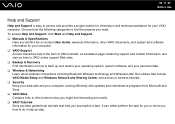
... to find interesting and useful. ❑ VAIO Tutorials Sony provides guided help tutorials that include VAIO Media Setup and Windows Network and Sharing Center, and access to back up and restore your operating system, system software, and your personal data. ❑ Wireless & Networking Learn about wireless connections including Bluetooth Wireless technology and Wireless LAN. It can either perform the task for your computer. ❑ VAIO Support Access interactive help you need. Run utilities that help in...
... to find interesting and useful. ❑ VAIO Tutorials Sony provides guided help tutorials that include VAIO Media Setup and Windows Network and Sharing Center, and access to back up and restore your operating system, system software, and your personal data. ❑ Wireless & Networking Learn about wireless connections including Bluetooth Wireless technology and Wireless LAN. It can either perform the task for your computer. ❑ VAIO Support Access interactive help you need. Run utilities that help in...
User Guide
Page 22
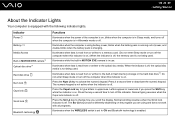
Indicator Power 1 Battery e Media Access Built-in MOTION EYE camera*1 Optical disc drive*1 Hard disk drive Num lock Caps lock Scroll lock Bluetooth technology Functions Illuminates when the power of power, and double-blinks when the battery pack is read from or written to deactivate the numeric keypad. Illuminates when data is charging. Do not enter Sleep mode or turn off the computer when this indicator is on . Press it a second time to the built-in flash memory storage or...
Indicator Power 1 Battery e Media Access Built-in MOTION EYE camera*1 Optical disc drive*1 Hard disk drive Num lock Caps lock Scroll lock Bluetooth technology Functions Illuminates when the power of power, and double-blinks when the battery pack is read from or written to deactivate the numeric keypad. Illuminates when data is charging. Do not enter Sleep mode or turn off the computer when this indicator is on . Press it a second time to the built-in flash memory storage or...
User Guide
Page 36
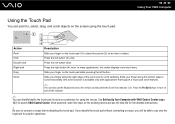
... fingerprint sensor for using the touch pad. Once launched, select the topic on an item or object. If you disable the touch pad without connecting a mouse, you will be able to launch VAIO Control Center. Be sure to scroll horizontally (the scroll function is lit. Press the left button (3) once. See Setting Up Your Computer with applications that support a touch pad scroll feature). ✍ You can disable/enable the touch pad to suit...
... fingerprint sensor for using the touch pad. Once launched, select the topic on an item or object. If you disable the touch pad without connecting a mouse, you will be able to launch VAIO Control Center. Be sure to scroll horizontally (the scroll function is lit. Press the left button (3) once. See Setting Up Your Computer with applications that support a touch pad scroll feature). ✍ You can disable/enable the touch pad to suit...

User Guide
Page 42
Check your specifications for the type of media your model. n 42 N Using Your VAIO Computer Reading and Writing Optical Discs Your computer plays and records CDs, DVDs, and Blu-ray Disc™ media, depending on your optical disc drive supports. Use the table below to see which types of optical disc drive installed on the model you purchased.
Check your specifications for the type of media your model. n 42 N Using Your VAIO Computer Reading and Writing Optical Discs Your computer plays and records CDs, DVDs, and Blu-ray Disc™ media, depending on your optical disc drive supports. Use the table below to see which types of optical disc drive installed on the model you purchased.
User Guide
Page 70
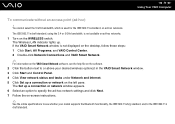
... the on the WIRELESS switch. The Set up a connection or network window appears. 6 Select an option to or above your model supports the Bluetooth functionality, the IEEE 802.11a/b/g standard, and/or the IEEE 802.11n draft standard. The Wireless LAN indicator lights up a connection or network on ad-hoc networks. n 70 N Using Your VAIO Computer To communicate without an access point (ad-hoc) ! If the VAIO Smart Network window is used for the IEEE...
... the on the WIRELESS switch. The Set up a connection or network window appears. 6 Select an option to or above your model supports the Bluetooth functionality, the IEEE 802.11a/b/g standard, and/or the IEEE 802.11n draft standard. The Wireless LAN indicator lights up a connection or network on ad-hoc networks. n 70 N Using Your VAIO Computer To communicate without an access point (ad-hoc) ! If the VAIO Smart Network window is used for the IEEE...

User Guide
Page 72
... your desired wireless option(s) in the VAIO Smart Network window. 4 Right-click or on the taskbar and select Connect to see whether your access point for more information. 2 Turn on the WIRELESS switch. If the VAIO Smart Network window is set up . The passphrase is case sensitive and must enter a passphrase. n 72 N Using Your VAIO Computer To connect to F. See the manual that came with your model supports the Bluetooth functionality, the IEEE...
... your desired wireless option(s) in the VAIO Smart Network window. 4 Right-click or on the taskbar and select Connect to see whether your access point for more information. 2 Turn on the WIRELESS switch. If the VAIO Smart Network window is set up . The passphrase is case sensitive and must enter a passphrase. n 72 N Using Your VAIO Computer To connect to F. See the manual that came with your model supports the Bluetooth functionality, the IEEE...

User Guide
Page 74
... Bluetooth indicator lights up Bluetooth functionality. To start Bluetooth communications 1 Turn on the software. 2 Click the button next to or above the Bluetooth icon in open space. ❑ Wireless WAN models See the SmartWi Connection Utility Help for setting up . If the VAIO Smart Network window is not displayed on the desktop, follow these devices without cables and up Bluetooth functionality. For instructions on how to 33 feet (10 meters) range in the VAIO Smart Network window. n 74 N Using Your VAIO...
... Bluetooth indicator lights up Bluetooth functionality. To start Bluetooth communications 1 Turn on the software. 2 Click the button next to or above the Bluetooth icon in open space. ❑ Wireless WAN models See the SmartWi Connection Utility Help for setting up . If the VAIO Smart Network window is not displayed on the desktop, follow these devices without cables and up Bluetooth functionality. For instructions on how to 33 feet (10 meters) range in the VAIO Smart Network window. n 74 N Using Your VAIO...
User Guide
Page 81
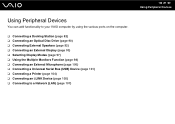
... ports on the computer. ❑ Connecting a Docking Station (page 82) ❑ Connecting an Optical Disc Drive (page 90) ❑ Connecting External Speakers (page 92) ❑ Connecting an External Display (page 93) ❑ Selecting Display Modes (page 97) ❑ Using the Multiple Monitors Function (page 98) ❑ Connecting an External Microphone (page 100) ❑ Connecting a Universal Serial Bus (USB) Device (page 101) ❑ Connecting a Printer (page 104) ❑ Connecting an i.LINK Device (page 105) ❑ Connecting to a Network (LAN...
... ports on the computer. ❑ Connecting a Docking Station (page 82) ❑ Connecting an Optical Disc Drive (page 90) ❑ Connecting External Speakers (page 92) ❑ Connecting an External Display (page 93) ❑ Selecting Display Modes (page 97) ❑ Using the Multiple Monitors Function (page 98) ❑ Connecting an External Microphone (page 100) ❑ Connecting a Universal Serial Bus (USB) Device (page 101) ❑ Connecting a Printer (page 104) ❑ Connecting an i.LINK Device (page 105) ❑ Connecting to a Network (LAN...
User Guide
Page 111
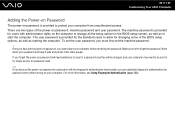
... entering the password. For more information, see Using Fingerprint Authentication (page 122). Once you have set the user password, you cannot start the computer. Make sure not to allow for password reset. ✍ If you have set the power-on password, you must first set the machine password. ! To set the power-on password in conjunction with administrator rights on the computer to change all the setup options in for depot service...
... entering the password. For more information, see Using Fingerprint Authentication (page 122). Once you have set the user password, you cannot start the computer. Make sure not to allow for password reset. ✍ If you have set the power-on password, you must first set the machine password. ! To set the power-on password in conjunction with administrator rights on the computer to change all the setup options in for depot service...
User Guide
Page 118
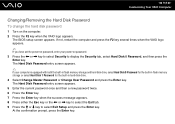
... m key to display the Security tab, select Hard Disk 0 Password, and then press the Enter key. The BIOS setup screen appears. At the confirmation prompt, press the Enter key. If not, restart the computer and press the F2 key several times when the VAIO logo appears. ✍ If you have set the power-on password, enter your computer is equipped with both the built-in flash memory storage and hard disk drive, select Hard Disk 0 Password...
... m key to display the Security tab, select Hard Disk 0 Password, and then press the Enter key. The BIOS setup screen appears. At the confirmation prompt, press the Enter key. If not, restart the computer and press the F2 key several times when the VAIO logo appears. ✍ If you have set the power-on password, enter your computer is equipped with both the built-in flash memory storage and hard disk drive, select Hard Disk 0 Password...

User Guide
Page 136
... them safe and private from other people. Sony assumes no liabilities for detailed information. Be sure to set a few passwords while installing the Infineon TPM Professional Package. To open the documentation, click Start, All Programs, Infineon Security Platform Solution, and Help. ! Then, double-click setup.exe in the C:\Infineon\Readme folder. Without these passwords, you must be able to restore...
... them safe and private from other people. Sony assumes no liabilities for detailed information. Be sure to set a few passwords while installing the Infineon TPM Professional Package. To open the documentation, click Start, All Programs, Infineon Security Platform Solution, and Help. ! Then, double-click setup.exe in the C:\Infineon\Readme folder. Without these passwords, you must be able to restore...
User Guide
Page 147
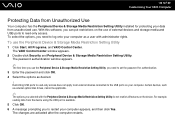
... from the device using the USB port is available. 5 Click OK. 6 A message prompting you need to log onto your computer. Certain devices, such as external optical disc drives, cannot be applicable. ✍ The options you can put restrictions on the device. The VAIO Control Center window appears. 2 Double-click Security and Peripheral Device & Storage Media Restriction Setting Utility. With this software, you selected with administrator rights. The changes are activated after...
... from the device using the USB port is available. 5 Click OK. 6 A message prompting you need to log onto your computer. Certain devices, such as external optical disc drives, cannot be applicable. ✍ The options you can put restrictions on the device. The VAIO Control Center window appears. 2 Double-click Security and Peripheral Device & Storage Media Restriction Setting Utility. With this software, you selected with administrator rights. The changes are activated after...

User Guide
Page 149
... sensitivity level. 5 Click OK. Activating VAIO HDD Protection To protect your hard disk drive against shock hazards, you must first activate VAIO HDD Protection. The VAIO HDD Protection window appears. 3 Select the Activate hard disk drive protection check box. 4 Select one of the VAIO HDD Protection utility. For more information, open the help file from the VAIO HDD Protection window. The VAIO Control Center window appears. 2 Double-click Security and Hard Disk Drive Protection Settings. You can select the sensitivity...
... sensitivity level. 5 Click OK. Activating VAIO HDD Protection To protect your hard disk drive against shock hazards, you must first activate VAIO HDD Protection. The VAIO HDD Protection window appears. 3 Select the Activate hard disk drive protection check box. 4 Select one of the VAIO HDD Protection utility. For more information, open the help file from the VAIO HDD Protection window. The VAIO Control Center window appears. 2 Double-click Security and Hard Disk Drive Protection Settings. You can select the sensitivity...
User Guide
Page 187
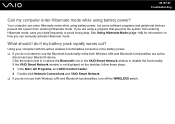
... manually activate Hibernate mode. Click the button next to or above the Bluetooth icon in the VAIO Smart Network window to avoid losing data. n 187 N Troubleshooting Can my computer enter Hibernate mode while using a program that prevents the system from entering Hibernate mode. Using your computer with the active wireless functionalities consumes more battery power. ❑ If you can enter Hibernate mode while using battery power, but some software programs and peripheral devices prevent the system from entering...
... manually activate Hibernate mode. Click the button next to or above the Bluetooth icon in the VAIO Smart Network window to avoid losing data. n 187 N Troubleshooting Can my computer enter Hibernate mode while using a program that prevents the system from entering Hibernate mode. Using your computer with the active wireless functionalities consumes more battery power. ❑ If you can enter Hibernate mode while using battery power, but some software programs and peripheral devices prevent the system from entering...

User Guide
Page 190
... Camera button to start VAIO Camera Capture Utility. For changing the setting, see Using the Power Saving Modes (page 139). Follow these steps: 1 Click Start, Control Panel, Hardware and Sound, and Device Manager. 2 Double-click Imaging devices. 3 Right-click the device name for the camera. Change the record format to the MPEG-1 format. n 190 N Troubleshooting Why can't I use ? ❑ Do not place your computer into Sleep or Hibernate mode while you must reinstall the driver software for your computer automatically enters Sleep...
... Camera button to start VAIO Camera Capture Utility. For changing the setting, see Using the Power Saving Modes (page 139). Follow these steps: 1 Click Start, Control Panel, Hardware and Sound, and Device Manager. 2 Double-click Imaging devices. 3 Right-click the device name for the camera. Change the record format to the MPEG-1 format. n 190 N Troubleshooting Why can't I use ? ❑ Do not place your computer into Sleep or Hibernate mode while you must reinstall the driver software for your computer automatically enters Sleep...
User Guide
Page 202
...-click the volume icon on the taskbar and click Open Volume Mixer to check the settings. ❑ Check the volume setting in the audio mixer. ❑ If you need to enable the device or reinstall the drivers. 5 Double-click the optical disc drive device to open a list of the optical disc drives of your computer. Follow these steps: 1 Click Start and Control Panel. 2 Click System and Maintenance. 3 Click System. 4 Click Device Manager on the...
...-click the volume icon on the taskbar and click Open Volume Mixer to check the settings. ❑ Check the volume setting in the audio mixer. ❑ If you need to enable the device or reinstall the drivers. 5 Double-click the optical disc drive device to open a list of the optical disc drives of your computer. Follow these steps: 1 Click Start and Control Panel. 2 Click System and Maintenance. 3 Click System. 4 Click Device Manager on the...

User Guide
Page 209
... connected to install the printer driver software before you use your computer. ❑ You may enable printing. See the manual that came with your printer, disabling the functions on your printer. This change to cancel the Enable bidirectional support check box. 6 Click OK. Follow these steps: 1 Click Start and Control Panel. 2 Click Printer under Hardware and Sound. 3 Right-click the printer icon and select Properties. 4 Click the Ports...
... connected to install the printer driver software before you use your computer. ❑ You may enable printing. See the manual that came with your printer, disabling the functions on your printer. This change to cancel the Enable bidirectional support check box. 6 Click OK. Follow these steps: 1 Click Start and Control Panel. 2 Click Printer under Hardware and Sound. 3 Right-click the printer icon and select Properties. 4 Click the Ports...
User Guide
Page 213
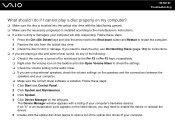
... of unsaved data. Turning off . ! n 213 N Troubleshooting Touch Pad What should I do not work, click Start, the arrow next to the Lock button, and Restart to restart your computer. ❑ If your computer does not restart, press the Ctrl+Alt+Delete keys and click the arrow next to your computer with the power button may have disabled the touch pad without connecting a mouse to the Shut...
... of unsaved data. Turning off . ! n 213 N Troubleshooting Touch Pad What should I do not work, click Start, the arrow next to the Lock button, and Restart to restart your computer. ❑ If your computer does not restart, press the Ctrl+Alt+Delete keys and click the arrow next to your computer with the power button may have disabled the touch pad without connecting a mouse to the Shut...


