

User Guide
Page 2
... 9 Getting Started 11 Locating Controls and Ports 12 About the Indicator Lights 18 Connecting a Power Source 19 Using the Battery Pack 20 Shutting Down Your Computer Safely 28 Updating Your Computer 29 Using Your VAIO Computer 30 Using the Keyboard 31 Using the Touch Pad 33 Using Special-function Buttons 34 Using the Built-in Camera 35 Using the Optical Disc Drive 36 Using the Memory Stick 43 Using Other Modules / Memory Cards 48 Using the Internet 54 Using the Network (LAN 56 Using the Wireless LAN 57 Using the Bluetooth Function 61 Using Fingerprint...
... 9 Getting Started 11 Locating Controls and Ports 12 About the Indicator Lights 18 Connecting a Power Source 19 Using the Battery Pack 20 Shutting Down Your Computer Safely 28 Updating Your Computer 29 Using Your VAIO Computer 30 Using the Keyboard 31 Using the Touch Pad 33 Using Special-function Buttons 34 Using the Built-in Camera 35 Using the Optical Disc Drive 36 Using the Memory Stick 43 Using Other Modules / Memory Cards 48 Using the Internet 54 Using the Network (LAN 56 Using the Wireless LAN 57 Using the Bluetooth Function 61 Using Fingerprint...

User Guide
Page 8
... a U.S. Before Use > Finding More about Your VAIO Computer n8 N 4. In Store Service & Support (available in USA only) Make an appointment with the set up of your new VAIO PC, system optimization, data rescue, and any repair service you might need. Sony Style store and get personalized service and support for at the lower right corner of the display on the computer. 2 Your computer's serial number You can...
... a U.S. Before Use > Finding More about Your VAIO Computer n8 N 4. In Store Service & Support (available in USA only) Make an appointment with the set up of your new VAIO PC, system optimization, data rescue, and any repair service you might need. Sony Style store and get personalized service and support for at the lower right corner of the display on the computer. 2 Your computer's serial number You can...
User Guide
Page 18
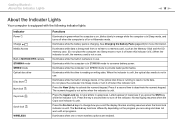
... more wireless options are using and does not work with the following indicator lights: Indicator Power 1 Charge Media Access Built-in MOTION EYE camera STAMINA mode SPEED mode Optical disc drive Disc drive Num lock Caps lock Scroll lock WIRELESS Functions Illuminates in Hibernate mode. Illuminates while the built-in use. Illuminates while the built-in storage device or the optical disc drive is not in camera is off when this indicator is lit.) When the indicator is unlit, the memory card is running...
... more wireless options are using and does not work with the following indicator lights: Indicator Power 1 Charge Media Access Built-in MOTION EYE camera STAMINA mode SPEED mode Optical disc drive Disc drive Num lock Caps lock Scroll lock WIRELESS Functions Illuminates in Hibernate mode. Illuminates while the built-in use. Illuminates while the built-in storage device or the optical disc drive is not in camera is off when this indicator is lit.) When the indicator is unlit, the memory card is running...
User Guide
Page 49
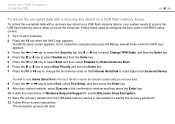
n 49 N Using Your VAIO Computer > Using Other Modules / Memory Cards To remove an ExpressCard module ✍ To remove the ExpressCard module when your computer is off, skip steps 1 to 4. 1 Double-click the Safely Remove Hardware icon on the taskbar. 2 Select the hardware you want to unplug. 3 Click Stop. 4 Follow the on-screen instructions to remove the ExpressCard module. 5 Push in the ExpressCard module toward the computer so that the module pops out. 6 Gently take hold of the ExpressCard module and pull it out of the slot.
n 49 N Using Your VAIO Computer > Using Other Modules / Memory Cards To remove an ExpressCard module ✍ To remove the ExpressCard module when your computer is off, skip steps 1 to 4. 1 Double-click the Safely Remove Hardware icon on the taskbar. 2 Select the hardware you want to unplug. 3 Click Stop. 4 Follow the on-screen instructions to remove the ExpressCard module. 5 Push in the ExpressCard module toward the computer so that the module pops out. 6 Gently take hold of the ExpressCard module and pull it out of the slot.

User Guide
Page 54
... connecting your computer to set up For detailed information on connection setups and modem configuration, see the manual that came with your computer. When you need to your modem. The following types of Internet connection services may need to the Internet. See Using the Wireless LAN (page 57) for example a USB telephone modem, a DSL modem, or a cable modem, to connect an external modem device, for more information. ! For the detailed instructions on devices...
... connecting your computer to set up For detailed information on connection setups and modem configuration, see the manual that came with your computer. When you need to your modem. The following types of Internet connection services may need to the Internet. See Using the Wireless LAN (page 57) for example a USB telephone modem, a DSL modem, or a cable modem, to connect an external modem device, for more information. ! For the detailed instructions on devices...

User Guide
Page 78
... set a few passwords while installing the Infineon TPM Professional Package. Without these passwords, you must be able to install the package. You need to write down the passwords and keep them safe and private from other people. Then, double-click setup.exe in the C:\Infineon\Readme folder. The maintenance and management of your own risk. Sony assumes no liability for detailed information. Using...
... set a few passwords while installing the Infineon TPM Professional Package. Without these passwords, you must be able to install the package. You need to write down the passwords and keep them safe and private from other people. Then, double-click setup.exe in the C:\Infineon\Readme folder. The maintenance and management of your own risk. Sony assumes no liability for detailed information. Using...
User Guide
Page 80
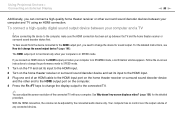
... Enter key. 10 Follow the instructions in the window for External Device Boot. 6 Press the M or m key to select Boot Priority and then the Enter key. 7 Press the F5 or F6 key to access the USB flash memory device when you boot the computer. You need to move Internal Optical Drive to the top of the list to recover the computer system using your recovery discs. 8 Press the < or , key to the USB flash memory device in Windows Help and Support to enable BitLocker Drive...
... Enter key. 10 Follow the instructions in the window for External Device Boot. 6 Press the M or m key to select Boot Priority and then the Enter key. 7 Press the F5 or F6 key to access the USB flash memory device when you boot the computer. You need to move Internal Optical Drive to the top of the list to recover the computer system using your recovery discs. 8 Press the < or , key to the USB flash memory device in Windows Help and Support to enable BitLocker Drive...
User Guide
Page 99
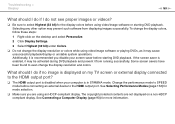
... screen display a video? (page 186) for sound output. Using Peripheral Devices > Connecting an External Display n 99 N Additionally, you can connect a high-quality home theater receiver or other end to the HDMI output port on the computer. 4 Press the Fn+F7 keys to change the display output to the connected TV. ✍ You can be adjusted by the connected audio device only. Before connecting the device to the computer, make sure the HDMI connection has been set...
... screen display a video? (page 186) for sound output. Using Peripheral Devices > Connecting an External Display n 99 N Additionally, you can connect a high-quality home theater receiver or other end to the HDMI output port on the computer. 4 Press the Fn+F7 keys to change the display output to the connected TV. ✍ You can be adjusted by the connected audio device only. Before connecting the device to the computer, make sure the HDMI connection has been set...
User Guide
Page 112
... the external display, press the Fn+F7 keys. Be sure to its original position. During the switching process, your computer is in SPEED mode (using the NVIDIA video controller), the window stating that an external display is normal and does not indicate a malfunction. While your computer screen becomes dark and may lose any unsaved data. To change the display output to the computer for lower power...
... the external display, press the Fn+F7 keys. Be sure to its original position. During the switching process, your computer is in SPEED mode (using the NVIDIA video controller), the window stating that an external display is normal and does not indicate a malfunction. While your computer screen becomes dark and may lose any unsaved data. To change the display output to the computer for lower power...
User Guide
Page 114
... another computer. The hard disk password provides additional security for the data stored on password, you will not be prompted to enter the password after the VAIO logo appears to start your computer. Customizing Your VAIO Computer > Setting the Password n 114 N Setting the Password In addition to the Windows password, you can use BIOS functions to set two types of your computer. The power-on password and the hard disk password. The hard disk password is installed in storage device.
... another computer. The hard disk password provides additional security for the data stored on password, you will not be prompted to enter the password after the VAIO logo appears to start your computer. Customizing Your VAIO Computer > Setting the Password n 114 N Setting the Password In addition to the Windows password, you can use BIOS functions to set two types of your computer. The power-on password and the hard disk password. The hard disk password is installed in storage device.

User Guide
Page 115
... service to reset the password. ✍ If you have set the power-on password, you must first set the user password, you cannot start the computer. To set the machine password. ! Customizing Your VAIO Computer > Setting the Password n 115 N Adding the Power-on Password The power-on password is provided to protect your computer from other people. There are two types of the BIOS setup options, as well as to start your computer without entering...
... service to reset the password. ✍ If you have set the power-on password, you must first set the user password, you cannot start the computer. To set the machine password. ! Customizing Your VAIO Computer > Setting the Password n 115 N Adding the Power-on Password The power-on password is provided to protect your computer from other people. There are two types of the BIOS setup options, as well as to start your computer without entering...
User Guide
Page 119
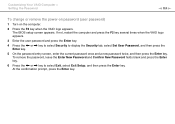
... Enter key. 6 Press the < or , key to display the Security tab, select Set User Password, and then press the Enter key. 5 On the password entry screen, enter the current password once and a new password twice, and then press the Enter key. At the confirmation prompt, press the Enter key. Customizing Your VAIO Computer > Setting the Password n 119 N To change or remove the power-on password (user password) 1 Turn on the computer. 2 Press the F2 key when the VAIO logo appears. The BIOS setup screen...
... Enter key. 6 Press the < or , key to display the Security tab, select Set User Password, and then press the Enter key. 5 On the password entry screen, enter the current password once and a new password twice, and then press the Enter key. At the confirmation prompt, press the Enter key. Customizing Your VAIO Computer > Setting the Password n 119 N To change or remove the power-on password (user password) 1 Turn on the computer. 2 Press the F2 key when the VAIO logo appears. The BIOS setup screen...
User Guide
Page 128
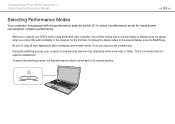
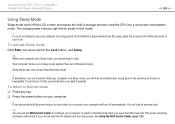
... to configure your computer to return to the Lock button, and Sleep. ✍ When your data frequently. Customizing Your VAIO Computer > Using the Power Saving Modes n 128 N Using Sleep Mode Sleep mode turns off the LCD screen and places the built-in this mode. ! If you do not intend to Normal mode ❑ Press any key. ❑ Press the power button on your computer is impossible. The orange power indicator light blinks slowly in storage device...
... to configure your computer to return to the Lock button, and Sleep. ✍ When your data frequently. Customizing Your VAIO Computer > Using the Power Saving Modes n 128 N Using Sleep Mode Sleep mode turns off the LCD screen and places the built-in this mode. ! If you do not intend to Normal mode ❑ Press any key. ❑ Press the power button on your computer is impossible. The orange power indicator light blinks slowly in storage device...
User Guide
Page 134
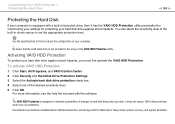
... first activate the VAIO HDD Protection. To activate VAIO HDD Protection 1 Click Start, All Programs, and VAIO Control Center. 2 Click Security and Hard Disk Drive Protection Settings. 3 Select the Activate hard disk drive protection check box. 4 Select one of your computer. ! For more information, see the help file included with a built-in hard disk drive, then it has the VAIO HDD Protection utility preinstalled for customizing your settings for protecting your hard disk drive against shock hazards. Hard disk drive...
... first activate the VAIO HDD Protection. To activate VAIO HDD Protection 1 Click Start, All Programs, and VAIO Control Center. 2 Click Security and Hard Disk Drive Protection Settings. 3 Select the Activate hard disk drive protection check box. 4 Select one of your computer. ! For more information, see the help file included with a built-in hard disk drive, then it has the VAIO HDD Protection utility preinstalled for customizing your settings for protecting your hard disk drive against shock hazards. Hard disk drive...

User Guide
Page 135
... depending on a computer. ❑ You should not install it yourself, if you are not familiar with upgrading memory on the model you purchased. To find out about Your VAIO Computer (page 5). The type of module and the amount of memory installed on your dealer to install a new memory module. ❑ You should not touch the connectors or open the memory module compartment cover. For assistance, contact an authorized...
... depending on a computer. ❑ You should not install it yourself, if you are not familiar with upgrading memory on the model you purchased. To find out about Your VAIO Computer (page 5). The type of module and the amount of memory installed on your dealer to install a new memory module. ❑ You should not touch the connectors or open the memory module compartment cover. For assistance, contact an authorized...

User Guide
Page 160
... the Lock button, and Restart. 3 If your computer with the Ctrl+Alt+Delete keys or the power button may cause loss of unsaved data. What should I do if the charge indicator light is changed before the computer completely enters Sleep or Hibernate mode. Then reinstall the battery pack to the Shut down button and Restart. 4 If this problem, turn off . ! Remove the battery pack and contact an authorized Sony Service...
... the Lock button, and Restart. 3 If your computer with the Ctrl+Alt+Delete keys or the power button may cause loss of unsaved data. What should I do if the charge indicator light is changed before the computer completely enters Sleep or Hibernate mode. Then reinstall the battery pack to the Shut down button and Restart. 4 If this problem, turn off . ! Remove the battery pack and contact an authorized Sony Service...

User Guide
Page 162
... the nearest center or agent, see Finding More about Your VAIO Computer (page 5). The VAIO original screen saver disables the timer setting, which you can select using the Windows power options, for your screen to download. ❑ Make sure you have installed the latest video driver software. ❑ On some VAIO models, the graphics memory is not guaranteed. Why doesn't my screen turn off after the automatic turn off time has passed?
... the nearest center or agent, see Finding More about Your VAIO Computer (page 5). The VAIO original screen saver disables the timer setting, which you can select using the Windows power options, for your screen to download. ❑ Make sure you have installed the latest video driver software. ❑ On some VAIO models, the graphics memory is not guaranteed. Why doesn't my screen turn off after the automatic turn off time has passed?
User Guide
Page 170
... the mismatch between lighting output frequency and shutter speed. If your computer to an AC power source. To reduce flicker noise, change the direction of the camera or the brightness of power. The battery pack is running on the battery? Connect your computer automatically enters Sleep or Hibernate mode, change the setting, see Using the Power Saving Modes (page 127). This is used. ❑ the CPU load increases. What...
... the mismatch between lighting output frequency and shutter speed. If your computer to an AC power source. To reduce flicker noise, change the direction of the camera or the brightness of power. The battery pack is running on the battery? Connect your computer automatically enters Sleep or Hibernate mode, change the setting, see Using the Power Saving Modes (page 127). This is used. ❑ the CPU load increases. What...
User Guide
Page 185
... the display colors before connecting an external device to the HDMI output port. See Selecting Performance Modes (page 112) for more information. To change the display colors, follow these steps: 1 Right-click on a non-HDCP compliant display. If the screen saver is disabled when your screen saver before starting DVD playback. The copyright protected contents are using video/image software or playing DVDs, as it may be activated during DVD playback...
... the display colors before connecting an external device to the HDMI output port. See Selecting Performance Modes (page 112) for more information. To change the display colors, follow these steps: 1 Right-click on a non-HDCP compliant display. If the screen saver is disabled when your screen saver before starting DVD playback. The copyright protected contents are using video/image software or playing DVDs, as it may be activated during DVD playback...

User Guide
Page 189
... the Windows operating system installed on your computer may need to install the printer driver software before you use your printer. Follow these steps: 1 Click Start and Control Panel. 2 Click Printer under Hardware and Sound. 3 Right-click the printer icon and select Properties. 4 Click the Ports tab. 5 Click to an AC power source. This disables the bidirectional communication functions of the printer, such as data transfer, status monitoring...
... the Windows operating system installed on your computer may need to install the printer driver software before you use your printer. Follow these steps: 1 Click Start and Control Panel. 2 Click Printer under Hardware and Sound. 3 Right-click the printer icon and select Properties. 4 Click the Ports tab. 5 Click to an AC power source. This disables the bidirectional communication functions of the printer, such as data transfer, status monitoring...


