

Recovery, Backup and Troubleshooting Guide
Page 1
... disc drive, connect an external optical disc drive (not supplied) to the computer and to the USB port on the computer while the computer is in Normal mode. 3 Turn off to its original factory condition, follow one of the USB flash drive you have formatted the C: drive by mistake Which software should I have to another location. The backup process creates a backup copy of the process. Creating Recovery Media You cannot use optical discs and a USB flash drive as a standard user...
... disc drive, connect an external optical disc drive (not supplied) to the computer and to the USB port on the computer while the computer is in Normal mode. 3 Turn off to its original factory condition, follow one of the USB flash drive you have formatted the C: drive by mistake Which software should I have to another location. The backup process creates a backup copy of the process. Creating Recovery Media You cannot use optical discs and a USB flash drive as a standard user...

Recovery, Backup and Troubleshooting Guide
Page 2
... power cord or the AC adapter, and turn off . For details, see the onscreen User Guide. A reset fee will not start. If not, click Next. 8 Select a restore point and click Next. 9 Click Finish to create Recovery Media again. 2 Download and install the latest updates using the USB flash drive, connect the drive to 15 seconds, then restart your computer and enter the correct password. I cannot complete the recovery process Disconnect all unnecessary external devices...
... power cord or the AC adapter, and turn off . For details, see the onscreen User Guide. A reset fee will not start. If not, click Next. 8 Select a restore point and click Next. 9 Click Finish to create Recovery Media again. 2 Download and install the latest updates using the USB flash drive, connect the drive to 15 seconds, then restart your computer and enter the correct password. I cannot complete the recovery process Disconnect all unnecessary external devices...
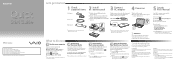
Startup Guide
Page 2
... a few times to download the updates. Recovery Media are subject to reduce heat. With the VAIO Care software, you can prevent or solve troubles on your computer. AC adapter Power cord Battery pack The illustrations in this sheet) Recovery, Backup and Troubleshooting Guide Safety Information Help and Support is turned on or in hard disk drive, avoid moving your computer's efficiency, security, and functionality. Printed manuals: Quick Start Guide (this document...
... a few times to download the updates. Recovery Media are subject to reduce heat. With the VAIO Care software, you can prevent or solve troubles on your computer. AC adapter Power cord Battery pack The illustrations in this sheet) Recovery, Backup and Troubleshooting Guide Safety Information Help and Support is turned on or in hard disk drive, avoid moving your computer's efficiency, security, and functionality. Printed manuals: Quick Start Guide (this document...
Help - Hard Disk Drive Replacement Instructions
Page 1
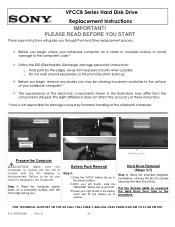
... instructions: o Hold parts by incorrect handling of these instructions. * Sony is disconnected. PLEASE READ BEFORE YOU START These easy instructions will guide you through the Hard Drive replacement process. Before you begin , remove any jewelry you may be wearing to prevent scratches to the surface of the electronic components shown in damage to remove the battery Hard Drive Door CAUTION: Make sure the Computer is turned...
... instructions: o Hold parts by incorrect handling of these instructions. * Sony is disconnected. PLEASE READ BEFORE YOU START These easy instructions will guide you through the Hard Drive replacement process. Before you begin , remove any jewelry you may be wearing to prevent scratches to the surface of the electronic components shown in damage to remove the battery Hard Drive Door CAUTION: Make sure the Computer is turned...
Help - Hard Disk Drive Replacement Instructions
Page 2
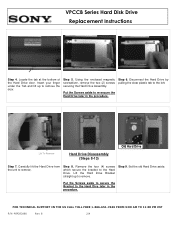
... the Screws aside to secure the Bracket to re-secure the Hard Drive later in the procedure. Using the enclosed magnetic screwdriver, remove the two (2) screws securing the Hard Drive Assembly. Lift To Remove Hard Drive Disassembly (Steps 8-13) Old Hard Drive Step 7. VPCCB Series Hard Disk Drive Replacement Instructions Step 4. FOR TECHNICAL SUPPORT IN THE US CALL TOLL FREE 1-866-651-7669 FROM 9:00 AM TO 11:00 PM...
... the Screws aside to secure the Bracket to re-secure the Hard Drive later in the procedure. Using the enclosed magnetic screwdriver, remove the two (2) screws securing the Hard Drive Assembly. Lift To Remove Hard Drive Disassembly (Steps 8-13) Old Hard Drive Step 7. VPCCB Series Hard Disk Drive Replacement Instructions Step 4. FOR TECHNICAL SUPPORT IN THE US CALL TOLL FREE 1-866-651-7669 FROM 9:00 AM TO 11:00 PM...
Safety - Safety Information
Page 2
... BASED ON TORT, CONTRACT, OR OTHERWISE, ARISING OUT OF OR IN CONNECTION WITH THIS MANUAL, THE SOFTWARE, OR OTHER INFORMATION CONTAINED HEREIN OR THE USE THEREOF. Software specifications are located on the bottom, the back panel, or inside the battery compartment of your Sony Service Center. Model Number: Serial Number: Notice © 2011 Sony Electronics Inc. WEB SITE INFORMATION IS OBTAINED FROM VARIOUS SOURCES AND MAY...
... BASED ON TORT, CONTRACT, OR OTHERWISE, ARISING OUT OF OR IN CONNECTION WITH THIS MANUAL, THE SOFTWARE, OR OTHER INFORMATION CONTAINED HEREIN OR THE USE THEREOF. Software specifications are located on the bottom, the back panel, or inside the battery compartment of your Sony Service Center. Model Number: Serial Number: Notice © 2011 Sony Electronics Inc. WEB SITE INFORMATION IS OBTAINED FROM VARIOUS SOURCES AND MAY...
Users Guide
Page 2
... Started 11 Locating Controls and Ports 12 About the Indicator Lights 17 Connecting a Power Source 18 Using the Battery Pack 20 Shutting Down Your Computer Safely 27 Using the Power Saving Modes 28 Keeping Your Computer in Optimum Condition .......... 31 Using Your VAIO Computer 34 Using the Keyboard 35 Using the Touch Pad 38 Using Special-function Buttons 39 Using the Quick Web Access Function 40 Using the Built-in Camera 42 Using the Optical Disc Drive 43 Using "Memory Stick 49 Using Other Modules / Memory Cards 56 Using the Internet...
... Started 11 Locating Controls and Ports 12 About the Indicator Lights 17 Connecting a Power Source 18 Using the Battery Pack 20 Shutting Down Your Computer Safely 27 Using the Power Saving Modes 28 Keeping Your Computer in Optimum Condition .......... 31 Using Your VAIO Computer 34 Using the Keyboard 35 Using the Touch Pad 38 Using Special-function Buttons 39 Using the Quick Web Access Function 40 Using the Built-in Camera 42 Using the Optical Disc Drive 43 Using "Memory Stick 49 Using Other Modules / Memory Cards 56 Using the Internet...
Users Guide
Page 5
Before Use > Finding More about Your VAIO Computer n5 N Finding More about Your VAIO Computer This section provides support information about your VAIO computer. 1. Printed Documentation ❑ Quick Start Guide - Safety guidelines and owner information. ✍ Before activating the wireless functions such as the wireless LAN and BLUETOOTH technology, read the Safety Information carefully. An overview of components connection, set-up information, etc. ❑ Recovery, Backup and Troubleshooting Guide ❑ Safety Information -
Before Use > Finding More about Your VAIO Computer n5 N Finding More about Your VAIO Computer This section provides support information about your VAIO computer. 1. Printed Documentation ❑ Quick Start Guide - Safety guidelines and owner information. ✍ Before activating the wireless functions such as the wireless LAN and BLUETOOTH technology, read the Safety Information carefully. An overview of components connection, set-up information, etc. ❑ Recovery, Backup and Troubleshooting Guide ❑ Safety Information -
Users Guide
Page 8
... bottom, the back panel, or inside the battery compartment of the display on the computer. 2 Your computer's serial number You can find the contact numbers on your VAIO computer. Visit the web site at a U.S. In Store Service & Support (available in USA only) Make an appointment with the setup of the number below the barcode. 3 The operating system on the Sony online support web site. Customer...
... bottom, the back panel, or inside the battery compartment of the display on the computer. 2 Your computer's serial number You can find the contact numbers on your VAIO computer. Visit the web site at a U.S. In Store Service & Support (available in USA only) Make an appointment with the setup of the number below the barcode. 3 The operating system on the Sony online support web site. Customer...
Users Guide
Page 17
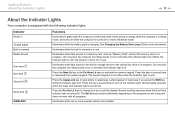
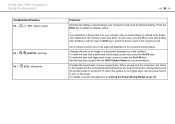
... key functions differently depending on the program you are enabled. See Charging the Battery Pack (page 23) for more wireless options are using and does not work with the following indicator lights: Indicator Power 1 Charge Built-in camera Media Access Disc drive Num lock Caps lock Scroll lock WIRELESS Functions Illuminates in green while the computer is in Normal mode, blinks slowly in orange while the computer is in Sleep mode, and turns off or enters Hibernate mode. Letters appear in storage device...
... key functions differently depending on the program you are enabled. See Charging the Battery Pack (page 23) for more wireless options are using and does not work with the following indicator lights: Indicator Power 1 Charge Built-in camera Media Access Disc drive Num lock Caps lock Scroll lock WIRELESS Functions Illuminates in green while the computer is in Normal mode, blinks slowly in orange while the computer is in Sleep mode, and turns off or enters Hibernate mode. Letters appear in storage device...
Users Guide
Page 36
... connected peripheral devices are saved to the computer screen. Provides the lowest level of multiple monitors may not be supported depending on some software. Use of power consumption. To return the system to its original state, use the power button to select the display output. ! Using Your VAIO Computer > Using the Keyboard Combination/Feature Fn + /T (F7): display output Fn + / (F9/F10): zooming Fn + (F12): hibernation n 36 N Function Switches the display...
... connected peripheral devices are saved to the computer screen. Provides the lowest level of multiple monitors may not be supported depending on some software. Use of power consumption. To return the system to its original state, use the power button to select the display output. ! Using Your VAIO Computer > Using the Keyboard Combination/Feature Fn + /T (F7): display output Fn + / (F9/F10): zooming Fn + (F12): hibernation n 36 N Function Switches the display...
Users Guide
Page 38
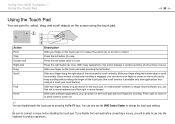
... change the touch pad settings. ! Press the left to move forward. Pinch open to move backward and flick right to zoom in a row. You can also use only the keyboard for zooming. Using Your VAIO Computer > Using the Touch Pad Using the Touch Pad You can point to zoom out. ✍ You can disable/enable the touch pad by pressing the Fn+F1 keys. Press the left button. On web browser software...
... change the touch pad settings. ! Press the left to move forward. Pinch open to move backward and flick right to zoom in a row. You can also use only the keyboard for zooming. Using Your VAIO Computer > Using the Touch Pad Using the Touch Pad You can point to zoom out. ✍ You can disable/enable the touch pad by pressing the Fn+F1 keys. Press the left button. On web browser software...
Users Guide
Page 60
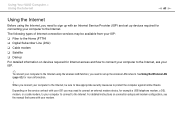
Using Your VAIO Computer > Using the Internet n 60 N Using the Internet Before using the wireless LAN function, you connect your modem. Depending on devices required for Internet access and how to connect your computer to the Internet, ask your ISP. ✍ To connect your computer to connect to connect an external modem device, for more information. ! When you need to the Internet. For detailed instructions on connection setups and modem configuration, see the manual that came with your computer...
Using Your VAIO Computer > Using the Internet n 60 N Using the Internet Before using the wireless LAN function, you connect your modem. Depending on devices required for Internet access and how to connect your computer to the Internet, ask your ISP. ✍ To connect your computer to connect to connect an external modem device, for more information. ! When you need to the Internet. For detailed instructions on connection setups and modem configuration, see the manual that came with your computer...

Users Guide
Page 79
... the performance mode, see Selecting Performance Modes (page 89). 3 Press Fn+F7 keys to change the display output to find out about the configuration of your computer. On models with the Blu-ray Disc Drive, you can play Blu-ray 3D Disc media Some features and options may not be available on your computer. Using Peripheral Devices > Connecting an External Display n 79 N ✍ See the manual that came...
... the performance mode, see Selecting Performance Modes (page 89). 3 Press Fn+F7 keys to change the display output to find out about the configuration of your computer. On models with the Blu-ray Disc Drive, you can play Blu-ray 3D Disc media Some features and options may not be available on your computer. Using Peripheral Devices > Connecting an External Display n 79 N ✍ See the manual that came...
Users Guide
Page 93
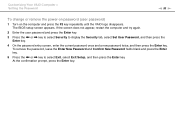
... Your VAIO Computer > Setting the Password n 93 N To change or remove the power-on password (user password) 1 Turn on the computer and press the F2 key repeatedly until the VAIO logo disappears. To remove the password, leave the Enter New Password and Confirm New Password fields blank and press the Enter key. 5 Press the < or , key to display the Security tab, select Set User Password, and then press the Enter key. 4 On the password entry screen, enter the current password once and a new password...
... Your VAIO Computer > Setting the Password n 93 N To change or remove the power-on password (user password) 1 Turn on the computer and press the F2 key repeatedly until the VAIO logo disappears. To remove the password, leave the Enter New Password and Confirm New Password fields blank and press the Enter key. 5 Press the < or , key to display the Security tab, select Set User Password, and then press the Enter key. 4 On the password entry screen, enter the current password once and a new password...
Users Guide
Page 99
... specifications to install a new memory module. ❑ You should not touch the connectors or open the memory module compartment cover. For assistance, contact an authorized Sony service/support center. Upgrading Your VAIO Computer > n 99 N Upgrading Your VAIO Computer Your VAIO computer and memory modules use high precision components and electronic connectors technology. To find out about Your VAIO Computer (page 5). To avoid invalidation of your computer. The type of module and the amount of memory installed...
... specifications to install a new memory module. ❑ You should not touch the connectors or open the memory module compartment cover. For assistance, contact an authorized Sony service/support center. Upgrading Your VAIO Computer > n 99 N Upgrading Your VAIO Computer Your VAIO computer and memory modules use high precision components and electronic connectors technology. To find out about Your VAIO Computer (page 5). To avoid invalidation of your computer. The type of module and the amount of memory installed...
Users Guide
Page 125
Troubleshooting > Computer Operations n 125 N Why doesn't my computer enter Sleep or Hibernate mode? To restore your computer to Normal mode 1 Close all open programs. 2 Click Start, the arrow next to the Shut down button and Restart. For details, see Finding More about Your VAIO Computer (page 5). Remove the battery pack and contact an authorized Sony service/support center. If the Windows Security window appears, click Restart. 4 If this problem, turn off...
Troubleshooting > Computer Operations n 125 N Why doesn't my computer enter Sleep or Hibernate mode? To restore your computer to Normal mode 1 Close all open programs. 2 Click Start, the arrow next to the Shut down button and Restart. For details, see Finding More about Your VAIO Computer (page 5). Remove the battery pack and contact an authorized Sony service/support center. If the Windows Security window appears, click Restart. 4 If this problem, turn off...
Users Guide
Page 135
... if my computer becomes unstable when it enters a power saving mode while the built-in camera is in camera suspended for a few seconds? Why is normal and does not indicate a malfunction. If your computer to eliminate flicker noise. To reduce flicker noise, change the setting, see Using the Power Saving Modes (page 28). Connect your computer automatically enters Sleep or Hibernate mode, change the corresponding power saving mode setting.
... if my computer becomes unstable when it enters a power saving mode while the built-in camera is in camera suspended for a few seconds? Why is normal and does not indicate a malfunction. If your computer to eliminate flicker noise. To reduce flicker noise, change the setting, see Using the Power Saving Modes (page 28). Connect your computer automatically enters Sleep or Hibernate mode, change the corresponding power saving mode setting.
Users Guide
Page 144
... open a list of the optical disc drives of your desired drive. Follow these steps: 1 Click Start and Control Panel. 2 Click System and Security. 3 Click System. 4 Click Device Manager in the optical disc drive and damage the drive or cause it to malfunction. ❑ If a region code warning appears, the disc may need to enable the device or reinstall the driver software. 5 Double-click the optical disc drive device to make sure the region code is installed...
... open a list of the optical disc drives of your desired drive. Follow these steps: 1 Click Start and Control Panel. 2 Click System and Security. 3 Click System. 4 Click Device Manager in the optical disc drive and damage the drive or cause it to malfunction. ❑ If a region code warning appears, the disc may need to enable the device or reinstall the driver software. 5 Double-click the optical disc drive device to make sure the region code is installed...
Users Guide
Page 152
... the printer cable is securely connected to the ports on the printer and your computer. ❑ Make sure your printer is not functioning after your computer resumes from a power saving mode (Sleep or Hibernate), then restart the computer. ❑ If the bidirectional communication functions are provided with the Windows operating system installed on your computer may need to cancel the Enable bidirectional support check box...
... the printer cable is securely connected to the ports on the printer and your computer. ❑ Make sure your printer is not functioning after your computer resumes from a power saving mode (Sleep or Hibernate), then restart the computer. ❑ If the bidirectional communication functions are provided with the Windows operating system installed on your computer may need to cancel the Enable bidirectional support check box...


