
User Manual
Page 2
... Using the Keyboard 30 Using the Touch Pad 32 Using Special-function Buttons 33 Using the Quick Web Access Function 34 Using the Built-in Camera 36 Using the Optical Disc Drive 37 Using "Memory Stick 44 Using Other Modules / Memory Cards 50 Using the Internet 56 Using the Network (LAN...
... Using the Keyboard 30 Using the Touch Pad 32 Using Special-function Buttons 33 Using the Quick Web Access Function 34 Using the Built-in Camera 36 Using the Optical Disc Drive 37 Using "Memory Stick 44 Using Other Modules / Memory Cards 50 Using the Internet 56 Using the Network (LAN...

User Manual
Page 3
...and Maintenance Information 116 Handling Your Computer 117 Handling the LCD Screen 119 Using the Power Source 120 Handling the Built-in Camera 121 Handling Discs 122 Using the Battery Pack 123 Handling "Memory Stick 124 Handling the Built-in Storage Device 125 Using ...Fingerprint Authentication 126 Troubleshooting 127 Computer 129 System Security 136 Battery 137 Built-in Camera 139 Networking 141 Bluetooth Technology 145 Optical Discs 149 Display 153 Printing 157 Microphone 158 Speakers 159 Touch Pad 160 Keyboard 161 ...
...and Maintenance Information 116 Handling Your Computer 117 Handling the LCD Screen 119 Using the Power Source 120 Handling the Built-in Camera 121 Handling Discs 122 Using the Battery Pack 123 Handling "Memory Stick 124 Handling the Built-in Storage Device 125 Using ...Fingerprint Authentication 126 Troubleshooting 127 Computer 129 System Security 136 Battery 137 Built-in Camera 139 Networking 141 Bluetooth Technology 145 Optical Discs 149 Display 153 Printing 157 Microphone 158 Speakers 159 Touch Pad 160 Keyboard 161 ...

User Manual
Page 10
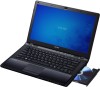
Getting Started > Locating Controls and Ports n 10 N Locating Controls and Ports Take a moment to identify the controls and ports shown on the following pages. Front A Built-in microphone (monaural) B Built-in MOTION EYE camera indicator (page 16) C Built-in MOTION EYE camera (page 36) D LCD screen (page 119) E WEB button* (page 33) F DISPLAY OFF button* (page 33) G VAIO button* (page 33) H Power button I Keyboard (page 30) J Touch pad (page 32) K Right button (page 32) L Fingerprint sensor* (page 71) M Left button (page 32) * On selected models only.
Getting Started > Locating Controls and Ports n 10 N Locating Controls and Ports Take a moment to identify the controls and ports shown on the following pages. Front A Built-in microphone (monaural) B Built-in MOTION EYE camera indicator (page 16) C Built-in MOTION EYE camera (page 36) D LCD screen (page 119) E WEB button* (page 33) F DISPLAY OFF button* (page 33) G VAIO button* (page 33) H Power button I Keyboard (page 30) J Touch pad (page 32) K Right button (page 32) L Fingerprint sensor* (page 71) M Left button (page 32) * On selected models only.

User Manual
Page 16
Illuminates while data access to turn it off while this indicator light is lit. Illuminates while the built-in camera is in use . Letters appear in lowercase if you scroll the display. Press the key a second time to the built-in storage device or the ... more wireless options are using and does not work with the following indicator lights: Indicator Power 1 Charge Disc drive Media Access Built-in MOTION EYE camera Num lock Caps lock Scroll lock WIRELESS Functions Illuminates in green while the computer is on the program you are enabled. Press it off while...
Illuminates while data access to turn it off while this indicator light is lit. Illuminates while the built-in camera is in use . Letters appear in lowercase if you scroll the display. Press the key a second time to the built-in storage device or the ... more wireless options are using and does not work with the following indicator lights: Indicator Power 1 Charge Disc drive Media Access Built-in MOTION EYE camera Num lock Caps lock Scroll lock WIRELESS Functions Illuminates in green while the computer is on the program you are enabled. Press it off while...

User Manual
Page 29
... Touch Pad (page 32) ❑ Using Special-function Buttons (page 33) ❑ Using the Quick Web Access Function (page 34) ❑ Using the Built-in Camera (page 36) ❑ Using the Optical Disc Drive (page 37) ❑ Using "Memory Stick" (page 44) ❑ Using Other Modules / Memory Cards (page 50) ❑...
... Touch Pad (page 32) ❑ Using Special-function Buttons (page 33) ❑ Using the Quick Web Access Function (page 34) ❑ Using the Built-in Camera (page 36) ❑ Using the Optical Disc Drive (page 37) ❑ Using "Memory Stick" (page 44) ❑ Using Other Modules / Memory Cards (page 50) ❑...

User Manual
Page 36
...> Using the Built-in Camera n 36 N Using the Built-in Camera Your computer is equipped with the appropriate software. ! Video conferences are using the built-in the main window. For detailed information on the computer activates the built-in MOTION EYE camera. With the preinstalled image ...capture software, you are possible with a built-in camera. Launching or exiting your desired icon in camera. Do not place your computer into Sleep or Hibernate mode while you...
...> Using the Built-in Camera n 36 N Using the Built-in Camera Your computer is equipped with the appropriate software. ! Video conferences are using the built-in the main window. For detailed information on the computer activates the built-in MOTION EYE camera. With the preinstalled image ...capture software, you are possible with a built-in camera. Launching or exiting your desired icon in camera. Do not place your computer into Sleep or Hibernate mode while you...

User Manual
Page 44
... "Memory Stick" The "Memory Stick Duo" slot on your computer can be used for exchanging and sharing digital data with compatible products, such as digital cameras, mobile phones, and other devices.
... "Memory Stick" The "Memory Stick Duo" slot on your computer can be used for exchanging and sharing digital data with compatible products, such as digital cameras, mobile phones, and other devices.

User Manual
Page 50
... Cards n 50 N Using Other Modules / Memory Cards Using the ExpressCard Module Your computer is equipped with an ExpressCard/34 slot* for transferring data among digital cameras, camcorders, music players, and other audio/video devices.
... Cards n 50 N Using Other Modules / Memory Cards Using the ExpressCard Module Your computer is equipped with an ExpressCard/34 slot* for transferring data among digital cameras, camcorders, music players, and other audio/video devices.

User Manual
Page 52
You can use the SD memory card The SD memory card slot on your computer supports the following memory cards: ❑ SD memory card ❑ SDHC memory card For the latest information on compatible memory cards, see Finding More about Your VAIO Computer (page 5) to transfer data among digital cameras, camcorders, music players, and other audio/video devices. Before you use this slot to visit the appropriate support web site. Using Your VAIO Computer > Using Other Modules / Memory Cards n 52 N Using the SD Memory Card Your computer is equipped with an SD memory card slot.
You can use the SD memory card The SD memory card slot on your computer supports the following memory cards: ❑ SD memory card ❑ SDHC memory card For the latest information on compatible memory cards, see Finding More about Your VAIO Computer (page 5) to transfer data among digital cameras, camcorders, music players, and other audio/video devices. Before you use this slot to visit the appropriate support web site. Using Your VAIO Computer > Using Other Modules / Memory Cards n 52 N Using the SD Memory Card Your computer is equipped with an SD memory card slot.

User Manual
Page 66
Using Your VAIO Computer > Using the Bluetooth Function n 66 N Communicating with Another Bluetooth Device You can connect your computer to a Bluetooth device such as another computer, a mobile phone, a PDA, a headset, a mouse, or a digital camera without the use of any cables.
Using Your VAIO Computer > Using the Bluetooth Function n 66 N Communicating with Another Bluetooth Device You can connect your computer to a Bluetooth device such as another computer, a mobile phone, a PDA, a headset, a mouse, or a digital camera without the use of any cables.

User Manual
Page 112
...) ❑ Handling Your Computer (page 117) ❑ Handling the LCD Screen (page 119) ❑ Using the Power Source (page 120) ❑ Handling the Built-in Camera (page 121) ❑ Handling Discs (page 122) ❑ Using the Battery Pack (page 123) ❑ Handling "Memory Stick" (page 124) ❑ Handling the Built-in...
...) ❑ Handling Your Computer (page 117) ❑ Handling the LCD Screen (page 119) ❑ Using the Power Source (page 120) ❑ Handling the Built-in Camera (page 121) ❑ Handling Discs (page 122) ❑ Using the Battery Pack (page 123) ❑ Handling "Memory Stick" (page 124) ❑ Handling the Built-in...

User Manual
Page 116
... is sensitive to the disc. ❑ For normal cleaning, hold the disc by its continuous reliability. Rubbing the surface could damage the screen. Built-in Camera Clean the lens protection cover of the disc from the center out. ❑ If the disc is essential to its edges and use a soft cloth... to wipe the surface of the built-in camera with a soft dry cloth. Do not use it to wipe the surface from the center out. Discs ❑ Proper care of the LCD screen. Precautions...
... is sensitive to the disc. ❑ For normal cleaning, hold the disc by its continuous reliability. Rubbing the surface could damage the screen. Built-in Camera Clean the lens protection cover of the disc from the center out. ❑ If the disc is essential to its edges and use a soft cloth... to wipe the surface of the built-in camera with a soft dry cloth. Do not use it to wipe the surface from the center out. Discs ❑ Proper care of the LCD screen. Precautions...

User Manual
Page 121
Precautions > Handling the Built-in Camera n 121 N Handling the Built-in Camera ❑ Do not touch the lens protection cover of the built-in camera, as it may cause scratches on the cover and such scratches will appear on the captured images. ❑ Do not let the direct sunlight get into the lens of the built-in camera regardless of your computer's power state, as it may cause the camera to malfunction. ❑ The built-in camera is disabled while videos or still images are imported from an i.LINK-compatible device connected to the i.LINK port.
Precautions > Handling the Built-in Camera n 121 N Handling the Built-in Camera ❑ Do not touch the lens protection cover of the built-in camera, as it may cause scratches on the cover and such scratches will appear on the captured images. ❑ Do not let the direct sunlight get into the lens of the built-in camera regardless of your computer's power state, as it may cause the camera to malfunction. ❑ The built-in camera is disabled while videos or still images are imported from an i.LINK-compatible device connected to the i.LINK port.

User Manual
Page 127
Features and options in Camera (page 139) ❑ Networking (page 141) ❑ Bluetooth Technology (page 145) ❑ Optical Discs (page 149) ❑ Display (page 153) ❑ Printing (page 157) ❑ ...
Features and options in Camera (page 139) ❑ Networking (page 141) ❑ Bluetooth Technology (page 145) ❑ Optical Discs (page 149) ❑ Display (page 153) ❑ Printing (page 157) ❑ ...

User Manual
Page 139
...in quality? ❑ The images captured under the fluorescent light may show no images or poor-quality images? ❑ The built-in camera cannot be shared by more software applications running than one software application. What should I do if captured images contain dropped frames and audio... streaks, when you are not currently using. ❑ The power management function of light. ❑ A dark portion in Camera (page 116). Troubleshooting > Built-in Camera n 139 N Built-in Camera Why does the viewfinder show reflections of your computer may be active. Clean the cover.
...in quality? ❑ The images captured under the fluorescent light may show no images or poor-quality images? ❑ The built-in camera cannot be shared by more software applications running than one software application. What should I do if captured images contain dropped frames and audio... streaks, when you are not currently using. ❑ The power management function of light. ❑ A dark portion in Camera (page 116). Troubleshooting > Built-in Camera n 139 N Built-in Camera Why does the viewfinder show reflections of your computer may be active. Clean the cover.

User Manual
Page 140
... a power saving mode while the built-in camera is the video input from the built-in use the camera under fluorescent lights due to one of camera images. Why is in camera suspended for a few seconds? To change the direction of the camera or the brightness of the camera properties (e.g. Connect your computer automatically enters Sleep... if: ❑ a shortcut key with the Fn key is normal and does not indicate a malfunction. If your computer to eliminate flicker noise. Troubleshooting > Built-in Camera n 140 N What should I do if captured images flicker?
... a power saving mode while the built-in camera is the video input from the built-in use the camera under fluorescent lights due to one of camera images. Why is in camera suspended for a few seconds? To change the direction of the camera or the brightness of the camera properties (e.g. Connect your computer automatically enters Sleep... if: ❑ a shortcut key with the Fn key is normal and does not indicate a malfunction. If your computer to eliminate flicker noise. Troubleshooting > Built-in Camera n 140 N What should I do if captured images flicker?

User Manual
Page 165
... the erasure prevention switch is off. Some versions of "Memory Stick" are compatible with an erasure prevention switch to keep. 1 Copy the data from a digital camera using "Memory Stick"? You may need to "Memory Stick"? Why can view video clips that you have recorded with digital... cameras that "Memory Stick" does not contain files you reformat "Memory Stick", back up important data and confirm that are equipped with "Memory Stick". Before you ...
... the erasure prevention switch is off. Some versions of "Memory Stick" are compatible with an erasure prevention switch to keep. 1 Copy the data from a digital camera using "Memory Stick"? You may need to "Memory Stick"? Why can view video clips that you have recorded with digital... cameras that "Memory Stick" does not contain files you reformat "Memory Stick", back up important data and confirm that are equipped with "Memory Stick". Before you ...

User Manual
Page 166
For example, if you are using a printer, check if the power cable is charged. If you are using a digital camera, check if the battery is connected properly to test if the port is turned on your computer. You may prevent a device from working at all. &#...
For example, if you are using a printer, check if the power cable is charged. If you are using a digital camera, check if the battery is connected properly to test if the port is turned on your computer. You may prevent a device from working at all. &#...


