

Help - Optical Disk Drive Replacement Instructions
Page 2
... the ODD. Identify tabs on the bezel and tab holes located on the new ODD provided. The screws & brackets will be removed. Step 7. VPCCW Series Optical Disk Drive Replacement Instructions (Look for assembly. Step 5. To initiate the removal of the optical drive, slightly pull the optical drive door as shown above. Step 9. Set old ODD aside. (ODD assembly) Steps 11-14 Step...
... the ODD. Identify tabs on the bezel and tab holes located on the new ODD provided. The screws & brackets will be removed. Step 7. VPCCW Series Optical Disk Drive Replacement Instructions (Look for assembly. Step 5. To initiate the removal of the optical drive, slightly pull the optical drive door as shown above. Step 9. Set old ODD aside. (ODD assembly) Steps 11-14 Step...

Safety - Safety Information
Page 2
... part without notice and may not be identical to the model and serial numbers when you call your Sony VAIO® computer. WEB SITE INFORMATION IS OBTAINED FROM VARIOUS SOURCES AND MAY BE INACCURATE. Refer to current retail versions. 2 IN NO EVENT SHALL SONY ELECTRONICS INC. SONY CANNOT WARRANT THAT THE FUNCTIONS DESCRIBED IN THIS GUIDE WILL BE UNINTERRUPTED OR ERROR-FREE. SONY...
... part without notice and may not be identical to the model and serial numbers when you call your Sony VAIO® computer. WEB SITE INFORMATION IS OBTAINED FROM VARIOUS SOURCES AND MAY BE INACCURATE. Refer to current retail versions. 2 IN NO EVENT SHALL SONY ELECTRONICS INC. SONY CANNOT WARRANT THAT THE FUNCTIONS DESCRIBED IN THIS GUIDE WILL BE UNINTERRUPTED OR ERROR-FREE. SONY...

Safety - Safety Information
Page 4
... easily accessible. ❑ Do not use wireless LAN on an aircraft, as radiators or air ducts; moisture or rain; Refer servicing to malfunction. ❑ If using the genuine Sony battery pack and AC adapter that are provided with any supplied connector covers and slot protectors in their appropriate locations, and secure the battery pack in the battery compartment. ❑ Always keep the battery pack installed while...
... easily accessible. ❑ Do not use wireless LAN on an aircraft, as radiators or air ducts; moisture or rain; Refer servicing to malfunction. ❑ If using the genuine Sony battery pack and AC adapter that are provided with any supplied connector covers and slot protectors in their appropriate locations, and secure the battery pack in the battery compartment. ❑ Always keep the battery pack installed while...

Startup Guide
Page 1
... documents and helpful support resources such as a desk or table. Start the SmartWi™ Connection Utility Use the SmartWi™ Connection Utility to manage wireless connections. Available on its lifespan, we encourage you to factory-installed settings in this sheet) Safety Information Help and Support is turned on or shutting down . 3 Slide the battery LOCK switch outward. Turn on the WIRELESS switch on 5 Locate VAIO Manual AC adapter Power cord Battery pack The illustrations...
... documents and helpful support resources such as a desk or table. Start the SmartWi™ Connection Utility Use the SmartWi™ Connection Utility to manage wireless connections. Available on its lifespan, we encourage you to factory-installed settings in this sheet) Safety Information Help and Support is turned on or shutting down . 3 Slide the battery LOCK switch outward. Turn on the WIRELESS switch on 5 Locate VAIO Manual AC adapter Power cord Battery pack The illustrations...

Users Guide
Page 2
... Started 11 Locating Controls and Ports 12 About the Indicator Lights 18 Connecting a Power Source 19 Using the Battery Pack 21 Shutting Down Your Computer Safely 27 Using the Power Saving Modes 28 Updating Your Computer 31 Using Your VAIO Computer 32 Using the Keyboard 33 Using the Touch Pad 35 Using Special-function Buttons 36 Using the Built-in Camera 37 Using the Optical Disc Drive 38 Using "Memory Stick 45 Using Other Modules / Memory Cards 51 Using the Internet 57 Using the Network (LAN 58 Using the Wireless LAN 59 Using the Bluetooth Function 63 Using...
... Started 11 Locating Controls and Ports 12 About the Indicator Lights 18 Connecting a Power Source 19 Using the Battery Pack 21 Shutting Down Your Computer Safely 27 Using the Power Saving Modes 28 Updating Your Computer 31 Using Your VAIO Computer 32 Using the Keyboard 33 Using the Touch Pad 35 Using Special-function Buttons 36 Using the Built-in Camera 37 Using the Optical Disc Drive 38 Using "Memory Stick 45 Using Other Modules / Memory Cards 51 Using the Internet 57 Using the Network (LAN 58 Using the Wireless LAN 59 Using the Bluetooth Function 63 Using...

Users Guide
Page 8
... 4 The hardware component or the software program that is the last 7 digits of the number below the barcode. 3 The operating system on your VAIO PC. Customer Information Center If you do not find the contact numbers on the bottom, the back panel, or inside the battery compartment of your Sony VAIO computer. In Store Service & Support (available in USA only) Make an appointment...
... 4 The hardware component or the software program that is the last 7 digits of the number below the barcode. 3 The operating system on your VAIO PC. Customer Information Center If you do not find the contact numbers on the bottom, the back panel, or inside the battery compartment of your Sony VAIO computer. In Store Service & Support (available in USA only) Make an appointment...

Users Guide
Page 18
... Lk keys to activate the numeric keypad. See Charging the Battery Pack (page 24) for more wireless options are using and does not work with the following indicator lights: Indicator Power 1 Charge Disc drive Media Access Built-in MOTION EYE camera Num lock Caps lock Scroll lock WIRELESS Functions Illuminates in uppercase. Press the Num Lk key to change how you scroll the display. Normal typing resumes when the Caps lock indicator light is turned off . Getting Started > About the Indicator Lights n 18 N About the Indicator Lights Your...
... Lk keys to activate the numeric keypad. See Charging the Battery Pack (page 24) for more wireless options are using and does not work with the following indicator lights: Indicator Power 1 Charge Disc drive Media Access Built-in MOTION EYE camera Num lock Caps lock Scroll lock WIRELESS Functions Illuminates in uppercase. Press the Num Lk key to change how you scroll the display. Normal typing resumes when the Caps lock indicator light is turned off . Getting Started > About the Indicator Lights n 18 N About the Indicator Lights Your...

Users Guide
Page 25
... frequently and manually activate a power management mode, such as Sleep or Hibernate. To avoid loss of power and both the charge and power indicator lights blink, you should either connect the AC adapter to an AC power source. Going back to charge while you should save your computer and install a fully charged battery pack. Getting Started > Using the Battery Pack n 25 N ✍ Keep the battery pack in use, your computer may not enter Hibernate mode even...
... frequently and manually activate a power management mode, such as Sleep or Hibernate. To avoid loss of power and both the charge and power indicator lights blink, you should either connect the AC adapter to an AC power source. Going back to charge while you should save your computer and install a fully charged battery pack. Getting Started > Using the Battery Pack n 25 N ✍ Keep the battery pack in use, your computer may not enter Hibernate mode even...
Users Guide
Page 35
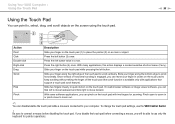
... change the touch pad settings, use only the keyboard for zooming. Be sure to place the pointer (2) on the touch pad (1) to connect a mouse before connecting a mouse, you can disable/enable the touch pad while a mouse is available only with two fingers for pointer operations. Slide your computer. With some software applications, you can move backward and flick right to scroll vertically. Pinch open to zoom in circles on the touch pad while...
... change the touch pad settings, use only the keyboard for zooming. Be sure to place the pointer (2) on the touch pad (1) to connect a mouse before connecting a mouse, you can disable/enable the touch pad while a mouse is available only with two fingers for pointer operations. Slide your computer. With some software applications, you can move backward and flick right to scroll vertically. Pinch open to zoom in circles on the touch pad while...
Users Guide
Page 52
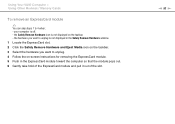
the Safely Remove Hardware icon is not displayed on the taskbar. 3 Select the hardware you want to 4 when: - Using Your VAIO Computer > Using Other Modules / Memory Cards To remove an ExpressCard module ✍ You can skip steps 1 to unplug. 4 Follow the on-screen instructions for removing the ExpressCard module. 5 Push in the Safely Remove Hardware window. 1 Locate the ExpressCard slot. 2 Click the Safely Remove Hardware and Eject Media icon on the taskbar. - your computer is not displayed in the...
the Safely Remove Hardware icon is not displayed on the taskbar. 3 Select the hardware you want to 4 when: - Using Your VAIO Computer > Using Other Modules / Memory Cards To remove an ExpressCard module ✍ You can skip steps 1 to unplug. 4 Follow the on-screen instructions for removing the ExpressCard module. 5 Push in the Safely Remove Hardware window. 1 Locate the ExpressCard slot. 2 Click the Safely Remove Hardware and Eject Media icon on the taskbar. - your computer is not displayed in the...
Users Guide
Page 57
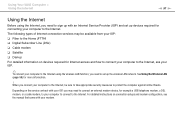
...; Cable modem ❑ Satellite ❑ Dial-up the wireless LAN network. Using Your VAIO Computer > Using the Internet n 57 N Using the Internet Before using the Internet, you need to sign up with an Internet Service Provider (ISP) and set up devices required for connecting your computer to the Internet using the wireless LAN function, you need to connect an external modem device, for example a USB telephone modem, a DSL modem, or a cable modem, to your computer to connect to the Internet. When you connect...
...; Cable modem ❑ Satellite ❑ Dial-up the wireless LAN network. Using Your VAIO Computer > Using the Internet n 57 N Using the Internet Before using the Internet, you need to sign up with an Internet Service Provider (ISP) and set up devices required for connecting your computer to the Internet using the wireless LAN function, you need to connect an external modem device, for example a USB telephone modem, a DSL modem, or a cable modem, to your computer to connect to the Internet. When you connect...
Users Guide
Page 84
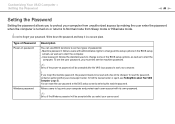
... Sony service/support center. Do not to start the computer. You can use BIOS functions to be reset and a fee will be charged. To set the user password, you must first set two types of Password Power-on password Windows password Description You can reset the user password at the BIOS setup screen by making the user enter the password when the computer is turned on password will be prompted after you select your user account. Customizing Your VAIO Computer > Setting the Password n 84 N Setting the Password Setting...
... Sony service/support center. Do not to start the computer. You can use BIOS functions to be reset and a fee will be charged. To set the user password, you must first set two types of Password Power-on password Windows password Description You can reset the user password at the BIOS setup screen by making the user enter the password when the computer is turned on password will be prompted after you select your user account. Customizing Your VAIO Computer > Setting the Password n 84 N Setting the Password Setting...
Users Guide
Page 88
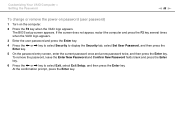
... BIOS setup screen appears. To remove the password, leave the Enter New Password and Confirm New Password fields blank and press the Enter key. 6 Press the < or , key to display the Security tab, select Set User Password, and then press the Enter key. 5 On the password entry screen, enter the current password once and a new password twice, and then press the Enter key. At the confirmation prompt, press the Enter key. Customizing Your VAIO Computer > Setting the Password n 88 N To change or remove the power...
... BIOS setup screen appears. To remove the password, leave the Enter New Password and Confirm New Password fields blank and press the Enter key. 6 Press the < or , key to display the Security tab, select Set User Password, and then press the Enter key. 5 On the password entry screen, enter the current password once and a new password twice, and then press the Enter key. At the confirmation prompt, press the Enter key. Customizing Your VAIO Computer > Setting the Password n 88 N To change or remove the power...

Users Guide
Page 93
... longer battery life. To change the advanced settings, click Change advanced power settings and go to ensure better operation of your desired power plan in the VAIO Control Center. Otherwise, click Save changes. 3 Click the VAIO Power Management tab. Change the Sleep mode and display settings as needed. 2 If you can check the current power plan settings with the VAIO Power Management Viewer in the Power Options window. With this icon to the Windows Power Options. The VAIO Power Management function is added to display the window...
... longer battery life. To change the advanced settings, click Change advanced power settings and go to ensure better operation of your desired power plan in the VAIO Control Center. Otherwise, click Save changes. 3 Click the VAIO Power Management tab. Change the Sleep mode and display settings as needed. 2 If you can check the current power plan settings with the VAIO Power Management Viewer in the Power Options window. With this icon to the Windows Power Options. The VAIO Power Management function is added to display the window...
Users Guide
Page 94
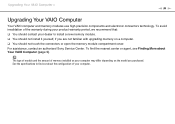
... about Your VAIO Computer (page 5). For assistance, contact an authorized Sony Service Center. The type of module and the amount of the warranty during your product warranty period, we recommend that: ❑ You should contact your computer. See the specifications to install a new memory module. ❑ You should not install it yourself, if you are not familiar with upgrading memory on the model you...
... about Your VAIO Computer (page 5). For assistance, contact an authorized Sony Service Center. The type of module and the amount of the warranty during your product warranty period, we recommend that: ❑ You should contact your computer. See the specifications to install a new memory module. ❑ You should not install it yourself, if you are not familiar with upgrading memory on the model you...
Users Guide
Page 122
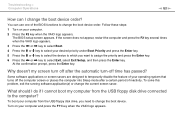
... the USB floppy disk drive connected to the computer? To solve this problem, exit the running software application(s) or change the boot device order. To boot your desired priority under Boot Priority and press the Enter key. 5 Press the M or m key to select the device to which you need to change the boot device. Turn on your operating system that turns off the computer screen or places the computer into Sleep mode after the automatic turn off...
... the USB floppy disk drive connected to the computer? To solve this problem, exit the running software application(s) or change the boot device order. To boot your desired priority under Boot Priority and press the Enter key. 5 Press the M or m key to select the device to which you need to change the boot device. Turn on your operating system that turns off the computer screen or places the computer into Sleep mode after the automatic turn off...
Users Guide
Page 130
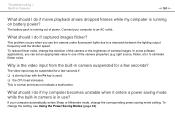
... is used. ❑ the CPU load increases. Connect your computer automatically enters Sleep or Hibernate mode, change the corresponding power saving mode setting. Troubleshooting > Built-in Camera n 130 N What should I do if captured images flicker? The video input may be suspended for a few seconds if: ❑ a shortcut key with the Fn key is normal and does not indicate a malfunction. Why is running on battery power? This problem occurs when...
... is used. ❑ the CPU load increases. Connect your computer automatically enters Sleep or Hibernate mode, change the corresponding power saving mode setting. Troubleshooting > Built-in Camera n 130 N What should I do if captured images flicker? The video input may be suspended for a few seconds if: ❑ a shortcut key with the Fn key is normal and does not indicate a malfunction. Why is running on battery power? This problem occurs when...

Users Guide
Page 147
... compatible with your printer, disabling the functions on your computer. ❑ You may need to install the printer driver software before you use your computer may enable printing. Follow these steps: 1 Click Start and Devices and Printers. 2 Right-click the printer icon and select Properties. 3 Click the Ports tab. 4 Click to cancel the Enable bidirectional support check box. 5 Click OK. Troubleshooting > Printing n 147 N Printing...
... compatible with your printer, disabling the functions on your computer. ❑ You may need to install the printer driver software before you use your computer may enable printing. Follow these steps: 1 Click Start and Devices and Printers. 2 Right-click the printer icon and select Properties. 3 Click the Ports tab. 4 Click to cancel the Enable bidirectional support check box. 5 Click OK. Troubleshooting > Printing n 147 N Printing...

Users Guide
Page 151
... Alt+F4 keys to close the application window. ❑ If the Alt+F4 keys do if the touch pad does not work , press and hold the power button until the computer turns off your computer with the M or m key, and press the Enter key to restart your computer. ❑ If this procedure does not work ? ❑ You may have disabled the touch pad before connecting a mouse to your...
... Alt+F4 keys to close the application window. ❑ If the Alt+F4 keys do if the touch pad does not work , press and hold the power button until the computer turns off your computer with the M or m key, and press the Enter key to restart your computer. ❑ If this procedure does not work ? ❑ You may have disabled the touch pad before connecting a mouse to your...
Users Guide
Page 154
... plug it in once again. See Connecting an i.LINK Device (page 81) for sound output. 1 Close all open programs. 2 Click Start and Control Panel. 3 Click Hardware and Sound. 4 Click Manage audio devices under Sound. 4 On the Sounds tab, click to a port, such as the USB port, HDMI output port, optical output port, or headphones jack, you do I change the device for more information. If you need to change the sound output device? If a message appears stating that...
... plug it in once again. See Connecting an i.LINK Device (page 81) for sound output. 1 Close all open programs. 2 Click Start and Control Panel. 3 Click Hardware and Sound. 4 Click Manage audio devices under Sound. 4 On the Sounds tab, click to a port, such as the USB port, HDMI output port, optical output port, or headphones jack, you do I change the device for more information. If you need to change the sound output device? If a message appears stating that...


