

Help - Hard Disk Drive Replacement Instructions
Page 1
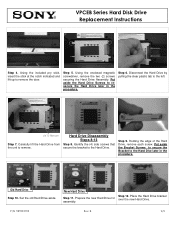
... in damage to re-secure the Hard Drive Door later in the illustrations may differ from exposed circuitry when possible. VPCEB Series Hard Disk Drive Replacement Instructions IMPORTANT! PLEASE READ BEFORE YOU START These easy instructions will guide you may be wearing to prevent scratches to remove the battery Hard Drive Door Hard Drive Removal (Steps 37) CAUTION: Make sure the computer is turned off, the lid is closed, and...
... in damage to re-secure the Hard Drive Door later in the illustrations may differ from exposed circuitry when possible. VPCEB Series Hard Disk Drive Replacement Instructions IMPORTANT! PLEASE READ BEFORE YOU START These easy instructions will guide you may be wearing to prevent scratches to remove the battery Hard Drive Door Hard Drive Removal (Steps 37) CAUTION: Make sure the computer is turned off, the lid is closed, and...
Help - Hard Disk Drive Replacement Instructions
Page 2
... the new Hard Drive. assembly. B 2/3 Using the enclosed magnetic screwdriver, remove the two (2) screws securing the Hard Drive Assembly. Identify the (4) side screws that secure the bracket to the left. Old Hard Drive DriveDrive Step 10. New Hard Drive Step 12. P/N 989201350 Rev. Place the Hard Drive bracket Step 11. Disconnect the Hard Drive by pulling the clear plastic tab to the Hard Drive. Step 5. Set the old Hard Drive aside. VPCEB Series Hard Disk Drive Replacement Instructions...
... the new Hard Drive. assembly. B 2/3 Using the enclosed magnetic screwdriver, remove the two (2) screws securing the Hard Drive Assembly. Identify the (4) side screws that secure the bracket to the left. Old Hard Drive DriveDrive Step 10. New Hard Drive Step 12. P/N 989201350 Rev. Place the Hard Drive bracket Step 11. Disconnect the Hard Drive by pulling the clear plastic tab to the Hard Drive. Step 5. Set the old Hard Drive aside. VPCEB Series Hard Disk Drive Replacement Instructions...
Startup Guide
Page 2
... factory-installed settings in the process of a system failure. On-screen manuals: 1 Click Start and Help and Support. 2 Click Use my VAIO. 3 Click VAIO User Guide. Click Start , All Programs, Windows Update or VAIO Update. Click Start , All Programs, and SmartWi Connection Utility. See the help file included with your computer's efficiency, security, and functionality. For more information. With the VAIO Care software, you to your computer when using it is required until the power indicator light turns...
... factory-installed settings in the process of a system failure. On-screen manuals: 1 Click Start and Help and Support. 2 Click Use my VAIO. 3 Click VAIO User Guide. Click Start , All Programs, Windows Update or VAIO Update. Click Start , All Programs, and SmartWi Connection Utility. See the help file included with your computer's efficiency, security, and functionality. For more information. With the VAIO Care software, you to your computer when using it is required until the power indicator light turns...
Safety - Safety Information
Page 2
... back panel, or inside the battery compartment of the software may not be reproduced, translated, or reduced to any time without written permission is prohibited. SONY ELECTRONICS INC. SONY CANNOT WARRANT THAT THE FUNCTIONS DESCRIBED IN THIS GUIDE WILL BE UNINTERRUPTED OR ERROR-FREE. COPIES OF COPYRIGHTED INFORMATION MAY ONLY BE MADE FOR LEGALLY PERMISSIBLE PURPOSES. Sony Electronics Inc. Model Number: Serial Number: Notice...
... back panel, or inside the battery compartment of the software may not be reproduced, translated, or reduced to any time without written permission is prohibited. SONY ELECTRONICS INC. SONY CANNOT WARRANT THAT THE FUNCTIONS DESCRIBED IN THIS GUIDE WILL BE UNINTERRUPTED OR ERROR-FREE. COPIES OF COPYRIGHTED INFORMATION MAY ONLY BE MADE FOR LEGALLY PERMISSIBLE PURPOSES. Sony Electronics Inc. Model Number: Serial Number: Notice...
Safety - Safety Information
Page 4
...user guide or as designated by Sony in writing. ❑ For your safety, Sony recommends using wireless LAN near the equipment and shall be sure to use wireless LAN on hospital premises. If either of these items needs to be replaced during the life of the product, be easily accessible. ❑ Do not use or store your computer in a location..., first attach any supplied connector covers and slot protectors in their appropriate locations, and secure the battery pack in the battery compartment. ❑ Always keep the battery pack installed while the computer is not responsible...
...user guide or as designated by Sony in writing. ❑ For your safety, Sony recommends using wireless LAN near the equipment and shall be sure to use wireless LAN on hospital premises. If either of these items needs to be replaced during the life of the product, be easily accessible. ❑ Do not use or store your computer in a location..., first attach any supplied connector covers and slot protectors in their appropriate locations, and secure the battery pack in the battery compartment. ❑ Always keep the battery pack installed while the computer is not responsible...
Users Guide
Page 2
... Started 11 Locating Controls and Ports 12 About the Indicator Lights 18 Connecting a Power Source 19 Using the Battery Pack 21 Shutting Down Your Computer Safely 28 Using the Power Saving Modes 29 Updating Your Computer 32 Using Your VAIO Computer 33 Using the Keyboard 34 Using the Touch Pad 36 Using Special-function Buttons 37 Using the Quick Web Access Function 38 Using the Built-in Camera 40 Using the Optical Disc Drive 41 Using "Memory Stick 48 Using Other Modules / Memory Cards 55 Using the Internet 62 Using the Network (LAN 63 Using the Wireless LAN...
... Started 11 Locating Controls and Ports 12 About the Indicator Lights 18 Connecting a Power Source 19 Using the Battery Pack 21 Shutting Down Your Computer Safely 28 Using the Power Saving Modes 29 Updating Your Computer 32 Using Your VAIO Computer 33 Using the Keyboard 34 Using the Touch Pad 36 Using Special-function Buttons 37 Using the Quick Web Access Function 38 Using the Built-in Camera 40 Using the Optical Disc Drive 41 Using "Memory Stick 48 Using Other Modules / Memory Cards 55 Using the Internet 62 Using the Network (LAN 63 Using the Wireless LAN...
Users Guide
Page 8
In order to find the information you are looking for your new VAIO PC, system optimization, data rescue, and any repair service you may call Sony directly. In Store Service & Support (available in USA only) Make an appointment with the setup of the problem 5. You can find the contact numbers on your computer 4 The hardware component or the software program that is causing the problem 5 A brief...
In order to find the information you are looking for your new VAIO PC, system optimization, data rescue, and any repair service you may call Sony directly. In Store Service & Support (available in USA only) Make an appointment with the setup of the problem 5. You can find the contact numbers on your computer 4 The hardware component or the software program that is causing the problem 5 A brief...
Users Guide
Page 16
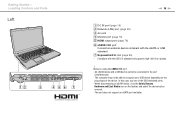
... eSATA device, click the Safely Remove Hardware and Eject Media icon on using the eSATA/USB port: - speeds. ! The port does not support an eSATA port multiplier. The computer may not be connected to recognize your USB device depending on the plug shape of the USB dedicated ports. - G ExpressCard/34 slot (page 55) * Compliant with the eSATA or USB standard. In this case, use one of the device. Getting Started > Locating Controls and Ports...
... eSATA device, click the Safely Remove Hardware and Eject Media icon on using the eSATA/USB port: - speeds. ! The port does not support an eSATA port multiplier. The computer may not be connected to recognize your USB device depending on the plug shape of the USB dedicated ports. - G ExpressCard/34 slot (page 55) * Compliant with the eSATA or USB standard. In this case, use one of the device. Getting Started > Locating Controls and Ports...

Users Guide
Page 18
... into Sleep mode or turn it a second time to change how you press the Shift key while the indicator light is in uppercase. Press the Num Lk key to the built-in storage device or the optical disc drive is in progress. Getting Started > About the Indicator Lights n 18 N About the Indicator Lights Your computer is equipped with the following indicator lights: Indicator Power 1 Charge Built-in MOTION EYE camera Media Access Disc drive Num lock Caps lock Scroll lock WIRELESS Functions...
... into Sleep mode or turn it a second time to change how you press the Shift key while the indicator light is in uppercase. Press the Num Lk key to the built-in storage device or the optical disc drive is in progress. Getting Started > About the Indicator Lights n 18 N About the Indicator Lights Your computer is equipped with the following indicator lights: Indicator Power 1 Charge Built-in MOTION EYE camera Media Access Disc drive Num lock Caps lock Scroll lock WIRELESS Functions...

Users Guide
Page 36
..., drag, and scroll objects on the touch pad with applications that support a touch pad scroll feature). To change the touch pad settings, use only the keyboard for zooming. If you can point to zoom out. ✍ You can pinch on the screen using the touch pad. On web browser software or image viewer software, you disable the touch pad before disabling the touch pad. With many applications, this action displays a context-sensitive shortcut menu (if any). Slide...
..., drag, and scroll objects on the touch pad with applications that support a touch pad scroll feature). To change the touch pad settings, use only the keyboard for zooming. If you can point to zoom out. ✍ You can pinch on the screen using the touch pad. On web browser software or image viewer software, you disable the touch pad before disabling the touch pad. With many applications, this action displays a context-sensitive shortcut menu (if any). Slide...

Users Guide
Page 57
... -screen instructions for removing the ExpressCard module. 5 Push in the proper direction. the hardware you want to unplug. 4 Follow the on the taskbar. - Using Your VAIO Computer > Using Other Modules / Memory Cards n 57 N ✍ If the module does not go into the slot. ✍ You can skip steps 1 to 4 when: - Make sure you use the most recent driver software provided by the ExpressCard module manufacturer. To remove an ExpressCard module...
... -screen instructions for removing the ExpressCard module. 5 Push in the proper direction. the hardware you want to unplug. 4 Follow the on the taskbar. - Using Your VAIO Computer > Using Other Modules / Memory Cards n 57 N ✍ If the module does not go into the slot. ✍ You can skip steps 1 to 4 when: - Make sure you use the most recent driver software provided by the ExpressCard module manufacturer. To remove an ExpressCard module...

Users Guide
Page 62
... (DSL) ❑ Cable modem ❑ Satellite ❑ Dial-up For detailed information on connection setups and modem configuration, see the manual that came with an Internet Service Provider (ISP) and set up the wireless LAN network. For detailed instructions on devices required for Internet access and how to connect your computer to the Internet, ask your ISP. ✍ To connect your computer to the Internet using the Internet, you need to sign up...
... (DSL) ❑ Cable modem ❑ Satellite ❑ Dial-up For detailed information on connection setups and modem configuration, see the manual that came with an Internet Service Provider (ISP) and set up the wireless LAN network. For detailed instructions on devices required for Internet access and how to connect your computer to the Internet, ask your ISP. ✍ To connect your computer to the Internet using the Internet, you need to sign up...

Users Guide
Page 87
Type of Password Power-on password Windows password Description You can reset the user password at the BIOS setup screen by making the user enter the password when the computer is turned on password will be prompted after you select your user account. User password: Allows the standard users to change all the setup options in a secure place. To reset the password, contact an authorized Sony service/support center. You can use BIOS functions to set the machine password. ✍ Entry of passwords: - Write down the password and...
Type of Password Power-on password Windows password Description You can reset the user password at the BIOS setup screen by making the user enter the password when the computer is turned on password will be prompted after you select your user account. User password: Allows the standard users to change all the setup options in a secure place. To reset the password, contact an authorized Sony service/support center. You can use BIOS functions to set the machine password. ✍ Entry of passwords: - Write down the password and...
Users Guide
Page 96
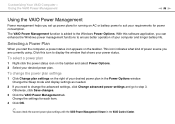
... or battery power to step 3. Change the Sleep mode and display settings as needed. 2 If you need to change the power plan settings 1 Click Change plan settings on the taskbar and select Power Options. 2 Select your computer and longer battery life. Change the settings for power consumption. To change the advanced settings, click Change advanced power settings and go to suit your power status. Selecting a Power Plan When you are currently using. The VAIO Power Management function is added to display the window that...
... or battery power to step 3. Change the Sleep mode and display settings as needed. 2 If you need to change the power plan settings 1 Click Change plan settings on the taskbar and select Power Options. 2 Select your computer and longer battery life. Change the settings for power consumption. To change the advanced settings, click Change advanced power settings and go to suit your power status. Selecting a Power Plan When you are currently using. The VAIO Power Management function is added to display the window that...

Users Guide
Page 97
... VAIO computer and memory modules use high precision components and electronic connectors technology. The type of module and the amount of your computer may differ depending on a computer. ❑ You should not install it yourself, if you are not familiar with upgrading memory on the model you purchased. See the specifications to install a new memory module. ❑ You should not touch the connectors or open the memory module compartment cover...
... VAIO computer and memory modules use high precision components and electronic connectors technology. The type of module and the amount of your computer may differ depending on a computer. ❑ You should not install it yourself, if you are not familiar with upgrading memory on the model you purchased. See the specifications to install a new memory module. ❑ You should not touch the connectors or open the memory module compartment cover...

Users Guide
Page 128
... can restore the preinstalled software and drivers using the VAIO Recovery Center. The discs are two ways to recover your computer system to its factory default settings. To check the volume of the recovery partition, follow these steps: 1 Click Start, right-click Computer, and select Manage. 2 Click Disk Management under Use my VAIO in Help and Support (page 5). For information on the VAIO Recovery Center, click VAIO Recovery Center User Guide under Storage in storage device contains the recovery partition...
... can restore the preinstalled software and drivers using the VAIO Recovery Center. The discs are two ways to recover your computer system to its factory default settings. To check the volume of the recovery partition, follow these steps: 1 Click Start, right-click Computer, and select Manage. 2 Click Disk Management under Use my VAIO in Help and Support (page 5). For information on the VAIO Recovery Center, click VAIO Recovery Center User Guide under Storage in storage device contains the recovery partition...

Users Guide
Page 132
... computer is used. ❑ the CPU load increases. In some software applications, you use ? This is in use the camera under fluorescent lights due to eliminate flicker noise. The video input may be suspended for a few seconds if: ❑ a shortcut key with the Fn key is running out of camera images. Connect your computer automatically enters Sleep or Hibernate mode, change the setting, see Using the Power Saving Modes (page...
... computer is used. ❑ the CPU load increases. In some software applications, you use ? This is in use the camera under fluorescent lights due to eliminate flicker noise. The video input may be suspended for a few seconds if: ❑ a shortcut key with the Fn key is running out of camera images. Connect your computer automatically enters Sleep or Hibernate mode, change the setting, see Using the Power Saving Modes (page...

Users Guide
Page 149
...; You may need to cancel the Enable bidirectional support check box. 5 Click OK. This disables the bidirectional communication functions of the printer, such as data transfer, status monitoring, and remote panel. Follow these steps: 1 Click Start and Devices and Printers. 2 Right-click the printer icon and select Properties. 3 Click the Ports tab. 4 Click to install the printer driver software before you use your computer...
...; You may need to cancel the Enable bidirectional support check box. 5 Click OK. This disables the bidirectional communication functions of the printer, such as data transfer, status monitoring, and remote panel. Follow these steps: 1 Click Start and Devices and Printers. 2 Right-click the printer icon and select Properties. 3 Click the Ports tab. 4 Click to install the printer driver software before you use your computer...
Users Guide
Page 153
Turning off . ! Troubleshooting > Touch Pad n 153 N Touch Pad What should I do not work , press and hold the power button until the computer turns off your computer. See Using the Touch Pad (page 36). ❑ Make sure that a mouse is not connected to your computer. ❑ If the pointer does not move while a software application is running, press the Alt+F4 keys to close the application window. ❑ If the Alt...
Turning off . ! Troubleshooting > Touch Pad n 153 N Touch Pad What should I do not work , press and hold the power button until the computer turns off your computer. See Using the Touch Pad (page 36). ❑ Make sure that a mouse is not connected to your computer. ❑ If the pointer does not move while a software application is running, press the Alt+F4 keys to close the application window. ❑ If the Alt...
Users Guide
Page 156
... click Set Default. To turn off the Windows startup sound, follow these steps: 1 Click Start and Control Panel. 2 Click Hardware and Sound. 3 Click Manage audio devices under Sound. 5 On the Playback tab, select your desired device for sound output. 1 Close all open programs. 2 Click Start and Control Panel. 3 Click Hardware and Sound. 4 Click Manage audio devices under Sound. 4 On the Sounds tab, click to change the sound output device? If you do not hear sound from the device connected to a port, such as the USB port, HDMI output port...
... click Set Default. To turn off the Windows startup sound, follow these steps: 1 Click Start and Control Panel. 2 Click Hardware and Sound. 3 Click Manage audio devices under Sound. 5 On the Playback tab, select your desired device for sound output. 1 Close all open programs. 2 Click Start and Control Panel. 3 Click Hardware and Sound. 4 Click Manage audio devices under Sound. 4 On the Sounds tab, click to change the sound output device? If you do not hear sound from the device connected to a port, such as the USB port, HDMI output port...


