User Manual
Page 3
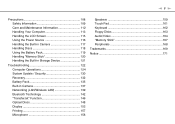
n3 N Precautions 108 Safety Information 109 Care and Maintenance Information 112 Handling Your Computer 113 Handling the LCD Screen 115 Using the Power Source 116 Handling the Built-in Camera 117 Handling Discs 118 Using the Battery Pack 119 Handling "Memory Stick 120 Handling ...
n3 N Precautions 108 Safety Information 109 Care and Maintenance Information 112 Handling Your Computer 113 Handling the LCD Screen 115 Using the Power Source 116 Handling the Built-in Camera 117 Handling Discs 118 Using the Battery Pack 119 Handling "Memory Stick 120 Handling ...

User Manual
Page 4
... you with a state-of-the-art computing experience. ! Before Use > n4 N Before Use Congratulations on your purchase of this manual may not be available on -screen User Guide. Sony has combined leading-edge technology in audio, video, computing, and communications to find out about the configuration of your computer, visit the...
... you with a state-of-the-art computing experience. ! Before Use > n4 N Before Use Congratulations on your purchase of this manual may not be available on -screen User Guide. Sony has combined leading-edge technology in audio, video, computing, and communications to find out about the configuration of your computer, visit the...

User Manual
Page 6
... your VAIO computer. Get started with my VAIO Get help with the VAIO Care, system restore, backup and recovery, and contact Sony support. ❑ Program help menu on your VAIO computer by accessing interactive VAIO tutorials, how-to find useful documentation such as...Connection Utility Help - To access Help and Support: 1 Click Start and Help and Support. 2 Choose from the help files - May be available on -screen guide: 1 Click Start, All Programs, and SmartWi Connection Utility. 2 Click SmartWi Connection Utility Help. Before Use > Finding More about Your VAIO Computer ...
... your VAIO computer. Get started with my VAIO Get help with the VAIO Care, system restore, backup and recovery, and contact Sony support. ❑ Program help menu on your VAIO computer by accessing interactive VAIO tutorials, how-to find useful documentation such as...Connection Utility Help - To access Help and Support: 1 Click Start and Help and Support. 2 Choose from the help files - May be available on -screen guide: 1 Click Start, All Programs, and SmartWi Connection Utility. 2 Click SmartWi Connection Utility Help. Before Use > Finding More about Your VAIO Computer ...

User Manual
Page 10
Make sure the display screen is at a comfortable viewing distance. You can reduce eye strain and muscle fatigue by adjusting the tilt of the computer display - Proper lighting adds to ...
Make sure the display screen is at a comfortable viewing distance. You can reduce eye strain and muscle fatigue by adjusting the tilt of the computer display - Proper lighting adds to ...
User Manual
Page 12
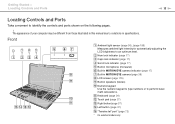
...) D Scroll lock indicator (page 17) E Built-in microphone (monaural) F Built-in MOTION EYE camera indicator (page 17) G Built-in MOTION EYE camera (page 39) H LCD screen (page 115) I Built-in specifications. The appearance of your computer may be different from those illustrated in this manual due to variations in speakers (stereo...
...) D Scroll lock indicator (page 17) E Built-in microphone (monaural) F Built-in MOTION EYE camera indicator (page 17) G Built-in MOTION EYE camera (page 39) H LCD screen (page 115) I Built-in specifications. The appearance of your computer may be different from those illustrated in this manual due to variations in speakers (stereo...

User Manual
Page 20
n 20 N Getting Started > Using the Battery Pack Using the Battery Pack The battery pack supplied with your computer is not fully charged at the time of delivery. Installing/Removing the Battery Pack To install the battery pack 1 Turn off the computer and close the LCD screen lid. 2 Slide the battery LOCK switch (1) inward.
n 20 N Getting Started > Using the Battery Pack Using the Battery Pack The battery pack supplied with your computer is not fully charged at the time of delivery. Installing/Removing the Battery Pack To install the battery pack 1 Turn off the computer and close the LCD screen lid. 2 Slide the battery LOCK switch (1) inward.

User Manual
Page 22
... unsaved data if you remove the battery pack while your computer is designed to the AC adapter. 1 Turn off the computer and close the LCD screen lid. 2 Slide the battery LOCK switch (1) inward. 3 Slide and hold the battery RELEASE latch (2) inward, put your fingertip underneath the tab (3) on and ...not connected to operate only with genuine Sony battery packs. This computer is on the battery pack, and lift the battery pack in the direction of the arrow, and then slide it away...
... unsaved data if you remove the battery pack while your computer is designed to the AC adapter. 1 Turn off the computer and close the LCD screen lid. 2 Slide the battery LOCK switch (1) inward. 3 Slide and hold the battery RELEASE latch (2) inward, put your fingertip underneath the tab (3) on and ...not connected to operate only with genuine Sony battery packs. This computer is on the battery pack, and lift the battery pack in the direction of the arrow, and then slide it away...

User Manual
Page 26
... Center. See Using the VAIO Power Management (page 100) for more information. ❑ Set the wallpaper in Long Battery Life Wallpaper Setting as your computer screen. ❑ Use the power saving mode. Getting Started > Using the Battery Pack n 26 N Extending the Battery Life When your computer is running on the Power...
... Center. See Using the VAIO Power Management (page 100) for more information. ❑ Set the wallpaper in Long Battery Life Wallpaper Setting as your computer screen. ❑ Use the power saving mode. Getting Started > Using the Battery Pack n 26 N Extending the Battery Life When your computer is running on the Power...
User Manual
Page 28
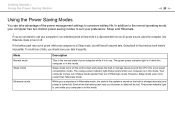
... mode Sleep mode Hibernate mode Description This is in storage device(s) and the CPU into Hibernate mode or turn it is turned off the LCD screen and places the built-in use your computer is in this mode. Your computer comes out of Sleep mode quicker than Hibernate mode. If you...
... mode Sleep mode Hibernate mode Description This is in storage device(s) and the CPU into Hibernate mode or turn it is turned off the LCD screen and places the built-in use your computer is in this mode. Your computer comes out of Sleep mode quicker than Hibernate mode. If you...

User Manual
Page 31
... the computer. ❑ Windows Update Click Start, All Programs, and Windows Update and then follow the on-screen instructions. ❑ VAIO Update 5 Click Start, All Programs, and VAIO Update 5 and then follow the on-screen instructions. ! Your computer must be connected to the Internet to update your VAIO computer with the following...
... the computer. ❑ Windows Update Click Start, All Programs, and Windows Update and then follow the on-screen instructions. ❑ VAIO Update 5 Click Start, All Programs, and VAIO Update 5 and then follow the on-screen instructions. ! Your computer must be connected to the Internet to update your VAIO computer with the following...

User Manual
Page 34
... may not be used only after the operating system is selected as the display output destination, the computer screen goes blank. Press the Enter key to the computer screen. Combinations and Functions with the Fn Key ✍ Some keyboard functions can be supported depending on and ... 34 N Using the Keyboard Your keyboard has additional keys that perform model-specific tasks. If you disconnect a display cable from your computer screen. Changes the volume level. Use of your computer while an external display is finished launching. Switches the display output between your computer...
... may not be used only after the operating system is selected as the display output destination, the computer screen goes blank. Press the Enter key to the computer screen. Combinations and Functions with the Fn Key ✍ Some keyboard functions can be supported depending on and ... 34 N Using the Keyboard Your keyboard has additional keys that perform model-specific tasks. If you disconnect a display cable from your computer screen. Changes the volume level. Use of your computer while an external display is finished launching. Switches the display output between your computer...

User Manual
Page 37
... taking the finger off the touch pad (the scroll function is connected to your finger on the touch pad (1) to place the pointer (2) on the screen using the touch pad. n 37 N Action Point Click Double-click Right-click Drag Scroll Flick Pinch Description Slide your computer. Pinch open to zoom in...
... taking the finger off the touch pad (the scroll function is connected to your finger on the touch pad (1) to place the pointer (2) on the screen using the touch pad. n 37 N Action Point Click Double-click Right-click Drag Scroll Flick Pinch Description Slide your computer. Pinch open to zoom in...

User Manual
Page 49
... you insert the media directly into the "Memory Stick Duo" slot without the adaptor, you insert "Memory Stick" into the slot. ! If nothing appears on -screen instructions to insert it clicks into place. Using Your VAIO Computer > Using "Memory Stick" n 49 N 3 Carefully slide "Memory Stick" into the slot until it into...
... you insert the media directly into the "Memory Stick Duo" slot without the adaptor, you insert "Memory Stick" into the slot. ! If nothing appears on -screen instructions to insert it clicks into place. Using Your VAIO Computer > Using "Memory Stick" n 49 N 3 Carefully slide "Memory Stick" into the slot until it into...

User Manual
Page 52
n 52 N Using Your VAIO Computer > Using "Memory Stick" 6 Click Start. 7 Follow the on the media type. It may take time to format "Memory Stick" depending on -screen instructions. !
n 52 N Using Your VAIO Computer > Using "Memory Stick" 6 Click Start. 7 Follow the on the media type. It may take time to format "Memory Stick" depending on -screen instructions. !

User Manual
Page 56
... Eject Media icon on the taskbar. 3 Select the hardware you want to 4 when: - the Safely Remove Hardware and Eject Media icon is not displayed on -screen instructions for removing the ExpressCard module. 5 Push in the ExpressCard module toward the computer so that the module pops out. 6 Gently take hold of the...
... Eject Media icon on the taskbar. 3 Select the hardware you want to 4 when: - the Safely Remove Hardware and Eject Media icon is not displayed on -screen instructions for removing the ExpressCard module. 5 Push in the ExpressCard module toward the computer so that the module pops out. 6 Gently take hold of the...

User Manual
Page 58
.... The SD memory card icon will appear in the Computer window after you may be prompted to install the software. If prompted, follow the on-screen instructions to install driver software.
.... The SD memory card icon will appear in the Computer window after you may be prompted to install the software. If prompted, follow the on-screen instructions to install driver software.
User Manual
Page 66
Be sure to turn on -screen guide: 1 Click Start, All Programs, and SmartWi Connection Utility. 2 Click SmartWi Connection Utility Help. Use the SmartWi Connection Utility to set up the wireless LAN function. To use the wireless LAN function, you first need to set up the wireless LAN function. See the SmartWi Connection Utility Help for more information. To access this on the WIRELESS switch before starting the wireless LAN function. Using Your VAIO Computer > Using the Wireless LAN n 66 N Using the Wireless LAN Function !
Be sure to turn on -screen guide: 1 Click Start, All Programs, and SmartWi Connection Utility. 2 Click SmartWi Connection Utility Help. Use the SmartWi Connection Utility to set up the wireless LAN function. To use the wireless LAN function, you first need to set up the wireless LAN function. See the SmartWi Connection Utility Help for more information. To access this on the WIRELESS switch before starting the wireless LAN function. Using Your VAIO Computer > Using the Wireless LAN n 66 N Using the Wireless LAN Function !
User Manual
Page 67
... set up the Bluetooth function. See the SmartWi Connection Utility Help for more information. To use the Bluetooth function, you first need to turn on -screen guide: 1 Click Start, All Programs, and SmartWi Connection Utility. 2 Click SmartWi Connection Utility Help.
... set up the Bluetooth function. See the SmartWi Connection Utility Help for more information. To use the Bluetooth function, you first need to turn on -screen guide: 1 Click Start, All Programs, and SmartWi Connection Utility. 2 Click SmartWi Connection Utility Help.

User Manual
Page 73
Follow the on-screen instructions to register the device appears. Using Your VAIO Computer > Using the "TransferJet" Function n 73 N 3 Place a "TransferJet" compatible device on the computer's palm rest so that both the "TransferJet" target point logos bring together. 4 Turn on the settings. For detailed information, see the help file included with the TransferJet Manager. ✍ The PMB (Picture Motion Browser) may launch depending on the device. The window prompting you to register the device.
Follow the on-screen instructions to register the device appears. Using Your VAIO Computer > Using the "TransferJet" Function n 73 N 3 Place a "TransferJet" compatible device on the computer's palm rest so that both the "TransferJet" target point logos bring together. 4 Turn on the settings. For detailed information, see the help file included with the TransferJet Manager. ✍ The PMB (Picture Motion Browser) may launch depending on the device. The window prompting you to register the device.
User Manual
Page 81
...do I change the device for sound output. The HDMI cable carries both video and audio signals. With the HDMI connection, the volume can adjust the screen resolution of any connected devices. To connect a high-quality digital sound output device between your computer and a TV You can connect a high-quality ... device to the HDMI output port on the computer. ✍ You can be adjusted by the connected audio device only. See Why doesn't my screen display a video? (page 155) for more information. Your computer has no control over the output volume of the connected TV with your TV for...
...do I change the device for sound output. The HDMI cable carries both video and audio signals. With the HDMI connection, the volume can adjust the screen resolution of any connected devices. To connect a high-quality digital sound output device between your computer and a TV You can connect a high-quality ... device to the HDMI output port on the computer. ✍ You can be adjusted by the connected audio device only. See Why doesn't my screen display a video? (page 155) for more information. Your computer has no control over the output volume of the connected TV with your TV for...


