

User Manual
Page 2
... Started 12 Locating Controls and Ports 13 About the Indicator Lights 19 Connecting a Power Source 20 Using the Battery Pack 22 Shutting Down Your Computer Safely 29 Using the Power Saving Modes 30 Keeping Your Computer in Optimum Condition .......... 32 Using Your VAIO Computer 35 Using the Keyboard 36 Using the Touch Pad 39 Using Special-function Buttons 40 Using the Built-in Camera 41 Using the Optical Disc Drive 42 Using "Memory Stick 49 Using Other Modules / Memory Cards 56 Using the Internet 63 Using the Network (LAN 64 Using...
... Started 12 Locating Controls and Ports 13 About the Indicator Lights 19 Connecting a Power Source 20 Using the Battery Pack 22 Shutting Down Your Computer Safely 29 Using the Power Saving Modes 30 Keeping Your Computer in Optimum Condition .......... 32 Using Your VAIO Computer 35 Using the Keyboard 36 Using the Touch Pad 39 Using Special-function Buttons 40 Using the Built-in Camera 41 Using the Optical Disc Drive 42 Using "Memory Stick 49 Using Other Modules / Memory Cards 56 Using the Internet 63 Using the Network (LAN 64 Using...
User Manual
Page 5
n5 N Printed Documentation ❑ Quick Start Guide - An overview of components connection, set-up information, etc. ❑ Recovery, Backup and Troubleshooting Guide ❑ Safety Information - Safety guidelines and owner information. ✍ Before activating the wireless functions such as the wireless LAN and Bluetooth technology, read the Safety Information carefully. Before Use > Finding More about Your VAIO Computer Finding More about Your VAIO Computer This section provides support information about your VAIO computer. 1.
n5 N Printed Documentation ❑ Quick Start Guide - An overview of components connection, set-up information, etc. ❑ Recovery, Backup and Troubleshooting Guide ❑ Safety Information - Safety guidelines and owner information. ✍ Before activating the wireless functions such as the wireless LAN and Bluetooth technology, read the Safety Information carefully. Before Use > Finding More about Your VAIO Computer Finding More about Your VAIO Computer This section provides support information about your VAIO computer. 1.

User Manual
Page 9
The serial number is the last 7 digits of the number below the barcode. 3 The operating system on your computer 4 The hardware component or the software program that is causing the problem 5 A brief description of your new VAIO computer, system optimization, data rescue, and any repair service you might need. In order to find the nearest location. Customer Information Center If you do not find it...
The serial number is the last 7 digits of the number below the barcode. 3 The operating system on your computer 4 The hardware component or the software program that is causing the problem 5 A brief description of your new VAIO computer, system optimization, data rescue, and any repair service you might need. In order to find the nearest location. Customer Information Center If you do not find it...

User Manual
Page 17
... eSATA device, click the Safely Remove Hardware and Eject Media icon on using the eSATA/USB port: - Notes on the taskbar and select the device before removal. - Getting Started > Locating Controls and Ports Left n 17 N A DC IN port (page 20) B Security slot C Air vent D Network (LAN) port (page 64) E Monitor port (page 82) F HDMI output port*1 (page 85) G eSATA/USB port*2 Connect an external device compliant with the USB 2.0 standard. ! An eSATA device and a USB device cannot be able to recognize your USB device...
... eSATA device, click the Safely Remove Hardware and Eject Media icon on using the eSATA/USB port: - Notes on the taskbar and select the device before removal. - Getting Started > Locating Controls and Ports Left n 17 N A DC IN port (page 20) B Security slot C Air vent D Network (LAN) port (page 64) E Monitor port (page 82) F HDMI output port*1 (page 85) G eSATA/USB port*2 Connect an external device compliant with the USB 2.0 standard. ! An eSATA device and a USB device cannot be able to recognize your USB device...

User Manual
Page 19
... indicator light. Illuminates while data access to the built-in storage device or the optical disc drive is in uppercase. Press the Caps Lock key to change how you are enabled. Press the Fn+Scr Lk keys to type letters in progress. See Charging the Battery Pack (page 25) for more wireless options are using and does not work with the following indicator lights: Indicator Power 1 Charge Built-in MOTION EYE camera Media Access Disc drive Num lock Caps lock Scroll lock WIRELESS Functions...
... indicator light. Illuminates while data access to the built-in storage device or the optical disc drive is in uppercase. Press the Caps Lock key to change how you are enabled. Press the Fn+Scr Lk keys to type letters in progress. See Charging the Battery Pack (page 25) for more wireless options are using and does not work with the following indicator lights: Indicator Power 1 Charge Built-in MOTION EYE camera Media Access Disc drive Num lock Caps lock Scroll lock WIRELESS Functions...

User Manual
Page 39
... scroll function is connected to your finger along the right edge of the touch pad to scroll vertically. To change the touch pad settings, use only the keyboard for zooming. Slide your finger in a row. Slide your computer. Press the left button (3) once. Once vertical or horizontal scrolling is engaged, you can move forward. Pinch open to zoom in quick motion on the touch pad with applications that support a touch pad scroll...
... scroll function is connected to your finger along the right edge of the touch pad to scroll vertically. To change the touch pad settings, use only the keyboard for zooming. Slide your finger in a row. Slide your computer. Press the left button (3) once. Once vertical or horizontal scrolling is engaged, you can move forward. Pinch open to zoom in quick motion on the touch pad with applications that support a touch pad scroll...

User Manual
Page 58
the Safely Remove Hardware and Eject Media icon is not displayed on -screen instructions for removing the ExpressCard module. 5 Push in the Safely Remove Hardware and Eject Media window. 1 Locate the ExpressCard slot. 2 Click the Safely Remove Hardware and Eject Media icon on the taskbar. 3 Select the hardware you want to 4 when: - the hardware you want to unplug is off. - n 58 N your computer is not displayed in the ExpressCard module toward the computer so that...
the Safely Remove Hardware and Eject Media icon is not displayed on -screen instructions for removing the ExpressCard module. 5 Push in the Safely Remove Hardware and Eject Media window. 1 Locate the ExpressCard slot. 2 Click the Safely Remove Hardware and Eject Media icon on the taskbar. 3 Select the hardware you want to 4 when: - the hardware you want to unplug is off. - n 58 N your computer is not displayed in the ExpressCard module toward the computer so that...
User Manual
Page 96
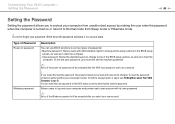
... Sleep mode or Hibernate mode. ! Do not to start the computer. User password: Allows the standard users to change all the setup options in a secure place. Type of the BIOS setup options, as well as to set the machine password. ✍ Entry of the Windows password will be charged. Write down the password and keep it in the BIOS setup screen, as well as to forget your password. You can use BIOS functions to start your user account. To reset...
... Sleep mode or Hibernate mode. ! Do not to start the computer. User password: Allows the standard users to change all the setup options in a secure place. Type of the BIOS setup options, as well as to set the machine password. ✍ Entry of the Windows password will be charged. Write down the password and keep it in the BIOS setup screen, as well as to forget your password. You can use BIOS functions to start your user account. To reset...

User Manual
Page 105
To change the advanced settings, click Change advanced power settings and go to step 3. Change the Sleep mode and display settings as needed. 2 If you can check the current power plan settings with the VAIO Power Management Viewer in the Power Options window. With this icon to ensure better operation of your desired power plan in the VAIO Control Center. Selecting a Power Plan When you are currently using. This icon indicates what kind of power source you start the...
To change the advanced settings, click Change advanced power settings and go to step 3. Change the Sleep mode and display settings as needed. 2 If you can check the current power plan settings with the VAIO Power Management Viewer in the Power Options window. With this icon to ensure better operation of your desired power plan in the VAIO Control Center. Selecting a Power Plan When you are currently using. This icon indicates what kind of power source you start the...

User Manual
Page 106
... the nearest center or agent, see Finding More about the configuration of memory installed on a computer. ❑ You should not touch the connectors or open the memory module compartment cover. To find out about Your VAIO Computer (page 5). Upgrading Your VAIO Computer > n 106 N Upgrading Your VAIO Computer Your VAIO computer and memory modules use high precision components and electronic connectors technology. For assistance, contact an authorized Sony service/support center.
... the nearest center or agent, see Finding More about the configuration of memory installed on a computer. ❑ You should not touch the connectors or open the memory module compartment cover. To find out about Your VAIO Computer (page 5). Upgrading Your VAIO Computer > n 106 N Upgrading Your VAIO Computer Your VAIO computer and memory modules use high precision components and electronic connectors technology. For assistance, contact an authorized Sony service/support center.

User Manual
Page 132
... about Your VAIO Computer (page 5). Troubleshooting > Computer Operations n 132 N Why doesn't my computer enter Sleep or Hibernate mode? Turning off your computer and remove the battery pack. What should I do if the charge indicator light is not compatible. To solve this procedure does not work, press and hold the power button until the computer turns off. ! To find the nearest center or agent, see Installing/Removing the Battery Pack...
... about Your VAIO Computer (page 5). Troubleshooting > Computer Operations n 132 N Why doesn't my computer enter Sleep or Hibernate mode? Turning off your computer and remove the battery pack. What should I do if the charge indicator light is not compatible. To solve this procedure does not work, press and hold the power button until the computer turns off. ! To find the nearest center or agent, see Installing/Removing the Battery Pack...

User Manual
Page 143
... Control Panel. 2 Click View network status and tasks under Network and Internet. 3 Click Connect to a network to confirm that your computer to a wireless LAN access point using the 5 GHz band, make sure the option to use the 5 GHz band or both the 2.4 GHz and 5 GHz bands is selected for Wireless LAN Settings in the VAIO Smart Network settings window. Wireless LAN communication (IEEE 802.11a standard) using . ❑ Make sure the WIRELESS switch is on and the WIRELESS indicator light...
... Control Panel. 2 Click View network status and tasks under Network and Internet. 3 Click Connect to a network to confirm that your computer to a wireless LAN access point using the 5 GHz band, make sure the option to use the 5 GHz band or both the 2.4 GHz and 5 GHz bands is selected for Wireless LAN Settings in the VAIO Smart Network settings window. Wireless LAN communication (IEEE 802.11a standard) using . ❑ Make sure the WIRELESS switch is on and the WIRELESS indicator light...

User Manual
Page 150
... change the SCMS-T settings, follow these steps: 1 Click Start and Devices and Printers. 2 Right-click the Bluetooth device icon and click Bluetooth settings. 3 Click the Options tab and select the Show the Bluetooth icon in the VAIO Smart Network window. ❑ If the SmartWi Connection Utility is installed on your headphones or audio/video controller supports the SCMS-T content protection. Check whether your computer, make sure that you need to manually change the settings. 1 Click Start...
... change the SCMS-T settings, follow these steps: 1 Click Start and Devices and Printers. 2 Right-click the Bluetooth device icon and click Bluetooth settings. 3 Click the Options tab and select the Show the Bluetooth icon in the VAIO Smart Network window. ❑ If the SmartWi Connection Utility is installed on your headphones or audio/video controller supports the SCMS-T content protection. Check whether your computer, make sure that you need to manually change the settings. 1 Click Start...
User Manual
Page 155
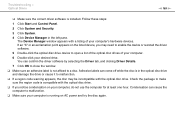
... optical disc drive. Condensation can come off while the disc is installed. Follow these steps: 1 Click Start and Control Panel. 2 Click System and Security. 3 Click System. 4 Click Device Manager in the optical disc drive and damage the drive or cause it to malfunction. ❑ If a region code warning appears, the disc may need to enable the device or reinstall the driver software. 5 Double-click the optical disc drive device to malfunction. ❑ Make...
... optical disc drive. Condensation can come off while the disc is installed. Follow these steps: 1 Click Start and Control Panel. 2 Click System and Security. 3 Click System. 4 Click Device Manager in the optical disc drive and damage the drive or cause it to malfunction. ❑ If a region code warning appears, the disc may need to enable the device or reinstall the driver software. 5 Double-click the optical disc drive device to malfunction. ❑ Make...

User Manual
Page 162
...; You may need to install the printer driver software before you use your computer may enable printing. This disables the bidirectional communication functions of the printer, such as data transfer, status monitoring, and remote panel. Troubleshooting > Printing n 162 N Printing What should I do if I cannot print a document? ❑ Make sure your printer is on, and the printer cable is securely connected to the ports on the...
...; You may need to install the printer driver software before you use your computer may enable printing. This disables the bidirectional communication functions of the printer, such as data transfer, status monitoring, and remote panel. Troubleshooting > Printing n 162 N Printing What should I do if I cannot print a document? ❑ Make sure your printer is on, and the printer cable is securely connected to the ports on the...

User Manual
Page 166
... , keys, press the Enter key, select Restart with the Ctrl+Alt+Delete keys or the power button may have disabled the touch pad before connecting a mouse to your computer. ❑ If the pointer does not move while a software application is not connected to restart your computer. ❑ If this procedure does not work ? ❑ You may cause loss of unsaved data. Turning off . ! See Using the Touch Pad...
... , keys, press the Enter key, select Restart with the Ctrl+Alt+Delete keys or the power button may have disabled the touch pad before connecting a mouse to your computer. ❑ If the pointer does not move while a software application is not connected to restart your computer. ❑ If this procedure does not work ? ❑ You may cause loss of unsaved data. Turning off . ! See Using the Touch Pad...

Recovery Backup and Troubleshooting Guide
Page 1
...-screen instructions. On models without the ASSIST button 1 Turn on -screen instructions. The Windows Boot Manager screen is not equipped with a built- Why do I have deleted the recovery area, you are using VAIO Update. 2 If your computer is displayed. 4 Press the or key to another location. in Normal mode, turn it to select Start VAIO Care Rescue and press the Enter key. 5 Select Start recovery wizard. About backup What is in optical disc drive, connect an external optical disc drive...
...-screen instructions. On models without the ASSIST button 1 Turn on -screen instructions. The Windows Boot Manager screen is not equipped with a built- Why do I have deleted the recovery area, you are using VAIO Update. 2 If your computer is displayed. 4 Press the or key to another location. in Normal mode, turn it to select Start VAIO Care Rescue and press the Enter key. 5 Select Start recovery wizard. About backup What is in optical disc drive, connect an external optical disc drive...
Recovery Backup and Troubleshooting Guide
Page 2
...+F4 keys several times to check that you are using an external display, make sure the power strip or UPS is installed properly and charged. Disconnect all connected USB devices (if any problem operating your computer Try these suggestions before you are using VAIO Care Rescue. The green power indicator light turns on the computer again. For details, see the onscreen User Guide. A reset fee will not start. Press and hold the power button...
...+F4 keys several times to check that you are using an external display, make sure the power strip or UPS is installed properly and charged. Disconnect all connected USB devices (if any problem operating your computer Try these suggestions before you are using VAIO Care Rescue. The green power indicator light turns on the computer again. For details, see the onscreen User Guide. A reset fee will not start. Press and hold the power button...

Safety - Safety Information
Page 2
... ON ACCOUNT OF YOUR ACCESS TO, USE OF, OR BROWSING IN ANY DESCRIBED WEB SITE, OR YOUR DOWNLOADING OF ANY MATERIALS, DATA, TEXT, IMAGES, VIDEO, OR AUDIO FROM ANY DESCRIBED WEB SITE. Sony Electronics Inc. Software specifications are located on the bottom, the back panel, or inside the battery compartment of a separate user license agreement. Record the model and serial numbers in the space provided...
... ON ACCOUNT OF YOUR ACCESS TO, USE OF, OR BROWSING IN ANY DESCRIBED WEB SITE, OR YOUR DOWNLOADING OF ANY MATERIALS, DATA, TEXT, IMAGES, VIDEO, OR AUDIO FROM ANY DESCRIBED WEB SITE. Sony Electronics Inc. Software specifications are located on the bottom, the back panel, or inside the battery compartment of a separate user license agreement. Record the model and serial numbers in the space provided...

Startup Guide
Page 2
... Install battery pack Connect AC adapter 4 Power on your computer. 1 Slide the battery LOCK switch inward. 2 Slide the battery pack diagonally into contact with VAIO Smart Network Click the VAIO Smart Network icon on hard surfaces, such as setup tools, tutorials, and FAQs. Recovery Media are subject to access, and provides important documents and helpful support resources such as a desk or table. Turn on the WIRELESS switch on 5 Locate VAIO Manual What to do next Update...
... Install battery pack Connect AC adapter 4 Power on your computer. 1 Slide the battery LOCK switch inward. 2 Slide the battery pack diagonally into contact with VAIO Smart Network Click the VAIO Smart Network icon on hard surfaces, such as setup tools, tutorials, and FAQs. Recovery Media are subject to access, and provides important documents and helpful support resources such as a desk or table. Turn on the WIRELESS switch on 5 Locate VAIO Manual What to do next Update...


