

User Manual
Page 2
... Started 11 Locating Controls and Ports 12 About the Indicator Lights 20 Connecting a Power Source 21 Using the Battery Pack 23 Shutting Down Your Computer Safely 33 Using the Power Saving Modes 34 Keeping Your Computer in Optimum Condition .......... 37 Using Your VAIO Computer 40 Using the Keyboard 41 Using the Touch Pad 44 Using Special-function Buttons 45 Using the Quick Web Access Function 46 Using the Built-in Camera 48 Using the Optical Disc Drive 49 Using "Memory Stick 56 Using Other Modules / Memory Cards 63 Using the Internet...
... Started 11 Locating Controls and Ports 12 About the Indicator Lights 20 Connecting a Power Source 21 Using the Battery Pack 23 Shutting Down Your Computer Safely 33 Using the Power Saving Modes 34 Keeping Your Computer in Optimum Condition .......... 37 Using Your VAIO Computer 40 Using the Keyboard 41 Using the Touch Pad 44 Using Special-function Buttons 45 Using the Quick Web Access Function 46 Using the Built-in Camera 48 Using the Optical Disc Drive 49 Using "Memory Stick 56 Using Other Modules / Memory Cards 63 Using the Internet...
User Manual
Page 5
Printed Documentation ❑ Quick Start Guide - An overview of components connection, set-up information, etc. ❑ Recovery, Backup and Troubleshooting Guide ❑ Safety Regulations - Safety guidelines and owner information. ✍ Before activating the wireless functions such as the wireless LAN and BLUETOOTH technology, read the Safety Regulations carefully. Before Use > Finding More about Your VAIO Computer n5 N Finding More about Your VAIO Computer This section provides support information about your VAIO computer. 1.
Printed Documentation ❑ Quick Start Guide - An overview of components connection, set-up information, etc. ❑ Recovery, Backup and Troubleshooting Guide ❑ Safety Regulations - Safety guidelines and owner information. ✍ Before activating the wireless functions such as the wireless LAN and BLUETOOTH technology, read the Safety Regulations carefully. Before Use > Finding More about Your VAIO Computer n5 N Finding More about Your VAIO Computer This section provides support information about your VAIO computer. 1.
User Manual
Page 8
... location. The serial number is causing the problem 5 A brief description of your new VAIO computer, system optimization, data rescue, and any repair service you may call Sony directly. You can find it at a U.S. Sony Technicians can assist with a Sony certified technician at the lower right corner of your VAIO computer. In Store Service & Support (available in USA only) Make an appointment with the setup of the display...
... location. The serial number is causing the problem 5 A brief description of your new VAIO computer, system optimization, data rescue, and any repair service you may call Sony directly. You can find it at a U.S. Sony Technicians can assist with a Sony certified technician at the lower right corner of your VAIO computer. In Store Service & Support (available in USA only) Make an appointment with the setup of the display...

User Manual
Page 42
... n 42 N Function Switches the display output between your computer while an external display is turned off. See the help file included with the VAIO Control Center for more information. To make the view look bigger and closer (zoom in storage device and the system power is selected as the display output destination, the computer screen goes blank. Press the Enter key to turn on some software. Changes the...
... n 42 N Function Switches the display output between your computer while an external display is turned off. See the help file included with the VAIO Control Center for more information. To make the view look bigger and closer (zoom in storage device and the system power is selected as the display output destination, the computer screen goes blank. Press the Enter key to turn on some software. Changes the...

User Manual
Page 44
... software, you can disable/enable the touch pad by pressing the Fn+F1 keys. Pinch open to zoom out. ✍ You can flick left button (3) once. Press the right button (4) once. With many applications, this action displays a context-sensitive shortcut menu (if any). Be sure to change the touch pad settings. ! If you will be able to use the VAIO Control Center to connect a mouse before connecting a mouse, you disable the touch pad before disabling the touch pad...
... software, you can disable/enable the touch pad by pressing the Fn+F1 keys. Pinch open to zoom out. ✍ You can flick left button (3) once. Press the right button (4) once. With many applications, this action displays a context-sensitive shortcut menu (if any). Be sure to change the touch pad settings. ! If you will be able to use the VAIO Control Center to connect a mouse before connecting a mouse, you disable the touch pad before disabling the touch pad...

User Manual
Page 47
... Access function is activated, you first need to use : ❑ the ASSIST button. ❑ the Scr Lk key in combination with the Fn key for a shortcut. ❑ any port and jack except the DC IN port, the LAN port, the USB ports, and the headphones jack. ❑ the "Memory Stick Duo" slot and the SD memory card slot. ❑ the wireless WAN function (available on selected models only). ❑ the Intel® Wireless Display (installed on selected models...
... Access function is activated, you first need to use : ❑ the ASSIST button. ❑ the Scr Lk key in combination with the Fn key for a shortcut. ❑ any port and jack except the DC IN port, the LAN port, the USB ports, and the headphones jack. ❑ the "Memory Stick Duo" slot and the SD memory card slot. ❑ the wireless WAN function (available on selected models only). ❑ the Intel® Wireless Display (installed on selected models...
User Manual
Page 67
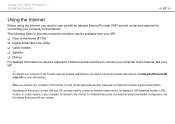
... service contract with your modem. See Using the Wireless LAN (page 69) for connecting your computer to set up devices required for more information. ! For detailed instructions on connection setups and modem configuration, see the manual that came with your ISP, you may be sure to take appropriate security measures to the Internet. Depending on devices required for example a USB telephone modem, a DSL modem, or a cable...
... service contract with your modem. See Using the Wireless LAN (page 69) for connecting your computer to set up devices required for more information. ! For detailed instructions on connection setups and modem configuration, see the manual that came with your ISP, you may be sure to take appropriate security measures to the Internet. Depending on devices required for example a USB telephone modem, a DSL modem, or a cable...
User Manual
Page 98
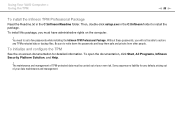
... have administrative rights on -screen documentation for any TPM-protected data or backup files. You need to write down the passwords and keep them safe and private from other people. To open the documentation, click Start, All Programs, Infineon Security Platform Solution, and Help. ! Then, double-click setup.exe in the C:\Infineon\Readme folder. Sony assumes no liability for...
... have administrative rights on -screen documentation for any TPM-protected data or backup files. You need to write down the passwords and keep them safe and private from other people. To open the documentation, click Start, All Programs, Infineon Security Platform Solution, and Help. ! Then, double-click setup.exe in the C:\Infineon\Readme folder. Sony assumes no liability for...

User Manual
Page 100
... then press the Enter key. 10 Follow the instructions in Windows Help and Support to enable BitLocker Drive Encryption. 11 Save the recovery password to change the boot device order so that Internal Hard Disk is listed higher than External Device. ! The BIOS setup screen appears. To enable the ports, follow the steps in the BIOS setup screen. Follow these steps to access the USB flash memory device when you disable the USB ports in Protecting Data from Unauthorized Use (page 133). 1 Connect a USB flash memory device. 2 Turn on the computer and...
... then press the Enter key. 10 Follow the instructions in Windows Help and Support to enable BitLocker Drive Encryption. 11 Save the recovery password to change the boot device order so that Internal Hard Disk is listed higher than External Device. ! The BIOS setup screen appears. To enable the ports, follow the steps in the BIOS setup screen. Follow these steps to access the USB flash memory device when you disable the USB ports in Protecting Data from Unauthorized Use (page 133). 1 Connect a USB flash memory device. 2 Turn on the computer and...
User Manual
Page 115
... with an HDMI cable and set up the TV configuration system. 2 Select the STAMINA mode with your computer. Using Peripheral Devices > Connecting an External Display n 115 N ✍ See the manual that came with your TV for more information on your computer. See the specifications to the computer with an HDMI cable. ! On models with the Blu-ray Disc Drive, you can play Blu-ray 3D Disc media Some features...
... with an HDMI cable and set up the TV configuration system. 2 Select the STAMINA mode with your computer. Using Peripheral Devices > Connecting an External Display n 115 N ✍ See the manual that came with your TV for more information on your computer. See the specifications to the computer with an HDMI cable. ! On models with the Blu-ray Disc Drive, you can play Blu-ray 3D Disc media Some features...
User Manual
Page 125
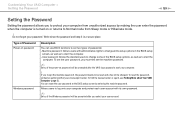
... Hibernate mode. ! Type of Password Power-on password Windows password Description You can reset the user password at the BIOS setup screen by making the user enter the password when the computer is turned on password will be charged. Machine password: Allows users with its own password. ✍ Entry of passwords: - Allows users to set two types of the Windows password will be prompted after you must first set the user password, you select your password. Do not forget your user account. You can use BIOS functions...
... Hibernate mode. ! Type of Password Power-on password Windows password Description You can reset the user password at the BIOS setup screen by making the user enter the password when the computer is turned on password will be charged. Machine password: Allows users with its own password. ✍ Entry of passwords: - Allows users to set two types of the Windows password will be prompted after you must first set the user password, you select your password. Do not forget your user account. You can use BIOS functions...
User Manual
Page 136
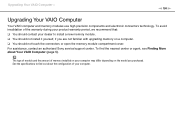
... install a new memory module. ❑ You should not touch the connectors or open the memory module compartment cover. To avoid invalidation of your computer may differ depending on a computer. ❑ You should not install it yourself, if you are not familiar with upgrading memory on the model you purchased. To find out about Your VAIO Computer (page 5). For assistance, contact an authorized Sony service/support center. The type...
... install a new memory module. ❑ You should not touch the connectors or open the memory module compartment cover. To avoid invalidation of your computer may differ depending on a computer. ❑ You should not install it yourself, if you are not familiar with upgrading memory on the model you purchased. To find out about Your VAIO Computer (page 5). For assistance, contact an authorized Sony service/support center. The type...

User Manual
Page 168
...-in the center pane. The media are displayed in the Disk 0 row in optical disc drive, you need to its factory default settings? How can I reinstall the original software and drivers? The volume of the recovery area and the total volume of the C drive are used to restore your computer system to connect an external optical disc drive (not supplied). How can I restore my computer system to recover your computer is not equipped...
...-in the center pane. The media are displayed in the Disk 0 row in optical disc drive, you need to its factory default settings? How can I reinstall the original software and drivers? The volume of the recovery area and the total volume of the C drive are used to restore your computer system to connect an external optical disc drive (not supplied). How can I restore my computer system to recover your computer is not equipped...

User Manual
Page 169
You cannot use USB devices if you recover your computer from Recovery Media (optical discs) on -screen instructions until the VAIO logo disappears. 4 Press the M or m key to select VAIO Care Rescue and press the Enter key. 5 Click Tools and Start advanced recovery wizard. ✍ When the Do you are using the external optical disc drive or USB flash drive, press the F11 key repeatedly until the Select recovery type window appears. 7 Select Custom recovery - Remove recovery contents. 8 Follow the on...
You cannot use USB devices if you recover your computer from Recovery Media (optical discs) on -screen instructions until the VAIO logo disappears. 4 Press the M or m key to select VAIO Care Rescue and press the Enter key. 5 Click Tools and Start advanced recovery wizard. ✍ When the Do you are using the external optical disc drive or USB flash drive, press the F11 key repeatedly until the Select recovery type window appears. 7 Select Custom recovery - Remove recovery contents. 8 Follow the on...

User Manual
Page 176
... cannot connect to a wireless LAN access point? ❑ Connection capability is affected by default. ❑ Follow these steps to check the settings: 1 Click Start and Control Panel. 2 Click View network status and tasks under Network and Internet. 3 Click Connect to a network to confirm that your access point is selected. ❑ Make sure the encryption key is correct. You may be using. ❑ Make sure the WIRELESS switch is on and the WIRELESS indicator light is...
... cannot connect to a wireless LAN access point? ❑ Connection capability is affected by default. ❑ Follow these steps to check the settings: 1 Click Start and Control Panel. 2 Click View network status and tasks under Network and Internet. 3 Click Connect to a network to confirm that your access point is selected. ❑ Make sure the encryption key is correct. You may be using. ❑ Make sure the WIRELESS switch is on and the WIRELESS indicator light is...
User Manual
Page 195
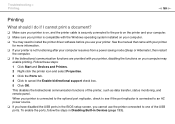
... may need to install the printer driver software before you cannot use your printer. Follow these steps: 1 Click Start and Devices and Printers. 2 Right-click the printer icon and select Properties. 3 Click the Ports tab. 4 Click to one of the printer, such as data transfer, status monitoring, and remote panel. To enable the ports, follow the steps in Disabling Built-in the BIOS setup screen, you use...
... may need to install the printer driver software before you cannot use your printer. Follow these steps: 1 Click Start and Devices and Printers. 2 Right-click the printer icon and select Properties. 3 Click the Ports tab. 4 Click to one of the printer, such as data transfer, status monitoring, and remote panel. To enable the ports, follow the steps in Disabling Built-in the BIOS setup screen, you use...

User Manual
Page 205
... BIOS setup screen, you connect the device. ❑ Try connecting a simple, low-powered device such as a mouse to an AC outlet. ❑ Try using another USB port. For example, if you are using its own power supply. If you are using a printer, check if the power cable is turned on and using a digital camera, check if the battery is working at all. ❑ USB hubs may have disabled the USB ports in the BIOS setup screen. The driver software could be installed...
... BIOS setup screen, you connect the device. ❑ Try connecting a simple, low-powered device such as a mouse to an AC outlet. ❑ Try using another USB port. For example, if you are using its own power supply. If you are using a printer, check if the power cable is turned on and using a digital camera, check if the battery is working at all. ❑ USB hubs may have disabled the USB ports in the BIOS setup screen. The driver software could be installed...

Recovery Guide
Page 1
... the Internet, download and install the latest updates using the external optical disc drive or USB flash drive, press the F11 key repeatedly until the VAIO logo disappears. Do not eject or disconnect the media while creating Recovery Media, as Recovery Media. Keep the Recovery Media in storage device. About backup What is displayed. 5 Press the or key to perform recovery. The Windows Boot Manager screen is a backup process? What is experiencing problems which cannot be able to create Recovery Media with selected models...
... the Internet, download and install the latest updates using the external optical disc drive or USB flash drive, press the F11 key repeatedly until the VAIO logo disappears. Do not eject or disconnect the media while creating Recovery Media, as Recovery Media. Keep the Recovery Media in storage device. About backup What is displayed. 5 Press the or key to perform recovery. The Windows Boot Manager screen is a backup process? What is experiencing problems which cannot be able to create Recovery Media with selected models...

Recovery Guide
Page 2
... for the first time, make sure the power strip or UPS is installed properly and charged. Disconnect all connected USB devices (if any problem operating your computer Try these suggestions before you enter the password. If the discs are using the Windows backup feature. 5 Click System Restore. At the time of unsaved data. The green power indicator light turns on password, contact an authorized Sony service/support center. Restoring your data using VAIO Update. Try other...
... for the first time, make sure the power strip or UPS is installed properly and charged. Disconnect all connected USB devices (if any problem operating your computer Try these suggestions before you enter the password. If the discs are using the Windows backup feature. 5 Click System Restore. At the time of unsaved data. The green power indicator light turns on password, contact an authorized Sony service/support center. Restoring your data using VAIO Update. Try other...
Safety
Page 3
... FUNCTIONS DESCRIBED IN THIS GUIDE WILL BE UNINTERRUPTED OR ERROR-FREE. Use of license agreements enclosed with this computer may require a fee and credit card information. All rights reserved. The software described herein is subject to online service providers may include features such as copy protection and content management technology. Software specifications are located on the bottom, the back panel, or inside the battery...
... FUNCTIONS DESCRIBED IN THIS GUIDE WILL BE UNINTERRUPTED OR ERROR-FREE. Use of license agreements enclosed with this computer may require a fee and credit card information. All rights reserved. The software described herein is subject to online service providers may include features such as copy protection and content management technology. Software specifications are located on the bottom, the back panel, or inside the battery...


