
Operating Instructions
Page 1
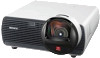
Sony Corporation Printed in China 4-436-147-11 (1) Video Projector Operating Instructions Before operating the unit, please read this manual thoroughly and retain it for future reference. VPL-BW120S © 2012 Sony Corporation
Sony Corporation Printed in China 4-436-147-11 (1) Video Projector Operating Instructions Before operating the unit, please read this manual thoroughly and retain it for future reference. VPL-BW120S © 2012 Sony Corporation
Operating Instructions
Page 5
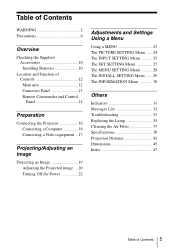
... 10 Installing Batteries 10 Location and Function of Controls 12 Main unit 12 Connector Panel 13 Remote Commander and Control Panel 14 Preparation Connecting the Projector 16 Connecting a Computer 16 Connecting a Video equipment ..17 Projecting/Adjusting an Image Projecting an Image 19 Adjusting the Projected image ...20 Turning Off the Power...
... 10 Installing Batteries 10 Location and Function of Controls 12 Main unit 12 Connector Panel 13 Remote Commander and Control Panel 14 Preparation Connecting the Projector 16 Connecting a Computer 16 Connecting a Video equipment ..17 Projecting/Adjusting an Image Projecting an Image 19 Adjusting the Projected image ...20 Turning Off the Power...
Operating Instructions
Page 6
... accessible. • The unit is not disconnected from the light may block the light during projection. If voltage adaptation is required, consult with qualified Sony personnel (charged). • If the ventilation holes are blocked, internal heat builds up , follow the items below: • Leave space around the... low voltage limited since it is not to direct sunlight, excessive dust or humidity, mechanical vibration or shock. • Never mount the projector on surfaces such as it out by the rear foot (adjustable) when you adjust the height of paper. Do not push hard on ...
... accessible. • The unit is not disconnected from the light may block the light during projection. If voltage adaptation is required, consult with qualified Sony personnel (charged). • If the ventilation holes are blocked, internal heat builds up , follow the items below: • Leave space around the... low voltage limited since it is not to direct sunlight, excessive dust or humidity, mechanical vibration or shock. • Never mount the projector on surfaces such as it out by the rear foot (adjustable) when you adjust the height of paper. Do not push hard on ...
Operating Instructions
Page 8
... be lowered as a result of time, the unit may deteriorate or the coating may break with qualified Sony personnel. This is in the INSTALL SETTING menu. Also, when you rub on the LCD projector. On Screen When using the unit at an altitude of certain components. Therefore, it may break or... the unit is a normal result of each lamp. On Illumination To obtain the best picture, the front of the same model, the color reproduction among projectors may vary, since color balance may , however, see tiny black points and/or bright 8 Precautions points (red, blue, or green) that has high ...
... be lowered as a result of time, the unit may deteriorate or the coating may break with qualified Sony personnel. This is in the INSTALL SETTING menu. Also, when you rub on the LCD projector. On Screen When using the unit at an altitude of certain components. Therefore, it may break or... the unit is a normal result of each lamp. On Illumination To obtain the best picture, the front of the same model, the color reproduction among projectors may vary, since color balance may , however, see tiny black points and/or bright 8 Precautions points (red, blue, or green) that has high ...
Operating Instructions
Page 14
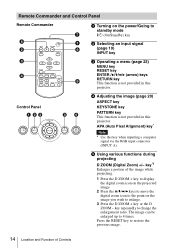
APA (Auto Pixel Alignment) key* Note * Use this projector. e Using various functions during projecting D ZOOM (Digital Zoom) +/- Control Panel 1 23 36 d Adjusting the image (page 20) ASPECT key KEYSTONE key PATTERN key This ...RETURN RESET key 4 ASPECT KEYSTONE PATTERN PIC MUTING D ZOOM VOLUME FREEZE AUDIO MUTING 5 ENTER /V/v/B/b (arrow) keys RETURN key This function is not provided in this projector. key*1 Enlarges a portion of Controls Remote Commander and Control Panel Remote Commander 4 2 INPUT APA ECO MODE MENU RESET a Turning on the image you wish to...
APA (Auto Pixel Alignment) key* Note * Use this projector. e Using various functions during projecting D ZOOM (Digital Zoom) +/- Control Panel 1 23 36 d Adjusting the image (page 20) ASPECT key KEYSTONE key PATTERN key This ...RETURN RESET key 4 ASPECT KEYSTONE PATTERN PIC MUTING D ZOOM VOLUME FREEZE AUDIO MUTING 5 ENTER /V/v/B/b (arrow) keys RETURN key This function is not provided in this projector. key*1 Enlarges a portion of Controls Remote Commander and Control Panel Remote Commander 4 2 INPUT APA ECO MODE MENU RESET a Turning on the image you wish to...
Operating Instructions
Page 15
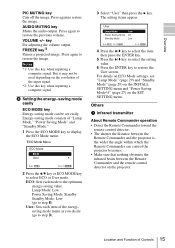
... User: Sets each mode to restore the User screen. f Setting the energy-saving mode easily ECO MODE key Energy-saving mode can control the projector becomes. • Make sure that nothing obstructs the infrared beam between the Remote Commander and the remote control detector on the... Commander operation • Direct the Remote Commander toward the remote control detector. • The shorter the distance between the Remote Commander and the projector is, the wider the angle within which the Remote Commander can be used depending on the SET SETTING menu. Press again to display the ECO...
... User: Sets each mode to restore the User screen. f Setting the energy-saving mode easily ECO MODE key Energy-saving mode can control the projector becomes. • Make sure that nothing obstructs the infrared beam between the Remote Commander and the remote control detector on the... Commander operation • Direct the Remote Commander toward the remote control detector. • The shorter the distance between the Remote Commander and the projector is, the wider the angle within which the Remote Commander can be used depending on the SET SETTING menu. Press again to display the ECO...

Operating Instructions
Page 16
... • Make sure all the equipment is powered off when connecting the projector. • Use the proper cables for the external monitor. 16 Connecting the Projector When pulling out a cable, be sure to grip it by the plug, not the cable itself. • For more information, refer also to 1280 × ...
... • Make sure all the equipment is powered off when connecting the projector. • Use the proper cables for the external monitor. 16 Connecting the Projector When pulling out a cable, be sure to grip it by the plug, not the cable itself. • For more information, refer also to 1280 × ...
Operating Instructions
Page 17
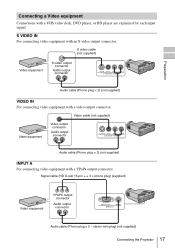
... connecting video equipment with a VHS video deck, DVD player, or BD player are explained for each input signal. stereo mini plug) (not supplied) Connecting the Projector 17 Signal cable (HD D-sub 15-pin y 3 × phono plug) (supplied) Video equipment YPBPR output connector Audio output connector Audio cable (Phono plug × 2 - Preparation...
... connecting video equipment with a VHS video deck, DVD player, or BD player are explained for each input signal. stereo mini plug) (not supplied) Connecting the Projector 17 Signal cable (HD D-sub 15-pin y 3 × phono plug) (supplied) Video equipment YPBPR output connector Audio output connector Audio cable (Phono plug × 2 - Preparation...
Operating Instructions
Page 18
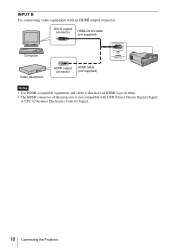
DVI-D output connector HDMI-DVI-D cable (not supplied) Computer Video equipment HDMI output connector HDMI cable (not supplied) Notes • Use HDMI-compatible equipment and cable(s) that have an HDMI logo on them. • The HDMI connector of this projector is not compatible with an HDMI output connector. INPUT B For connecting video equipment with DSD (Direct Stream Digital) Signal or CEC (Consumer Electronics Control) Signal. 18 Connecting the Projector
DVI-D output connector HDMI-DVI-D cable (not supplied) Computer Video equipment HDMI output connector HDMI cable (not supplied) Notes • Use HDMI-compatible equipment and cable(s) that have an HDMI logo on them. • The HDMI connector of this projector is not compatible with an HDMI output connector. INPUT B For connecting video equipment with DSD (Direct Stream Digital) Signal or CEC (Consumer Electronics Control) Signal. 18 Connecting the Projector

Operating Instructions
Page 19
...3 Press ?/1 to turn on the unit. 4 Turn on the type of computer. (Example) + 7 Adjust the focus and position of a projected image depends on the projector, the input signal switches. Projecting an Image 19 How to switch the computer to output to external display by changing your computer's setting. Each time... you press the INPUT key on the distance between the projector and screen. Press the INPUT key repeatedly to select an image to be projected. 6 Switch your computer to output to the...
...3 Press ?/1 to turn on the unit. 4 Turn on the type of computer. (Example) + 7 Adjust the focus and position of a projected image depends on the projector, the input signal switches. Projecting an Image 19 How to switch the computer to output to external display by changing your computer's setting. Each time... you press the INPUT key on the distance between the projector and screen. Press the INPUT key repeatedly to select an image to be projected. 6 Switch your computer to output to the...
Operating Instructions
Page 20
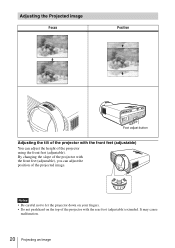
It may cause malfunction. 20 Projecting an Image By changing the slope of the projector with the rear foot (adjustable) extended. Notes • Be careful not to let the projector down on your fingers. • Do not push hard on the top of the projector with the front feet (adjustable), you can adjust the height of the projector using the front feet (adjustable). Adjusting the Projected image Focus Position Foot adjust button Adjusting the tilt of the projector with the front feet (adjustable) You can adjust the position of the projected image.
It may cause malfunction. 20 Projecting an Image By changing the slope of the projector with the rear foot (adjustable) extended. Notes • Be careful not to let the projector down on your fingers. • Do not push hard on the top of the projector with the front feet (adjustable), you can adjust the height of the projector using the front feet (adjustable). Adjusting the Projected image Focus Position Foot adjust button Adjusting the tilt of the projector with the front feet (adjustable) You can adjust the position of the projected image.
Operating Instructions
Page 25
... legally protected. • Depending on the setting item. *4: Available when a video signal is input from the YPBPR input connector (INPUT A). *3: • Note that if the projector is input Normal: Displays the image with an aspect ratio fixed to "On," the outer edges of the picture will be displayed in some other...
... legally protected. • Depending on the setting item. *4: Available when a video signal is input from the YPBPR input connector (INPUT A). *3: • Note that if the projector is input Normal: Displays the image with an aspect ratio fixed to "On," the outer edges of the picture will be displayed in some other...
Operating Instructions
Page 27
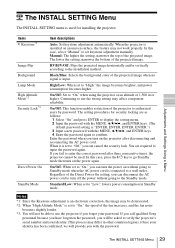
... menu is used for setting various functions of input signal. It indicates the input channel when the power is turned on the type of the projector. c The projector goes to "Off." When replacing the lamp, resets the lamp timer (page 35). Notes *1: Executes APA when a computer signal is selected...reduced if no signal is input.*1 *2 On/Off: When set to Standby mode if no signal is pressed. However, you do not want the projector to enter Standby mode automatically, set to "On," executes APA automatically when a signal is input for approximately 10 seconds during power on . •...
... menu is used for setting various functions of input signal. It indicates the input channel when the power is turned on the type of the projector. c The projector goes to "Off." When replacing the lamp, resets the lamp timer (page 35). Notes *1: Executes APA when a computer signal is selected...reduced if no signal is input.*1 *2 On/Off: When set to Standby mode if no signal is pressed. However, you do not want the projector to enter Standby mode automatically, set to "On," executes APA automatically when a signal is input for approximately 10 seconds during power on . •...
Operating Instructions
Page 28
... Start Up Image Item descriptions On: All on -screen displays. Top Left/Bottom Left/Center/Top Right/Bottom Right: Selects the display position of the projector. 28 The MENU SETTING Menu Off: Turn off the on-screen displays except for the operations by using the menu or the Remote Commander. On...
... Start Up Image Item descriptions On: All on -screen displays. Top Left/Bottom Left/Center/Top Right/Bottom Right: Selects the display position of the projector. 28 The MENU SETTING Menu Off: Turn off the on-screen displays except for the operations by using the menu or the Remote Commander. On...
Operating Instructions
Page 29
...process may affect component reliability. Regardless of the Direct Power On setting, you fail to the Standby mode. If you call qualified Sony personnel because you have forgotten the password, you will provide you turn on an uneven surface, the feature may be deteriorated. *2: ...When "High Altitude Mode" is set keystone adjustment manually. Continuing to authorized users by password. When the projector is "ENTER, ENTER, ENTER, ENTER.") 3 Input a new password with the MENU, V/v/B/b, and ENTER keys. 4 Enter the password again to the...
...process may affect component reliability. Regardless of the Direct Power On setting, you fail to the Standby mode. If you call qualified Sony personnel because you have forgotten the password, you will provide you turn on an uneven surface, the feature may be deteriorated. *2: ...When "High Altitude Mode" is set keystone adjustment manually. Continuing to authorized users by password. When the projector is "ENTER, ENTER, ENTER, ENTER.") 3 Input a new password with the MENU, V/v/B/b, and ENTER keys. 4 Enter the password again to the...
Operating Instructions
Page 30
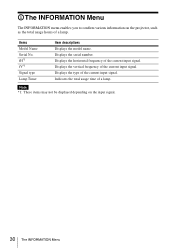
... type Lamp Timer Item descriptions Displays the model name. Displays the vertical frequency of a lamp. Note *1: These items may not be displayed depending on the projector, such as the total usage hours of a lamp. Indicates the total usage time of the current input signal. Displays the horizontal frequency of the current...
... type Lamp Timer Item descriptions Displays the model name. Displays the vertical frequency of a lamp. Note *1: These items may not be displayed depending on the projector, such as the total usage hours of a lamp. Indicates the total usage time of the current input signal. Displays the horizontal frequency of the current...
Operating Instructions
Page 31
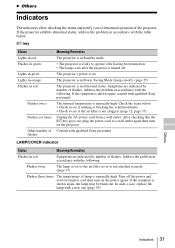
... cover or the air filter cover is not attached securely. (page 37) Flashes three times The temperature of flashes Meaning/Remedies The projector is in accordance with qualified Sony personnel. Turn off the power and wait for lamp to see if the air filter is shown again, the lamp may be burnt...flashes. After checking that the ?/1 key goes out, plug the power cord to operate after having been turned on. • The lamp cools after the projector is on the projector. In such a case, replace the lamp with qualified Sony personnel. The projector's power is turned off ). (page 27) The...
... cover or the air filter cover is not attached securely. (page 37) Flashes three times The temperature of flashes Meaning/Remedies The projector is in accordance with qualified Sony personnel. Turn off the power and wait for lamp to see if the air filter is shown again, the lamp may be burnt...flashes. After checking that the ?/1 key goes out, plug the power cord to operate after having been turned on. • The lamp cools after the projector is on the projector. In such a case, replace the lamp with qualified Sony personnel. The projector's power is turned off ). (page 27) The...

Operating Instructions
Page 32
Lamp off in accordance with a new one for signals supported by the projector. message appears whenever you replace the lamp and reset the lamp timer. Set "Input-A Signal Sel." Not applicable! Message Meaning/Remedy High temp.! Frequency is ...
Lamp off in accordance with a new one for signals supported by the projector. message appears whenever you replace the lamp and reset the lamp timer. Set "Input-A Signal Sel." Not applicable! Message Meaning/Remedy High temp.! Frequency is ...
Operating Instructions
Page 33
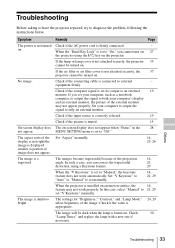
... display does not appear when "Status" in the 28 not appear. The image is a trapezoid. Others Troubleshooting 33 Troubleshooting Before asking to have the projector repaired, try to external - If the air filter or air filter cover is set "V Keystone" manually. No image. Set "Aspect" manually. 14...to both your computer to output the signal to an external 19 monitor. If you set manually. 14, 21, 29 When the projector is connected to diagnose the problem, following the instructions below. The settings for output to only an external monitor. Check if the ...
... display does not appear when "Status" in the 28 not appear. The image is a trapezoid. Others Troubleshooting 33 Troubleshooting Before asking to have the projector repaired, try to external - If the air filter or air filter cover is set "V Keystone" manually. No image. Set "Aspect" manually. 14...to both your computer to output the signal to an external 19 monitor. If you set manually. 14, 21, 29 When the projector is connected to diagnose the problem, following the instructions below. The settings for output to only an external monitor. Check if the ...
Operating Instructions
Page 34
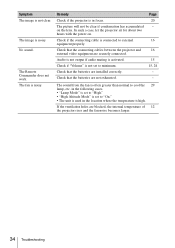
... clear. Check if "Volume" is used in focus. Page 20 - 16 16 15 15, 24 - - Symptom The image is activated. In such a case, let the projector sit for about two hours with the power on the lens. Check if the connecting cable is connected to "On." • The unit is not... set to external equipment properly. If the ventilation holes are not exhausted. The image is noisy. The fan is noisy. Remedy Check if the projector is in the location where the temperature is set to cool the 29 lamp, etc. Check that the batteries are securely connected. Check that the...
... clear. Check if "Volume" is used in focus. Page 20 - 16 16 15 15, 24 - - Symptom The image is activated. In such a case, let the projector sit for about two hours with the power on the lens. Check if the connecting cable is connected to "On." • The unit is not... set to external equipment properly. If the ventilation holes are not exhausted. The image is noisy. The fan is noisy. Remedy Check if the projector is in the location where the temperature is set to cool the 29 lamp, etc. Check that the batteries are securely connected. Check that the...


