Operating Instructions
Page 2
... 33913 Telephone No.: 800-686-7669 The number below is intended to alert the user to persons. For the customers in this manual could void your authority to operate this equipment does cause harmful interference to radio or television reception, which the receiver is subject to...to try to correct the interference by one or more of electric shock to the presence of Conformity Trade Name: SONY Model No.: VPL-CS6/VPL-CX6/VPL-EX1 Responsible Party: Sony Electronics Inc. Connect the equipment into an outlet on , the user is no guarantee that any interference received, including...
... 33913 Telephone No.: 800-686-7669 The number below is intended to alert the user to persons. For the customers in this manual could void your authority to operate this equipment does cause harmful interference to radio or television reception, which the receiver is subject to...to try to correct the interference by one or more of electric shock to the presence of Conformity Trade Name: SONY Model No.: VPL-CS6/VPL-CX6/VPL-EX1 Responsible Party: Sony Electronics Inc. Connect the equipment into an outlet on , the user is no guarantee that any interference received, including...
Operating Instructions
Page 14
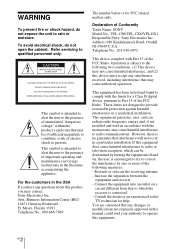
.... For details, see "To connect an IBM PC/ AT compatible computer" on a mouse. This icon indicates the point you adjust the picture manually. 3 PIC MUTING key Used to activate the FUNCTION keys. This will enhance your presentation. Press again to restore the picture. 4 ENTER key ... as mouse buttons of a computer only when the projector is displayed on the kinds of a computer connected via USB with the projector. • You can open a file on page 26. 6 FUNCTION 1, 2 keys (VPL-CX6 only) When you connect the projector with the application software. This key functions when the...
.... For details, see "To connect an IBM PC/ AT compatible computer" on a mouse. This icon indicates the point you adjust the picture manually. 3 PIC MUTING key Used to activate the FUNCTION keys. This will enhance your presentation. Press again to restore the picture. 4 ENTER key ... as mouse buttons of a computer only when the projector is displayed on the kinds of a computer connected via USB with the projector. • You can open a file on page 26. 6 FUNCTION 1, 2 keys (VPL-CX6 only) When you connect the projector with the application software. This key functions when the...

Operating Instructions
Page 15
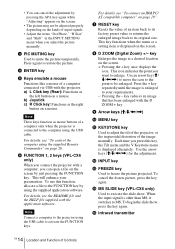
Overview To install batteries 1 Push and slide to install the battery from the # side. 2 Replace the lid. Be sure to open the lid, then install the two size AA (R6) batteries (supplied) with the correct polarity. For VPL-EX1 1 I / 1 (on/standby) key 2 ENTER/arrow key (M/m/ While pressing the lid, slide it.
Overview To install batteries 1 Push and slide to install the battery from the # side. 2 Replace the lid. Be sure to open the lid, then install the two size AA (R6) batteries (supplied) with the correct polarity. For VPL-EX1 1 I / 1 (on/standby) key 2 ENTER/arrow key (M/m/ While pressing the lid, slide it.
Operating Instructions
Page 18
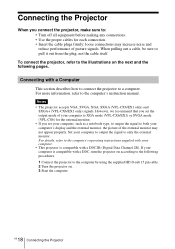
... 2B). For details, refer to the computer's instruction manual. When pulling out a cable, be sure to pull it out from the plug, not the cable itself To connect the projector, refer to a computer. Connecting with a DDC, turn the projector on the next and the following procedures. 1 Connect ...computer. 18 GB Connecting the Projector Notes • The projector accepts VGA, SVGA, XGA, SXGA (VPL-CX6/EX1 only) and SXGA+ (VPL-CX6/EX1 only) signals. However, we recommend that you set the output mode of your computer to XGA mode (VPL-CX6/EX1) or SVGA mode (VPL-CS6) for each connection. •...
... 2B). For details, refer to the computer's instruction manual. When pulling out a cable, be sure to pull it out from the plug, not the cable itself To connect the projector, refer to a computer. Connecting with a DDC, turn the projector on the next and the following procedures. 1 Connect ...computer. 18 GB Connecting the Projector Notes • The projector accepts VGA, SVGA, XGA, SXGA (VPL-CX6/EX1 only) and SXGA+ (VPL-CX6/EX1 only) signals. However, we recommend that you set the output mode of your computer to XGA mode (VPL-CX6/EX1) or SVGA mode (VPL-CS6) for each connection. •...

Operating Instructions
Page 20
... Macintosh computer using the USB cable to S video output VCR 20 GB Connecting the Projector Note The supplied software does not run on Macintosh computer. to audio output to the projector, wireless mouse functions become available. When you are connecting. For more information, refer to the instruction manuals of pins, use a commercially available plug...
... Macintosh computer using the USB cable to S video output VCR 20 GB Connecting the Projector Note The supplied software does not run on Macintosh computer. to audio output to the projector, wireless mouse functions become available. When you are connecting. For more information, refer to the instruction manuals of pins, use a commercially available plug...
Operating Instructions
Page 25
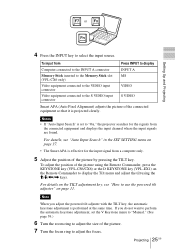
...) Video equipment connected to the VIDEO input connector Video equipment connected to the S VIDEO input connector VIDEO S VIDEO Smart APA (Auto Pixel Alignment) adjusts the picture of the picture using the Remote Commander, press the KEYSTONE key (VPL-CS6/CX6) or the D KEYSTONE key (VPL-EX1) on page 37. • The Smart APA is set to "On," the projector searches...
...) Video equipment connected to the VIDEO input connector Video equipment connected to the S VIDEO input connector VIDEO S VIDEO Smart APA (Auto Pixel Alignment) adjusts the picture of the picture using the Remote Commander, press the KEYSTONE key (VPL-CS6/CX6) or the D KEYSTONE key (VPL-EX1) on page 37. • The Smart APA is set to "On," the projector searches...
Operating Instructions
Page 26
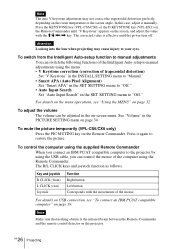
Note The auto V keystone adjustment may not correct the trapezoidal distortion perfectly, depending on the screen, and adjust the value with the M/m/ In this case, adjust it manually. Press the KEYSTONE key (VPL-CS6/CX6) or the D KEYSTONE key (VPL-EX1) on the Remote Commander until "V Keystone" appears on the room temperature or the screen angle.
Note The auto V keystone adjustment may not correct the trapezoidal distortion perfectly, depending on the screen, and adjust the value with the M/m/ In this case, adjust it manually. Press the KEYSTONE key (VPL-CS6/CX6) or the D KEYSTONE key (VPL-EX1) on the Remote Commander until "V Keystone" appears on the room temperature or the screen angle.

Operating Instructions
Page 39
...the trapezoidal distortion caused by the projection angle. When the top of the trapezoid is used for manual correction using the projector at an altitude of the trapezoid is input to the projector. Lamp Mode Sets the lamp brightness in the projection. Note The auto V Keystone adjustment may ...when using the < or , key. Pressing the f on the TILT adjustment key or M/, key on the Remote Commander, the more the projector tilts and the higher the position of the projected picture. Standard: Reduces fan noise and power consumption. Security Lock Turns on page 27. 39...
...the trapezoidal distortion caused by the projection angle. When the top of the trapezoid is used for manual correction using the projector at an altitude of the trapezoid is input to the projector. Lamp Mode Sets the lamp brightness in the projection. Note The auto V Keystone adjustment may ...when using the < or , key. Pressing the f on the TILT adjustment key or M/, key on the Remote Commander, the more the projector tilts and the higher the position of the projected picture. Standard: Reduces fan noise and power consumption. Security Lock Turns on page 27. 39...
Operating Instructions
Page 48
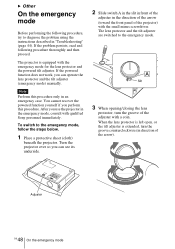
... are switched to the emergency mode, follow the steps below. 1 Place a protective sheet (cloth) beneath the projector. When the lens protector is left open, or the tilt adjuster is equipped with qualified Sony personnel immediately. If the problem persists, read and following procedure, try to diagnose the problem using the instructions... direction of the arrow (toward the front panel of the arrow). After you can operate the lens protector and the tilt adjuster (emergency mode) manually. The projector is extended, turn the groove of the adjuster with the small minus screwdriver.
... are switched to the emergency mode, follow the steps below. 1 Place a protective sheet (cloth) beneath the projector. When the lens protector is left open, or the tilt adjuster is equipped with qualified Sony personnel immediately. If the problem persists, read and following procedure, try to diagnose the problem using the instructions... direction of the arrow (toward the front panel of the arrow). After you can operate the lens protector and the tilt adjuster (emergency mode) manually. The projector is extended, turn the groove of the adjuster with the small minus screwdriver.
Operating Instructions
Page 49
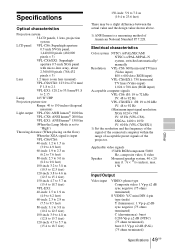
...method of the projector. Electrical characteristics Color system NTSC3.58/PAL/SECAM/ NTSC4.43/PAL-M/PAL-N system, switched automatically/ manually Resolution VPL-CS6: 600 horizontal TV lines (Video input) 800 × 600 dots (RGB input) VPL-CX6/EX1: 750 horizontal TV lines (Video input) 1,024 ...±2 dB (PAL) (75 ohms terminated) Specifications 49 GB Other Specifications Optical characteristics Projection system 3 LCD panels, 1 lens, projection system LCD panel VPL-CS6: Superhigh-aperture 0.7-inch SVGA panel, 1,440,000 pixels (480,000 pixels × 3) VPL-CX6/EX1: Superhigh-
...method of the projector. Electrical characteristics Color system NTSC3.58/PAL/SECAM/ NTSC4.43/PAL-M/PAL-N system, switched automatically/ manually Resolution VPL-CS6: 600 horizontal TV lines (Video input) 800 × 600 dots (RGB input) VPL-CX6/EX1: 750 horizontal TV lines (Video input) 1,024 ...±2 dB (PAL) (75 ohms terminated) Specifications 49 GB Other Specifications Optical characteristics Projection system 3 LCD panels, 1 lens, projection system LCD panel VPL-CS6: Superhigh-aperture 0.7-inch SVGA panel, 1,440,000 pixels (480,000 pixels × 3) VPL-CX6/EX1: Superhigh-

