Operating Instructions
Page 8
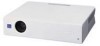
... projection. When transporting the unit stored in High Altitude • When using something to shock, as VGA, SVGA, XGA, SXGA1) and SXGA+1) signals, which all other connecting cables, and store the supplied accessories in scan the projector at an altitude of 1,500 m or higher, turn on "High Accepts various input signals Altitude Mode" in any way other than placing on the distance between the screen and the projector...
... projection. When transporting the unit stored in High Altitude • When using something to shock, as VGA, SVGA, XGA, SXGA1) and SXGA+1) signals, which all other connecting cables, and store the supplied accessories in scan the projector at an altitude of 1,500 m or higher, turn on "High Accepts various input signals Altitude Mode" in any way other than placing on the distance between the screen and the projector...
Operating Instructions
Page 9
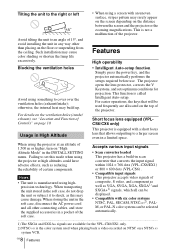
... input signals. 4) The Remote Commander available for the wireless mouse and the USB cable are supplied with the VPL-CS6/CX6. 5) The application software (Projector Station) can project images from a computer operated with external equipment This projector is disconnected. For VPL-CS6: Three superhigh-aperture 0.7-inch SVGA panels with micro-lens array, provide a resolution of input signals. Security lock By setting a password, you can also control the projector by using the application software (Projector Station)5) supplied with the projector from an external signal source...
... input signals. 4) The Remote Commander available for the wireless mouse and the USB cable are supplied with the VPL-CS6/CX6. 5) The application software (Projector Station) can project images from a computer operated with external equipment This projector is disconnected. For VPL-CS6: Three superhigh-aperture 0.7-inch SVGA panels with micro-lens array, provide a resolution of input signals. Security lock By setting a password, you can also control the projector by using the application software (Projector Station)5) supplied with the projector from an external signal source...

Operating Instructions
Page 10
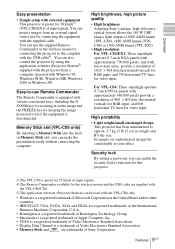
.... Lights in red when a AC power cord is turned on page 11. 4 INPUT key Selects the input signal. When turning off . Lights in green while the cooling fan runs after the power is turned off with the I / 1 key. Flashes in green when the power is plugged into a wall outlet. The fan runs for turning off the power" on . Each time you press the key, the input signal switches as follows: INPUT A t MS t VIDEO t S VIDEO (VPL-CX6 only) 5 Lens protector (lens cover) The lens...
.... Lights in red when a AC power cord is turned on page 11. 4 INPUT key Selects the input signal. When turning off . Lights in green while the cooling fan runs after the power is turned off with the I / 1 key. Flashes in green when the power is plugged into a wall outlet. The fan runs for turning off the power" on . Each time you press the key, the input signal switches as follows: INPUT A t MS t VIDEO t S VIDEO (VPL-CX6 only) 5 Lens protector (lens cover) The lens...

Operating Instructions
Page 11
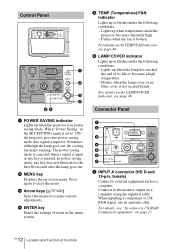
...) Turn the adjuster to an optional security cable (Kensington's). qf Speaker qg Security lock Connects to the right or left for minor tilt adjustment of the projected picture. How to use the powered tilt adjuster To adjust the height Adjust the height of the projector. qj Zoom ring Adjusts the picture size. The adjuster stops at its previously adjusted position. Web page address: http://www.kensington.com/ qh Focus ring Adjusts the picture focus. Powered tilt adjuster...
...) Turn the adjuster to an optional security cable (Kensington's). qf Speaker qg Security lock Connects to the right or left for minor tilt adjustment of the projected picture. How to use the powered tilt adjuster To adjust the height Adjust the height of the projector. qj Zoom ring Adjusts the picture size. The adjuster stops at its previously adjusted position. Web page address: http://www.kensington.com/ qh Focus ring Adjusts the picture focus. Powered tilt adjuster...
Operating Instructions
Page 12
... Displays the on a computer using the supplied cable. For details on page 21. 12 GB Location and Function of items in the menu system. 5 TEMP (Temperature)/FAN indicator Lights up or flashes under the following conditions: - Connector Panel 1 2 3 4 5 PRO AUDIO 6 ACCESS 7 INPUT A POWER SAVING MENU VIDEO S VIDEO TEMP/FAN PUSH ENTER LAMP/COVER 1 INPUT A connector (HD D-sub 15-pin, female) Connect to "ON," the projector goes into power saving mode if no signal is pressed. When inputting a component or 15k RGB signal, use...
... Displays the on a computer using the supplied cable. For details on page 21. 12 GB Location and Function of items in the menu system. 5 TEMP (Temperature)/FAN indicator Lights up or flashes under the following conditions: - Connector Panel 1 2 3 4 5 PRO AUDIO 6 ACCESS 7 INPUT A POWER SAVING MENU VIDEO S VIDEO TEMP/FAN PUSH ENTER LAMP/COVER 1 INPUT A connector (HD D-sub 15-pin, female) Connect to "ON," the projector goes into power saving mode if no signal is pressed. When inputting a component or 15k RGB signal, use...

Operating Instructions
Page 13
... the attached "Operating Instructions" for upstream, 4-pin) Connect to the USB connector on the screen. When you connect the projector to the computer, you can control the mouse function with the supplied Remote Commander. (When you use the VPL-EX1, an optional Remote Commander is required to control the mouse function with a Remote Commander.) The supplied application software (VPL-CX6 only) can be installed in the SET SETTING menu is input from a computer. Do not remove the Memory...
... the attached "Operating Instructions" for upstream, 4-pin) Connect to the USB connector on the screen. When you connect the projector to the computer, you can control the mouse function with the supplied Remote Commander. (When you use the VPL-EX1, an optional Remote Commander is required to control the mouse function with a Remote Commander.) The supplied application software (VPL-CX6 only) can be installed in the SET SETTING menu is input from a computer. Do not remove the Memory...
Operating Instructions
Page 14
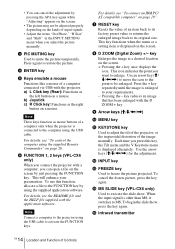
... on the screen. 8 D ZOOM (Digital Zoom) +/- Note These keys function as mouse buttons of a computer only when the projector is displayed on the kinds of input signals. • Adjust the items "Dot Phase," "H Size" and "Shift" in the INPUT SETTING menu when you connect the projector with the application software. Note Connect a computer to the projector using the USB cable. This icon indicates the point you can cancel the adjustment by using the supplied Remote Commander" on the screen by...
... on the screen. 8 D ZOOM (Digital Zoom) +/- Note These keys function as mouse buttons of a computer only when the projector is displayed on the kinds of input signals. • Adjust the items "Dot Phase," "H Size" and "Shift" in the INPUT SETTING menu when you connect the projector with the application software. Note Connect a computer to the projector using the USB cable. This icon indicates the point you can cancel the adjustment by using the supplied Remote Commander" on the screen by...
Operating Instructions
Page 19
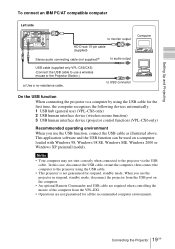
.... Setting Up and Projecting To connect an IBM PC/AT compatible computer Left side PRO AUDIO ACCESS INPUT A POWER SAVING MENU VIDEO S VIDEO TEMP/FAN PUSH ENTER LAMP/COVER to monitor output HD D-sub 15-pin cable (supplied) Computer Stereo audio connecting cable (not supplied)a) to audio output USB cable (supplied only VPL-CS6/CX6) (Connect the USB cable to use the projector in suspend, standby mode, disconnect the projector from the USB port on a computer loaded with Windows 98, Windows 98 SE, Windows ME, Windows 2000 or Windows XP preinstall models...
.... Setting Up and Projecting To connect an IBM PC/AT compatible computer Left side PRO AUDIO ACCESS INPUT A POWER SAVING MENU VIDEO S VIDEO TEMP/FAN PUSH ENTER LAMP/COVER to monitor output HD D-sub 15-pin cable (supplied) Computer Stereo audio connecting cable (not supplied)a) to audio output USB cable (supplied only VPL-CS6/CX6) (Connect the USB cable to use the projector in suspend, standby mode, disconnect the projector from the USB port on a computer loaded with Windows 98, Windows 98 SE, Windows ME, Windows 2000 or Windows XP preinstall models...
Operating Instructions
Page 24
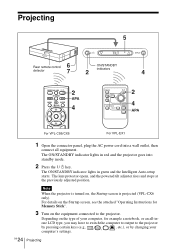
... Intelligent Auto-setup starts. The ON/STANDBY indicator lights in red and the projector goes into standby mode. 2 Press the I / 1 KEYSTONE INPUT APA MENU PIC ENTER MUTING For VPL-CS6/CX6 For VPL-EX1 1 Open the connector panel, plug the AC power cord into a wall outlet, then connect all -inone LCD type, you may have to switch the computer to output to the projector. Depending on the type of your computer, for Memory Stick". 3 Turn...
... Intelligent Auto-setup starts. The ON/STANDBY indicator lights in red and the projector goes into standby mode. 2 Press the I / 1 KEYSTONE INPUT APA MENU PIC ENTER MUTING For VPL-CS6/CX6 For VPL-EX1 1 Open the connector panel, plug the AC power cord into a wall outlet, then connect all -inone LCD type, you may have to switch the computer to output to the projector. Depending on the type of your computer, for Memory Stick". 3 Turn...
Operating Instructions
Page 26
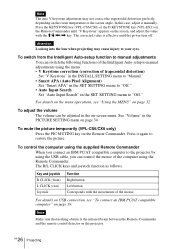
In this case, adjust it manually. Note The auto V keystone adjustment may not correct the trapezoidal distortion perfectly, depending on the screen, and adjust the value with the M/m/ Press the KEYSTONE key (VPL-CS6/CX6) or the D KEYSTONE key (VPL-EX1) on the Remote Commander until "V Keystone" appears on the room temperature or the screen angle.
In this case, adjust it manually. Note The auto V keystone adjustment may not correct the trapezoidal distortion perfectly, depending on the screen, and adjust the value with the M/m/ Press the KEYSTONE key (VPL-CS6/CX6) or the D KEYSTONE key (VPL-EX1) on the Remote Commander until "V Keystone" appears on the room temperature or the screen angle.
Operating Instructions
Page 27
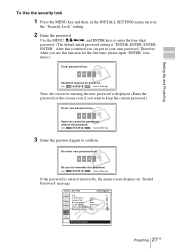
Setting Up and Projecting To Use the security lock 1 Press the MENU key and then, in the INSTALL SETTING menu, turn on the "Security Lock" setting. 2 Enter the password. Use the MENU, M/m/
Setting Up and Projecting To Use the security lock 1 Press the MENU key and then, in the INSTALL SETTING menu, turn on the "Security Lock" setting. 2 Enter the password. Use the MENU, M/m/

Operating Instructions
Page 36
... data for INPUT-A into which are displayed in the INPUT SETTING menu, it will not be displayed (VPLCX6/EX1). • When SVGA or XGA signal is registered to the left. Adjust the picture further for an unpreset input signal. When a preset signal is input) INPUT SETTING SIGNAL SETTING Input A Dot Phase: H Size: Shift: 24 1504 H: 181 V: 34 Dot Phase Adjusts the dot phase of the LCD. This projector has 20 types of preset data (for VPL-CX6/EX1)(25types for VPL...
... data for INPUT-A into which are displayed in the INPUT SETTING menu, it will not be displayed (VPLCX6/EX1). • When SVGA or XGA signal is registered to the left. Adjust the picture further for an unpreset input signal. When a preset signal is input) INPUT SETTING SIGNAL SETTING Input A Dot Phase: H Size: Shift: 24 1504 H: 181 V: 34 Dot Phase Adjusts the dot phase of the LCD. This projector has 20 types of preset data (for VPL-CX6/EX1)(25types for VPL...
Operating Instructions
Page 37
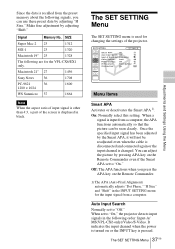
... 4:3, a part of the screen is used for changing the settings of the projector. When a signal is input from a computer, the APA functions automatically so that the picture can use these preset data by pressing APA key on the Remote Commander even if the Smart APA set to "Off." The SET SETTING Menu The SET SETTING menu is displayed in the following order: Input-A/ MS(VPL-CX6 only)/Video/S-Video. It indicates the input channel when the power is turned on...
... 4:3, a part of the screen is used for changing the settings of the projector. When a signal is input from a computer, the APA functions automatically so that the picture can use these preset data by pressing APA key on the Remote Commander even if the Smart APA set to "Off." The SET SETTING Menu The SET SETTING menu is displayed in the following order: Input-A/ MS(VPL-CX6 only)/Video/S-Video. It indicates the input channel when the power is turned on...
Operating Instructions
Page 38
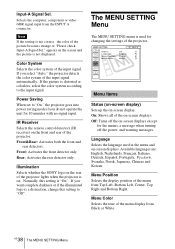
... of the menu display from Black or White. Selects the computer, component or video GBR signal input from Top Left, Bottom Left, Center, Top Right and Bottom Right. If the picture is used in the menu and on . Off: Turns off the power, and warning messages. Normally, this setting to the input signal. If you select "Auto," the projector detects the color system of the projector. GB 38 The MENU SETTING Menu Input-A Signal Sel...
... of the menu display from Black or White. Selects the computer, component or video GBR signal input from Top Left, Bottom Left, Center, Top Right and Bottom Right. If the picture is used in the menu and on . Off: Turns off the power, and warning messages. Normally, this setting to the input signal. If you select "Auto," the projector detects the color system of the projector. GB 38 The MENU SETTING Menu Input-A Signal Sel...

Operating Instructions
Page 39
... color of the screen when no signal is used for manual correction using the projector at an altitude of the projector. Adjustments and Settings Using the Menu The INSTALL SETTING Menu The INSTALL SETTING menu is input to the projector. High: Illuminates the projected image brightly. Note The auto V Keystone adjustment may not correct the trapezoidal distortion perfectly, depending on page 27. 39 The INSTALL SETTING Menu GB When the top of the projected picture. Standard: Reduces fan noise and power consumption. Security Lock Turns...
... color of the screen when no signal is used for manual correction using the projector at an altitude of the projector. Adjustments and Settings Using the Menu The INSTALL SETTING Menu The INSTALL SETTING menu is input to the projector. High: Illuminates the projected image brightly. Note The auto V Keystone adjustment may not correct the trapezoidal distortion perfectly, depending on page 27. 39 The INSTALL SETTING Menu GB When the top of the projected picture. Standard: Reduces fan noise and power consumption. Security Lock Turns...

Operating Instructions
Page 41
... least an hour for the lamp to cool. Notes • If the lamp breaks, consult with the Phillips screwdriver. Turn the projector over . 2 Open the lamp cover by loosening a screw with the Phillips screwdriver (supplied with a new one in the following case. • When the lamp has burnt out or dims • "Please replace the LAMP." When replacing the lamp after using the projector Turn off the projector with the...
... least an hour for the lamp to cool. Notes • If the lamp breaks, consult with the Phillips screwdriver. Turn the projector over . 2 Open the lamp cover by loosening a screw with the Phillips screwdriver (supplied with a new one in the following case. • When the lamp has burnt out or dims • "Please replace the LAMP." When replacing the lamp after using the projector Turn off the projector with the...

Operating Instructions
Page 44
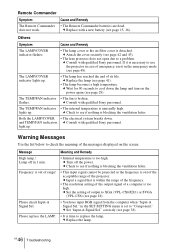
... TEMP/FAN indicators c Consult with qualified Sony personnel. c Check that the proper connections have been made (see page 18). • Noise may appear on the background depending on the combination of the numbers of dot input from the connector and numbers of pixel on the LCD panel. c Select the input source correctly using the following instructions. Picture Symptom No picture. GB 44 Troubleshooting If the problem persists, consult with the power...
... TEMP/FAN indicators c Consult with qualified Sony personnel. c Check that the proper connections have been made (see page 18). • Noise may appear on the background depending on the combination of the numbers of dot input from the connector and numbers of pixel on the LCD panel. c Select the input source correctly using the following instructions. Picture Symptom No picture. GB 44 Troubleshooting If the problem persists, consult with the power...
Operating Instructions
Page 46
... cover securely (see page 41). • The lamp becomes a high temperature. c Replace the lamp (see page 42 and 43). • The lens protector does not open due to a problem. The TEMP/FAN indicator • The fan is unusually high. Lamp off the power. c Turn off in the SET SETTING menu is set to cool down . c Input a signal that is blocking the ventilation holes. c Consult with qualified Sony personnel. c Wait for 90 seconds to "Component." flashes. c Check...
... cover securely (see page 41). • The lamp becomes a high temperature. c Replace the lamp (see page 42 and 43). • The lens protector does not open due to a problem. The TEMP/FAN indicator • The fan is unusually high. Lamp off the power. c Turn off in the SET SETTING menu is set to cool down . c Input a signal that is blocking the ventilation holes. c Consult with qualified Sony personnel. c Wait for 90 seconds to "Component." flashes. c Check...

Operating Instructions
Page 50
... (Application software) (VPL-CX6 only) (1) Soft case (1) AC power cord (1) Air filter (for replacement) Signal Cable SMF-402 (HD D-sub 15-pin (male) y 3 × phono type (male)) Screens 50-inch Portable Screen VPS50C1) Some of the items may not be available in some areas. Optional accessories Projector Lamp LMP-C150 (for replacement) (1) Operating Instructions (1) Quick Reference Card (1) Security Label (1) Design and specifications are subject to change without the projection parts) Mass...
... (Application software) (VPL-CX6 only) (1) Soft case (1) AC power cord (1) Air filter (for replacement) Signal Cable SMF-402 (HD D-sub 15-pin (male) y 3 × phono type (male)) Screens 50-inch Portable Screen VPS50C1) Some of the items may not be available in some areas. Optional accessories Projector Lamp LMP-C150 (for replacement) (1) Operating Instructions (1) Quick Reference Card (1) Security Label (1) Design and specifications are subject to change without the projection parts) Mass...

Operating Instructions
Page 54
...7 unsuitable installation .. 7 L Lamp Mode 39 Lamp replacement .......... 41 Lamp Timer 40 Language 38 selecting the menu language 22 Lens protector 10 Lithium battery 16 Location and function of controls connector panel .......... 12 control panel 12 rear/right side/bottom . 10 Remote Commander .. 13 top/front/left side ........ 10 M Menu clearing the menu display 33 INFORMATION Menu 40 INPUT SETTING menu 35 INSTALL SETTING menu 39 MENU SETTING menu 38 PICTURE SETTING menu 34 SET SETTING menu . 37 using the menu 32 Menu Color 38 Menu Position 38 Message caution 47 warning 46...
...7 unsuitable installation .. 7 L Lamp Mode 39 Lamp replacement .......... 41 Lamp Timer 40 Language 38 selecting the menu language 22 Lens protector 10 Lithium battery 16 Location and function of controls connector panel .......... 12 control panel 12 rear/right side/bottom . 10 Remote Commander .. 13 top/front/left side ........ 10 M Menu clearing the menu display 33 INFORMATION Menu 40 INPUT SETTING menu 35 INSTALL SETTING menu 39 MENU SETTING menu 38 PICTURE SETTING menu 34 SET SETTING menu . 37 using the menu 32 Menu Color 38 Menu Position 38 Message caution 47 warning 46...


