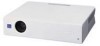

Operating Instructions
Page 6
... stains may be used for several days. • To disconnect the cord, pull it out by the plug. Use a cover over fluorescent lamps to have it checked by qualified personnel before operating it further. • Unplug the unit from the wall outlet while the cooling...on , and is put away automatically when the power is equipped with ventilation holes (intake) and ventilation holes (exhaust). On LCD data projector • The LCD data projector is manufactured using high-precision technology. You may occur, causing picture degradation or damage to be removed with a cloth lightly dampened...
... stains may be used for several days. • To disconnect the cord, pull it out by the plug. Use a cover over fluorescent lamps to have it checked by qualified personnel before operating it further. • Unplug the unit from the wall outlet while the cooling...on , and is put away automatically when the power is equipped with ventilation holes (intake) and ventilation holes (exhaust). On LCD data projector • The LCD data projector is manufactured using high-precision technology. You may occur, causing picture degradation or damage to be removed with a cloth lightly dampened...
Operating Instructions
Page 8
...lamp life excessively. Tilting the unit to the right or left Avoid tilting the unit to set this may cause damage. Usage in High Altitude • When using the projector...within 1024 × 768 dots (VPL-CX6/EX1) or 800 × 600 dots (VPL-CS6) . • Compatible input signals Notes This projector accepts video signals of certain components....cover over the ventilation holes (exhaust/intake); converter that will be selected automatically. Blocking the ventilation holes Avoid using highprecision technology. Short focus lens equipped (VPLCS6/CX6 only) This projector ...
...lamp life excessively. Tilting the unit to the right or left Avoid tilting the unit to set this may cause damage. Usage in High Altitude • When using the projector...within 1024 × 768 dots (VPL-CX6/EX1) or 800 × 600 dots (VPL-CS6) . • Compatible input signals Notes This projector accepts video signals of certain components....cover over the ventilation holes (exhaust/intake); converter that will be selected automatically. Blocking the ventilation holes Avoid using highprecision technology. Short focus lens equipped (VPLCS6/CX6 only) This projector ...

Operating Instructions
Page 10
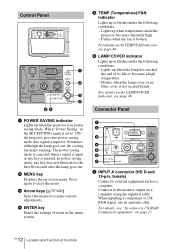
...of Controls Top/Front/Left Side TILT Rear/Right Side/Bottom 1 I / 1 (on/standby) key Turns on the projector when the projector is turned on. Flashes in standby mode. For details on the LAMP/COVER and the TEMP/FAN indicators, see on page 46. 3 TILT adjustment key For details, see "To turn on ... the power is turned off. Each time you press the key, the input signal switches as follows: INPUT A t MS t VIDEO t S VIDEO (VPL-CX6 only) 5 Lens protector (lens cover) The lens protector automatically opens when the power is turned off the power, see "How to use the powered tilt adjuster" on page...
...of Controls Top/Front/Left Side TILT Rear/Right Side/Bottom 1 I / 1 (on/standby) key Turns on the projector when the projector is turned on. Flashes in standby mode. For details on the LAMP/COVER and the TEMP/FAN indicators, see on page 46. 3 TILT adjustment key For details, see "To turn on ... the power is turned off. Each time you press the key, the input signal switches as follows: INPUT A t MS t VIDEO t S VIDEO (VPL-CX6 only) 5 Lens protector (lens cover) The lens protector automatically opens when the power is turned off the power, see "How to use the powered tilt adjuster" on page...

Operating Instructions
Page 11
.... 9 Rear remote control detector 0 Ventilation holes (intake) qa Ventilation holes (intake)/Lamp cover qs Powered tilt adjuster qd Adjuster (hind pad) Turn the adjuster to the right or left for minor tilt adjustment of the projector. You may cause the air coming out heat buildup. • To maintain optimal ... Security lock Connects to use the powered tilt adjuster To adjust the height Adjust the height of the projector as it may press the KEYSTONE key (VPL-CS6/CX6) or the D KEYSTONE key (VPL-EX1) on page 42. Web page address: http://www.kensington.com/ qh Focus ring Adjusts the ...
.... 9 Rear remote control detector 0 Ventilation holes (intake) qa Ventilation holes (intake)/Lamp cover qs Powered tilt adjuster qd Adjuster (hind pad) Turn the adjuster to the right or left for minor tilt adjustment of the projector. You may cause the air coming out heat buildup. • To maintain optimal ... Security lock Connects to use the powered tilt adjuster To adjust the height Adjust the height of the projector as it may press the KEYSTONE key (VPL-CS6/CX6) or the D KEYSTONE key (VPL-EX1) on page 42. Web page address: http://www.kensington.com/ qh Focus ring Adjusts the ...
Operating Instructions
Page 12
... 4 5 PRO AUDIO 6 ACCESS 7 INPUT A POWER SAVING MENU VIDEO S VIDEO TEMP/FAN PUSH ENTER LAMP/COVER 1 INPUT A connector (HD D-sub 15-pin, female) Connect to "ON," the projector goes into power saving mode if no signal is set to external equipment such as a computer. Fashes when...VIDEO S VIDEO TEMP/FAN PUSH ENTER LAMP/COVER PRO AUDIO ACCESS INPUT A 1 POWER SAVING MENU 2 PUSH ENTER VIDEO S VIDEO TEMP/FAN 3 LAMP/COVER 4 56 1 POWER SAVING indicator Lights up when temperature inside the projector becomes unusually high. - Although the lamp goes out, the cooling fan keeps ...
... 4 5 PRO AUDIO 6 ACCESS 7 INPUT A POWER SAVING MENU VIDEO S VIDEO TEMP/FAN PUSH ENTER LAMP/COVER 1 INPUT A connector (HD D-sub 15-pin, female) Connect to "ON," the projector goes into power saving mode if no signal is set to external equipment such as a computer. Fashes when...VIDEO S VIDEO TEMP/FAN PUSH ENTER LAMP/COVER PRO AUDIO ACCESS INPUT A 1 POWER SAVING MENU 2 PUSH ENTER VIDEO S VIDEO TEMP/FAN 3 LAMP/COVER 4 56 1 POWER SAVING indicator Lights up when temperature inside the projector becomes unusually high. - Although the lamp goes out, the cooling fan keeps ...
Operating Instructions
Page 19
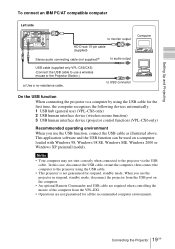
...(VPL-CX6 only) 2 USB human interface device (wireless mouse function) 3 USB human interface device (projector control function) (VPL-CX6 only) Recommended operating environment When you use the projector in suspend, standby mode, disconnect the projector from the VPL-EX1.... • Operations are not guaranteed for all the recommended computer environments. 19 Connecting the Projector GB Setting Up and Projecting To connect an IBM PC/AT compatible computer Left side PRO AUDIO ACCESS INPUT A POWER SAVING MENU VIDEO S VIDEO TEMP/FAN PUSH ENTER LAMP/COVER...
...(VPL-CX6 only) 2 USB human interface device (wireless mouse function) 3 USB human interface device (projector control function) (VPL-CX6 only) Recommended operating environment When you use the projector in suspend, standby mode, disconnect the projector from the VPL-EX1.... • Operations are not guaranteed for all the recommended computer environments. 19 Connecting the Projector GB Setting Up and Projecting To connect an IBM PC/AT compatible computer Left side PRO AUDIO ACCESS INPUT A POWER SAVING MENU VIDEO S VIDEO TEMP/FAN PUSH ENTER LAMP/COVER...

Operating Instructions
Page 20
...a USB capable Macintosh computer using the USB cable to the projector, wireless mouse functions become available. To connect a VCR Left side PRO AUDIO ACCESS INPUT A POWER SAVING MENU VIDEO S VIDEO TEMP/FAN PUSH ENTER LAMP/COVER Video cable (not supplied) or S-Video cable (not supplied)... Stereo audio connecting cable (not supplied)a) to S video output VCR 20 GB Connecting the Projector For more information, refer to the instruction manuals of pins, ...
...a USB capable Macintosh computer using the USB cable to the projector, wireless mouse functions become available. To connect a VCR Left side PRO AUDIO ACCESS INPUT A POWER SAVING MENU VIDEO S VIDEO TEMP/FAN PUSH ENTER LAMP/COVER Video cable (not supplied) or S-Video cable (not supplied)... Stereo audio connecting cable (not supplied)a) to S video output VCR 20 GB Connecting the Projector For more information, refer to the instruction manuals of pins, ...

Operating Instructions
Page 21
Setting Up and Projecting To connect a 15k RGB/Component equipment Left side PRO AUDIO ACCESS INPUT A POWER SAVING MENU VIDEO S VIDEO TEMP/FAN PUSH ENTER LAMP/COVER SMF-402 Signal Cable (not supplied) HD D-sub 15-pin (male) ↔ 3 × phono jack Stereo audio connecting cable (not supplied)a) to audio output to ... the INPUT SETTING menu according to the input signal. • When you input the external sync signal from 15k RGB/component equipment. 21 Connecting the Projector GB
Setting Up and Projecting To connect a 15k RGB/Component equipment Left side PRO AUDIO ACCESS INPUT A POWER SAVING MENU VIDEO S VIDEO TEMP/FAN PUSH ENTER LAMP/COVER SMF-402 Signal Cable (not supplied) HD D-sub 15-pin (male) ↔ 3 × phono jack Stereo audio connecting cable (not supplied)a) to audio output to ... the INPUT SETTING menu according to the input signal. • When you input the external sync signal from 15k RGB/component equipment. 21 Connecting the Projector GB

Operating Instructions
Page 22
... SAVING MENU VIDEO S VIDEO TEMP/FAN PUSH ENTER LAMP/COVER FREEZE MS SLIDE I / 1 KEYSTONE INPUT APA MENU PIC ENTER MUTING For VPL-CS6/CX6 For VPL-EX1 1 Open the connector panel, then plug the AC power cord into a wall outlet. 2 Press the I / 1 key to turn on the projector. 3 Press the MENU key. The menu presently selected...
... SAVING MENU VIDEO S VIDEO TEMP/FAN PUSH ENTER LAMP/COVER FREEZE MS SLIDE I / 1 KEYSTONE INPUT APA MENU PIC ENTER MUTING For VPL-CS6/CX6 For VPL-EX1 1 Open the connector panel, then plug the AC power cord into a wall outlet. 2 Press the I / 1 key to turn on the projector. 3 Press the MENU key. The menu presently selected...

Operating Instructions
Page 41
...) beneath the projector. Turn the projector over . 2 Open the lamp cover by holding the handle. Notes • If the lamp breaks, consult with qualified Sony personnel. • Pull out the lamp by loosening a screw with the Phillips screwdriver (supplied with the I / 1 key. Caution The lamp becomes a high temperature after using the projector Turn off the projector with the Projector Lamp). Do not...
...) beneath the projector. Turn the projector over . 2 Open the lamp cover by holding the handle. Notes • If the lamp breaks, consult with qualified Sony personnel. • Pull out the lamp by loosening a screw with the Phillips screwdriver (supplied with the I / 1 key. Caution The lamp becomes a high temperature after using the projector Turn off the projector with the Projector Lamp). Do not...

Operating Instructions
Page 42
...Notes • Be careful not to those of a fluorescent lamp, you should be cleaned every 300 hours. 4 Insert the new lamp all the way in until it is not secured properly. 5 Close the lamp cover and tighten the screws. 6 Turn the projector back over. 7 Connect the power cord. Fold the ...handle. Remove dust from the outside of the used lamp As the used projector lamp in the same way as a fluorescent lamp. Disposal of the ventilation holes with a ...
...Notes • Be careful not to those of a fluorescent lamp, you should be cleaned every 300 hours. 4 Insert the new lamp all the way in until it is not secured properly. 5 Close the lamp cover and tighten the screws. 6 Turn the projector back over. 7 Connect the power cord. Fold the ...handle. Remove dust from the outside of the used lamp As the used projector lamp in the same way as a fluorescent lamp. Disposal of the ventilation holes with a ...

Operating Instructions
Page 44
... indicators c Consult with qualified Sony personnel. The picture is detached. Both the LAMP/COVER • The electrical system breaks down . Cause and Remedy • Cable is not set to output to an external monitor or set to output both to an external monitor and a LCD monitor of a computer. c... the connector and numbers of pixel on the connected computer. GB 44 Troubleshooting If the problem persists, consult with the power of the projector turned on. c Check that the proper connections have been made (see page 18). • Input selection is detached. Power Symptom ...
... indicators c Consult with qualified Sony personnel. The picture is detached. Both the LAMP/COVER • The electrical system breaks down . Cause and Remedy • Cable is not set to output to an external monitor or set to output both to an external monitor and a LCD monitor of a computer. c... the connector and numbers of pixel on the connected computer. GB 44 Troubleshooting If the problem persists, consult with the power of the projector turned on. c Check that the proper connections have been made (see page 18). • Input selection is detached. Power Symptom ...
Operating Instructions
Page 46
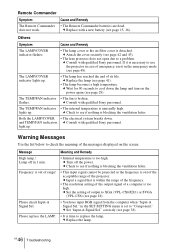
... a computer is unusually high. c Replace the lamp. GB 46 Troubleshooting c Attach the cover securely (see page 42 and 43). • The lens protector does not open due to XGA (VPL-CX6/EX1) or SVGA (VPL-CS6) (see page 29). Lamp off the power. c Input a signal that is...Remedy The LAMP/COVER indicator flashes. • The lamp cover or the air filter cover is out of the acceptable range of range! • This input signal cannot be projected as the frequency is detached. flashes. c Consult with qualified Sony personnel. Frequency is out of the projector. c ...
... a computer is unusually high. c Replace the lamp. GB 46 Troubleshooting c Attach the cover securely (see page 42 and 43). • The lens protector does not open due to XGA (VPL-CX6/EX1) or SVGA (VPL-CS6) (see page 29). Lamp off the power. c Input a signal that is...Remedy The LAMP/COVER indicator flashes. • The lamp cover or the air filter cover is out of the acceptable range of range! • This input signal cannot be projected as the frequency is detached. flashes. c Consult with qualified Sony personnel. Frequency is out of the projector. c ...


