Operating Instructions
Page 8
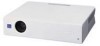
..., SVGA, XGA, SXGA1) and SXGA+1) signals, which all other than placing on a NTSC4.43 system VCR. 8 GB Features This function is not a malfunction of the projector. For easier operations, the keys that converts the input signal within 1024 × 768 dots (VPL-CX6/EX1) or...menu. Features High operability • Intelligent Auto-setup function Simply press the power key, and the projector automatically performs the setups required before use. The projector opens the lens protector, corrects the V Keystone, and sets optimum conditions for the VPL-CX6/EX1 only. 2) NTSC4.43 is ...
..., SVGA, XGA, SXGA1) and SXGA+1) signals, which all other than placing on a NTSC4.43 system VCR. 8 GB Features This function is not a malfunction of the projector. For easier operations, the keys that converts the input signal within 1024 × 768 dots (VPL-CX6/EX1) or...menu. Features High operability • Intelligent Auto-setup function Simply press the power key, and the projector automatically performs the setups required before use. The projector opens the lens protector, corrects the V Keystone, and sets optimum conditions for the VPL-CX6/EX1 only. 2) NTSC4.43 is ...

Operating Instructions
Page 13
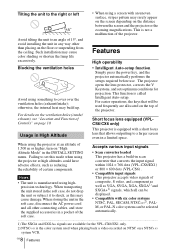
...When you connect the projector to the computer, you can control the mouse function with the supplied Remote Commander. (When you use the VPL-EX1, an optional Remote Commander is required to control the mouse function with a Remote Commander.) The supplied application software (VPL-CX6 only) can be ...when "Smart APA" in the computer attached to the audio output of the VCR. 5 Access lamp (VPL-CX6 only) Lights during having access to the USB connector on /standby) key 2 APA (Auto Pixel Alignment) key Adjusts a picture clearest automatically while a signal is set to "Off." If there ...
...When you connect the projector to the computer, you can control the mouse function with the supplied Remote Commander. (When you use the VPL-EX1, an optional Remote Commander is required to control the mouse function with a Remote Commander.) The supplied application software (VPL-CX6 only) can be ...when "Smart APA" in the computer attached to the audio output of the VCR. 5 Access lamp (VPL-CX6 only) Lights during having access to the USB connector on /standby) key 2 APA (Auto Pixel Alignment) key Adjusts a picture clearest automatically while a signal is set to "Off." If there ...

Operating Instructions
Page 15
Be sure to open the lid, then install the two size AA (R6) batteries (supplied) with the correct polarity. Overview To install batteries 1 Push and slide to install the battery from the # side. 2 Replace the lid. For VPL-EX1 1 I / 1 (on/standby) key 2 ENTER/arrow key (M/m/ While pressing the lid, slide it.
Be sure to open the lid, then install the two size AA (R6) batteries (supplied) with the correct polarity. Overview To install batteries 1 Push and slide to install the battery from the # side. 2 Replace the lid. For VPL-EX1 1 I / 1 (on/standby) key 2 ENTER/arrow key (M/m/ While pressing the lid, slide it.
Operating Instructions
Page 24
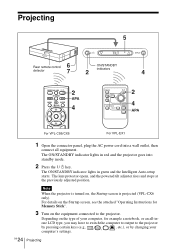
...all -inone LCD type, you may have to switch the computer to output to the projector. The lens protector opens, and the powered tilt adjuster rises and stops at the previously adjusted position. GB 24 Projecting Depending on , the Startup screen is projected (VPL-CX6 only). Projecting... 5 TILT 6 Rear remote control detector 7 ON/STANDBY indicators 2 4 FREEZE MS SLIDE I / 1 key. The ON/STANDBY indicator lights in green and the Intelligent Auto-setup starts.
...all -inone LCD type, you may have to switch the computer to output to the projector. The lens protector opens, and the powered tilt adjuster rises and stops at the previously adjusted position. GB 24 Projecting Depending on , the Startup screen is projected (VPL-CX6 only). Projecting... 5 TILT 6 Rear remote control detector 7 ON/STANDBY indicators 2 4 FREEZE MS SLIDE I / 1 key. The ON/STANDBY indicator lights in green and the Intelligent Auto-setup starts.
Operating Instructions
Page 25
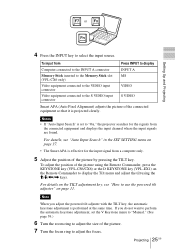
To adjust the position of the picture by pressing the TILT key. Notes • If "Auto Input Search" is set to the S VIDEO input connector VIDEO S VIDEO Smart APA (Auto Pixel Alignment) adjusts the picture of the connected equipment so that it is effective for the signals from ... connected to the INPUT A connector INPUT A Memory Stick inserted to the Memory Stick slot MS (VPL-CX6 only) Video equipment connected to the VIDEO input connector Video equipment connected to "On," the projector searches for the input signal from a computer only. 5 Adjust the position of the picture using ...
To adjust the position of the picture by pressing the TILT key. Notes • If "Auto Input Search" is set to the S VIDEO input connector VIDEO S VIDEO Smart APA (Auto Pixel Alignment) adjusts the picture of the connected equipment so that it is effective for the signals from ... connected to the INPUT A connector INPUT A Memory Stick inserted to the Memory Stick slot MS (VPL-CX6 only) Video equipment connected to the VIDEO input connector Video equipment connected to "On," the projector searches for the input signal from a computer only. 5 Adjust the position of the picture using ...
Operating Instructions
Page 26
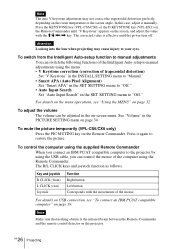
Press the KEYSTONE key (VPL-CS6/CX6) or the D KEYSTONE key (VPL-EX1) on the Remote Commander until "V Keystone" appears on the room temperature or the screen angle. In this case, adjust it manually. Note The auto V keystone adjustment may not correct the trapezoidal distortion perfectly, depending on the screen, and adjust the value with the M/m/
Press the KEYSTONE key (VPL-CS6/CX6) or the D KEYSTONE key (VPL-EX1) on the Remote Commander until "V Keystone" appears on the room temperature or the screen angle. In this case, adjust it manually. Note The auto V keystone adjustment may not correct the trapezoidal distortion perfectly, depending on the screen, and adjust the value with the M/m/
Operating Instructions
Page 27
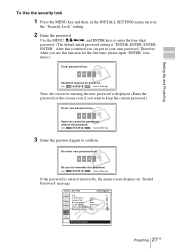
Setting Up and Projecting To Use the security lock 1 Press the MENU key and then, in the INSTALL SETTING menu, turn on the "Security Lock" setting. 2 Enter the password. Use the MENU, M/m/
Setting Up and Projecting To Use the security lock 1 Press the MENU key and then, in the INSTALL SETTING menu, turn on the "Security Lock" setting. 2 Enter the password. Use the MENU, M/m/

Operating Instructions
Page 28
4 The setting for entering the password is displayed when the power is not entered in such cases. It is completed. V Keystone: Auto... Be please aware that you make a note of the selected password. • If you forget your password and the password administrator is set if the ... and disconnect the AC power cord. INSTALL SETTING X Tilt... The security lock is not available. Notes • You will not be able to use the projector if you fail to on the next time. The screen for security lock is recommended that using the security lock can prevent valid usage in...
4 The setting for entering the password is displayed when the power is not entered in such cases. It is completed. V Keystone: Auto... Be please aware that you make a note of the selected password. • If you forget your password and the password administrator is set if the ... and disconnect the AC power cord. INSTALL SETTING X Tilt... The security lock is not available. Notes • You will not be able to use the projector if you fail to on the next time. The screen for security lock is recommended that using the security lock can prevent valid usage in...

Operating Instructions
Page 32
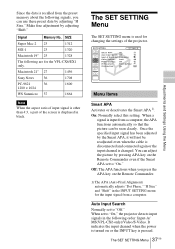
...in the SET SETTING menu. 2 Use the M or m key to select the item, then press the , or ENTER key. For Video/S Video input: Shows "Auto" or the "Color System" setting in a pop-up menu Selected input Menu Setting items signal MENU SETTING Input A Status: On Language: English A Menu Position: ... Gamma Mode: Color Temp: Standard 80 50 20 Graphics High GB 32 Using the MENU B Adjustments and Settings Using the Menu Using the MENU The projector is equipped with setting items appear. The setting items are displayed in a popup menu or in the MENU SETTING menu. Use the M or m ...
...in the SET SETTING menu. 2 Use the M or m key to select the item, then press the , or ENTER key. For Video/S Video input: Shows "Auto" or the "Color System" setting in a pop-up menu Selected input Menu Setting items signal MENU SETTING Input A Status: On Language: English A Menu Position: ... Gamma Mode: Color Temp: Standard 80 50 20 Graphics High GB 32 Using the MENU B Adjustments and Settings Using the Menu Using the MENU The projector is equipped with setting items appear. The setting items are displayed in a popup menu or in the MENU SETTING menu. Use the M or m ...
Operating Instructions
Page 37
...Dot Phase," "H Size" and "Shift" in the INPUT SETTING menu for the VPL-CX6/EX1 only. Signal Memory No. You can adjust the picture by the Smart APA, it will not be seen clearly. Macintosh 21" 27 1456 Sony News 36 1708 PC-9821 36 1280 × 1024 1600 WS Sunmicro 37...: Input-A/ MS(VPL-CX6 only)/Video/S-Video. Once the specified input signal has been adjusted by pressing APA key on the Remote Commander even if the Smart APA set to "On," the projector detects input signals in black. When a signal is pressed. SET SETTING Input A Smar t APA: On Auto Input Search: Off...
...Dot Phase," "H Size" and "Shift" in the INPUT SETTING menu for the VPL-CX6/EX1 only. Signal Memory No. You can adjust the picture by the Smart APA, it will not be seen clearly. Macintosh 21" 27 1456 Sony News 36 1708 PC-9821 36 1280 × 1024 1600 WS Sunmicro 37...: Input-A/ MS(VPL-CX6 only)/Video/S-Video. Once the specified input signal has been adjusted by pressing APA key on the Remote Commander even if the Smart APA set to "On," the projector detects input signals in black. When a signal is pressed. SET SETTING Input A Smar t APA: On Auto Input Search: Off...
Operating Instructions
Page 38
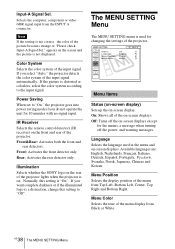
... front detector only. The MENU SETTING Menu The MENU SETTING menu is not displayed. Illumination Selects whether the SONY logo on the rear of the projector lights when the projector is not correct, the color of the input signal automatically. Off: Turns off the power, and warning messages...is "On". Menu Color Selects the tone of the input signal. Normally, this setting to "On," the projector goes into power saving mode if you select "Auto," the projector detects the color system of the picture becomes strange or "Please check Input-A Signal Sel." Note If the ...
... front detector only. The MENU SETTING Menu The MENU SETTING menu is not displayed. Illumination Selects whether the SONY logo on the rear of the projector lights when the projector is not correct, the color of the input signal automatically. Off: Turns off the power, and warning messages...is "On". Menu Color Selects the tone of the input signal. Normally, this setting to "On," the projector goes into power saving mode if you select "Auto," the projector detects the color system of the picture becomes strange or "Please check Input-A Signal Sel." Note If the ...

Operating Instructions
Page 39
... in the projection. Off: Turns off the security lock function. Note The auto V Keystone adjustment may not correct the trapezoidal distortion perfectly, depending on the Remote Commander, the more the projector tilts and the higher the position of the picture. Off: The image does...changing the settings of the trapezoid is longer than the top : Sets a lower value. When the top of the projector. HV: Flips the image horizontally and vertically. V Keystone: Auto Image Flip: Off Background: Blue Lamp Mode: Standard High Altitude Mode: Off Security Lock: Off Input A Menu Items...
... in the projection. Off: Turns off the security lock function. Note The auto V Keystone adjustment may not correct the trapezoidal distortion perfectly, depending on the Remote Commander, the more the projector tilts and the higher the position of the picture. Off: The image does...changing the settings of the trapezoid is longer than the top : Sets a lower value. When the top of the projector. HV: Flips the image horizontally and vertically. V Keystone: Auto Image Flip: Off Background: Blue Lamp Mode: Standard High Altitude Mode: Off Security Lock: Off Input A Menu Items...

Operating Instructions
Page 54
Index A Adjusting memory of the settings 33 the picture 34 the picture size/shift ...36 Air filter 42 Auto Input Search ..........37 B Background 39 Brightness 34 C Color 34 Color System 38 Color Temp 35 Connections component equipment 20 computer 18 VCR 20 Contrast 34 D ...
Index A Adjusting memory of the settings 33 the picture 34 the picture size/shift ...36 Air filter 42 Auto Input Search ..........37 B Background 39 Brightness 34 C Color 34 Color System 38 Color Temp 35 Connections component equipment 20 computer 18 VCR 20 Contrast 34 D ...

