
Operating Instructions
Page 2
... 4 Remote Commander and Control Panel Keys 5 Preparation Connecting the Projector 7 Connecting a Computer 7 Connecting a Video equipment .... 8 Others Indicators 25 Messages List 26 Troubleshooting 27 Replacing the Lamp 29 Cleaning the Air Filter 31 Specifications 32 Projection Distance 37 Dimensions 42 Index 45 Projecting/Adjusting an Image Projecting an Image 9 Adjusting the Projected...
... 4 Remote Commander and Control Panel Keys 5 Preparation Connecting the Projector 7 Connecting a Computer 7 Connecting a Video equipment .... 8 Others Indicators 25 Messages List 26 Troubleshooting 27 Replacing the Lamp 29 Cleaning the Air Filter 31 Specifications 32 Projection Distance 37 Dimensions 42 Index 45 Projecting/Adjusting an Image Projecting an Image 9 Adjusting the Projected...
Operating Instructions
Page 3
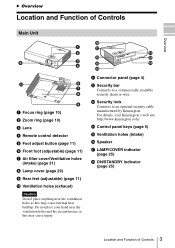
...l Security bar Connects to an optional security cable manufactured by Kensington. http://www.kensington.com/ n Control panel keys (page 5) o Ventilation holes (intake) p Speaker q LAMP/COVER indicator (page 25) r ON/STANDBY indicator (page 25) Location and Function of Controls Main Unit 1 2 5 3 4 0 6 7 8 9 a Focus ... Foot adjust button (page 11) f Front foot (adjustable) (page 11) g Air filter cover/Ventilation holes (intake) (page 31) h Lamp cover (page 29) i Rear feet (adjustable) (page 11) j Ventilation holes (exhaust) Caution Do not place anything near the ventilation holes ...
...l Security bar Connects to an optional security cable manufactured by Kensington. http://www.kensington.com/ n Control panel keys (page 5) o Ventilation holes (intake) p Speaker q LAMP/COVER indicator (page 25) r ON/STANDBY indicator (page 25) Location and Function of Controls Main Unit 1 2 5 3 4 0 6 7 8 9 a Focus ... Foot adjust button (page 11) f Front foot (adjustable) (page 11) g Air filter cover/Ventilation holes (intake) (page 31) h Lamp cover (page 29) i Rear feet (adjustable) (page 11) j Ventilation holes (exhaust) Caution Do not place anything near the ventilation holes ...
Operating Instructions
Page 6
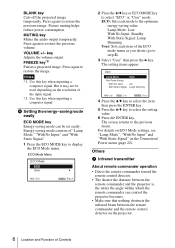
..., the wider the angle within which the remote commander can be used depending on the resolution of Controls For details on ECO Mode settings, see "Lamp Mode", "With No Input" and "With Static Signal" on the projector. 6 Location and Function of the input signal. *2: Use this key when ...on the Connection/ Power menu (page 22). MUTING key Mutes the audio output temporarily. key Adjusts the volume output. ECO: Sets each item of "Lamp Mode," "With No Input," and "With Static Signal." 1 Press the ECO MODE key to restore the previous volume. The screen returns to the...
..., the wider the angle within which the remote commander can be used depending on the resolution of Controls For details on ECO Mode settings, see "Lamp Mode", "With No Input" and "With Static Signal" on the projector. 6 Location and Function of the input signal. *2: Use this key when ...on the Connection/ Power menu (page 22). MUTING key Mutes the audio output temporarily. key Adjusts the volume output. ECO: Sets each item of "Lamp Mode," "With No Input," and "With Static Signal." 1 Press the ECO MODE key to restore the previous volume. The screen returns to the...

Operating Instructions
Page 20
... Item descriptions The higher the value, the louder an audio volume and the lower the value, the lower the audio volume. When replacing the lamp, resets the lamp timer (page 29). The Function Menu The Function menu is input.*1 Off: Closed caption does not appear. On/Off: When set to "On," APA...
... Item descriptions The higher the value, the louder an audio volume and the lower the value, the lower the audio volume. When replacing the lamp, resets the lamp timer (page 29). The Function Menu The Function menu is input.*1 Off: Closed caption does not appear. On/Off: When set to "On," APA...
Operating Instructions
Page 22
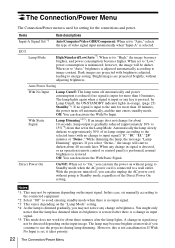
... reduced (approximately 10% to a wall outlet. When set to "Low," power consumption is connected to 15%*3) from that the lamp has dimmed when its lamp output according to the selected time (with brightness adjusted, leading to Standby mode, regardless of video signal input automatically when "Input-A"...a change to "Auto," selects the type of the Direct Power On setting. Auto Power Saving With No Input With Static Signal Lamp Cutoff: The lamp turns off automatically, and the unit enters standby mode. You might only notice that set in signal is detected, or an operation...
... reduced (approximately 10% to a wall outlet. When set to "Low," power consumption is connected to 15%*3) from that the lamp has dimmed when its lamp output according to the selected time (with brightness adjusted, leading to Standby mode, regardless of video signal input automatically when "Input-A"...a change to "Auto," selects the type of the Direct Power On setting. Auto Power Saving With No Input With Static Signal Lamp Cutoff: The lamp turns off automatically, and the unit enters standby mode. You might only notice that set in signal is detected, or an operation...
Operating Instructions
Page 24
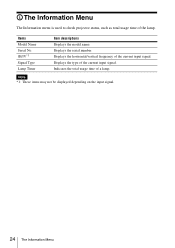
Items Model Name Serial No. Displays the type of a lamp. Indicates the total usage time of the current input signal. Note *1: These items may not be displayed depending on the input signal. 24 The Information Menu Displays the horizontal/vertical frequency of the lamp. Displays the serial number. The Information Menu The Information menu is used to check projector status, such as total usage time of the current input signal. fH/fV*1 Signal Type Lamp Timer Item descriptions Displays the model name.
Items Model Name Serial No. Displays the type of a lamp. Indicates the total usage time of the current input signal. Note *1: These items may not be displayed depending on the input signal. 24 The Information Menu Displays the horizontal/vertical frequency of the lamp. Displays the serial number. The Information Menu The Information menu is used to check projector status, such as total usage time of the current input signal. fH/fV*1 Signal Type Lamp Timer Item descriptions Displays the model name.

Operating Instructions
Page 25
... symptom persists, despite having been turned on. • The lamp cools after the projector is turned off the power and wait for lamp to a wall outlet again then turn on the power again. Consult with qualified Sony personnel. Turn off . B Others Indicators The indicators allow checking... high. The internal temperature is on the projector. LAMP/COVER indicator Status Meaning/Remedies Flashes in Standby mode. • The projector is ready to operate after having taken measures below, consult with qualified Sony personnel. ON/STANDBY indicator Status Lights in red Flashes...
... symptom persists, despite having been turned on. • The lamp cools after the projector is turned off the power and wait for lamp to a wall outlet again then turn on the power again. Consult with qualified Sony personnel. Turn off . B Others Indicators The indicators allow checking... high. The internal temperature is on the projector. LAMP/COVER indicator Status Meaning/Remedies Flashes in Standby mode. • The projector is ready to operate after having taken measures below, consult with qualified Sony personnel. ON/STANDBY indicator Status Lights in red Flashes...
Operating Instructions
Page 26
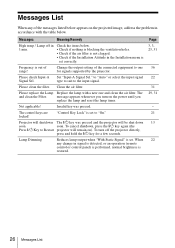
...check Input-A Signal Sel. Not applicable! "Control Key Lock" is set. Set "Input-A Signal Sel." The control keys are locked! Lamp Dimming Reduces lamp output when "With Static Signal" is set to one and clean the air filter. When any of the messages listed below appears on... is detected, or an operation (remote control or control panel) is performed, normal brightness is out of range! Please replace the Lamp Replace the lamp with the table below. To turn on ). Frequency is restored. Change the output setting of the connected equipment to "On." To...
...check Input-A Signal Sel. Not applicable! "Control Key Lock" is set. Set "Input-A Signal Sel." The control keys are locked! Lamp Dimming Reduces lamp output when "With Static Signal" is set to one and clean the air filter. When any of the messages listed below appears on... is detected, or an operation (remote control or control panel) is performed, normal brightness is out of range! Please replace the Lamp Replace the lamp with the table below. To turn on ). Frequency is restored. Change the output setting of the connected equipment to "On." To...
Operating Instructions
Page 27
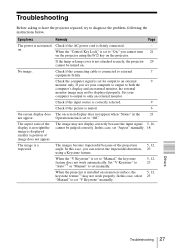
... ratio of the display is not right/the image is not attached securely, the projector 29 cannot be judged correctly. Others Troubleshooting 27 If the lamp or lamp cover is displayed smaller /a portion of the projection 5, 12, angle. Operation menu is set to "Manual," the keystone feature does not work properly. When...
... ratio of the display is not right/the image is not attached securely, the projector 29 cannot be judged correctly. Others Troubleshooting 27 If the lamp or lamp cover is displayed smaller /a portion of the projection 5, 12, angle. Operation menu is set to "Manual," the keystone feature does not work properly. When...
Operating Instructions
Page 28
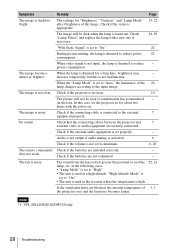
...blocked, the internal temperature of 3, 3 the projector rises and the fan noise becomes larger. No sound. Note *1: VPL-DX140/DX120/DW120 only. 28 Troubleshooting The image becomes When the lamp is used at a high altitude. Audio is not output if audio muting is activated. 6 Check if the volume...and 7 external video or audio equipment are not exhausted. - "High Altitude Mode" is set to "On." 22 During picture muting, the lamp is not malfunction. In this is dimmed to the input image. Check if the external audio equipment is high. Check if the batteries are ...
...blocked, the internal temperature of 3, 3 the projector rises and the fan noise becomes larger. No sound. Note *1: VPL-DX140/DX120/DW120 only. 28 Troubleshooting The image becomes When the lamp is used at a high altitude. Audio is not output if audio muting is activated. 6 Check if the volume...and 7 external video or audio equipment are not exhausted. - "High Altitude Mode" is set to "On." 22 During picture muting, the lamp is not malfunction. In this is dimmed to the input image. Check if the external audio equipment is high. Check if the batteries are ...
Operating Instructions
Page 29
... Use an LMP-D213 projector lamp (not supplied) for the lamp to pull it may be sure to cool sufficiently. • Do not allow any metallic or inflammable objects into the slot. Do not put your finger. Notes • If the lamp breaks, contact qualified Sony personnel. Fold out the handle.... 3 1 2 1 Others Replacing the Lamp 29 Do not replace the lamp yourself. • When removing the lamp, be burned or injured. Note For safety reasons, do not loosen...
... Use an LMP-D213 projector lamp (not supplied) for the lamp to pull it may be sure to cool sufficiently. • Do not allow any metallic or inflammable objects into the slot. Do not put your finger. Notes • If the lamp breaks, contact qualified Sony personnel. Fold out the handle.... 3 1 2 1 Others Replacing the Lamp 29 Do not replace the lamp yourself. • When removing the lamp, be burned or injured. Note For safety reasons, do not loosen...
Operating Instructions
Page 30
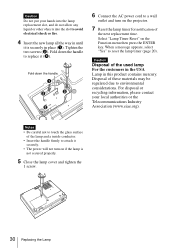
... time. Disposal of the used lamp For the customers in the USA Lamp in this product contains mercury. Select "Lamp Timer Reset" on if the lamp is securely in until it is not secured properly. 5 Close the lamp cover and tighten the 1 screw. 30 Replacing the Lamp When a message appears, select ...considerations. Fold down the handle to avoid electrical shock or fire. 4 Insert the new lamp all the way in place (1). For disposal or recycling information, please contact your hands into the lamp replacement slot, and do not allow any liquid or other objects into the slot to ...
... time. Disposal of the used lamp For the customers in the USA Lamp in this product contains mercury. Select "Lamp Timer Reset" on if the lamp is securely in until it is not secured properly. 5 Close the lamp cover and tighten the 1 screw. 30 Replacing the Lamp When a message appears, select ...considerations. Fold down the handle to avoid electrical shock or fire. 4 Insert the new lamp all the way in place (1). For disposal or recycling information, please contact your hands into the lamp replacement slot, and do not allow any liquid or other objects into the slot to ...
Operating Instructions
Page 32
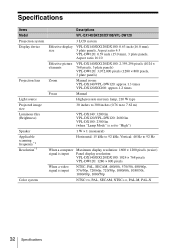
... (1280 × 800 pixels, 3 plate panels) Zoom Manual zoom: VPL-DX140/VPL-DW120: approx.1.3 times VPL-DX120/DX100: approx.1.2 times Focus Manual High-pressure mercury lamp, 210 W type 30 inches to 300 inches (0.76 m to 7.62 m) VPL-DX140: 3200 lm VPL-DX120/VPL-DW120: 2600 lm VPL-DX100: 2300 lm (when "Lamp Mode" is set to "High") 1 W × 1 (monaural) Horizontal: 15...
... (1280 × 800 pixels, 3 plate panels) Zoom Manual zoom: VPL-DX140/VPL-DW120: approx.1.3 times VPL-DX120/DX100: approx.1.2 times Focus Manual High-pressure mercury lamp, 210 W type 30 inches to 300 inches (0.76 m to 7.62 m) VPL-DX140: 3200 lm VPL-DX120/VPL-DW120: 2600 lm VPL-DX100: 2300 lm (when "Lamp Mode" is set to "High") 1 W × 1 (monaural) Horizontal: 15...

Operating Instructions
Page 34
SONY WILL NOT BE LIABLE FOR DAMAGES OF ANY KIND INCLUDING, BUT NOT LIMITED TO, COMPENSATION OR REIMBURSEMENT ON ACCOUNT OF THE LOSS OF PRESENT OR ... Reference Manual. Please check with your local Sony Authorized Dealer. Design and specifications of September 2012. *3: Not all countries and area. Projector Lamp LMP-D213 (for replacement) Notes *1: For details, refer to change without notice. Items Model Mass Supplied accessories Optional accessories*2 *3 Descriptions VPL-DX140/DX120/DX100/VPL-DW120 Approx. 2.5 kg (5 lb 7 oz) See "Checking...
SONY WILL NOT BE LIABLE FOR DAMAGES OF ANY KIND INCLUDING, BUT NOT LIMITED TO, COMPENSATION OR REIMBURSEMENT ON ACCOUNT OF THE LOSS OF PRESENT OR ... Reference Manual. Please check with your local Sony Authorized Dealer. Design and specifications of September 2012. *3: Not all countries and area. Projector Lamp LMP-D213 (for replacement) Notes *1: For details, refer to change without notice. Items Model Mass Supplied accessories Optional accessories*2 *3 Descriptions VPL-DX140/DX120/DX100/VPL-DW120 Approx. 2.5 kg (5 lb 7 oz) See "Checking...
Operating Instructions
Page 45
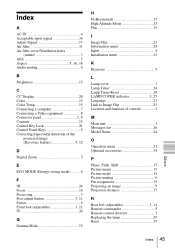
... G Gamma Mode 15 H H (Horizontal 17 High Altitude Mode 23 Hue 15 I Image Flip 23 Information menu 24 Input 4 Installation menu 23 K Keystone 5 L Lamp cover 3 Lamp Timer 24 Lamp Timer Reset 20 LAMP/COVER indicator 3, 25 Language 21 Link to Image Flip 23 Location and function of controls 3 M Main unit 3 Messages list 26 Model Name... Picture mode 15 Picture muting 6 Pin assignment 35 Projecting an image 9 Projection distance 37 R Rear feet (adjustable 3, 11 Remote commander 5 Remote control detector 3 Replacing the lamp 29 Reset 15 Others Index 45
... G Gamma Mode 15 H H (Horizontal 17 High Altitude Mode 23 Hue 15 I Image Flip 23 Information menu 24 Input 4 Installation menu 23 K Keystone 5 L Lamp cover 3 Lamp Timer 24 Lamp Timer Reset 20 LAMP/COVER indicator 3, 25 Language 21 Link to Image Flip 23 Location and function of controls 3 M Main unit 3 Messages list 26 Model Name... Picture mode 15 Picture muting 6 Pin assignment 35 Projecting an image 9 Projection distance 37 R Rear feet (adjustable 3, 11 Remote commander 5 Remote control detector 3 Replacing the lamp 29 Reset 15 Others Index 45
Quick Reference Manual
Page 27
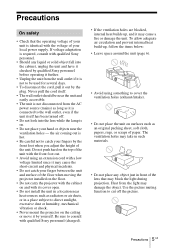
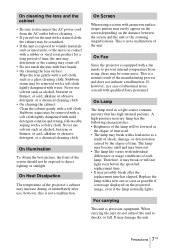
... ventilation holes may take in such materials. • Do not place any liquid or solid object fall into the lens while the lamp is required, consult with qualified Sony personnel (charged). • If the ventilation holes are blocked, internal heat builds up , follow the items below: • Leave...carry the projector with the cabinet on . • Do not place your local power supply. Use the picture muting function to consult with qualified Sony personnel. • Should any object just in a place subject to cover the ventilation holes (exhaust/intake). • Do not place the ...
... ventilation holes may take in such materials. • Do not place any liquid or solid object fall into the lens while the lamp is required, consult with qualified Sony personnel (charged). • If the ventilation holes are blocked, internal heat builds up , follow the items below: • Leave...carry the projector with the cabinet on . • Do not place your local power supply. Use the picture muting function to consult with qualified Sony personnel. • Should any object just in a place subject to cover the ventilation holes (exhaust/intake). • Do not place the ...
Quick Reference Manual
Page 29
... soft cloth, such as a glass cleaning cloth. A high-pressure mercury lamp has the following characteristics: • Brightness of the lamp will not light even before cleaning. • If you rub on the unit with qualified Sony personnel. When carrying the unit, do not subject the unit to prevent... screen with an uneven surface, stripes pattern may burn out. • The lamp life varies with a rubber or vinyl resin product for a long period of the unit. On Lamp The lamp used . • The lamp may be removed with a soft cloth lightly dampened with mild detergent solution and wrung...
... soft cloth, such as a glass cleaning cloth. A high-pressure mercury lamp has the following characteristics: • Brightness of the lamp will not light even before cleaning. • If you rub on the unit with qualified Sony personnel. When carrying the unit, do not subject the unit to prevent... screen with an uneven surface, stripes pattern may burn out. • The lamp life varies with a rubber or vinyl resin product for a long period of the unit. On Lamp The lamp used . • The lamp may be removed with a soft cloth lightly dampened with mild detergent solution and wrung...

Quick Reference Manual
Page 39
.... • Check if the air filter is in accordance with qualified Sony personnel. Indicators 17 GB The projector is not clogged. (page 20) • Check if the Installation Attitude in accordance with the table below , consult with the following . LAMP/COVER indicator Status Meaning/Remedies Flashes in red Flashes twice Flashes six... the projector. After checking that the ON/STANDBY indicator goes out, plug the power cord to cool then turn on . In this case, replace the lamp with qualified Sony personnel. Turn off . Address the problem in abnormal status.
.... • Check if the air filter is in accordance with qualified Sony personnel. Indicators 17 GB The projector is not clogged. (page 20) • Check if the Installation Attitude in accordance with the table below , consult with the following . LAMP/COVER indicator Status Meaning/Remedies Flashes in red Flashes twice Flashes six... the projector. After checking that the ON/STANDBY indicator goes out, plug the power cord to cool then turn on . In this case, replace the lamp with qualified Sony personnel. Turn off . Address the problem in abnormal status.

Quick Reference Manual
Page 40
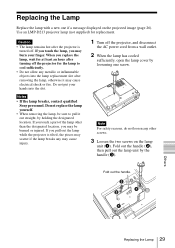
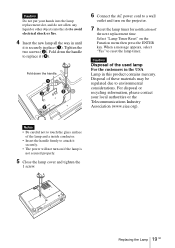
...; If the lamp breaks, contact qualified Sony personnel. If you pull out the lamp while the projector is turned off. Caution • The lamp remains hot after the projector is tilted, the pieces may scatter if the lamp breaks any may cause injury. 1 Turn off the projector for the lamp to cool sufficiently..., and disconnect the AC power cord from a wall outlet. 2 When the lamp has cooled sufficiently, open the lamp cover by loosening one if a message displayed on the lamp unit (1). When you touch a part of the lamp other screws. 3 Loosen the two screws on the projected image. Do not...
...; If the lamp breaks, contact qualified Sony personnel. If you pull out the lamp while the projector is turned off. Caution • The lamp remains hot after the projector is tilted, the pieces may scatter if the lamp breaks any may cause injury. 1 Turn off the projector for the lamp to cool sufficiently..., and disconnect the AC power cord from a wall outlet. 2 When the lamp has cooled sufficiently, open the lamp cover by loosening one if a message displayed on the lamp unit (1). When you touch a part of the lamp other screws. 3 Loosen the two screws on the projected image. Do not...
Quick Reference Manual
Page 41
...of the next replacement time. Fold down the handle. 1 3 2 2 6 Connect the AC power cord to a wall outlet and turn on if the lamp is securely in this product contains mercury. Fold down the handle to replace it securely. • The power will not turn on the Function menu... then press the ENTER key. Tighten the two screws (2). Replacing the Lamp 19 GB When a message appears, select "Yes" to environmental considerations. Caution Do not put your local authorities or the Telecommunications Industry Association (www...
...of the next replacement time. Fold down the handle. 1 3 2 2 6 Connect the AC power cord to a wall outlet and turn on if the lamp is securely in this product contains mercury. Fold down the handle to replace it securely. • The power will not turn on the Function menu... then press the ENTER key. Tighten the two screws (2). Replacing the Lamp 19 GB When a message appears, select "Yes" to environmental considerations. Caution Do not put your local authorities or the Telecommunications Industry Association (www...


