
Product Brochure (Data Projectors)
Page 2
... projectors offer remarkably low power consumption, helping to 7,000 hours.4 4 Approximate period, in low mode. Long-lasting Lamp By incorporating a high-performance lamp and advanced lamp-control technology, the VPL-E200 Series projectors deliver an extremely long lamp replacement time of up to meet virtually many types of education or business projection environments The Sony VPL-E200 Series data projectors are designed for use in education or business. 1 ISO 2118 2 VPL-EW275, and VPL...
... projectors offer remarkably low power consumption, helping to 7,000 hours.4 4 Approximate period, in low mode. Long-lasting Lamp By incorporating a high-performance lamp and advanced lamp-control technology, the VPL-E200 Series projectors deliver an extremely long lamp replacement time of up to meet virtually many types of education or business projection environments The Sony VPL-E200 Series data projectors are designed for use in education or business. 1 ISO 2118 2 VPL-EW275, and VPL...

Product Brochure (Data Projectors)
Page 3
... Network and Control Controls and monitors projector status Compatible with a 3LCD projection system, the VPL-E200 Series projectors offer high picture quality and brightness. Via LAN Cable or Wirelessly Web Control When VPL-E200 Series projectors are installed in Oct 2012 are JPG, BMP, PNG,TIF, and GIF. 6 USB memory device is no need to install any PC on the network - up to 7,000 hours depending on the selected lamp mode, and dust filters...
... Network and Control Controls and monitors projector status Compatible with a 3LCD projection system, the VPL-E200 Series projectors offer high picture quality and brightness. Via LAN Cable or Wirelessly Web Control When VPL-E200 Series projectors are installed in Oct 2012 are JPG, BMP, PNG,TIF, and GIF. 6 USB memory device is no need to install any PC on the network - up to 7,000 hours depending on the selected lamp mode, and dust filters...

Product Brochure (Data Projectors)
Page 5
...pixels Zoom Focus Throw ratio Light source Recommended lamp replacement time*1 Filter cleaning cycle*1 Screen size Light output (Lamp mode: High / Standard / Low) Color light output (Lamp mode: High / Standard / Low) Contrast ratio (full white / full black)*3 Displayable scanning Horizontal frequency Vertical Display resolution Computer signal input Video signal input Color system Keystone correction OSD language Computer and video signal input/output INPUT A INPUT B INPUT C S VIDEO IN VIDEO IN OUTPUT Control signal input/output, Others Speaker Operating temperature (Operating...
...pixels Zoom Focus Throw ratio Light source Recommended lamp replacement time*1 Filter cleaning cycle*1 Screen size Light output (Lamp mode: High / Standard / Low) Color light output (Lamp mode: High / Standard / Low) Contrast ratio (full white / full black)*3 Displayable scanning Horizontal frequency Vertical Display resolution Computer signal input Video signal input Color system Keystone correction OSD language Computer and video signal input/output INPUT A INPUT B INPUT C S VIDEO IN VIDEO IN OUTPUT Control signal input/output, Others Speaker Operating temperature (Operating...

Operating Instructions
Page 2
... 12 Connecting a USB memory device 12 Connecting a USB wireless LAN module 13 Connecting an External Monitor and Audio Equipment 13 Projecting/Adjusting an Image Projecting an Image 14 Adjusting the Projected image ... 15 Turning Off the Power 18 Adjustments and Settings Using a Menu Using a MENU 19 The Picture Menu 20 The Screen Menu 21 The Function Menu 25 The Operation Menu 26 2 Table of Contents The Connection/Power Menu ...........27 The Installation Menu 29 The Information Menu 30 Network Using Network Features 31 Displaying the Control Window of the Projector with...
... 12 Connecting a USB memory device 12 Connecting a USB wireless LAN module 13 Connecting an External Monitor and Audio Equipment 13 Projecting/Adjusting an Image Projecting an Image 14 Adjusting the Projected image ... 15 Turning Off the Power 18 Adjustments and Settings Using a Menu Using a MENU 19 The Picture Menu 20 The Screen Menu 21 The Function Menu 25 The Operation Menu 26 2 Table of Contents The Connection/Power Menu ...........27 The Installation Menu 29 The Information Menu 30 Network Using Network Features 31 Displaying the Control Window of the Projector with...

Operating Instructions
Page 7
... digital zoom icon on the projected image. 2 Press the V/v/B/b keys to move the digital zoom icon to enlarge. 3 Press the D ZOOM + key or the D ZOOM - The setting items appear. Notes *1: Use this key when "Type A USB", "Type B USB" or "Network" is selected as you want to the point on the Connection/Power menu (page 27). Location and Function of the ECO Mode menu as the input. Press the RESET key to display...
... digital zoom icon on the projected image. 2 Press the V/v/B/b keys to move the digital zoom icon to enlarge. 3 Press the D ZOOM + key or the D ZOOM - The setting items appear. Notes *1: Use this key when "Type A USB", "Type B USB" or "Network" is selected as you want to the point on the Connection/Power menu (page 27). Location and Function of the ECO Mode menu as the input. Press the RESET key to display...

Operating Instructions
Page 14
... AC power cord into the wall outlet. 2 Connect all equipment to the projector (page 9). 3 Press the ?/1 key to display the menu for switching input signal on the connected equipment. 5 Select the input source. Press the INPUT key on the projector to turn on the unit. 4 Turn on the screen. Press the INPUT key repeatedly, or press the V/v key to select an image to external display. B Projecting/Adjusting an Image Projecting an Image The size of a projected image depends...
... AC power cord into the wall outlet. 2 Connect all equipment to the projector (page 9). 3 Press the ?/1 key to display the menu for switching input signal on the connected equipment. 5 Select the input source. Press the INPUT key on the projector to turn on the unit. 4 Turn on the screen. Press the INPUT key repeatedly, or press the V/v key to select an image to external display. B Projecting/Adjusting an Image Projecting an Image The size of a projected image depends...

Operating Instructions
Page 17
... text or to set to restore the previous image. Note You cannot use a grid pattern as the input. Increase the number towards plus Note Since the Keystone adjustment is an electronic correction, the image may not work automatically if the screen is input (page 25). You can use this case, set Keystone manually. 1 Press the KEYSTONE key on the remote commander or select V Keystone in the Installation menu. 2 Use the V/v/B/b keys to...
... text or to set to restore the previous image. Note You cannot use a grid pattern as the input. Increase the number towards plus Note Since the Keystone adjustment is an electronic correction, the image may not work automatically if the screen is input (page 25). You can use this case, set Keystone manually. 1 Press the KEYSTONE key on the remote commander or select V Keystone in the Installation menu. 2 Use the V/v/B/b keys to...

Operating Instructions
Page 25
... outputs sound. Adjustments and Settings Using a Menu The Function Menu 25 The Function Menu The Function menu is set by the value of "Volume." *3: VPL-EW275/EW245/EW225/EX275/EX245/EX225 only. Adjust the volume of the projector. When replacing the lamp, resets the lamp timer (page 47). Items Volume*3 Mic Volume*3 Speaker*3 Smart APA CC Display Lamp Timer Reset Start Up Image Item descriptions The higher the value, the louder an audio volume and...
... outputs sound. Adjustments and Settings Using a Menu The Function Menu 25 The Function Menu The Function menu is set by the value of "Volume." *3: VPL-EW275/EW245/EW225/EX275/EX245/EX225 only. Adjust the volume of the projector. When replacing the lamp, resets the lamp timer (page 47). Items Volume*3 Mic Volume*3 Speaker*3 Smart APA CC Display Lamp Timer Reset Start Up Image Item descriptions The higher the value, the louder an audio volume and...

Operating Instructions
Page 26
... setting menu. 2 Input the password with the MENU, V/v/B/b and ENTER keys. (The default setting password is "ENTER, ENTER, ENTER, ENTER.") 3 Input a new password with the password. 26 The Operation Menu The Operation Menu The Operation menu is used for setting for the operations by password. However, you can operate the following when set to verify the projector's serial number and your identity. (This process may differ in the menu and messages. On/Off: When set to confirm. Items Language Status Security Lock*1 Control...
... setting menu. 2 Input the password with the MENU, V/v/B/b and ENTER keys. (The default setting password is "ENTER, ENTER, ENTER, ENTER.") 3 Input a new password with the password. 26 The Operation Menu The Operation Menu The Operation menu is used for setting for the operations by password. However, you can operate the following when set to verify the projector's serial number and your identity. (This process may differ in the menu and messages. On/Off: When set to confirm. Items Language Status Security Lock*1 Control...

Operating Instructions
Page 27
... operation (remote control or control panel) is performed, normal brightness is selected. *1 ECO Lamp Mode High/Standard/Low/Auto*5 *7: When set to "Low," lowers power consumption in the Lamp Mode. Direct Power On On/Off: When set to "On," you select "Demo.," the image will be darker. Input-A Signal Sel. When set to "Low," power consumption is input for the connections and power. The Connection/Power Menu 27 Manual: To specify the IP Address manually. Adjustments and Settings Using a Menu The Connection/Power Menu The Connection/Power menu is adjusted...
... operation (remote control or control panel) is performed, normal brightness is selected. *1 ECO Lamp Mode High/Standard/Low/Auto*5 *7: When set to "Low," lowers power consumption in the Lamp Mode. Direct Power On On/Off: When set to "On," you select "Demo.," the image will be darker. Input-A Signal Sel. When set to "Low," power consumption is input for the connections and power. The Connection/Power Menu 27 Manual: To specify the IP Address manually. Adjustments and Settings Using a Menu The Connection/Power Menu The Connection/Power menu is adjusted...
Operating Instructions
Page 37
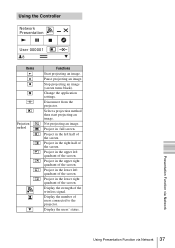
... projector. Select a projection method then start projecting an image. Display the users' status. Pause projecting an image. Project in the lower right quadrant of the screen. Project in the upper right quadrant of the screen. Stop projecting an image (screen turns black). Project in the left quadrant of the screen. Project in the upper left quadrant of the screen. Presentation Function via Network Using Presentation Function via Network 37 Change the application settings. Display the number of the wireless signal. Using the Controller Network...
... projector. Select a projection method then start projecting an image. Display the users' status. Pause projecting an image. Project in the lower right quadrant of the screen. Project in the upper right quadrant of the screen. Stop projecting an image (screen turns black). Project in the left quadrant of the screen. Project in the upper left quadrant of the screen. Presentation Function via Network Using Presentation Function via Network 37 Change the application settings. Display the number of the wireless signal. Using the Controller Network...

Operating Instructions
Page 43
... abnormal operation of flashes. Address the problem in Standby mode. • The projector is ready to a wall outlet again then turn on . • The lamp cools after the projector is unusually high. After checking that the ON/STANDBY indicator goes out, plug the power cord to operate after having been turned on the power again. ON/STANDBY indicator Status Lights in red Flashes in green Lights in green Lights in orange Flashes in red Flashes twice Flashes six times Other number of flashes Meaning/Remedies The projector is...
... abnormal operation of flashes. Address the problem in Standby mode. • The projector is ready to a wall outlet again then turn on . • The lamp cools after the projector is unusually high. After checking that the ON/STANDBY indicator goes out, plug the power cord to operate after having been turned on the power again. ON/STANDBY indicator Status Lights in red Flashes in green Lights in green Lights in orange Flashes in red Flashes twice Flashes six times Other number of flashes Meaning/Remedies The projector is...

Operating Instructions
Page 44
... connected equipment to Restart projector will be "On" if Projector is set . When not using the projector at high altitude. The control keys are locked! Not applicable! Messages List When any change in the Installation menu is out of the messages listed below appears on the projected image, address the problem in accordance with a new one for signals supported by the projector. Lamp off the projector directly, press and hold the ?/1 key. Clean the air filter. High Altitude Mode...
... connected equipment to Restart projector will be "On" if Projector is set . When not using the projector at high altitude. The control keys are locked! Not applicable! Messages List When any change in the Installation menu is out of the messages listed below appears on the projected image, address the problem in accordance with a new one for signals supported by the projector. Lamp off the projector directly, press and hold the ?/1 key. Clean the air filter. High Altitude Mode...

Operating Instructions
Page 45
... connecting cable is set "V Keystone" manually. When the "V Keystone" is connected to the projector is firmly connected. - If the lamp or lamp cover is not attached securely, the projector 47 cannot be judged correctly. Troubleshooting Before asking to have the projector repaired, try to the projector. • Check the condition of the wireless connection. Symptoms Remedy Page The power is not turned Check if the AC power cord is 39 compatible with the projector. When the "Control...
... connecting cable is set "V Keystone" manually. When the "V Keystone" is connected to the projector is firmly connected. - If the lamp or lamp cover is not attached securely, the projector 47 cannot be judged correctly. Troubleshooting Before asking to have the projector repaired, try to the projector. • Check the condition of the wireless connection. Symptoms Remedy Page The power is not turned Check if the AC power cord is 39 compatible with the projector. When the "Control...

Operating Instructions
Page 46
.... "High Altitude Mode" is used at a high altitude. power consumption. on . "With Static Signal" is set to the input image. Check "Lamp Timer," and replace the lamp with the power on the lens. When the "Lamp Mode" is set to "Auto," the luminance of 4, 4 the projector rises and the fan noise becomes larger. 46 Troubleshooting The image becomes When the lamp is not set properly. - Remedy The settings for "Brightness," "Contrast," and "Lamp Mode" affect brightness of the image. Audio is...
.... "High Altitude Mode" is used at a high altitude. power consumption. on . "With Static Signal" is set to the input image. Check "Lamp Timer," and replace the lamp with the power on the lens. When the "Lamp Mode" is set to "Auto," the luminance of 4, 4 the projector rises and the fan noise becomes larger. 46 Troubleshooting The image becomes When the lamp is not set properly. - Remedy The settings for "Brightness," "Contrast," and "Lamp Mode" affect brightness of the image. Audio is...

Operating Instructions
Page 47
... the designated location. If you touch the lamp, you pull out the lamp while the projector is turned off the projector, and disconnect the AC power cord from a wall outlet. 2 When the lamp has cooled sufficiently, open the lamp cover by loosening 1 screw. If you may cause injury. 3 Loosen the 2 screws on the projected image (page 44). Replacing the Lamp Replace the lamp with a new one if a message displayed on the lamp then pull...
... the designated location. If you touch the lamp, you pull out the lamp while the projector is turned off the projector, and disconnect the AC power cord from a wall outlet. 2 When the lamp has cooled sufficiently, open the lamp cover by loosening 1 screw. If you may cause injury. 3 Loosen the 2 screws on the projected image (page 44). Replacing the Lamp Replace the lamp with a new one if a message displayed on the lamp then pull...

Operating Instructions
Page 78
... IN 6 Acceptable input signal 57 Adjust Signal 22 Air filter 49 Air filter cover/Ventilation holes (intake 4 APA 6 Aspect 6, 21, 23 B BLANK 7 Brightness 20 C CC Display 25 Color 20 Color Temp 20 Connecting a computer 9 Connecting a Video equipment 10 Connecting an external monitor and audio equipment 13 Connector panel 4, 5 Contrast 20 Control Key Lock 26 Control Panel Keys 6 Correcting trapezoidal distortion of the projected image (Keystone feature 6, 17 D Digital Zoom 7 E ECO MODE (Energy-saving mode) ......... 7 F fH 30 Focus 15 Focus ring 4 Freeze 7 Front...
... IN 6 Acceptable input signal 57 Adjust Signal 22 Air filter 49 Air filter cover/Ventilation holes (intake 4 APA 6 Aspect 6, 21, 23 B BLANK 7 Brightness 20 C CC Display 25 Color 20 Color Temp 20 Connecting a computer 9 Connecting a Video equipment 10 Connecting an external monitor and audio equipment 13 Connector panel 4, 5 Contrast 20 Control Key Lock 26 Control Panel Keys 6 Correcting trapezoidal distortion of the projected image (Keystone feature 6, 17 D Digital Zoom 7 E ECO MODE (Energy-saving mode) ......... 7 F fH 30 Focus 15 Focus ring 4 Freeze 7 Front...
Startup Guide
Page 29
... (red, blue, or green) that has high internal pressure. • When using the unit at high altitudes could have adverse effects, such as reducing the reliability of certain components. • Set "Installation Attitude" on the Installation menu correctly to suit to "On" in the Installation menu. Failing to set this mode when using the unit at an altitude of the same model, the color reproduction among projectors may...
... (red, blue, or green) that has high internal pressure. • When using the unit at high altitudes could have adverse effects, such as reducing the reliability of certain components. • Set "Installation Attitude" on the Installation menu correctly to suit to "On" in the Installation menu. Failing to set this mode when using the unit at an altitude of the same model, the color reproduction among projectors may...

Startup Guide
Page 37
... menu is set APA in the Installation menu. 2 Use the V/v/B/b keys to "On", executes APA automatically when a signal is input from a computer (APA (Auto Pixel Alignment)) Press the APA key on the remote commander or select V Keystone in the Screen Menu. Press again to restore the previous image. The higher the value, narrower the top of the projected image (Keystone feature) Normally the Keystone feature automatically adjusts the projected image. Automatically adjusts...
... menu is set APA in the Installation menu. 2 Use the V/v/B/b keys to "On", executes APA automatically when a signal is input from a computer (APA (Auto Pixel Alignment)) Press the APA key on the remote commander or select V Keystone in the Screen Menu. Press again to restore the previous image. The higher the value, narrower the top of the projected image (Keystone feature) Normally the Keystone feature automatically adjusts the projected image. Automatically adjusts...

Startup Guide
Page 39
... air filter is on the projector. After checking that the ON/STANDBY indicator goes out, plug the power cord to cool then turn on . Consult with qualified Sony personnel. Flashes twice The lamp cover is unusually high. Flashes three times The temperature of flashes. The projector's power is not clogged (page 20). • Check if the Installation Attitude in accordance with the following . Address the problem in red Symptoms are indicated by number of flashes. Turn off . LAMP/COVER indicator Status Meaning/Remedies Flashes...
... air filter is on the projector. After checking that the ON/STANDBY indicator goes out, plug the power cord to cool then turn on . Consult with qualified Sony personnel. Flashes twice The lamp cover is unusually high. Flashes three times The temperature of flashes. The projector's power is not clogged (page 20). • Check if the Installation Attitude in accordance with the following . Address the problem in red Symptoms are indicated by number of flashes. Turn off . LAMP/COVER indicator Status Meaning/Remedies Flashes...


