
Brochure
Page 1
...approximately 3kg, the stylish, practical design of the image displayed by Sony to access making it ideal for professional presentations in schools, universities and corporate environments. PrimeSupport All Sony business projectors come supplied with a 3-year support pack which produces higher brightness,...(1024 x 768) resolution, allows users to your presentation without the audience knowing. Product Information VPL-EX70 3LCD portable projector with 2600 ANSI lumens The VPL-EX70 projector has been designed to be both simple to use and easy to deliver improved panel light resistance,...
...approximately 3kg, the stylish, practical design of the image displayed by Sony to access making it ideal for professional presentations in schools, universities and corporate environments. PrimeSupport All Sony business projectors come supplied with a 3-year support pack which produces higher brightness,...(1024 x 768) resolution, allows users to your presentation without the audience knowing. Product Information VPL-EX70 3LCD portable projector with 2600 ANSI lumens The VPL-EX70 projector has been designed to be both simple to use and easy to deliver improved panel light resistance,...

Brochure
Page 2
... again when a signal is input or any key is pressed. There is switched off . Technical Specifications --Optical-- VPL- Security Features Password access, control panel lock and optional security cable and security bar can all help to prevent misuse... Spanish, Portuguese, Russian, Swedish, Norwegian, Japanese, Chinese (Simplifi ed / Traditional), Korean, Thai, Arabic, Turkish www.sonybiz.net/projectors 2 Projector System Projector Lens Throw Distance Lamp Lamp Life Screen Coverage Light Output Colour Light Output Contrast Colour System --Signals-- Dimensions (WxHxD) Mass Cabinet Colour...
... again when a signal is input or any key is pressed. There is switched off . Technical Specifications --Optical-- VPL- Security Features Password access, control panel lock and optional security cable and security bar can all help to prevent misuse... Spanish, Portuguese, Russian, Swedish, Norwegian, Japanese, Chinese (Simplifi ed / Traditional), Korean, Thai, Arabic, Turkish www.sonybiz.net/projectors 2 Projector System Projector Lens Throw Distance Lamp Lamp Life Screen Coverage Light Output Colour Light Output Contrast Colour System --Signals-- Dimensions (WxHxD) Mass Cabinet Colour...

Brochure
Page 3
... Label CD-ROM (Operating Instructions) Quick Reference Manual Safety Regulations AC Power Cord Lens Cap Carrying Case (1) Warranty Card (outside of box) www.sonybiz.net/projectors 3 VPL- --Safety Regulations-- Safety Regulations --Interfaces--
... Label CD-ROM (Operating Instructions) Quick Reference Manual Safety Regulations AC Power Cord Lens Cap Carrying Case (1) Warranty Card (outside of box) www.sonybiz.net/projectors 3 VPL- --Safety Regulations-- Safety Regulations --Interfaces--

User Manual
Page 1
Please check with your local Sony Authorized Dealer. © 2009 Sony Corporation VPL-EX70 VPL-EX7 VPL-ES7 Not all models are available in all countries. 4-135-541-12 (1) Data Projector Operating Instructions Before operating the unit, please read this manual thoroughly and retain it for future reference.
Please check with your local Sony Authorized Dealer. © 2009 Sony Corporation VPL-EX70 VPL-EX7 VPL-ES7 Not all models are available in all countries. 4-135-541-12 (1) Data Projector Operating Instructions Before operating the unit, please read this manual thoroughly and retain it for future reference.

User Manual
Page 4
... Controls .. 11 Top/Right Side/Front 11 Rear/Bottom 11 Control Panel 13 Connector Panel 15 Remote Commander 16 Projecting the Picture Installing the Projector 18 Connecting the Projector 18 Connecting a Computer 18 Connecting a VCR 19 Projecting 20 Turning Off the Power 22 Convenient Functions Selecting the Menu Language .......... 23 Security Lock...
... Controls .. 11 Top/Right Side/Front 11 Rear/Bottom 11 Control Panel 13 Connector Panel 15 Remote Commander 16 Projecting the Picture Installing the Projector 18 Connecting the Projector 18 Connecting a Computer 18 Connecting a VCR 19 Projecting 20 Turning Off the Power 22 Convenient Functions Selecting the Menu Language .......... 23 Security Lock...

User Manual
Page 5
...cloth or glass cleaning cloth lightly dampened with ventilation holes (intake) and ventilation holes (exhaust). If voltage adaptation is required, consult with qualified Sony personnel. • Should any windows that face the screen with respect to the "Cleaning the Air Filter" on the cabinet. Never pull the..., benzene or thinner, or acid, alkaline or abrasive detergent, or chemical cleaning cloth, as it is hot. • Be careful not to the projector. Do not use a damp cloth, detergent solution, or thinner. • Wipe the lens gently with a soft cloth such as a cleaning cloth ...
...cloth or glass cleaning cloth lightly dampened with ventilation holes (intake) and ventilation holes (exhaust). If voltage adaptation is required, consult with qualified Sony personnel. • Should any windows that face the screen with respect to the "Cleaning the Air Filter" on the cabinet. Never pull the..., benzene or thinner, or acid, alkaline or abrasive detergent, or chemical cleaning cloth, as it is hot. • Be careful not to the projector. Do not use a damp cloth, detergent solution, or thinner. • Wipe the lens gently with a soft cloth such as a cleaning cloth ...

User Manual
Page 6
... high-precision technology. When the images are projected onto the screens from multiple LCD data projectors, they may generate color distinctions because each projector has its own color balance even if the projectors are the same models. You may, however, see tiny black points and/or bright ... temperature sensor will function, and the power will be scratched. • If the cabinet is in the following situations. LCD data projector This LCD data projector is a normal result of the manufacturing process and does not indicate a malfunction. • If you rub on the cabinet with ...
... high-precision technology. When the images are projected onto the screens from multiple LCD data projectors, they may generate color distinctions because each projector has its own color balance even if the projectors are the same models. You may, however, see tiny black points and/or bright ... temperature sensor will function, and the power will be scratched. • If the cabinet is in the following situations. LCD data projector This LCD data projector is a normal result of the manufacturing process and does not indicate a malfunction. • If you rub on the cabinet with ...

User Manual
Page 7
...sensor may cause malfunction. Notes on its side. Clean the air filter whenever you replace the lamp. Unsuitable Conditions Do not use the projector under the following conditions. Locations subject to moisture condensation or a rise in any way other than placing it . Do not stand ...obstructed, and this may cause a malfunction of the unit or damage it on a level surface or suspending from an air-conditioner Installing the projector in a location where the temperature may rise rapidly. Hot and humid Very dusty, extremely smoky locations • Avoid installing the unit in a...
...sensor may cause malfunction. Notes on its side. Clean the air filter whenever you replace the lamp. Unsuitable Conditions Do not use the projector under the following conditions. Locations subject to moisture condensation or a rise in any way other than placing it . Do not stand ...obstructed, and this may cause a malfunction of the unit or damage it on a level surface or suspending from an air-conditioner Installing the projector in a location where the temperature may rise rapidly. Hot and humid Very dusty, extremely smoky locations • Avoid installing the unit in a...

User Manual
Page 8
...in the carrying case, disconnect the AC power cord and all other connecting cables or cards, and store the supplied accessories in a pocket of the projector. Do not place a blocking object just in front of the lens Do not place any object just in the carrying case, do not drop ...transporting the unit stored in front of the lens that covers the ventilation holes (exhaust/ intake); Note on the distance between the screen and the projector or the zooming magnification settings used. otherwise, internal heat may cause damage. Use the PIC MUTING key to set this may build up. Failing to...
...in the carrying case, disconnect the AC power cord and all other connecting cables or cards, and store the supplied accessories in a pocket of the projector. Do not place a blocking object just in front of the lens Do not place any object just in the carrying case, do not drop ...transporting the unit stored in front of the lens that covers the ventilation holes (exhaust/ intake); Note on the distance between the screen and the projector or the zooming magnification settings used. otherwise, internal heat may cause damage. Use the PIC MUTING key to set this may build up. Failing to...

User Manual
Page 9
... handling and use . Check them before use of this product includes the Main unit (projector) and the following manuals are supplied with the projector. Included Attachments The package for projecting pictures after you have Adobe Acrobat Reader 5.0 or ...describes the setup and operations of this projector. Manuals Quick Reference Manual (separately printed manual) This manual describes basic operations for this projector. Main unit (projector) (1) RM-PJ6 Remote Commander (1) HD D-sub 15 pin cable (1.8 m) (1) (1-967100-11/Sony) About the Supplied Manuals / Included Attachments...
... handling and use . Check them before use of this product includes the Main unit (projector) and the following manuals are supplied with the projector. Included Attachments The package for projecting pictures after you have Adobe Acrobat Reader 5.0 or ...describes the setup and operations of this projector. Manuals Quick Reference Manual (separately printed manual) This manual describes basic operations for this projector. Main unit (projector) (1) RM-PJ6 Remote Commander (1) HD D-sub 15 pin cable (1.8 m) (1) (1-967100-11/Sony) About the Supplied Manuals / Included Attachments...
User Manual
Page 13
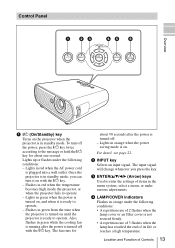
...off with the ?/1 key. - c ENTER/v/V/b/B (Arrow) keys Used to enter the settings of its life or reaches a high temperature. Once the projector is turned off the power, press the ?/1 key twice according to operate. Location and Function of 2 flashes when the lamp cover or air filter ...cover is ready to operate. - Control Panel 1 23 45 6 Overview a ?/1 (On/Standby) key Turns on the projector when the projector is on. Flashes in the menu system, select a menu, or make various adjustments. Lights in standby mode. The fan runs for about 90 ...
...off with the ?/1 key. - c ENTER/v/V/b/B (Arrow) keys Used to enter the settings of its life or reaches a high temperature. Once the projector is turned off the power, press the ?/1 key twice according to operate. Location and Function of 2 flashes when the lamp cover or air filter ...cover is ready to operate. - Control Panel 1 23 45 6 Overview a ?/1 (On/Standby) key Turns on the projector when the projector is on. Flashes in the menu system, select a menu, or make various adjustments. Lights in standby mode. The fan runs for about 90 ...
User Manual
Page 16
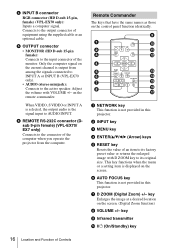
... c MENU key d ENTER/v/V/b/B (Arrow) keys e RESET key Resets the value of the computer when you operate the projector from among the signals connected to INPUT A or INPUT B (VPL-EX70 only). • AUDIO (stereo minijack): Connects to its factory preset value or returns the enlarged image with VOLUME +/- key...same names as those on the remote commander. f AUTO FOCUS key This function is not provided in this projector. d INPUT B connector RGB connector (HD D-sub 15-pin, female) (VPL-EX70 only): Inputs a computer signal. Connects to the connector of an item to its original size. on the...
... c MENU key d ENTER/v/V/b/B (Arrow) keys e RESET key Resets the value of the computer when you operate the projector from among the signals connected to INPUT A or INPUT B (VPL-EX70 only). • AUDIO (stereo minijack): Connects to its factory preset value or returns the enlarged image with VOLUME +/- key...same names as those on the remote commander. f AUTO FOCUS key This function is not provided in this projector. d INPUT B connector RGB connector (HD D-sub 15-pin, female) (VPL-EX70 only): Inputs a computer signal. Connects to the connector of an item to its original size. on the...

User Manual
Page 17
... the battery cover by a thin stick inserting to its clearest while a signal is not provided in "The SET SETTING Menu" on the projector. Pressing this projector. p AUDIO MUTING key Cuts off the picture. To cancel the frozen picture, press the key again. Location and Function of the image....8226; Keep the lithium battery out of the reach of the remote control detector or the screen. • The operation range is used in this projector. m LENS key This function is input from the lithium battery holder. l APA (Auto Pixel Alignment) key Automatically adjusts a picture to a hole,...
... the battery cover by a thin stick inserting to its clearest while a signal is not provided in "The SET SETTING Menu" on the projector. Pressing this projector. p AUDIO MUTING key Cuts off the picture. To cancel the frozen picture, press the key again. Location and Function of the image....8226; Keep the lithium battery out of the reach of the remote control detector or the screen. • The operation range is used in this projector. m LENS key This function is input from the lithium battery holder. l APA (Auto Pixel Alignment) key Automatically adjusts a picture to a hole,...

User Manual
Page 18
...any connections. • Use the proper cables for each connection. • Insert the cable plugs firmly; B Projecting the Picture Installing the Projector This unit can be sure to pull it out by the plug, not the cable itself. For more information, refer to the computer's ...instruction manual. 18 Installing the Projector / Connecting the Projector For details, see "Installation Diagram" on a floor or desktop (floor installation), but also can be operated on page 52. loose connections...
...any connections. • Use the proper cables for each connection. • Insert the cable plugs firmly; B Projecting the Picture Installing the Projector This unit can be sure to pull it out by the plug, not the cable itself. For more information, refer to the computer's ...instruction manual. 18 Installing the Projector / Connecting the Projector For details, see "Installation Diagram" on a floor or desktop (floor installation), but also can be operated on page 52. loose connections...

User Manual
Page 19
Projecting the Picture To connect a computer Rear side VPL-EX70 to the AUDIO INPUT connector. • The projector accepts VGA, SVGA, XGA, SXGA, SXGA+, WXGA signals. Note To connect a Macintosh computer equipped with your computer. To connect to a video or S video output connector Rear side VPL-EX70 to audio input 1 HD D-sub 15-pin cable (supplied...
Projecting the Picture To connect a computer Rear side VPL-EX70 to the AUDIO INPUT connector. • The projector accepts VGA, SVGA, XGA, SXGA, SXGA+, WXGA signals. Note To connect a Macintosh computer equipped with your computer. To connect to a video or S video output connector Rear side VPL-EX70 to audio input 1 HD D-sub 15-pin cable (supplied...

User Manual
Page 20
...) (Use a no-resistance cable.) 2 Video cable (not supplied) or S-Video cable (not supplied) To connect to a video GBR/ Component output connector Rear side VPL-EX70 Projecting 1,2 4 7 to audio output (L) to audio output (R) to video GBR/ component output VCR 1 Signal Cable (not supplied) HD D-sub 15-pin (male)... setting on the INPUT SETTING menu according to the input signal. • When you connect the projector to a video GBR output connector, select "Video GBR" or when you connect the projector to the AUDIO INPUT connector. • Set the aspect ratio using "Aspect" on the SET ...
...) (Use a no-resistance cable.) 2 Video cable (not supplied) or S-Video cable (not supplied) To connect to a video GBR/ Component output connector Rear side VPL-EX70 Projecting 1,2 4 7 to audio output (L) to audio output (R) to video GBR/ component output VCR 1 Signal Cable (not supplied) HD D-sub 15-pin (male)... setting on the INPUT SETTING menu according to the input signal. • When you connect the projector to a video GBR output connector, select "Video GBR" or when you connect the projector to the AUDIO INPUT connector. • Set the aspect ratio using "Aspect" on the SET ...

User Manual
Page 21
... on page 33. • The Smart APA feature is projected clearly. Adjuster adjustment button Notes • Be careful not to let the projector down on your computer, for the input analog signal from the connected equipment and displays the input channel where the input signals are found. ... The ?/1 key lights in -one LCD type, you press the key, the input signal switches as follows: Input-A t Input-B t Video t S-Video (VPL-EX70 only) To input from Press INPUT to display Computer/Component Input-A connected to the INPUT A connector Computer connected to Input-B the INPUT B connector...
... on page 33. • The Smart APA feature is projected clearly. Adjuster adjustment button Notes • Be careful not to let the projector down on your computer, for the input analog signal from the connected equipment and displays the input channel where the input signals are found. ... The ?/1 key lights in -one LCD type, you press the key, the input signal switches as follows: Input-A t Input-B t Video t S-Video (VPL-EX70 only) To input from Press INPUT to display Computer/Component Input-A connected to the INPUT A connector Computer connected to Input-B the INPUT B connector...

User Manual
Page 22
... disappears if you press any key for the first 60 seconds. 7 Adjust the trapezoidal distortion ( ) of the picture and the focus. For VPL-EX70 • When you will not be perfectly adjusted depending on the room temperature or the screen angle. Press the KEYSTONE key to "V Keystone" ...key flashes quickly for five seconds. 2 Press the ?/1 key again. In this time, you adjust the tilt of the projector with the v/V/b/B keys. 8 Adjust the size of the picture. (VPL-EX7/ ES7 only) Press the KEYSTONE key on the screen, and adjust the value with the adjuster, the V keystone...
... disappears if you press any key for the first 60 seconds. 7 Adjust the trapezoidal distortion ( ) of the picture and the focus. For VPL-EX70 • When you will not be perfectly adjusted depending on the room temperature or the screen angle. Press the KEYSTONE key to "V Keystone" ...key flashes quickly for five seconds. 2 Press the ?/1 key again. In this time, you adjust the tilt of the projector with the v/V/b/B keys. 8 Adjust the size of the picture. (VPL-EX7/ ES7 only) Press the KEYSTONE key on the screen, and adjust the value with the adjuster, the V keystone...
User Manual
Page 23
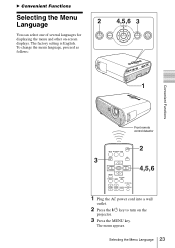
Selecting the Menu Language 23 The menu appears. The factory setting is English. To change the menu language, proceed as follows: 2 4,5,6 3 1 Convenient Functions Front remote control detector 3 INPUT NETWORK USB MENU APA 2 ENTER RESET KEYSTONE AUTO FOCUS LENS /TILT PIC MUTING D ZOOM VOLUME FREEZE AUDIO MUTING 4,5,6 1 Plug the AC power cord into a wall outlet. 2 Press the ?/1 key to turn on -screen displays. B Convenient Functions Selecting the Menu Language You can select one of several languages for displaying the menu and other on the projector. 3 Press the MENU key.
Selecting the Menu Language 23 The menu appears. The factory setting is English. To change the menu language, proceed as follows: 2 4,5,6 3 1 Convenient Functions Front remote control detector 3 INPUT NETWORK USB MENU APA 2 ENTER RESET KEYSTONE AUTO FOCUS LENS /TILT PIC MUTING D ZOOM VOLUME FREEZE AUDIO MUTING 4,5,6 1 Plug the AC power cord into a wall outlet. 2 Press the ?/1 key to turn on -screen displays. B Convenient Functions Selecting the Menu Language You can select one of several languages for displaying the menu and other on the projector. 3 Press the MENU key.
User Manual
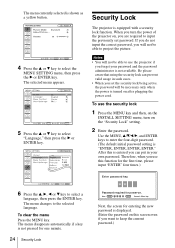
Page 24
... put in such cases. • When you forget your own password. After this screen even if you want to use the projector if you set password. Security Lock The projector is not pressed for one minute. 24 Security Lock Password required for entering the new password is displayed. (Enter the password on..., when you use the security lock 1 Press the MENU key and then, on the INSTALL SETTING menu, turn on , you turn the power of the projector on the "Security Lock" setting. 2 Enter the password.
... put in such cases. • When you forget your own password. After this screen even if you want to use the projector if you set password. Security Lock The projector is not pressed for one minute. 24 Security Lock Password required for entering the new password is displayed. (Enter the password on..., when you use the security lock 1 Press the MENU key and then, on the INSTALL SETTING menu, turn on , you turn the power of the projector on the "Security Lock" setting. 2 Enter the password.


