
Brochure
Page 2
... and security bar can all help to prevent misuse, tampering and theft in Standby: 3W 816 BTU 33dB (Lamp mode: Standard) Monaural speaker system, Approx. 40x28.5mm (output 1W MAX) 0 to 35°C degrees...V, 3.6 to 1.6 A, 50/60 Hz Max.: 260W, in classrooms or meeting rooms. 2 x Power-saving modes Lamp Cutoff: Lamp cuts off . Easy to use The projector's height adjuster is located at the back to make it easier to be... on the top of the projector. VPL- Projector System Projector Lens Throw Distance Lamp Lamp Life Screen Coverage Light Output Colour Light Output Contrast Colour System --Signals--
... and security bar can all help to prevent misuse, tampering and theft in Standby: 3W 816 BTU 33dB (Lamp mode: Standard) Monaural speaker system, Approx. 40x28.5mm (output 1W MAX) 0 to 35°C degrees...V, 3.6 to 1.6 A, 50/60 Hz Max.: 260W, in classrooms or meeting rooms. 2 x Power-saving modes Lamp Cutoff: Lamp cuts off . Easy to use The projector's height adjuster is located at the back to make it easier to be... on the top of the projector. VPL- Projector System Projector Lens Throw Distance Lamp Lamp Life Screen Coverage Light Output Colour Light Output Contrast Colour System --Signals--

User Manual
Page 3
... or the Electronic Industries Alliance (www.eiae.org). Disposal of the FCC Rules. - All interface cables used lamp For the customers in the USA Lamp in this product, you have any changes or modifications not expressly approved in order to the addresses given in... You are cautioned that any questions about this product contains mercury. For the State of Conformity Trade Name: SONY Model: VPL-EX70, VPL-EX7, VPL-ES7 Responsible party: Sony Electronics Inc. Operation is Sony Corporation, 1-7-1 Konan, Minato-ku, Tokyo, 108-0075 Japan. Telephone Number: 858-942-2230 This device ...
... or the Electronic Industries Alliance (www.eiae.org). Disposal of the FCC Rules. - All interface cables used lamp For the customers in the USA Lamp in this product, you have any changes or modifications not expressly approved in order to the addresses given in... You are cautioned that any questions about this product contains mercury. For the State of Conformity Trade Name: SONY Model: VPL-EX70, VPL-EX7, VPL-ES7 Responsible party: Sony Electronics Inc. Operation is Sony Corporation, 1-7-1 Konan, Minato-ku, Tokyo, 108-0075 Japan. Telephone Number: 858-942-2230 This device ...

User Manual
Page 4
... Memory No. ....32 The SET SETTING Menu 33 The MENU SETTING Menu ...........35 The INSTALL SETTING Menu .......36 The INFORMATION Menu 38 Maintenance Replacing the Lamp 40 Cleaning the Air Filter 42 Others Troubleshooting 43 Messages List 45 Specifications 47 Installation Diagram 52 Floor Installation (Front Projection 52 Ceiling Installation (Front...
... Memory No. ....32 The SET SETTING Menu 33 The MENU SETTING Menu ...........35 The INSTALL SETTING Menu .......36 The INFORMATION Menu 38 Maintenance Replacing the Lamp 40 Cleaning the Air Filter 42 Others Troubleshooting 43 Messages List 45 Specifications 47 Installation Diagram 52 Floor Installation (Front Projection 52 Ceiling Installation (Front...

User Manual
Page 5
... of the cabinet or remove the indications on the lens, use a soft dry cloth. Precautions 5 If voltage adaptation is required, consult with qualified Sony personnel. • Should any windows that face the screen with a soft dry cloth. Cleaning the air filter • Clean the air filter whenever... you replace the lamp. • Refer to the following: • Avoid touching the lens. To remove dust on the cabinet. Do not use solvent such as alcohol,...
... of the cabinet or remove the indications on the lens, use a soft dry cloth. Precautions 5 If voltage adaptation is required, consult with qualified Sony personnel. • Should any windows that face the screen with a soft dry cloth. Cleaning the air filter • Clean the air filter whenever... you replace the lamp. • Refer to the following: • Avoid touching the lens. To remove dust on the cabinet. Do not use solvent such as alcohol,...

User Manual
Page 7
... upright on Installation and Usage 7 Locations subject to direct cool or warm air from the ceiling. Clean the air filter whenever you replace the lamp. It may cause a malfunction of the unit due to an angle of the unit. Notes on its side. Such an installation may cause... Do not use the projector under the following conditions. Dust preventing the air passing through the filter may cause color shading or shorten the lamp life excessively. Hot and humid Very dusty, extremely smoky locations • Avoid installing the unit in a location where the temperature or humidity...
... upright on Installation and Usage 7 Locations subject to direct cool or warm air from the ceiling. Clean the air filter whenever you replace the lamp. It may cause a malfunction of the unit due to an angle of the unit. Notes on its side. Such an installation may cause... Do not use the projector under the following conditions. Dust preventing the air passing through the filter may cause color shading or shorten the lamp life excessively. Hot and humid Very dusty, extremely smoky locations • Avoid installing the unit in a location where the temperature or humidity...

User Manual
Page 12
... it . Security bar p Security lock Connects to pull out, pull out the Security bar using a screwdriver. g Ventilation holes (intake)/Air filter cover h Adjusters (fore pad) i Lamp cover j Adjuster k Connector Panel For details, see "Cleaning the Air Filter" on page 15. e Zoom ring Adjusts the picture size. For details, see "Connector Panel... the adjuster" on page 13. Web page address: http://www.kensington.com/ Note To maintain optimal performance, clean the air filter whenever you replace the lamp. l AC IN socket Connects the supplied AC power cord.
... it . Security bar p Security lock Connects to pull out, pull out the Security bar using a screwdriver. g Ventilation holes (intake)/Air filter cover h Adjusters (fore pad) i Lamp cover j Adjuster k Connector Panel For details, see "Cleaning the Air Filter" on page 15. e Zoom ring Adjusts the picture size. For details, see "Connector Panel... the adjuster" on page 13. Web page address: http://www.kensington.com/ Note To maintain optimal performance, clean the air filter whenever you replace the lamp. l AC IN socket Connects the supplied AC power cord.
User Manual
Page 13
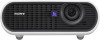
... will change whenever you can turn off . - Also, flashes in green while the cooling fan is running after the power is plugged into a wall outlet. d LAMP/COVER indicators Flashes in green when the power is turned on, and when it on with the ?/1 key. Lights in orange under the following conditions...input signal. For detail, see page 22. To turn it is not secured firmly. • A repetition rate of 3 flashes when the lamp has reached the end of 2 flashes when the lamp cover or air filter cover is ready to the message or hold the ?/1 key for about one second. Lights up or...
... will change whenever you can turn off . - Also, flashes in green while the cooling fan is running after the power is plugged into a wall outlet. d LAMP/COVER indicators Flashes in green when the power is turned on, and when it on with the ?/1 key. Lights in orange under the following conditions...input signal. For detail, see page 22. To turn it is not secured firmly. • A repetition rate of 3 flashes when the lamp has reached the end of 2 flashes when the lamp cover or air filter cover is ready to the message or hold the ?/1 key for about one second. Lights up or...

User Manual
Page 27
... Input-A Smar t APA: On Auto Input Search: Off Input-A Signal Sel.: Component Color System: Auto Power Saving: Off Panel Key Lock: Off CC Display: Off Lamp Timer Reset Sub menu Menu Setting items PICTURE SETTING Input A ADJUST PICTURE Contrast: Brightness: Gamma Mode: Color Temp.: Standard 80 50 Graphics High 4 Make the...
... Input-A Smar t APA: On Auto Input Search: Off Input-A Signal Sel.: Component Color System: Auto Power Saving: Off Panel Key Lock: Off CC Display: Off Lamp Timer Reset Sub menu Menu Setting items PICTURE SETTING Input A ADJUST PICTURE Contrast: Brightness: Gamma Mode: Color Temp.: Standard 80 50 Graphics High 4 Make the...

User Manual
Page 33
...color system of signal input from the equipment connected to "On," the projector detects input signals in Off the following order: Input-A/Input-B (VPL-EX70 only)/Video/S-Video. If you press the APA key on or the INPUT key is pressed. Adjustments and Settings Using a Menu The SET ...t APA: On Auto Input Search: Off Input-A Signal Sel.: Auto Color System: Auto Power Saving: Off Panel Key Lock: Off CC Display: Off Lamp Timer Reset Input-A Setting items Functions Initial setting Smart APA The APA (Auto Pixel Alignment) automatically On adjusts "Dot Phase," "H Size" and "Shift"...
...color system of signal input from the equipment connected to "On," the projector detects input signals in Off the following order: Input-A/Input-B (VPL-EX70 only)/Video/S-Video. If you press the APA key on or the INPUT key is pressed. Adjustments and Settings Using a Menu The SET ...t APA: On Auto Input Search: Off Input-A Signal Sel.: Auto Color System: Auto Power Saving: Off Panel Key Lock: Off CC Display: Off Lamp Timer Reset Input-A Setting items Functions Initial setting Smart APA The APA (Auto Pixel Alignment) automatically On adjusts "Dot Phase," "H Size" and "Shift"...
User Manual
Page 34
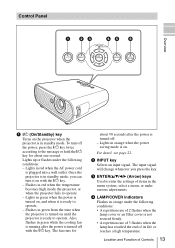
...when the full image is displayed on -screen menus - while you are operating on the screen 34 The SET SETTING Menu Off • Lamp off: The lamp goes off the Closed Captions (CC) function. If you adjust the picture manually. • If the input signal is not displayed correctly...input or any key is pressed. • Standby: The projector goes into Power Saving mode. Setting items Power Saving Panel Key Lock CC Display Lamp Timer Reset Functions Initial setting Selects the Power Saving mode. Adjust the "Dot Phase," "H Size," and "Shift" items on the INPUT SETTING ...
...when the full image is displayed on -screen menus - while you are operating on the screen 34 The SET SETTING Menu Off • Lamp off: The lamp goes off the Closed Captions (CC) function. If you adjust the picture manually. • If the input signal is not displayed correctly...input or any key is pressed. • Standby: The projector goes into Power Saving mode. Setting items Power Saving Panel Key Lock CC Display Lamp Timer Reset Functions Initial setting Selects the Power Saving mode. Adjust the "Dot Phase," "H Size," and "Shift" items on the INPUT SETTING ...
User Manual
Page 36
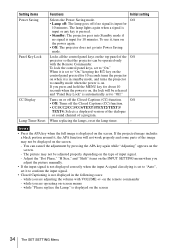
...screen horizontally and/or vertically. When the top of the trapezoid is used at an altitude of the projector. Lamp Mode Sets the lamp brightness used for manual correction using the v/V/b/B keys on page 24. The brightness of the screen when no ... lower value. INSTALL SETTING V Keystone: Auto Image Flip: Off Background: Blue Lamp Mode: Standard High Altitude Mode:Off Security Lock: Off Direct Power On: Off Input-A Setting items Functions Initial setting V Keystone (VPL-EX70 only) Corrects the trapezoidal distortion caused by the projection 0 angle using the v/V/b/B...
...screen horizontally and/or vertically. When the top of the trapezoid is used at an altitude of the projector. Lamp Mode Sets the lamp brightness used for manual correction using the v/V/b/B keys on page 24. The brightness of the screen when no ... lower value. INSTALL SETTING V Keystone: Auto Image Flip: Off Background: Blue Lamp Mode: Standard High Altitude Mode:Off Security Lock: Off Direct Power On: Off Input-A Setting items Functions Initial setting V Keystone (VPL-EX70 only) Corrects the trapezoidal distortion caused by the projection 0 angle using the v/V/b/B...
User Manual
Page 37
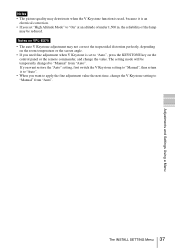
The INSTALL SETTING Menu 37 Notes on VPL-EX70 • The auto V Keystone adjustment may be temporarily changed to "Manual" from "Auto". If you want restore the "Auto" setting, first switch the V Keystone setting .... • If you need fine adjustment when V Keystone is set "High Altitude Mode" to "On" at an altitude of under 1,500 m, the reliability of the lamp may not correct the trapezoidal distortion perfectly, depending on the control panel or the remote commander, and change the V Keystone setting to "Manual" from "Auto...
The INSTALL SETTING Menu 37 Notes on VPL-EX70 • The auto V Keystone adjustment may be temporarily changed to "Manual" from "Auto". If you want restore the "Auto" setting, first switch the V Keystone setting .... • If you need fine adjustment when V Keystone is set "High Altitude Mode" to "On" at an altitude of under 1,500 m, the reliability of the lamp may not correct the trapezoidal distortion perfectly, depending on the control panel or the remote commander, and change the V Keystone setting to "Manual" from "Auto...

User Manual
Page 38
...is approximate. The displayed value is approximate. INFORMATION VPL-EX70 fH: fV: Lamp Timer: Input A Serial No. 3 3 3 3 3 3 3 48,47kHz 60,00Hz No.23 1024x768 2 H Model name Serial number Memory number of an input signal Signal type Setting items fH fV Lamp Timer Functions Displays the horizontal frequency of the input... signal. Displays the vertical frequency of the input signal. Note These are only displayed on . Indicates how long the lamp has been turned on the screen. You cannot alter the display, and these is no setting to be altered. 38 The INFORMATION ...
...is approximate. The displayed value is approximate. INFORMATION VPL-EX70 fH: fV: Lamp Timer: Input A Serial No. 3 3 3 3 3 3 3 48,47kHz 60,00Hz No.23 1024x768 2 H Model name Serial number Memory number of an input signal Signal type Setting items fH fV Lamp Timer Functions Displays the horizontal frequency of the input... signal. Displays the vertical frequency of the input signal. Note These are only displayed on . Indicates how long the lamp has been turned on the screen. You cannot alter the display, and these is no setting to be altered. 38 The INFORMATION ...
User Manual
Page 40
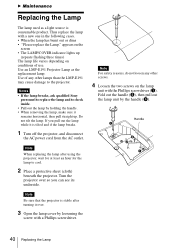
Notes • If the lamp breaks, ask qualified Sony personnel to replace the lamp and to check inside. • Pull out the lamp by holding the handle. • When removing the lamp, make sure it over so you pull out the lamp while it is tilted and if the lamp breaks. 1 Turn off the ...projector, and disconnect the AC power cord from the AC outlet. Do not tilt the lamp. Note Be sure that the projector is consumable product. B Maintenance Replacing the Lamp The lamp used as the replacement lamp. Note For safety reasons, do not loosen any other screws. 4 Loosen the two screws...
Notes • If the lamp breaks, ask qualified Sony personnel to replace the lamp and to check inside. • Pull out the lamp by holding the handle. • When removing the lamp, make sure it over so you pull out the lamp while it is tilted and if the lamp breaks. 1 Turn off the ...projector, and disconnect the AC power cord from the AC outlet. Do not tilt the lamp. Note Be sure that the projector is consumable product. B Maintenance Replacing the Lamp The lamp used as the replacement lamp. Note For safety reasons, do not loosen any other screws. 4 Loosen the two screws...
User Manual
Page 41
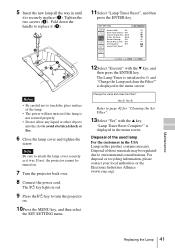
... t APA: On Auto Input Search: Off Input-A Signal Sel.: Auto Color System: Auto Power Saving: Off Panel Key Lock: Off CC Display: Off Lamp Timer Reset Input-A Notes • Be careful not to page 42 for "Cleaning the Air Filter". 13Select "Yes" with the V key, and then...cannot be regulated due to environmental considerations. Tighten the two screws (b). Fold down the handle to avoid electrical shock or fire. 6 Close the lamp cover and tighten the screw. is displayed in the menu screen. For disposal or recycling information, please contact your local authorities or the Electronic ...
... t APA: On Auto Input Search: Off Input-A Signal Sel.: Auto Color System: Auto Power Saving: Off Panel Key Lock: Off CC Display: Off Lamp Timer Reset Input-A Notes • Be careful not to page 42 for "Cleaning the Air Filter". 13Select "Yes" with the V key, and then...cannot be regulated due to environmental considerations. Tighten the two screws (b). Fold down the handle to avoid electrical shock or fire. 6 Close the lamp cover and tighten the screw. is displayed in the menu screen. For disposal or recycling information, please contact your local authorities or the Electronic ...

User Manual
Page 42
... or how the projector is not closed securely. • The air filter has a face and a reverse side. Air filter Notes • If you replace the lamp. As a result, the temperature may accumulate, clogging it. Place the air filter so that it fits in a shaded place. 5 Attach the air filter so that...
... or how the projector is not closed securely. • The air filter has a face and a reverse side. Air filter Notes • If you replace the lamp. As a result, the temperature may accumulate, clogging it. Place the air filter so that it fits in a shaded place. 5 Attach the air filter so that...
User Manual
Page 43
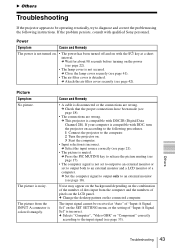
...page 18). • The connections are wrong. c Attach the air filter cover securely (see page 21). • The picture is compatible with qualified Sony personnel. c This projector is muted. If your computer is not secured. c Selects "Computer", "Video GBR" or "Component" correctly according to an external...; The power has been turned off and on with DDC, turn the projector on the LCD panel. c Close the lamp cover securely (see page 22). • The lamp cover is compatible with the ?/1 key at "Auto" of "Input-A Signal Sel" on the connected computer. The picture...
...page 18). • The connections are wrong. c Attach the air filter cover securely (see page 21). • The picture is compatible with qualified Sony personnel. c This projector is muted. If your computer is not secured. c Selects "Computer", "Video GBR" or "Component" correctly according to an external...; The power has been turned off and on with DDC, turn the projector on the LCD panel. c Close the lamp cover securely (see page 22). • The lamp cover is compatible with the ?/1 key at "Auto" of "Input-A Signal Sel" on the connected computer. The picture...

User Manual
Page 44
... wrong. key on the Remote Commander or adjust "Volume" on the INPUT SETTING menu has not been adjusted properly. The picture flickers. c Replace the lamp with the VOLUME +/- c Set the output setting to "On" (see page 19). • The sound is disconnected or the connections are black edges...menu (see page 19). c Set "Status" on the SET SETTING menu to "Off." c Set "Color System" on the MENU SETTING menu to SVGA (VPL-ES7) or XGA (VPLEX70/EX7) (see page 30). 44 Troubleshooting c Adjust the focus (see page 22). • Condensation has accumulated on the INPUT SETTING...
... wrong. key on the Remote Commander or adjust "Volume" on the INPUT SETTING menu has not been adjusted properly. The picture flickers. c Replace the lamp with the VOLUME +/- c Set the output setting to "On" (see page 19). • The sound is disconnected or the connections are black edges...menu (see page 19). c Set "Status" on the SET SETTING menu to "Off." c Set "Color System" on the MENU SETTING menu to SVGA (VPL-ES7) or XGA (VPLEX70/EX7) (see page 30). 44 Troubleshooting c Adjust the focus (see page 22). • Condensation has accumulated on the INPUT SETTING...
User Manual
Page 45
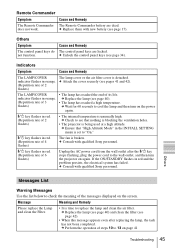
... power again. :/1 key flashes in red. (Repetition rate of 6 flashes) Unplug the AC power cord from the wall outlet after replacing the lamp, the task has not been completed. c Perform the operation of 2 flashes) • The internal temperature is detached. c Attach the cover securely...When this message appears even after the :/1 key stops flashing, plug the power cord to replace the lamp and clean the air filter. c Consult with qualified Sony personnel. c Consult with qualified Sony personnel. :/1 key flashes in the INSTALL SETTING menu is set to see page 34). does not ...
... power again. :/1 key flashes in red. (Repetition rate of 6 flashes) Unplug the AC power cord from the wall outlet after replacing the lamp, the task has not been completed. c Perform the operation of 2 flashes) • The internal temperature is detached. c Attach the cover securely...When this message appears even after the :/1 key stops flashing, plug the power cord to replace the lamp and clean the air filter. c Consult with qualified Sony personnel. c Consult with qualified Sony personnel. :/1 key flashes in the INSTALL SETTING menu is set to see page 34). does not ...

User Manual
Page 47
...-p ±2 dB (75 ohms terminated) HD: Horizontal sync input: TTL level, positive/negative VD: Vertical sync input: TTL level, positive/negative RGB (VPL-EX70 only): HD Dsub15-pin (female) Analog RGB: Specifications 47 Others Electrical characteristics Color system NTSC3.58/PAL/SECAM/ NTSC4.43/PAL-M/PAL-N/ PAL60 system, switched...f 18.53 to 22.18 mm/F1.65 to 1.93 Lamp 190 W Ultra high pressure lamp Projected picture size 40 to 300 inches (1,016 to 7,620 mm) Light output 1) VPL-EX70: 2600 lm VPL-EX7/ES7: 2000 lm 1) When the Lamp Mode is the color system used when playing back a video ...
...-p ±2 dB (75 ohms terminated) HD: Horizontal sync input: TTL level, positive/negative VD: Vertical sync input: TTL level, positive/negative RGB (VPL-EX70 only): HD Dsub15-pin (female) Analog RGB: Specifications 47 Others Electrical characteristics Color system NTSC3.58/PAL/SECAM/ NTSC4.43/PAL-M/PAL-N/ PAL60 system, switched...f 18.53 to 22.18 mm/F1.65 to 1.93 Lamp 190 W Ultra high pressure lamp Projected picture size 40 to 300 inches (1,016 to 7,620 mm) Light output 1) VPL-EX70: 2600 lm VPL-EX7/ES7: 2000 lm 1) When the Lamp Mode is the color system used when playing back a video ...


