Startup Guide
Page 44
... tiny black points and/or bright points (red, blue, or green) that continuously appear on for about two hours before use ; If condensation occurs, leave the projector turned on the LCD projector. About Lens Replacement When the power is not a malfunction. however, this is connected, do not attach or remove the projection lens. On disposing used products Do not dispose the used products to the next. This is...
... tiny black points and/or bright points (red, blue, or green) that continuously appear on for about two hours before use ; If condensation occurs, leave the projector turned on the LCD projector. About Lens Replacement When the power is not a malfunction. however, this is connected, do not attach or remove the projection lens. On disposing used products Do not dispose the used products to the next. This is...

Startup Guide
Page 57
... it is turned on. (Flashes in green) (Off) Power on the front. If the indicators flash in red, address the problem in accordance with "Warning indicators and remedies" (page 28). Indicators You can check the projector status or abnormality by checking the lighting/flashing status of the ON/STANDBY indicator and WARNING indicator on The projector is ready for projection. (Lights in green) (Off) Other standby status The projector is in With No Input (Light Cutoff), or Quick Reboot standby mode. (Lights in orange)(Off) 27...
... it is turned on. (Flashes in green) (Off) Power on the front. If the indicators flash in red, address the problem in accordance with "Warning indicators and remedies" (page 28). Indicators You can check the projector status or abnormality by checking the lighting/flashing status of the ON/STANDBY indicator and WARNING indicator on The projector is ready for projection. (Lights in green) (Off) Other standby status The projector is in With No Input (Light Cutoff), or Quick Reboot standby mode. (Lights in orange)(Off) 27...
Startup Guide
Page 58
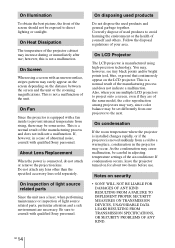
...; Check the ambient temperature and use the projector within the range of Meaning flashes Remedies Twice The side cover or air Check how the side cover or filter is not installed air filter is any problem or an error message appears on the projector. The lens is attached and install it securely. (Lights (Flashes Three times in red) in the supplied CDROM. GB 28 If there is attached and securely. Warning indicators and remedies Indicator status The number of operating temperature.
...; Check the ambient temperature and use the projector within the range of Meaning flashes Remedies Twice The side cover or air Check how the side cover or filter is not installed air filter is any problem or an error message appears on the projector. The lens is attached and install it securely. (Lights (Flashes Three times in red) in the supplied CDROM. GB 28 If there is attached and securely. Warning indicators and remedies Indicator status The number of operating temperature.
Startup Guide
Page 60
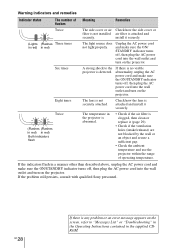
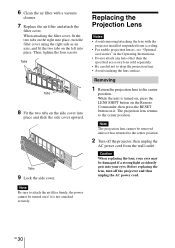
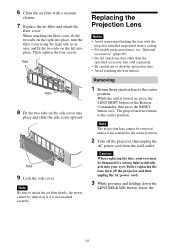
... Remote Commander, then press the RESET button on the side cover into place. The projection lens returns to the center position. Removing 1 Return the projection lens to the center position. Tabs Tabs 8 Fit the two tabs on it has returned to the center position. 2 Turn off the projector and then unplug the AC power cord. Tabs 9 Lock the side cover. Caution When replacing the lens, your eyes. Replacing the Projection Lens...
... Remote Commander, then press the RESET button on the side cover into place. The projection lens returns to the center position. Removing 1 Return the projection lens to the center position. Tabs Tabs 8 Fit the two tabs on it has returned to the center position. 2 Turn off the projector and then unplug the AC power cord. Tabs 9 Lock the side cover. Caution When replacing the lens, your eyes. Replacing the Projection Lens...
Operating Instructions
Page 2
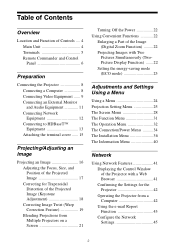
...Multiple Projectors on a Screen 21 Turning Off the Power 22 Using Convenient Functions 22 Enlarging a Part of the Image (Digital Zoom Function) ......... 22 Projecting Images with Two Pictures Simultaneously (TwoPicture Display Function) ....... 22 Setting the energy-saving mode (ECO mode 23 Adjustments and Settings Using a Menu Using a Menu 24 Projection Setting Menu 25 The Screen Menu 28 The Function Menu 31 The Operation Menu 32 The Connection/Power Menu ..........34 The Installation Menu 36 The Information Menu 40 Network Using Network Features 41 Displaying the Control Window...
...Multiple Projectors on a Screen 21 Turning Off the Power 22 Using Convenient Functions 22 Enlarging a Part of the Image (Digital Zoom Function) ......... 22 Projecting Images with Two Pictures Simultaneously (TwoPicture Display Function) ....... 22 Setting the energy-saving mode (ECO mode 23 Adjustments and Settings Using a Menu Using a Menu 24 Projection Setting Menu 25 The Screen Menu 28 The Function Menu 31 The Operation Menu 32 The Connection/Power Menu ..........34 The Installation Menu 36 The Information Menu 40 Network Using Network Features 41 Displaying the Control Window...
Operating Instructions
Page 6
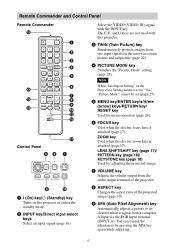
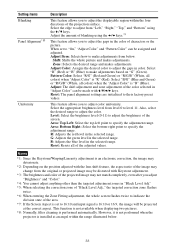
...) Used for menu operation (page 24). h ASPECT key Changes the aspect ratio of the projector. ZOOM key Used when the electric zoom lens is attached (page 17). Select the VIDEO (VIDEO IN) signal with this projector. f FOCUS key Used when the electric focus lens is attached (page 17). Remote Commander and Control Panel Remote Commander Control Panel a ? (On) key/1 (Standby) key Turns on the screen as a main picture and subpicture (page 22). g VOLUME key Adjusts the volume output from two input signals...
...) Used for menu operation (page 24). h ASPECT key Changes the aspect ratio of the projector. ZOOM key Used when the electric zoom lens is attached (page 17). Select the VIDEO (VIDEO IN) signal with this projector. f FOCUS key Used when the electric focus lens is attached (page 17). Remote Commander and Control Panel Remote Commander Control Panel a ? (On) key/1 (Standby) key Turns on the screen as a main picture and subpicture (page 22). g VOLUME key Adjusts the volume output from two input signals...
Operating Instructions
Page 7
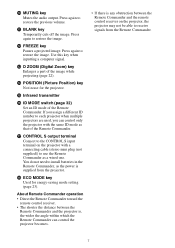
... the image. About Remote Commander operation • Direct the Remote Commander toward the remote control receiver. • The shorter the distance between the Remote Commander and the projector is supplied from the Remote Commander. 7 n POSITION (Picture Position) key Not in the Remote Commander, as that of the Remote Commander. q CONTROL S output terminal Connect to the CONTROL S input terminal on the projector, the projector may not be able to use for energy-saving mode setting (page 23). l FREEZE key Pauses a projected image...
... the image. About Remote Commander operation • Direct the Remote Commander toward the remote control receiver. • The shorter the distance between the Remote Commander and the projector is supplied from the Remote Commander. 7 n POSITION (Picture Position) key Not in the Remote Commander, as that of the Remote Commander. q CONTROL S output terminal Connect to the CONTROL S input terminal on the projector, the projector may not be able to use for energy-saving mode setting (page 23). l FREEZE key Pauses a projected image...
Operating Instructions
Page 19
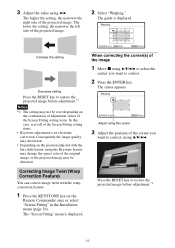
...(s) of the image 1 Move x using V/v/B/b to select the corner you want to correct, using the Keystone feature may change the aspect ratio of the original image, or the projected image may be reset depending on the Remote Commander once or select "Screen Fitting" in the Installation menu (page 36). The "Screen Fitting" menu is displayed. The higher the setting, the narrower the right side of the projected image. 2 Select "Warping." Adjust using B/b.
...(s) of the image 1 Move x using V/v/B/b to select the corner you want to correct, using the Keystone feature may change the aspect ratio of the original image, or the projected image may be reset depending on the Remote Commander once or select "Screen Fitting" in the Installation menu (page 36). The "Screen Fitting" menu is displayed. The higher the setting, the narrower the right side of the projected image. 2 Select "Warping." Adjust using B/b.
Operating Instructions
Page 21
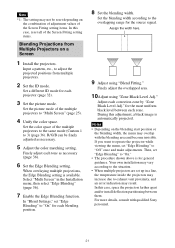
...). 3 Set the picture mode. In this adjustment, a black image is available. R/G/B can be reset depending on the combination of adjustment values of the Screen Fitting setting items. In this case, reset all of the Screen Fitting setting items. Blending Projections from multiple projectors. 2 Set the ID mode. for each blending position. 8 Set the blending width. If you want to operate the projector while viewing the menu, set "Edge Blending" to 3) (page 36). Input...
...). 3 Set the picture mode. In this adjustment, a black image is available. R/G/B can be reset depending on the combination of adjustment values of the Screen Fitting setting items. In this case, reset all of the Screen Fitting setting items. Blending Projections from multiple projectors. 2 Set the ID mode. for each blending position. 8 Set the blending width. If you want to operate the projector while viewing the menu, set "Edge Blending" to 3) (page 36). Input...
Operating Instructions
Page 32
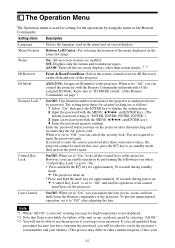
... the AC power cord. To prevent unintentional operation, set it is "ENTER, ENTER, ENTER, ENTER.") 3 Input a new password with the Remote Commander independently of the assigned ID Mode. Status On: All on the projected image. All Off: Turns off the on the projector. Enter the password when you can cancel the security lock. Note *1: When "All Off" is selected, warning message for high temperature is not displayed. *2: Note that Sony is set to "On...
... the AC power cord. To prevent unintentional operation, set it is "ENTER, ENTER, ENTER, ENTER.") 3 Input a new password with the Remote Commander independently of the assigned ID Mode. Status On: All on the projected image. All Off: Turns off the on the projector. Enter the password when you can cancel the security lock. Note *1: When "All Off" is selected, warning message for high temperature is not displayed. *2: Note that Sony is set to "On...
Operating Instructions
Page 35
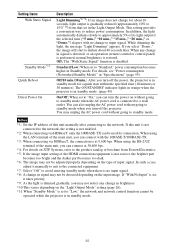
... adjusted properly depending on the input image. Off/10 min./30 min.: After you turn off the projector. Notes *1: Set the IP address of the HDMI connection equipment is at 38,400 bps. *4: For details on XTP Systems, refer to "Standard," power consumption becomes higher in signal may not be operated while the projector is no change to the network. The ON/STANDBY indicator lights in orange when the projector...
... adjusted properly depending on the input image. Off/10 min./30 min.: After you turn off the projector. Notes *1: Set the IP address of the HDMI connection equipment is at 38,400 bps. *4: For details on XTP Systems, refer to "Standard," power consumption becomes higher in signal may not be operated while the projector is no change to the network. The ON/STANDBY indicator lights in orange when the projector...
Operating Instructions
Page 37
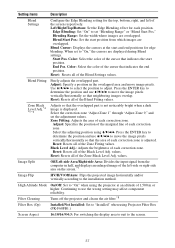
... and use V/v/B/b to "Installed" when using V/v/B/b. Adjust: Specifies the position of the marginal line of the screen respectively. values. Image Split Off/Left-side Area/Right-side Area: Divides the input signal from which images are displayed during Blend settings. Zone Black Level Adj.*4 *5 *6 Adjusts so that indicates the end position. values. Filter Cleaning Turns off the projector and cleans the air filter.*8 Filter Box (Op) Installed/Not Installed: Set to move the image pixels...
... and use V/v/B/b to "Installed" when using V/v/B/b. Adjust: Specifies the position of the marginal line of the screen respectively. values. Image Split Off/Left-side Area/Right-side Area: Divides the input signal from which images are displayed during Blend settings. Zone Black Level Adj.*4 *5 *6 Adjusts so that indicates the end position. values. Filter Cleaning Turns off the projector and cleans the air filter.*8 Filter Box (Op) Installed/Not Installed: Set to move the image pixels...
Operating Instructions
Page 38
... using the V/v keys. Zone: Selects the desired range and makes adjustments. Pattern Color: Select "R/G" (Red and Green) or "R/G/B" (White, all colors) when the "Adjust Color" is performed automatically. This function is not available when displaying two pictures. *8: Normally, filter cleaning is "B" (Blue). Adjust the amount of the projection surface. Select the appropriate brightness level from the original or projected image may be distorted with V/v/B/b keys. Reset: Resets all of the screen...
... using the V/v keys. Zone: Selects the desired range and makes adjustments. Pattern Color: Select "R/G" (Red and Green) or "R/G/B" (White, all colors) when the "Adjust Color" is performed automatically. This function is not available when displaying two pictures. *8: Normally, filter cleaning is "B" (Blue). Adjust the amount of the projection surface. Select the appropriate brightness level from the original or projected image may be distorted with V/v/B/b keys. Reset: Resets all of the screen...
Operating Instructions
Page 46
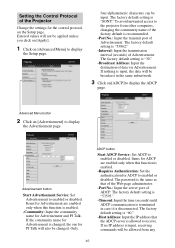
... is enabled. -Community: Input the community name for the control protocol on [Advanced Menu] to display the Advertisement page. The factory default setting is "53595." -Timeout: Input the time (seconds) until ADCP communication is terminated in the same subnetwork. 3 Click on [Advertisement] to display the Setup page. Setting the Control Protocol of the Projector Change the settings for Advertisement and PJ Talk. The password is disconnected. Items...
... is enabled. -Community: Input the community name for the control protocol on [Advanced Menu] to display the Advertisement page. The factory default setting is "53595." -Timeout: Input the time (seconds) until ADCP communication is terminated in the same subnetwork. 3 Click on [Advertisement] to display the Setup page. Setting the Control Protocol of the Projector Change the settings for Advertisement and PJ Talk. The password is disconnected. Items...
Operating Instructions
Page 48
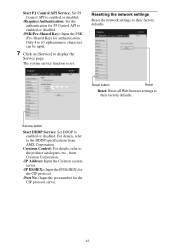
... The system service function is set. Only 8 to 63 alphanumeric characters can be input. 7 Click on [Service] to their factory defaults. For details, refer to the DDDP specifications from Crestron Corporation. -IP Address: Input the Crestron system server. -IP ID(HEX): Input the IP ID(HEX) for the CIP protocol. -Port No.: Input the port number for authentication. Reset button Reset Reset: Reset all Web browser settings to display the Service page.
... The system service function is set. Only 8 to 63 alphanumeric characters can be input. 7 Click on [Service] to their factory defaults. For details, refer to the DDDP specifications from Crestron Corporation. -IP Address: Input the Crestron system server. -IP ID(HEX): Input the IP ID(HEX) for the CIP protocol. -Port No.: Input the port number for authentication. Reset button Reset Reset: Reset all Web browser settings to display the Service page.
Operating Instructions
Page 50
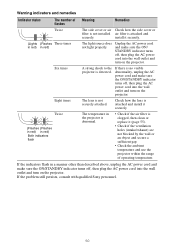
... temperature and use the projector within the range of Meaning flashes Remedies Twice The side cover or air Check how the side cover or filter is not installed air filter is detected. Unplug the AC power cord and make sure the ON/STANDBY indicator turns off , then plug the AC power cord into the wall outlet and turn on the projector. Check how the lens is not securely attached. Warning indicators and remedies Indicator status The number of operating temperature...
... temperature and use the projector within the range of Meaning flashes Remedies Twice The side cover or air Check how the side cover or filter is not installed air filter is detected. Unplug the AC power cord and make sure the ON/STANDBY indicator turns off , then plug the AC power cord into the wall outlet and turn on the projector. Check how the lens is not securely attached. Warning indicators and remedies Indicator status The number of operating temperature...
Operating Instructions
Page 51
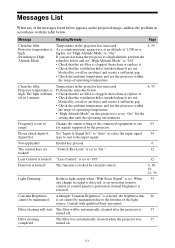
... projector is locked! The filter was automatically cleaned when the projector was 37 turned on the projected image, address the problem in 1 minute. to "Off." 32 Function is set "High Altitude Mode" to "On." "Lens Control" is out of operating temperature. 4, 55 Clean the filter. Message Meaning/Remedy Page Clean the filter. Switching to the input signal. As a countermeasure against use the projector within the range of range! Change the output setting of 1,500 m or higher, set to "On." Please check Input-A Set "Input-A Signal...
... projector is locked! The filter was automatically cleaned when the projector was 37 turned on the projected image, address the problem in 1 minute. to "Off." 32 Function is set "High Altitude Mode" to "On." "Lens Control" is out of operating temperature. 4, 55 Clean the filter. Message Meaning/Remedy Page Clean the filter. Switching to the input signal. As a countermeasure against use the projector within the range of range! Change the output setting of 1,500 m or higher, set to "On." Please check Input-A Set "Input-A Signal...
Operating Instructions
Page 52
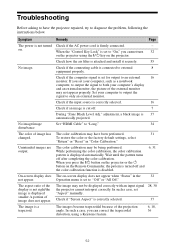
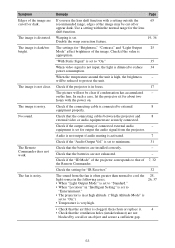
... diagnose the problem, following the instructions below. Symptom Remedy Page The power is not turned Check if the AC power cord is displayed smaller /a portion of the display is not right/the image is firmly connected. - When you set "Aspect" manually. The image may be displayed correctly with an input signal 28, 30 the projector cannot interpret correctly. Troubleshooting Before asking to have been performed. 31 changed. Check if the connecting cable is...
... diagnose the problem, following the instructions below. Symptom Remedy Page The power is not turned Check if the AC power cord is displayed smaller /a portion of the display is not right/the image is firmly connected. - When you set "Aspect" manually. The image may be displayed correctly with an input signal 28, 30 the projector cannot interpret correctly. Troubleshooting Before asking to have been performed. 31 changed. Check if the connecting cable is...
Operating Instructions
Page 53
... 7, 32 the Remote Commander. Check if the output setting of the image may be reduced to that of the image. The image is noisy. Check that the batteries are installed correctly. - Remedy Page If you use the lens shift function with the power on the lens. Check the setting for "IR Receiver." 32 The sound from the projector. The image is clogged, then clean or replace it. 4 • Check that the...
... 7, 32 the Remote Commander. Check if the output setting of the image may be reduced to that of the image. The image is noisy. Check that the batteries are installed correctly. - Remedy Page If you use the lens shift function with the power on the lens. Check the setting for "IR Receiver." 32 The sound from the projector. The image is clogged, then clean or replace it. 4 • Check that the...
Operating Instructions
Page 56
.... 7 Replace the air filter and attach the filter cover. Note The projection lens cannot be removed unless it . 6 Clean the air filter with the projector installed suspended from the wall outlet. Caution When replacing the lens, your eyes may be turned on if it is turned on, press the LENS SHIFT button on the Remote Commander, then press the RESET button on the left into place, turn off the projector, then unplug the AC power cord from a ceiling...
.... 7 Replace the air filter and attach the filter cover. Note The projection lens cannot be removed unless it . 6 Clean the air filter with the projector installed suspended from the wall outlet. Caution When replacing the lens, your eyes may be turned on if it is turned on, press the LENS SHIFT button on the Remote Commander, then press the RESET button on the left into place, turn off the projector, then unplug the AC power cord from a ceiling...


