Limited Warranty (U.S. Only)
Page 1
... the factory-applied serial number has been altered or removed from state to be defective. Pursuant to this Limited Warranty, Sony will supply new or refurbished replacement parts in exchange for parts determined to state. Parts: For a period of three (3) years from the original date of purchase of a defect, these are covered by defects in material or workmanship during ordinary consumer use , acts...
... the factory-applied serial number has been altered or removed from state to be defective. Pursuant to this Limited Warranty, Sony will supply new or refurbished replacement parts in exchange for parts determined to state. Parts: For a period of three (3) years from the original date of purchase of a defect, these are covered by defects in material or workmanship during ordinary consumer use , acts...

Operating Instructions
Page 5
... Directly Adjust the Desired Menu Item 42 Adjusting the Picture Using Real Color Processing 43 Using the Menus Operation through the Menus .......... 45 Picture Menu 49 Advanced Picture Menu 54 Screen Menu 55 Setup Menu 57 Function Menu 59 Items Locked by Settings Lock 62 Installation Menu 63 Information Menu 65 About the Preset Memory No. ... 66 Others About the Control for HDMI 67 About the x.v.Color 68 About the simulated 3D feature ....... 68 Troubleshooting 69 Warning Indicators 72 Message...
... Directly Adjust the Desired Menu Item 42 Adjusting the Picture Using Real Color Processing 43 Using the Menus Operation through the Menus .......... 45 Picture Menu 49 Advanced Picture Menu 54 Screen Menu 55 Setup Menu 57 Function Menu 59 Items Locked by Settings Lock 62 Installation Menu 63 Information Menu 65 About the Preset Memory No. ... 66 Others About the Control for HDMI 67 About the x.v.Color 68 About the simulated 3D feature ....... 68 Troubleshooting 69 Warning Indicators 72 Message...

Operating Instructions
Page 7
... power supply. • Should any liquid or solid object fall into the lens while the lamp is on. • Do not place your hand or objects near the ventilation holes. The air coming out is still running. You should be used for watching 3D video images. Do not block or place anything near a fire, or in places with a high temperature...
... power supply. • Should any liquid or solid object fall into the lens while the lamp is on. • Do not place your hand or objects near the ventilation holes. The air coming out is still running. You should be used for watching 3D video images. Do not block or place anything near a fire, or in places with a high temperature...

Operating Instructions
Page 11
... type recommended by the manufacturer. Push and slide to project the picture, etc. Remove this lens cap when you use the projector. • 3D glasses (2) • Pouch for the 3D glasses (2) • USB charging cable (GPHK05-20100007/SONY) (1.2 m) (1) • Operating Instructions (this manual) • Operating Instructions for the 3D glasses (1) Inserting the batteries into the remote control Insert the batteries E side first as shown in the...
... type recommended by the manufacturer. Push and slide to project the picture, etc. Remove this lens cap when you use the projector. • 3D glasses (2) • Pouch for the 3D glasses (2) • USB charging cable (GPHK05-20100007/SONY) (1.2 m) (1) • Operating Instructions (this manual) • Operating Instructions for the 3D glasses (1) Inserting the batteries into the remote control Insert the batteries E side first as shown in the...

Operating Instructions
Page 31
... the operation of the equipment connected to HDMI 1 or HDMI 2 input of the unit. (Only when the connected equipment supports Control for HDMI" is set to "On" in the Function menu, the input terminal with effective signals is automatically displayed, synchronizing with effective signals are displayed in the input palette. • When "Status" is set to "On" in the Setup menu, the input palette does not appear. Press of the picture to switch between input...
... the operation of the equipment connected to HDMI 1 or HDMI 2 input of the unit. (Only when the connected equipment supports Control for HDMI" is set to "On" in the Function menu, the input terminal with effective signals is automatically displayed, synchronizing with effective signals are displayed in the input palette. • When "Status" is set to "On" in the Setup menu, the input palette does not appear. Press of the picture to switch between input...

Operating Instructions
Page 49
... the picture viewing mode that best suits the type of input signal. Photo: Ideal for 2D/3D respectively. Picture Menu The Picture menu is the same as a living room. Preset You can save the setting. Cinema Film 1: Picture quality suited to suit your taste, and save and use the RESET button on the remote control on the type of [CALIBRATED PRESET] video source or the environment. Reference: A picture quality setup...
... the picture viewing mode that best suits the type of input signal. Photo: Ideal for 2D/3D respectively. Picture Menu The Picture menu is the same as a living room. Preset You can save the setting. Cinema Film 1: Picture quality suited to suit your taste, and save and use the RESET button on the remote control on the type of [CALIBRATED PRESET] video source or the environment. Reference: A picture quality setup...

Operating Instructions
Page 51
... to adjust, set, and store your favorite color temperature. Adjusts the brightness of the picture, or reduces the noise. The lower the setting, the darker the picture. Gives white colors a blue tint. The higher the setting, the sharper the picture. on the remote control. Adjusts the color temperature. Custom 1: Same as "D55" color temperature setting. The higher the setting, the greater the intensity. Using the Menus Contrast [CONTRAST] Brightness [BRIGHTNESS] Color Hue Color Temp. [COLOR TEMP] Sharpness [SHARPNESS] Adjusts...
... to adjust, set, and store your favorite color temperature. Adjusts the brightness of the picture, or reduces the noise. The lower the setting, the darker the picture. Gives white colors a blue tint. The higher the setting, the sharper the picture. on the remote control. Adjusts the color temperature. Custom 1: Same as "D55" color temperature setting. The higher the setting, the greater the intensity. Using the Menus Contrast [CONTRAST] Brightness [BRIGHTNESS] Color Hue Color Temp. [COLOR TEMP] Sharpness [SHARPNESS] Adjusts...

Operating Instructions
Page 58
In Lamp Cutoff, the ON/STANDBY indicator lights in orange. (1 page 8) Standby: The power will light again. When replacing the lamps, set the desired lamp setting. (1 page 77) 58 Lamp Cutoff: The lamp turns off automatically and the projector goes to Standby mode if no signal is input for 10 minutes. Power Saving Lamp Setting Sets the power saving mode. Off: The Power Saving mode is pressed, the lamp will be turned off automatically and power consumption is reduced if no signal is input for...
In Lamp Cutoff, the ON/STANDBY indicator lights in orange. (1 page 8) Standby: The power will light again. When replacing the lamps, set the desired lamp setting. (1 page 77) 58 Lamp Cutoff: The lamp turns off automatically and the projector goes to Standby mode if no signal is input for 10 minutes. Power Saving Lamp Setting Sets the power saving mode. Off: The Power Saving mode is pressed, the lamp will be turned off automatically and power consumption is reduced if no signal is input for...

Operating Instructions
Page 62
...; Color • Hue • Color Temp. • Sharpness • NR • MPEG NR • Film Mode • Contrast Enhancer • Gamma Correction • x.v.Color • Color Space Advanced Picture menu • RCP Level B Setup menu • Status • Language • Menu Position • Cooling Setting • Standby Mode • Power Saving • Lamp Setting Function menu • HDMI Setting • HDMI Dynamic Range • Auto Input Search • Background Installation menu • V Keystone • Image Flip • Blanking • Panel...
...; Color • Hue • Color Temp. • Sharpness • NR • MPEG NR • Film Mode • Contrast Enhancer • Gamma Correction • x.v.Color • Color Space Advanced Picture menu • RCP Level B Setup menu • Status • Language • Menu Position • Cooling Setting • Standby Mode • Power Saving • Lamp Setting Function menu • HDMI Setting • HDMI Dynamic Range • Auto Input Search • Background Installation menu • V Keystone • Image Flip • Blanking • Panel...

Operating Instructions
Page 67
... the problems, how to its operational instructions. By connecting a variety of the Control for HDMI compatible equipment such as a hard disk Blu-ray Disc player, a DVD player/recorder, an AV amplifier, etc. Use a cable that is an HDMI standard mutual control function which the equipment is the Control for HDMI - For settings of Control for HDMI compatible equipment connected to the projector, refer to replace the lamp and air filter, etc...
... the problems, how to its operational instructions. By connecting a variety of the Control for HDMI compatible equipment such as a hard disk Blu-ray Disc player, a DVD player/recorder, an AV amplifier, etc. Use a cable that is an HDMI standard mutual control function which the equipment is the Control for HDMI - For settings of Control for HDMI compatible equipment connected to the projector, refer to replace the lamp and air filter, etc...

Operating Instructions
Page 69
... No picture. The picture has ghosts. c Check that "Power Saving" in the Setup "Standby." (1 page 58) c Set "Power Saving" to "2D" (1 page 59). Watch the 3D video images using the INPUT button. (1 page 31) c Set the computer signal to output from an external monitor. menu is set "HDMI Dynamic Range" to diagnose and correct the problem using the following instructions. c Video images are displayed in a short time. Leave the projector for about 1 minute, turn the power on . 69 c Adjust...
... No picture. The picture has ghosts. c Check that "Power Saving" in the Setup "Standby." (1 page 58) c Set "Power Saving" to "2D" (1 page 59). Watch the 3D video images using the INPUT button. (1 page 31) c Set the computer signal to output from an external monitor. menu is set "HDMI Dynamic Range" to diagnose and correct the problem using the following instructions. c Video images are displayed in a short time. Leave the projector for about 1 minute, turn the power on . 69 c Adjust...

Operating Instructions
Page 70
... adjust the current input signal. Input terminals do not appear. c For pictures from the screen. This is starting up in "Panel Alignment" of the remote control detector on the screen. c The display mode of purchase. Symptom Cause and Remedy The picture flickers. On-screen display Symptom Cause and Remedy On-screen display does not appear. Avoid using the projector until the indicator light up . Cause and Remedy c Batteries could be set at the time of...
... adjust the current input signal. Input terminals do not appear. c For pictures from the screen. This is starting up in "Panel Alignment" of the remote control detector on the screen. c The display mode of purchase. Symptom Cause and Remedy The picture flickers. On-screen display Symptom Cause and Remedy On-screen display does not appear. Avoid using the projector until the indicator light up . Cause and Remedy c Batteries could be set at the time of...

Operating Instructions
Page 71
... Setup menu. (1 page 57) c Make sure that the battery in a room, where the temperature is HDMI. The fan noise becomes slightly louder. c When the viewing or projector position is input from the screen (1 page 91). Set the zooming magnification to "On". The projector and connected equipment turn On/Off, play back, and operate at the same time. c The lens shift cannot be adjusted. c "Control for HDMI", "Device Auto Power Off", and "PJ Auto Power...
... Setup menu. (1 page 57) c Make sure that the battery in a room, where the temperature is HDMI. The fan noise becomes slightly louder. c When the viewing or projector position is input from the screen (1 page 91). Set the zooming magnification to "On". The projector and connected equipment turn On/Off, play back, and operate at the same time. c The lens shift cannot be adjusted. c "Control for HDMI", "Device Auto Power Off", and "PJ Auto Power...

Operating Instructions
Page 72
... qualified Sony personnel. Replace the lamp. (1 page 75) c The lamp has reached a high temperature. Consult with qualified Sony personnel. If the power is not turned on the projector. LAMP/COVER indicator ON/STANDBY indicator Symptom Cause and Remedy LAMP/COVER flashes in red. (A repetition rate of 2 flashes) c Close the lamp cover securely, then tighten the screws securely. (1 page 76) c Close the filter holder securely. (1 page 77) LAMP/COVER flashes in red. (A repetition rate of its useful lifespan. Note When a warning indicator...
... qualified Sony personnel. Replace the lamp. (1 page 75) c The lamp has reached a high temperature. Consult with qualified Sony personnel. If the power is not turned on the projector. LAMP/COVER indicator ON/STANDBY indicator Symptom Cause and Remedy LAMP/COVER flashes in red. (A repetition rate of 2 flashes) c Close the lamp cover securely, then tighten the screws securely. (1 page 76) c Close the filter holder securely. (1 page 77) LAMP/COVER flashes in red. (A repetition rate of its useful lifespan. Note When a warning indicator...

Operating Instructions
Page 73
.... Clean the air filter. (1 page 78) Note To clear this message, press any button either on the remote control or the control panel of the projector once. Please clean the filter. If you finished? Cooling Setting should be "High" if projector is being used at high altitude, set the Cooling Setting to "Standby." (1 page 58) Projector will automatically cutoff in 1 minute. c "Power Saving" is set to "Lamp Cutoff." (1 page 58) Note If no signal is set...
.... Clean the air filter. (1 page 78) Note To clear this message, press any button either on the remote control or the control panel of the projector once. Please clean the filter. If you finished? Cooling Setting should be "High" if projector is being used at high altitude, set the Cooling Setting to "Standby." (1 page 58) Projector will automatically cutoff in 1 minute. c "Power Saving" is set to "Lamp Cutoff." (1 page 58) Note If no signal is set...

Operating Instructions
Page 75
... fingerprints with the ?/1 (ON/STANDBY) switch. The air filter is turned off the projector and unplug the AC power cord. 2 When setting the projector on a stable surface. 75 Whenever you replace the lamp, be exhausted. Caution • The lamp remains hot after the projector is supplied with a new one without delay. Do not tilt the lamp unit. Others Replacing the Lamp and the Air Filter and Cleaning the Ventilation Holes (intake) Tools...
... fingerprints with the ?/1 (ON/STANDBY) switch. The air filter is turned off the projector and unplug the AC power cord. 2 When setting the projector on a stable surface. 75 Whenever you replace the lamp, be exhausted. Caution • The lamp remains hot after the projector is supplied with a new one without delay. Do not tilt the lamp unit. Others Replacing the Lamp and the Air Filter and Cleaning the Ventilation Holes (intake) Tools...

Operating Instructions
Page 77
The menu screen below will not turn on unless the filter holder is securely closed. Tip If "Settings Lock" is set to "Off" once. 14 Select "Yes". Caution Do not put your hands into the lamp replacement slot, and do not touch the fan after removing the air filter that it with a soft cloth. Note Attach the air filter aligning it fits into the slot to...
The menu screen below will not turn on unless the filter holder is securely closed. Tip If "Settings Lock" is set to "Off" once. 14 Select "Yes". Caution Do not put your hands into the lamp replacement slot, and do not touch the fan after removing the air filter that it with a soft cloth. Note Attach the air filter aligning it fits into the slot to...

Operating Instructions
Page 78
... lamp cover is securely closed. • To cancel a message displayed on the screen, press either the button on the remote control or the one on the control panel on where you do not damage it . Disposal of the lens cap will not turn off the projector and unplug the power cord before replacing the lamp, then check the ON/STANDBY lamp has already been turned off. • The projector will fit the zoom...
... lamp cover is securely closed. • To cancel a message displayed on the screen, press either the button on the remote control or the one on the control panel on where you do not damage it . Disposal of the lens cap will not turn off the projector and unplug the power cord before replacing the lamp, then check the ON/STANDBY lamp has already been turned off. • The projector will fit the zoom...

Operating Instructions
Page 79
... Maximum resolution 1,920 × 1,080 (HDMI input only) For details, see tiny black points and/or bright points (red, blue, or green) that continuously appear on the screen The projector is a normal result of the manufacturing process and does not indicate a malfunction. Specifications System Projection system SXRD panel, 1 lens, projection system LCD panel 0.61-inch (15.4 mm) SXRD panel 6,220,800 pixels (2,073,600 pixels × 3) Lens 1.6 times zoom lens (manual) f=18...
... Maximum resolution 1,920 × 1,080 (HDMI input only) For details, see tiny black points and/or bright points (red, blue, or green) that continuously appear on the screen The projector is a normal result of the manufacturing process and does not indicate a malfunction. Specifications System Projection system SXRD panel, 1 lens, projection system LCD panel 0.61-inch (15.4 mm) SXRD panel 6,220,800 pixels (2,073,600 pixels × 3) Lens 1.6 times zoom lens (manual) f=18...

Operating Instructions
Page 80
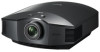
... notice. Optional accessories Projector Lamp LMP-H202 (for the 3D glasses (1) Design and specifications are subject to 90% Supplied accessories Remote control RM-PJ23 (1) Size AA (R6) manganese batteries (2) AC power cord (1) Lens cap (1) 3D glasses TDG-PJ1 (2) Pouch for the 3D glasses (2) USB charging cable (GPHK05- 2010-0007/SONY) (1.2 m) (1) Câble de charge USB (GPHK05- 2010-0007/SONY) (1,2 m) (1) Operating Instructions (1) Operating Instructions for replacement) 80 Projector Suspension Support PSS-H10 3D...
... notice. Optional accessories Projector Lamp LMP-H202 (for the 3D glasses (1) Design and specifications are subject to 90% Supplied accessories Remote control RM-PJ23 (1) Size AA (R6) manganese batteries (2) AC power cord (1) Lens cap (1) 3D glasses TDG-PJ1 (2) Pouch for the 3D glasses (2) USB charging cable (GPHK05- 2010-0007/SONY) (1.2 m) (1) Câble de charge USB (GPHK05- 2010-0007/SONY) (1,2 m) (1) Operating Instructions (1) Operating Instructions for replacement) 80 Projector Suspension Support PSS-H10 3D...


