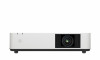
Operating Instructions
Page 2
... Focus, Size, and Position of the Projected Image 15 Turning Off the Power 17 Adjustments and Settings Using a Menu Using a MENU 18 Projection Setting Menu 19 The Screen Menu 21 The Function Menu 23 The Operation Menu 24 The Connection/Power Menu 25 The Installation Menu 27 The Information Menu 28 Network Using Network Features 29 Displaying the Control Window of the Projector with a Web Browser 29 Confirming the Information regarding the Projector 30 Operating the Projector from a Computer 30 Using the e-mail report Function 30 Setting the LAN Network...
... Focus, Size, and Position of the Projected Image 15 Turning Off the Power 17 Adjustments and Settings Using a Menu Using a MENU 18 Projection Setting Menu 19 The Screen Menu 21 The Function Menu 23 The Operation Menu 24 The Connection/Power Menu 25 The Installation Menu 27 The Information Menu 28 Network Using Network Features 29 Displaying the Control Window of the Projector with a Web Browser 29 Confirming the Information regarding the Projector 30 Operating the Projector from a Computer 30 Using the e-mail report Function 30 Setting the LAN Network...

Operating Instructions
Page 6
... Setting: Sync with Power User: Sets each mode to 4 times. MUTING key Mutes the audio output temporarily. You cannot use this key when "Type B USB" or "Network" is selected as you want to standby mode / (On/Standby) key Selecting an input signal (page 14) INPUT key Operating a menu (page 18) MENU key RESET key ENTER arrow) keys RETURN key Adjusting the image (page 15) ASPECT key (page 21) KEYSTONE...
... Setting: Sync with Power User: Sets each mode to 4 times. MUTING key Mutes the audio output temporarily. You cannot use this key when "Type B USB" or "Network" is selected as you want to standby mode / (On/Standby) key Selecting an input signal (page 14) INPUT key Operating a menu (page 18) MENU key RESET key ENTER arrow) keys RETURN key Adjusting the image (page 15) ASPECT key (page 21) KEYSTONE...

Operating Instructions
Page 9
... A) USB A-B cable (not supplied) Computer LAN terminal For connecting to the network that the projector is in Standby mode (Standby Mode: "Low"), or the AC power cord is set to "LAN Port" (page 25). Connect the projector to a computer via a hub or router ("Presentation Function via Network" (page 38)). When you monitor and control the projector via the network, access the Setup page of this projector is not compatible with a USB terminal ("Playing Video and Audio using network...
... A) USB A-B cable (not supplied) Computer LAN terminal For connecting to the network that the projector is in Standby mode (Standby Mode: "Low"), or the AC power cord is set to "LAN Port" (page 25). Connect the projector to a computer via a hub or router ("Presentation Function via Network" (page 38)). When you monitor and control the projector via the network, access the Setup page of this projector is not compatible with a USB terminal ("Playing Video and Audio using network...

Operating Instructions
Page 14
... play video and audio using USB Connection" (page 43). Press the INPUT key repeatedly, or press the / key to select an image to be projected. 6 When projecting a computer image, switch your computer's output to display the menu for switching input signal on the distance between the projector and screen. Press the INPUT key on the projector to external display. Projecting/Adjusting an Image Projecting an Image The size of a projected image depends on the screen. Install the projector so that the projected image...
... play video and audio using USB Connection" (page 43). Press the INPUT key repeatedly, or press the / key to select an image to be projected. 6 When projecting a computer image, switch your computer's output to display the menu for switching input signal on the distance between the projector and screen. Press the INPUT key on the projector to external display. Projecting/Adjusting an Image Projecting an Image The size of a projected image depends on the screen. Install the projector so that the projected image...
Operating Instructions
Page 24
... the projected image. On/Off: This function enables restriction of the projector to confirm. Off: Displays only the menus, the message when turning off the power, and warning messages. Enter the password when you can cancel the security lock. However, you turn on the power again. If you with the MENU and ENTER keys. 4 Enter the password again to authorized users by using the menu or the remote commander. Front...
... the projected image. On/Off: This function enables restriction of the projector to confirm. Off: Displays only the menus, the message when turning off the power, and warning messages. Enter the password when you can cancel the security lock. However, you turn on the power again. If you with the MENU and ENTER keys. 4 Enter the password again to authorized users by using the menu or the remote commander. Front...

Operating Instructions
Page 25
... LAN Settings IP Address Setup*1 WLAN Settings WLAN Connection*2 WLAN Network*3 HDBaseT Settings LAN Setting RS-232C Setting Extron XTP Network Presentation Connection CODE Display Setting Dynamic Range*9 Input-A Signal Sel. During the image transmission, using the displayed number (CODE) on the remote commander makes Connection CODE display again. LAN Mode Displays the LAN settings of the projector or the settings of the USB wireless LAN module that operates as an access point at the bottom right of the USB wireless LAN module preferentially. Limited: Set when the image input...
... LAN Settings IP Address Setup*1 WLAN Settings WLAN Connection*2 WLAN Network*3 HDBaseT Settings LAN Setting RS-232C Setting Extron XTP Network Presentation Connection CODE Display Setting Dynamic Range*9 Input-A Signal Sel. During the image transmission, using the displayed number (CODE) on the remote commander makes Connection CODE display again. LAN Mode Displays the LAN settings of the projector or the settings of the USB wireless LAN module that operates as an access point at the bottom right of the USB wireless LAN module preferentially. Limited: Set when the image input...

Operating Instructions
Page 26
... the input image. When any key is restored. Notes *1: To set in signal is detected, or an operation (remote control or control panel) is performed, normal brightness is pressed. A change in standby mode. 26 You might only notice that set the IP address manually, select "Manual", press "Apply", then enter the IP address. *2: Reflecting changes in brightness. The light lights again when a signal is set respectively. Setting the IP address when using the LAN terminal...
... the input image. When any key is restored. Notes *1: To set in signal is detected, or an operation (remote control or control panel) is performed, normal brightness is pressed. A change in standby mode. 26 You might only notice that set the IP address manually, select "Manual", press "Apply", then enter the IP address. *2: Reflecting changes in brightness. The light lights again when a signal is set respectively. Setting the IP address when using the LAN terminal...

Operating Instructions
Page 27
...set to use the wrong setting may deteriorate. *2: Normally, filter cleaning is "B" (Blue). Pattern Color: Select "R/G" (Red and Green) or "R/G/B" (White, all colors) when the "Adjust Color" is performed automatically. Adjust: The shift adjustment and zone adjustment of the whole projected image manually from the signal level in "Screen Fitting." This is displayed when "HV Keystone" is installed at an altitude of the projected image. Setting items Screen Fitting V Keystone*1 H Keystone*1 Corner Keystone*1 Image Flip High Altitude Mode Filter Cleaning Digital Shrink *3*4*5 Panel...
...set to use the wrong setting may deteriorate. *2: Normally, filter cleaning is "B" (Blue). Pattern Color: Select "R/G" (Red and Green) or "R/G/B" (White, all colors) when the "Adjust Color" is performed automatically. Adjust: The shift adjustment and zone adjustment of the whole projected image manually from the signal level in "Screen Fitting." This is displayed when "HV Keystone" is installed at an altitude of the projected image. Setting items Screen Fitting V Keystone*1 H Keystone*1 Corner Keystone*1 Image Flip High Altitude Mode Filter Cleaning Digital Shrink *3*4*5 Panel...

Operating Instructions
Page 29
... limitation of the factory preset values (page 29). Administrator: Allowed access to all pages User: Allowed access to display the desired setting page. http://pro.sony.com/bbsc/ssr/cat-projectors/ resource.downloads Contact your local Sony dealer for detailed information of Projector Station for the projector using "LAN Settings" on the Connection/Power menu (page 25). 3 Start a web browser on the model you are using. • Supported Web browsers are...
... limitation of the factory preset values (page 29). Administrator: Allowed access to all pages User: Allowed access to display the desired setting page. http://pro.sony.com/bbsc/ssr/cat-projectors/ resource.downloads Contact your local Sony dealer for detailed information of Projector Station for the projector using "LAN Settings" on the Connection/Power menu (page 25). 3 Start a web browser on the model you are using. • Supported Web browsers are...
Operating Instructions
Page 34
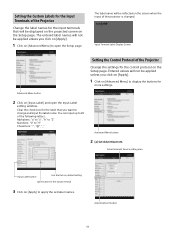
... displayed on the projected screen on [Advanced Menu] to display the buttons for the input terminal 3 Click on the screen when the input of the following letters. Advanced Menu button 2 Click on the Setup page. Alphabets: "a" to "z", "A" to "Z" Numbers: "0" to 20 of the projector is changed. Advertisement Service setting area Input Label button Use the factory default setting Label name for more settings. The label name will be reflected on [Apply] to open the Input Label setting window...
... displayed on the projected screen on [Advanced Menu] to display the buttons for the input terminal 3 Click on the screen when the input of the following letters. Advanced Menu button 2 Click on the Setup page. Alphabets: "a" to "z", "A" to "Z" Numbers: "0" to 20 of the projector is changed. Advertisement Service setting area Input Label button Use the factory default setting Label name for more settings. The label name will be reflected on [Apply] to open the Input Label setting window...

Operating Instructions
Page 36
.... Reset button Reset 36 System service setting area IP Control Sync. Notes *1: Enable the PJ Link function of the projector the unit will synchronize with, and then set the authentication and password of the projector that the unit is trying to synchronize with . (g) Reset the network settings. PJ Link Service setting area -Port No.: Input the port number for the CIP protocol. setting area -Power: Set to enabled to change the power status of the projector that...
.... Reset button Reset 36 System service setting area IP Control Sync. Notes *1: Enable the PJ Link function of the projector the unit will synchronize with, and then set the authentication and password of the projector that the unit is trying to synchronize with . (g) Reset the network settings. PJ Link Service setting area -Port No.: Input the port number for the CIP protocol. setting area -Power: Set to enabled to change the power status of the projector that...
Operating Instructions
Page 38
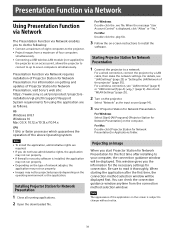
... the operating environment or the application. Installing Projector Station for Network Presentation. Starting Projector Station for Network Presentation 1 Connect the projector to your computer, the connection guidance window will be projected properly depending on the screen is subject to install the software. Also check "WLAN Settings" (page 25). 2 Turn on getting and updates of network adapter, the application may not run properly. • Images may not be displayed first. For Windows Select [Start]-[All Programs]-[Projector...
... the operating environment or the application. Installing Projector Station for Network Presentation. Starting Projector Station for Network Presentation 1 Connect the projector to your computer, the connection guidance window will be projected properly depending on the screen is subject to install the software. Also check "WLAN Settings" (page 25). 2 Turn on getting and updates of network adapter, the application may not run properly. • Images may not be displayed first. For Windows Select [Start]-[All Programs]-[Projector...

Operating Instructions
Page 39
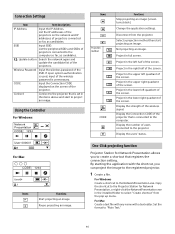
... Windows Connection guidance window displayed while the computer is not displayed on the screen and starts projecting an image. Input the password to the USB wireless LAN module of the projector that you press the "Connect" button. LAN Mode Select this mode, the computer connects to the wired LAN of the projector or the USB wireless LAN module of the projector that you want the computer connect to the network information on the projected screen of the projector that operates as your computer's resolution) change...
... Windows Connection guidance window displayed while the computer is not displayed on the screen and starts projecting an image. Input the password to the USB wireless LAN module of the projector that you press the "Connect" button. LAN Mode Select this mode, the computer connects to the wired LAN of the projector or the USB wireless LAN module of the projector that you want the computer connect to the network information on the projected screen of the projector that operates as your computer's resolution) change...
Operating Instructions
Page 40
... users connected to the computer. For Mac Items Functions Start projecting an image. Pause projecting an image. If open system authentication is used, input of the projector that registers the connection setting. Project in the upper right quadrant of the screen. Display the Connection CODE of the wireless password is connected to the projector. Update button Search the network again and update the candidate list of the screen. Project in the right half of the screen. Connection Settings Item Item descriptions IP Address Input...
... users connected to the computer. For Mac Items Functions Start projecting an image. Pause projecting an image. If open system authentication is used, input of the projector that registers the connection setting. Project in the upper right quadrant of the screen. Display the Connection CODE of the wireless password is connected to the projector. Update button Search the network again and update the candidate list of the screen. Project in the right half of the screen. Connection Settings Item Item descriptions IP Address Input...

Operating Instructions
Page 41
..., and use it to . Command Examples Example 1) If the settings of the projector that you want to display an image when the computer starts connecting to it Network:LAN Mode IP address:192.168.1.187 Connection CODE: On For Windows C:\Program Files (x86)\Sony\Projector Station for Network Presentation\Network Presentation.exe connect 192.168.1.187:on:1 For Mac -connect 192.168.1.187:on "Name & Extension" to start projecting an image with the controller. 1:Displays an image when...
..., and use it to . Command Examples Example 1) If the settings of the projector that you want to display an image when the computer starts connecting to it Network:LAN Mode IP address:192.168.1.187 Connection CODE: On For Windows C:\Program Files (x86)\Sony\Projector Station for Network Presentation\Network Presentation.exe connect 192.168.1.187:on:1 For Mac -connect 192.168.1.187:on "Name & Extension" to start projecting an image with the controller. 1:Displays an image when...
Operating Instructions
Page 42
...) from the one you assigned. 40 Start from the projector while communicating. Connected to the access point, but failed while connecting using WEP64 bit or WEP128 bit. Check the setting of the security software of the computer, the power status and the network composition of the computer. Error code list of Projector Station for Network Presentation is not operating before installing the application. • Make sure the...
...) from the one you assigned. 40 Start from the projector while communicating. Connected to the access point, but failed while connecting using WEP64 bit or WEP128 bit. Check the setting of the security software of the computer, the power status and the network composition of the computer. Error code list of Projector Station for Network Presentation is not operating before installing the application. • Make sure the...

Operating Instructions
Page 44
...turned on. (Flashes in green)(Off) Power on the projector. Warning indicators and remedies Indicator status The number of the ON/ STANDBY indicator and WARNING indicator on the projector. 44 A strong shock to the setting. If the indicators flash in red, address the problem in accordance with "Warning indicators and remedies" (page 44). Error Handling Indicators You can check the projector status or abnormality by checking the lighting/flashing status of flashes Twice (Lights (Flashes in red) in red) Three times Six times Meaning/Remedies The air filter is not installed...
...turned on. (Flashes in green)(Off) Power on the projector. Warning indicators and remedies Indicator status The number of the ON/ STANDBY indicator and WARNING indicator on the projector. 44 A strong shock to the setting. If the indicators flash in red, address the problem in accordance with "Warning indicators and remedies" (page 44). Error Handling Indicators You can check the projector status or abnormality by checking the lighting/flashing status of flashes Twice (Lights (Flashes in red) in red) Three times Six times Meaning/Remedies The air filter is not installed...

Operating Instructions
Page 46
... Check the ambient temperature and use the projector within the range of operating temperature. "High Altitude Mode" on the projected image, address the problem in accordance with the table below and set to "On." Please check HDBaseT Settings. Temperature in the projector has increased. Clean the filter. Please check Input-A Signal Sel. Invalid key was turned on the HDBaseT/LAN connection. Projector temperature is high. Set the setting that the air filter is set "High Altitude Mode" to one for signals supported by the projector. "Control Key Lock" is set "High...
... Check the ambient temperature and use the projector within the range of operating temperature. "High Altitude Mode" on the projected image, address the problem in accordance with the table below and set to "On." Please check HDBaseT Settings. Temperature in the projector has increased. Clean the filter. Please check Input-A Signal Sel. Invalid key was turned on the HDBaseT/LAN connection. Projector temperature is high. Set the setting that the air filter is set "High Altitude Mode" to one for signals supported by the projector. "Control Key Lock" is set "High...

Operating Instructions
Page 47
... AC power cord is set your computer to output the signal to diagnose the problem, following the instructions below. Check if the application "USB Display" or "Projector Station for color calibration is set "Aspect" manually. In this mode, the pattern for Network Presentation" is running. 38, 43 Check if the input source is correctly selected. 14 Check if the picture is attached and install it securely. 49 No image. If you use the lens...
... AC power cord is set your computer to output the signal to diagnose the problem, following the instructions below. Check if the application "USB Display" or "Projector Station for color calibration is set "Aspect" manually. In this mode, the pattern for Network Presentation" is running. 38, 43 Check if the input source is correctly selected. 14 Check if the picture is attached and install it securely. 49 No image. If you use the lens...

Operating Instructions
Page 48
... the projector and external video or audio equipment are securely connected. When the temperature around the unit is high, the brightness will not be reduced to "On") Temperature is very high. Check that the air filter is dimmed to minimum. No sound. Check the setting for about two hours with the power on the lens. The fan is grounded. Use the STP (Shielded Twisted Pair) type LAN cable. The image...
... the projector and external video or audio equipment are securely connected. When the temperature around the unit is high, the brightness will not be reduced to "On") Temperature is very high. Check that the air filter is dimmed to minimum. No sound. Check the setting for about two hours with the power on the lens. The fan is grounded. Use the STP (Shielded Twisted Pair) type LAN cable. The image...


