The Sony Guide to Home Theater
Page 50
... Broadcast Reception. Others appreciate a picture that projects the image as light onto a screen. A television display system that fills their own power amplifier. Rear projectors are self-contained boxes that makes channel programming and timer setting easy. the point of modern surround sound systems. Most subwoofers are also "active," meaning that they include their 4:3 screen. The opposite of video signal detail for the full-range...
... Broadcast Reception. Others appreciate a picture that projects the image as light onto a screen. A television display system that fills their own power amplifier. Rear projectors are self-contained boxes that makes channel programming and timer setting easy. the point of modern surround sound systems. Most subwoofers are also "active," meaning that they include their 4:3 screen. The opposite of video signal detail for the full-range...

Limited Warranty (US Only)
Page 1
... United States. Any parts or product replaced under this Limited Warranty for the applicable labor charge. This Limited Warranty is longer. This Limited Warranty does not cover Sony products sold AS IS or WITH ALL FAULTS or consumables (such as set forth below is still in material or workmanship for the LCD Projector Lamp the period will do...
... United States. Any parts or product replaced under this Limited Warranty for the applicable labor charge. This Limited Warranty is longer. This Limited Warranty does not cover Sony products sold AS IS or WITH ALL FAULTS or consumables (such as set forth below is still in material or workmanship for the LCD Projector Lamp the period will do...
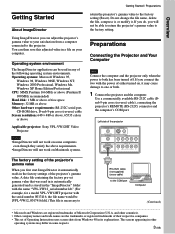
Image Director Operating Instructions
Page 4
... one or both has been turned off. Use a commercially available RS-232C cable (Dsub 9-pin cross (reverse) cable), connecting the projector's REMOTE (RS-232C) connector and the computer's COM port. The screens appearing in the "ImageDirector" folder with the name "VPL-VW12_serial number.ldt." (For example, for a model VPL-VW12HT projector with the power of Operating Instructions uses screen shots from a computer connected to the projector. Do not change the file name, delete...
... one or both has been turned off. Use a commercially available RS-232C cable (Dsub 9-pin cross (reverse) cable), connecting the projector's REMOTE (RS-232C) connector and the computer's COM port. The screens appearing in the "ImageDirector" folder with the name "VPL-VW12_serial number.ldt." (For example, for a model VPL-VW12HT projector with the power of Operating Instructions uses screen shots from a computer connected to the projector. Do not change the file name, delete...
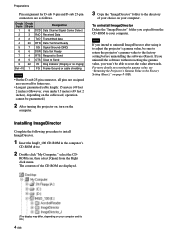
Image Director Operating Instructions
Page 5
..." folder you intend to uninstall ImageDirector after using it to adjust the projector's gamma value, be sure to return the projector's gamma value to your computer. Note If you copied from the Right click menu. ROM icon, then select [Open] from the CD-ROM to the factory setting before uninstalling the software (Reset). Installing ImageDirector Complete the following procedure to Send...
..." folder you intend to uninstall ImageDirector after using it to adjust the projector's gamma value, be sure to return the projector's gamma value to your computer. Note If you copied from the Right click menu. ROM icon, then select [Open] from the CD-ROM to the factory setting before uninstalling the software (Reset). Installing ImageDirector Complete the following procedure to Send...
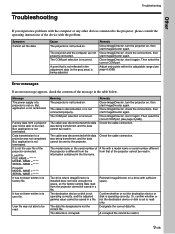
Image Director Operating Instructions
Page 10
... Close ImageDirector, turn the projector on a drive with a model name or serial number different the projector is not on . Message The power supply of the message in . 9 (GB) Then select the correct COM port (see page 6 (GB)). The data file designated is corrupted. The data file is not the correct file. Reinstall ImageDirector on , then start it again. Other Troubleshooting Troubleshooting If you experience problems with the...
... Close ImageDirector, turn the projector on a drive with a model name or serial number different the projector is not on . Message The power supply of the message in . 9 (GB) Then select the correct COM port (see page 6 (GB)). The data file designated is corrupted. The data file is not the correct file. Reinstall ImageDirector on , then start it again. Other Troubleshooting Troubleshooting If you experience problems with the...
Operating Instructions
Page 7
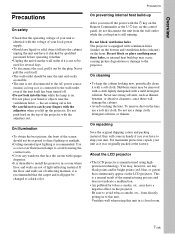
... connected to the wall outlet, even if the unit itself . • The wall outlet should not be exposed to direct lighting or sunlight. • Ceiling-mounted spot lighting is recommended. On illumination • To obtain the best picture, the front of your local power supply. • Should any windows that face the screen with opaque draperies. • It is desirable to install the projector...
... connected to the wall outlet, even if the unit itself . • The wall outlet should not be exposed to direct lighting or sunlight. • Ceiling-mounted spot lighting is recommended. On illumination • To obtain the best picture, the front of your local power supply. • Should any windows that face the screen with opaque draperies. • It is desirable to install the projector...
Operating Instructions
Page 8
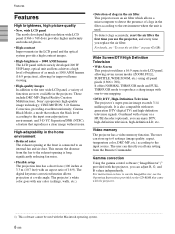
...:9 projection), allowing for improved home viewing. • High-quality images In addition to use the projector, and every time you use the ImageDirector, see "To reset the air filter" on how to the new wide LCD panel, a variety of clogs in the projector. Wide Screen/DTV/High Definition Television • Wide Screen This projector utilizes a 16:9 aspect ratio LCD panel, allowing seven screen modes (ZOOM, FULL, SUBTITLE, WIDE ZOOM, etc.) using all panel pixels (1366 × 768). The projector's white color...
...:9 projection), allowing for improved home viewing. • High-quality images In addition to use the projector, and every time you use the ImageDirector, see "To reset the air filter" on how to the new wide LCD panel, a variety of clogs in the projector. Wide Screen/DTV/High Definition Television • Wide Screen This projector utilizes a 16:9 aspect ratio LCD panel, allowing seven screen modes (ZOOM, FULL, SUBTITLE, WIDE ZOOM, etc.) using all panel pixels (1366 × 768). The projector's white color...
Operating Instructions
Page 10
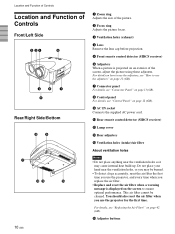
.../Bottom 09 qa qs qd qf 10 (GB) 1 Zoom ring Adjusts the size of the picture. 2 Focus ring Adjusts the picture focus. 3 Ventilation holes (exhaust) 4 Lens Remove the lens cap before projection. 5 Front remote control detector (SIRCS receiver) 6 Adjusters When a picture is displayed on the screen to use the projector for the first time. qf Adjuster buttons For details on page 13 (GB). 8 Control panel For details, see "Replacing the Air Filter!" on an exterior of the screen, adjust the picture using these adjusters.
.../Bottom 09 qa qs qd qf 10 (GB) 1 Zoom ring Adjusts the size of the picture. 2 Focus ring Adjusts the picture focus. 3 Ventilation holes (exhaust) 4 Lens Remove the lens cap before projection. 5 Front remote control detector (SIRCS receiver) 6 Adjusters When a picture is displayed on the screen to use the projector for the first time. qf Adjuster buttons For details on page 13 (GB). 8 Control panel For details, see "Replacing the Air Filter!" on an exterior of the screen, adjust the picture using these adjusters.
Operating Instructions
Page 12
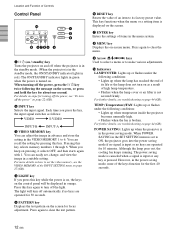
... the setting in a suitable setting. Pressing this key while the power is on, the keys on the control panel will turn off automatically if no keys are operated for 30 seconds. 5 PATTERN key Displays the test pattern on the screen for focus adjustment. For more details on how to 6. Press again to turn off the light. Location and Function of Controls Control Panel 0 LAMP/ COVER TEMP/ FAN POWER SAVING ON/ STANDBY MENU PATTERN ENTER RESET LIGHT INPUT VIDEO...
... the setting in a suitable setting. Pressing this key while the power is on, the keys on the control panel will turn off automatically if no keys are operated for 30 seconds. 5 PATTERN key Displays the test pattern on the screen for focus adjustment. For more details on how to 6. Press again to turn off the light. Location and Function of Controls Control Panel 0 LAMP/ COVER TEMP/ FAN POWER SAVING ON/ STANDBY MENU PATTERN ENTER RESET LIGHT INPUT VIDEO...
Operating Instructions
Page 13
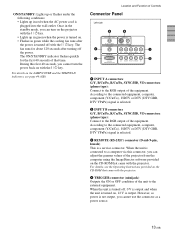
..., SYNC/HD, VD connectors (phono type): Connect to the connected equipment, computer, component (Y/CB/CR), HDTV or DTV (DTV GBR, DTV YPBPR) signal is a service connector. The fan runs for the first 40 seconds of the equipment. During this connector, you can adjust the gamma values of the equipment. For details on the LAMP/COVER and the TEMP/FAN indicators, see the Operating Instructions...
..., SYNC/HD, VD connectors (phono type): Connect to the connected equipment, computer, component (Y/CB/CR), HDTV or DTV (DTV GBR, DTV YPBPR) signal is a service connector. The fan runs for the first 40 seconds of the equipment. During this connector, you can adjust the gamma values of the equipment. For details on the LAMP/COVER and the TEMP/FAN indicators, see the Operating Instructions...
Operating Instructions
Page 15
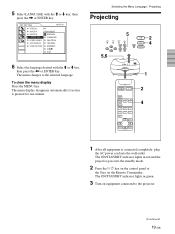
For more details on page 27 (GB). 5 MENU key 6 ENTER key 7 RESET key 8 Arrow (M/m/ 4 VIDEO MEMORY keys You can store an image setting to set the video memory, see the VIDEO MEMORY of the INPUT SETTING menu on how to one of the VIDEO MEMORY keys (1 - 6), and you can directly recall the setting by pressing the appropriate key.
For more details on page 27 (GB). 5 MENU key 6 ENTER key 7 RESET key 8 Arrow (M/m/ 4 VIDEO MEMORY keys You can store an image setting to set the video memory, see the VIDEO MEMORY of the INPUT SETTING menu on how to one of the VIDEO MEMORY keys (1 - 6), and you can directly recall the setting by pressing the appropriate key.
Operating Instructions
Page 18
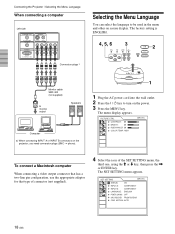
...: FRONT&REAR CINE MOTION: AUTO 18 (GB) Connecting the Projector / Selecting the Menu Language When connecting a computer Left side CONTROL S IN VIDEO IN PLUG IN POWER TRIGGER S VIDEO VIDEO INPUT A REMOTE G/Y B/CB/PB R/CR/PR SYNC/HD VD INPUT B RS-232C (FOR SERVICE USE) G/Y B/CB/PB R/CR/PR SYNC/HD VD Conversion plugs a) Selecting the Menu Language You can select the language to turn on screen display. The menu display appears. The SET SETTING menu appears. PICTURE CTRL...
...: FRONT&REAR CINE MOTION: AUTO 18 (GB) Connecting the Projector / Selecting the Menu Language When connecting a computer Left side CONTROL S IN VIDEO IN PLUG IN POWER TRIGGER S VIDEO VIDEO INPUT A REMOTE G/Y B/CB/PB R/CR/PR SYNC/HD VD INPUT B RS-232C (FOR SERVICE USE) G/Y B/CB/PB R/CR/PR SYNC/HD VD Conversion plugs a) Selecting the Menu Language You can select the language to turn on screen display. The menu display appears. The SET SETTING menu appears. PICTURE CTRL...
Operating Instructions
Page 19
... power cord into the standby mode. 2 Press the I / 1 key on the control panel or the I key on equipment connected to the selected language. Selecting the Menu Language / Projecting Projecting 5 LAMP/ COVER TEMP/ FAN POWER SAVING ON/ STANDBY MENU PATTERN ENTER RESET 5,6 LIGHT INPUT VIDEO MEMORY 2 4 1 MUTING PIC INPUT SELECT VIDEO A B S VIDEO VIDEO MEMORY 1 2 3 4 5 6 OFF MENU RESET ENTER 2 4 1 After all equipment is pressed for one minute. The ON/STANDBY indicator lights in red and the projector goes into the wall outlet. SET SETTING INPUT-A STATUS...
... power cord into the standby mode. 2 Press the I / 1 key on the control panel or the I key on equipment connected to the selected language. Selecting the Menu Language / Projecting Projecting 5 LAMP/ COVER TEMP/ FAN POWER SAVING ON/ STANDBY MENU PATTERN ENTER RESET 5,6 LIGHT INPUT VIDEO MEMORY 2 4 1 MUTING PIC INPUT SELECT VIDEO A B S VIDEO VIDEO MEMORY 1 2 3 4 5 6 OFF MENU RESET ENTER 2 4 1 After all equipment is pressed for one minute. The ON/STANDBY indicator lights in red and the projector goes into the wall outlet. SET SETTING INPUT-A STATUS...
Operating Instructions
Page 29
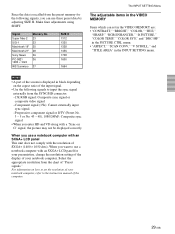
...; "CONTRAST," "BRIGHT," "COLOR," "HUE," "SHARP," "RGB ENHANCER," "D.PICTURE," "COLOR TEMP," "COLOR SYS," and "DRC-MF" in the PICTURE CTRL menu. • "ASPECT," "SCAN CONV," "V SCROLL," and "TITLE AREA" in the INPUT SETTING menu. Notes • A part of the screen is recalled from the chart of "Preset signals." Since the data is displayed in the VIDEO MEMORY Items which can use a notebook computer with an SXGA+ LCD panel This unit...
...; "CONTRAST," "BRIGHT," "COLOR," "HUE," "SHARP," "RGB ENHANCER," "D.PICTURE," "COLOR TEMP," "COLOR SYS," and "DRC-MF" in the PICTURE CTRL menu. • "ASPECT," "SCAN CONV," "V SCROLL," and "TITLE AREA" in the INPUT SETTING menu. Notes • A part of the screen is recalled from the chart of "Preset signals." Since the data is displayed in the VIDEO MEMORY Items which can use a notebook computer with an SXGA+ LCD panel This unit...
Operating Instructions
Page 42
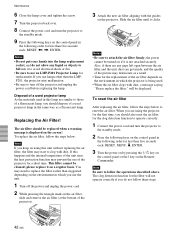
Maintenance 6 Close the lamp cover and tighten the screw. 7 Turn the projector back over. 8 Connect the power cord and turn the projector to the standby mode. 9 Press the following keys on the control panel in the following order for less than five seconds each: RESET,
Maintenance 6 Close the lamp cover and tighten the screw. 7 Turn the projector back over. 8 Connect the power cord and turn the projector to the standby mode. 9 Press the following keys on the control panel in the following order for less than five seconds each: RESET,
Operating Instructions
Page 43
... picture. Then, display the INSTALL SETTING menu again and set to both the LCD of the computer and an external monitor. The computer signal is not a sign of the flicker. If the problem still persists, consult with qualified Sony personnel. Attach the air filter securely (see page 20 (GB)). The picture flickers. The input selection is detached. The lamp cover is incorrect. The picture is noisy. Select the input source correctly using...
... picture. Then, display the INSTALL SETTING menu again and set to both the LCD of the computer and an external monitor. The computer signal is not a sign of the flicker. If the problem still persists, consult with qualified Sony personnel. Attach the air filter securely (see page 20 (GB)). The picture flickers. The input selection is detached. The lamp cover is incorrect. The picture is noisy. Select the input source correctly using...
Operating Instructions
Page 44
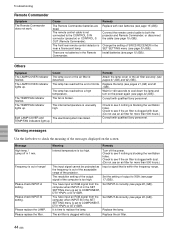
... CONTROL S IN connector (projector) or CONTROL S OUT (Remote Commander). Remedy Replace with qualified Sony personnel. The LAMP/COVER indicator lights up . The lamp has reached too a high temperature. Check to cool down the lamp and turn on the screen. Warning messages Use the list below to check the meaning of the messages displayed on the power again (see if nothing is clogged with dust. (Do not use an air filter for more than 500 hours.) This input signal cannot be projected as Input a signal...
... CONTROL S IN connector (projector) or CONTROL S OUT (Remote Commander). Remedy Replace with qualified Sony personnel. The LAMP/COVER indicator lights up . The lamp has reached too a high temperature. Check to cool down the lamp and turn on the screen. Warning messages Use the list below to check the meaning of the messages displayed on the power again (see if nothing is clogged with dust. (Do not use an air filter for more than 500 hours.) This input signal cannot be projected as Input a signal...
Operating Instructions
Page 47
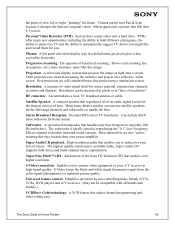
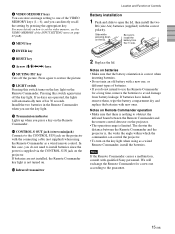
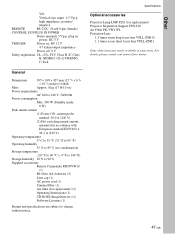
... Storage humidity 10 % to change without notice. Specifications Optional accessories Projector Lamp LMP-P201 (for replacement) (3) Operating Instructions (1) CD-ROM (ImageDirector) (1) Software Licenses (1) Design and specifications are subject to 90 % Supplied accessories Remote Commander RM-PJVW10 (1) R6 (Size AA) batteries (2) Lens cap (1) AC power cord (1) Cinema Filter (1) Air filter (for replacement) Projector Suspension Support PSS-610 Air Filter PK-VW11FL Projection Lens 1.5 times zoom long focus lens VPLL-ZM101 1.1 times zoom short focus lens VPLL-ZM31 Some of the...
... Storage humidity 10 % to change without notice. Specifications Optional accessories Projector Lamp LMP-P201 (for replacement) (3) Operating Instructions (1) CD-ROM (ImageDirector) (1) Software Licenses (1) Design and specifications are subject to 90 % Supplied accessories Remote Commander RM-PJVW10 (1) R6 (Size AA) batteries (2) Lens cap (1) AC power cord (1) Cinema Filter (1) Air filter (for replacement) Projector Suspension Support PSS-610 Air Filter PK-VW11FL Projection Lens 1.5 times zoom long focus lens VPLL-ZM101 1.1 times zoom short focus lens VPLL-ZM31 Some of the...
Operating Instructions
Page 50
...) KEYSTONE MEM 31 (GB) L Lamp replacement 41 (GB) LAMP TIMER 31 (GB) LANGUAGE 30 (GB) Location and function of controls connector panel 13 (GB) control panel 12 (GB) front/left side 10 (GB) rear/right side/bottom 10 (GB) Remote Commander 14 (GB) M, N Menu clearing the menu display 19 (GB) INPUT SETTING menu 25 (GB) INSTALL SETTING menu 31 (GB) PICTURE CTRL menu 24 (GB) SET SETTING menu 30 (GB) using the menu 23 (GB) Messages cautions 45 (GB) warnings 44...
...) KEYSTONE MEM 31 (GB) L Lamp replacement 41 (GB) LAMP TIMER 31 (GB) LANGUAGE 30 (GB) Location and function of controls connector panel 13 (GB) control panel 12 (GB) front/left side 10 (GB) rear/right side/bottom 10 (GB) Remote Commander 14 (GB) M, N Menu clearing the menu display 19 (GB) INPUT SETTING menu 25 (GB) INSTALL SETTING menu 31 (GB) PICTURE CTRL menu 24 (GB) SET SETTING menu 30 (GB) using the menu 23 (GB) Messages cautions 45 (GB) warnings 44...
Marketing Specifications
Page 2
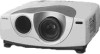
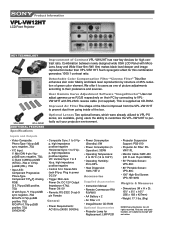
... Information VPL-VW12HT LCD Front Projector KEY TECHNOLOGY Improvement of Contrast VPL-VW12HT has new key devices for this combination generates 1000:1 contrast ratio. This is improved from the VPL-VW11HT to change without notice. Detachable Color Compensation Filter "Cinema Filter" This filter enhances skin color fidelity and black level reproduction by connecting to 85% • Heat Dispersion: 1023.7 BTU Accessories Supplied Accessories • Instruction Manual • Remote Commancer RM...
... Information VPL-VW12HT LCD Front Projector KEY TECHNOLOGY Improvement of Contrast VPL-VW12HT has new key devices for this combination generates 1000:1 contrast ratio. This is improved from the VPL-VW11HT to change without notice. Detachable Color Compensation Filter "Cinema Filter" This filter enhances skin color fidelity and black level reproduction by connecting to 85% • Heat Dispersion: 1023.7 BTU Accessories Supplied Accessories • Instruction Manual • Remote Commancer RM...


