2017 Home Cinema Projectors Brochure
Page 7
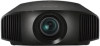
...functions make finalizing the installation a breeze 7 This ultra-short throw 4K HDR home theater projector works with corner-to be placed on the floor, mounted on the ceiling, or used to radically enhance Full HD content and upscale to near 4K • 4K SXRD™ advanced projection technology features a super-fast ... of 4K projection. A breathtaking view with no limits Now you use it, there are no limits on the design or layout of your imagination! VPL-VZ1000ES • Ultra-short throw for flexibility, this projector can turn any room and no limits on your home.
...functions make finalizing the installation a breeze 7 This ultra-short throw 4K HDR home theater projector works with corner-to be placed on the floor, mounted on the ceiling, or used to radically enhance Full HD content and upscale to near 4K • 4K SXRD™ advanced projection technology features a super-fast ... of 4K projection. A breathtaking view with no limits Now you use it, there are no limits on the design or layout of your imagination! VPL-VZ1000ES • Ultra-short throw for flexibility, this projector can turn any room and no limits on your home.

2017 Home Cinema Projectors Brochure
Page 15
... a screen or ceiling mount to best suit your overall viewing experience. OPTIONAL ACCESSORIES LMP-H210 Projector Lamp (replacement lamp for VPL-HW45ES & VPL-HW65ES) LMP-H280 Projector Lamp (replacement lamp for VPL-VW675ES) COMPATIBLE LENSES for VPL-VW5000ES Projection lens VPLL-Z7008 (Optional) VPLL-Z7013 (Bundled) LMP-H220 Projector Lamp (replacement lamp for VPL-WV385ES and VPL-VW285ES) TDG...
... a screen or ceiling mount to best suit your overall viewing experience. OPTIONAL ACCESSORIES LMP-H210 Projector Lamp (replacement lamp for VPL-HW45ES & VPL-HW65ES) LMP-H280 Projector Lamp (replacement lamp for VPL-VW675ES) COMPATIBLE LENSES for VPL-VW5000ES Projection lens VPLL-Z7008 (Optional) VPLL-Z7013 (Bundled) LMP-H220 Projector Lamp (replacement lamp for VPL-WV385ES and VPL-VW285ES) TDG...
Operating Instructions
Page 65
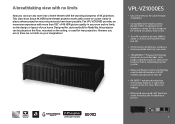
The distance between the front of the lens and the front of the cabinet Unit: mm (inches) 36.8 (1 7/16) Front of the lens Front of the cabinet Attaching the PSS-H10 projector suspension support Front view 150 (5 29/32) 75 (2 15/16) 8 (5/16) Ceiling Center of the supporting pole 175 (6 7/8) Unit: mm (inches) The bottom surface of the mount bracket 108 (4 1/4) Center of the lens 65
The distance between the front of the lens and the front of the cabinet Unit: mm (inches) 36.8 (1 7/16) Front of the lens Front of the cabinet Attaching the PSS-H10 projector suspension support Front view 150 (5 29/32) 75 (2 15/16) 8 (5/16) Ceiling Center of the supporting pole 175 (6 7/8) Unit: mm (inches) The bottom surface of the mount bracket 108 (4 1/4) Center of the lens 65
Operating Instructions
Page 66
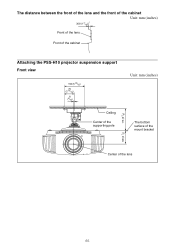
Side view 213.5 (8 13/32) 130 (5 1/8) Unit: mm (inches) Front of the cabinet Top view 258.5 (10 3/16) 463.6 (18 1/4) 213.4 (8 13/32) 130 (5 1/8) Front of the cabinet Unit: mm (inches) 258.5 (10 3/16) Upper ceiling mount bracket Center of the supporting pole (The center of the supporting pole is different from that of the unit.) 66
Side view 213.5 (8 13/32) 130 (5 1/8) Unit: mm (inches) Front of the cabinet Top view 258.5 (10 3/16) 463.6 (18 1/4) 213.4 (8 13/32) 130 (5 1/8) Front of the cabinet Unit: mm (inches) 258.5 (10 3/16) Upper ceiling mount bracket Center of the supporting pole (The center of the supporting pole is different from that of the unit.) 66
Operating Instructions
Page 67
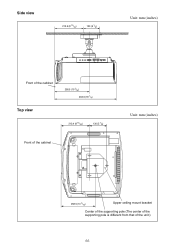
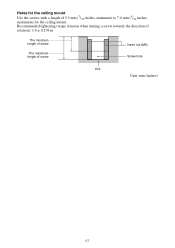
Holes for the ceiling mount. Recommended tightening torque (tension when turning a screw towards the direction of rotation): 1.4 ± 0.2 N-m The minimum length of screw The maximum length of 5.3 mm (7/32 inches, minimum) to 7.6 mm (5/16 inches, maximum) for the ceiling mount Use the screws with a length of screw Insert nut (M5) Screw hole Unit Unit: mm (inches) 67
Holes for the ceiling mount. Recommended tightening torque (tension when turning a screw towards the direction of rotation): 1.4 ± 0.2 N-m The minimum length of screw The maximum length of 5.3 mm (7/32 inches, minimum) to 7.6 mm (5/16 inches, maximum) for the ceiling mount Use the screws with a length of screw Insert nut (M5) Screw hole Unit Unit: mm (inches) 67
Quick Reference Manual
Page 8
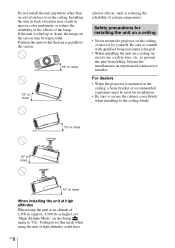
... effects, such as reducing the reliability of the lamp. Be sure to consult with qualified Sony personnel (charged). • When installing the unit on a ceiling, be used for installing the unit on a ceiling • Never mount the projector on the ceiling, a Sony bracket or recommended equivalent must be sure to use a safety wire, etc., to an...
... effects, such as reducing the reliability of the lamp. Be sure to consult with qualified Sony personnel (charged). • When installing the unit on a ceiling, be used for installing the unit on a ceiling • Never mount the projector on the ceiling, a Sony bracket or recommended equivalent must be sure to use a safety wire, etc., to an...
VPL-VW675ES/VW385ES/VW285ES Home Theater Projector Brochure
Page 6
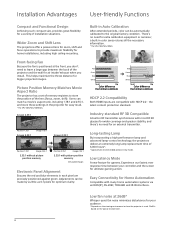
... images Electronic Panel Alignment Ensures the red and blue elements in low mode. Built-in color sensor stores all the necessary information. * The VPL-VW675ES/385ES. This helps maximize the throw distance for gamers. Picture Position Memory Matches Movie Aspect Ratio The projector has a set of memory ...-control technology, the projectors deliver an extremely long lamp replacement time of the projector and the wall for home installations, including high ceiling mounting. Low fan noise at the front, you don't need to provide maximum flexibility for air intake/exhaust when you install.
... images Electronic Panel Alignment Ensures the red and blue elements in low mode. Built-in color sensor stores all the necessary information. * The VPL-VW675ES/385ES. This helps maximize the throw distance for gamers. Picture Position Memory Matches Movie Aspect Ratio The projector has a set of memory ...-control technology, the projectors deliver an extremely long lamp replacement time of the projector and the wall for home installations, including high ceiling mounting. Low fan noise at the front, you don't need to provide maximum flexibility for air intake/exhaust when you install.


