
Operating Instructions
Page 1
4-262-154-11 (1) Video Projector Operating Instructions VPL-VW90ES © 2010 Sony Corporation
4-262-154-11 (1) Video Projector Operating Instructions VPL-VW90ES © 2010 Sony Corporation
Operating Instructions
Page 5
...10 3D Glasses 11 Connections and Preparations Unpacking 12 Step 1: Installing the Projector .........13 Before Setting Up the Projector 13 Positioning the Projector and a Screen 15 Step 2: Adjusting the Picture Position 19 Step 3: Connecting the Projector .....24 Connecting to a VCR 24 Connecting to a Computer ..........27 Connecting... on the Screen 31 Turning Off the Power 32 Operating the BRAVIA Sync Compatible Equipment with the Remote Control of the Projector ...... 33 Selecting the Wide Screen Mode .... 35 Watching 3D Video Images 38 Using the Simulated 3D Function 39 Using ...
...10 3D Glasses 11 Connections and Preparations Unpacking 12 Step 1: Installing the Projector .........13 Before Setting Up the Projector 13 Positioning the Projector and a Screen 15 Step 2: Adjusting the Picture Position 19 Step 3: Connecting the Projector .....24 Connecting to a VCR 24 Connecting to a Computer ..........27 Connecting... on the Screen 31 Turning Off the Power 32 Operating the BRAVIA Sync Compatible Equipment with the Remote Control of the Projector ...... 33 Selecting the Wide Screen Mode .... 35 Watching 3D Video Images 38 Using the Simulated 3D Function 39 Using ...
Operating Instructions
Page 6
This projector supports DeepColor, x.v.Color, LipSync, 3D signal and computer input signal of HDMI standards. HDMI, the HDMI logo and High-Definition Multimedia Interface are trademarks of ... Replacing the Lamp and the Air Filter and Cleaning the Ventilation Holes (intake 76 Cleaning the Air Filter 79 Cleaning and the Screen of the Projector 79 Replacing the Battery of the 3D Glasses 80 Removing/Attaching the Filter Attachment for HDMI is a registered trademark of...
This projector supports DeepColor, x.v.Color, LipSync, 3D signal and computer input signal of HDMI standards. HDMI, the HDMI logo and High-Definition Multimedia Interface are trademarks of ... Replacing the Lamp and the Air Filter and Cleaning the Ventilation Holes (intake 76 Cleaning the Air Filter 79 Cleaning and the Screen of the Projector 79 Replacing the Battery of the 3D Glasses 80 Removing/Attaching the Filter Attachment for HDMI is a registered trademark of...

Operating Instructions
Page 7
Caution The projector is equipped with the voltage of your unit is identical with ventilation holes (intake) and ventilation holes (exhaust). Precautions On safety • Check that the ... lamp is on. • Do not place your hand or objects near the unit and easily accessible. • The unit is not disconnected to the projector. they will come in handy if you turn off . • Do not look into the cabinet, unplug the unit and have to ship your unit...
Caution The projector is equipped with the voltage of your unit is identical with ventilation holes (intake) and ventilation holes (exhaust). Precautions On safety • Check that the ... lamp is on. • Do not place your hand or objects near the unit and easily accessible. • The unit is not disconnected to the projector. they will come in handy if you turn off . • Do not look into the cabinet, unplug the unit and have to ship your unit...

Operating Instructions
Page 8
Press the button and open the cover. Control panel LENS button (1 page 19) M/m/ Location of Controls Front/Right Side You can use the buttons on the control panel with the same names as those on the remote control to operate the projector.
Press the button and open the cover. Control panel LENS button (1 page 19) M/m/ Location of Controls Front/Right Side You can use the buttons on the control panel with the same names as those on the remote control to operate the projector.

Operating Instructions
Page 9
Rear/Bottom Remote control detector (1 page 19) Ventilation holes (intake) (1 page 14) Ventilation holes (intake) (1 page 14) Ventilation holes (intake) (1 page 14) Ventilation holes (intake) (1 page 14) Lamp cover (1 page 77) Adjusters (1 page 23) Filter holder (1 page 78) Ventilation holes (intake) (1 page 14) Projector suspension support attaching hole (1 page 93) 9 Location of Controls
Rear/Bottom Remote control detector (1 page 19) Ventilation holes (intake) (1 page 14) Ventilation holes (intake) (1 page 14) Ventilation holes (intake) (1 page 14) Ventilation holes (intake) (1 page 14) Lamp cover (1 page 77) Adjusters (1 page 23) Filter holder (1 page 78) Ventilation holes (intake) (1 page 14) Projector suspension support attaching hole (1 page 93) 9 Location of Controls
Operating Instructions
Page 12
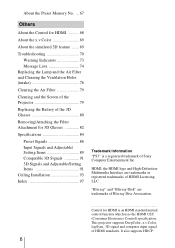
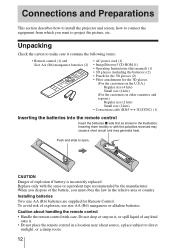
... (including the batteries) (2) • Pouch for the 3D glasses (2) • Filter attachments for Remote Control. Connections and Preparations This section describes how to install the projector and screen, how to connect the equipment from which you dispose of any kind onto it. • Do not place the remote control in a location...
... (including the batteries) (2) • Pouch for the 3D glasses (2) • Filter attachments for Remote Control. Connections and Preparations This section describes how to install the projector and screen, how to connect the equipment from which you dispose of any kind onto it. • Do not place the remote control in a location...

Operating Instructions
Page 13
Poorly ventilated location Malfunction of the sensor may cause malfunction or damage to have broader options for placing the projector and viewing pictures easily. Locations subject to moisture condensation or rise in such a location may cause a malfunction of the unit due to...30 cm (11 7/8 inches) 30 cm (11 7/8 inches) 30 cm (11 7/8 inches) 30 cm (11 7/8 inches) 13 Before Setting Up the Projector Installing the projector in temperature. Hot and humid Install in the following situations, which may occur. Very dusty and extremely smoky locations Leave space of more than...
Poorly ventilated location Malfunction of the sensor may cause malfunction or damage to have broader options for placing the projector and viewing pictures easily. Locations subject to moisture condensation or rise in such a location may cause a malfunction of the unit due to...30 cm (11 7/8 inches) 30 cm (11 7/8 inches) 30 cm (11 7/8 inches) 30 cm (11 7/8 inches) 13 Before Setting Up the Projector Installing the projector in temperature. Hot and humid Install in the following situations, which may occur. Very dusty and extremely smoky locations Leave space of more than...

Operating Instructions
Page 14
... of the ventilation holes (intake or exhaust), see "Location of 1,500 m or higher, set this mode when using the projector. Improper use Do not do any of the following while using the projector at an angle of more than on a level surface or on page 8. Failing to switch the power supply off... color uniformity or reduce the reliability of the effects of the lamp. Tilting front/rear and left/right 15° or more Avoid using the projector tilted at high altitudes could have adverse effects, such as reducing the reliability of certain components. 15° or more 15° or more 15...
... of the ventilation holes (intake or exhaust), see "Location of 1,500 m or higher, set this mode when using the projector. Improper use Do not do any of the following while using the projector at an angle of more than on a level surface or on page 8. Failing to switch the power supply off... color uniformity or reduce the reliability of the effects of the lamp. Tilting front/rear and left/right 15° or more Avoid using the projector tilted at high altitudes could have adverse effects, such as reducing the reliability of certain components. 15° or more 15° or more 15...

Operating Instructions
Page 15
Connections and Preparations Positioning the Projector and a Screen The installation distance between the projector and a screen varies depending on the size of the screen or whether or not you position the projector so that the center of the projector's lens. For installation of the projector and screen. You can obtain a... good quality picture if you use the lens shift features. 1 Determine the installation position of the projector on a ceiling, see "Ceiling Installation." (1 page 93) For details on page 16 or 17 as a guide. x: Horizontal distance between ...
Connections and Preparations Positioning the Projector and a Screen The installation distance between the projector and a screen varies depending on the size of the screen or whether or not you position the projector so that the center of the projector's lens. For installation of the projector and screen. You can obtain a... good quality picture if you use the lens shift features. 1 Determine the installation position of the projector on a ceiling, see "Ceiling Installation." (1 page 93) For details on page 16 or 17 as a guide. x: Horizontal distance between ...

Operating Instructions
Page 18
This is parallel to the screen. Note When using a screen with an uneven surface, stripes pattern may rarely appear on the screen depending on the screen and adjust the picture so that the lens is not a malfunction of the projector. 18 Top view Screen 3 Project an image on the distance between the screen and the projector or the zooming magnifications. 2 Position the projector so that it fits the screen (1 page 19).
This is parallel to the screen. Note When using a screen with an uneven surface, stripes pattern may rarely appear on the screen depending on the screen and adjust the picture so that the lens is not a malfunction of the projector. 18 Top view Screen 3 Project an image on the distance between the screen and the projector or the zooming magnifications. 2 Position the projector so that it fits the screen (1 page 19).

Operating Instructions
Page 19
Step 2: Adjusting the Picture Position Project an image on the screen and then adjust the picture position. 1 ON/STANDBY indicator Connections and Preparations Remote control detector 2 ?/1 (On/ standby) switch 3, 4, 5 Lens button Tip The ?/1 (ON/STANDBY), INPUT, LENS, MENU, and M/m/
Step 2: Adjusting the Picture Position Project an image on the screen and then adjust the picture position. 1 ON/STANDBY indicator Connections and Preparations Remote control detector 2 ?/1 (On/ standby) switch 3, 4, 5 Lens button Tip The ?/1 (ON/STANDBY), INPUT, LENS, MENU, and M/m/

Operating Instructions
Page 20
appears on the projector. The ON/STANDBY indicator flashes in green, and then lights in green. 2 Press the ?/1 (ON/STANDBY) switch to turn on the screen. 3 Adjust the focus. Press the LENS button repeatedly until the Lens Focus adjustment window (test pattern) appears. When the ON/STANDBY indicator flashes, "Starting..." Flashes in green for a while (tens of the picture by pressing the M/m/ The lens protector will open. Then adjust the focus of seconds) and then lights in green.
appears on the projector. The ON/STANDBY indicator flashes in green, and then lights in green. 2 Press the ?/1 (ON/STANDBY) switch to turn on the screen. 3 Adjust the focus. Press the LENS button repeatedly until the Lens Focus adjustment window (test pattern) appears. When the ON/STANDBY indicator flashes, "Starting..." Flashes in green for a while (tens of the picture by pressing the M/m/ The lens protector will open. Then adjust the focus of seconds) and then lights in green.

Operating Instructions
Page 22
To adjust the horizontal position Press
To adjust the horizontal position Press

Operating Instructions
Page 23
Adjusters Notes • Pointing the projector at too high or too low of the installation surface If the projector is installed on an uneven surface, use the adjusters to catch your finger when turning the adjusters. 23 Connections and Preparations Range of movement of the projected picture Projected Picture H: Width of the projected picture V: Height of the projected picture To adjust the tilt of a tilt will result in trapezoidal distortion in the projected image. • Be careful not to keep the projector level. Turn to adjust.
Adjusters Notes • Pointing the projector at too high or too low of the installation surface If the projector is installed on an uneven surface, use the adjusters to catch your finger when turning the adjusters. 23 Connections and Preparations Range of movement of the projected picture Projected Picture H: Width of the projected picture V: Height of the projected picture To adjust the tilt of a tilt will result in trapezoidal distortion in the projected image. • Be careful not to keep the projector level. Turn to adjust.

Operating Instructions
Page 24
...HDMI cable, be sure to do the following: • Turn off all equipment before making connections, be sure to the HDMI input of the projector. Moreover, if you have a Control for HDMI compatible equipment, you can enjoy better picture quality by connecting a DVD player/recorder, Blu-ray Disc... side of the connected equipment. Connecting to a VCR To connect to equipment with HDMI output connectors You can operate the projector synchronizing with HDMI output to use a Sony HDMI cable or other cable they has the HDMI logo. 24 poor connection at the plugs may cause a malfunction or poor...
...HDMI cable, be sure to do the following: • Turn off all equipment before making connections, be sure to the HDMI input of the projector. Moreover, if you have a Control for HDMI compatible equipment, you can enjoy better picture quality by connecting a DVD player/recorder, Blu-ray Disc... side of the connected equipment. Connecting to a VCR To connect to equipment with HDMI output connectors You can operate the projector synchronizing with HDMI output to use a Sony HDMI cable or other cable they has the HDMI logo. 24 poor connection at the plugs may cause a malfunction or poor...

Operating Instructions
Page 25
..., and 3D video images may not be displayed properly. • When connecting an HDMI cable to the projector, make sure the V mark on the upper part of the HDMI input of the projector and the v mark on the connector of the cable is set at the same position. • If... the picture from equipment connected to equipment with component video output connectors Right side of the projector AV amplifier Speakers Equipment with an HDMI cable is not clear, check the settings of the connected equipment. Connections and Preparations Notes • Use ...
..., and 3D video images may not be displayed properly. • When connecting an HDMI cable to the projector, make sure the V mark on the upper part of the HDMI input of the projector and the v mark on the connector of the cable is set at the same position. • If... the picture from equipment connected to equipment with component video output connectors Right side of the projector AV amplifier Speakers Equipment with an HDMI cable is not clear, check the settings of the connected equipment. Connections and Preparations Notes • Use ...

Operating Instructions
Page 26
To connect to Video output : Video signal flow Video cable (not supplied) 26 Right side of the projector Speakers AV amplifier Video equipment to a VCR equipped with the video connector You can connect a DVD player/recorder, hard disk video recorder, VCR or laser disk player, which is not equipped with component video connectors.
To connect to Video output : Video signal flow Video cable (not supplied) 26 Right side of the projector Speakers AV amplifier Video equipment to a VCR equipped with the video connector You can connect a DVD player/recorder, hard disk video recorder, VCR or laser disk player, which is not equipped with component video connectors.

Operating Instructions
Page 27
... (1 pages 60, 74). Connections and Preparations Connecting to a Computer Right side of the computer. • If the picture from equipment connected to the projector with your computer. Set your computer, such as a notebook type, to output the signal to both computer's display and this equipment, the picture of the... of 1080P, DeepColor, and 3D video images may not appear properly. For settings of the computer, consult with the manufacturer of the projector Computer to use a Sony HDMI cable or other cable they has the HDMI logo. Notes • Use a high-speed HDMI cable.
... (1 pages 60, 74). Connections and Preparations Connecting to a Computer Right side of the computer. • If the picture from equipment connected to the projector with your computer. Set your computer, such as a notebook type, to output the signal to both computer's display and this equipment, the picture of the... of 1080P, DeepColor, and 3D video images may not appear properly. For settings of the computer, consult with the manufacturer of the projector Computer to use a Sony HDMI cable or other cable they has the HDMI logo. Notes • Use a high-speed HDMI cable.

Operating Instructions
Page 28
... 15 cm (6 inches) Tip Place the optional 3D Sync Transmitter directly facing the 3D glasses. Also, keep the LAN cable away from the projector's built-in 3D Sync Transmitter. In this case, connect an optional TMRBR100 3D Sync Transmitter and place it is dedicated for the optional 3D Sync...; Be sure to use cable of up to 15 m, and do not use both at the same time. 28 Also, in order to a projector. Depending on the installation environment of the projector, the 3D glasses may cause a malfunction. • When connected to an Optional TMR-BR100 3D Sync Transmitter The...
... 15 cm (6 inches) Tip Place the optional 3D Sync Transmitter directly facing the 3D glasses. Also, keep the LAN cable away from the projector's built-in 3D Sync Transmitter. In this case, connect an optional TMRBR100 3D Sync Transmitter and place it is dedicated for the optional 3D Sync...; Be sure to use cable of up to 15 m, and do not use both at the same time. 28 Also, in order to a projector. Depending on the installation environment of the projector, the 3D glasses may cause a malfunction. • When connected to an Optional TMR-BR100 3D Sync Transmitter The...


