Product Manual (vplcx6 series ops)
Page 2
...Using a Menu Using a MENU 19 The PICTURE SETTING Menu ...... 20 The INPUT SETTING Menu .......... 21 The SET SETTING Menu 24 The MENU SETTING Menu .......... 26 The INSTALL SETTING Menu ...... 27 The INFORMATION Menu 29 Network Using Network Features 30 Displaying the Control Window of the Projector with a Web Browser 30 Confirming the Information regarding the Projector 31 Operating the Projector from a Computer 31 Making the Network Settings .....31 Using the e-mail report Function 32 Others Indicators 33 Messages List 34 Troubleshooting 35 Replacing the Lamp 37 Cleaning the Air...
...Using a Menu Using a MENU 19 The PICTURE SETTING Menu ...... 20 The INPUT SETTING Menu .......... 21 The SET SETTING Menu 24 The MENU SETTING Menu .......... 26 The INSTALL SETTING Menu ...... 27 The INFORMATION Menu 29 Network Using Network Features 30 Displaying the Control Window of the Projector with a Web Browser 30 Confirming the Information regarding the Projector 31 Operating the Projector from a Computer 31 Making the Network Settings .....31 Using the e-mail report Function 32 Others Indicators 33 Messages List 34 Troubleshooting 35 Replacing the Lamp 37 Cleaning the Air...
Product Manual (vplcx6 series ops)
Page 5
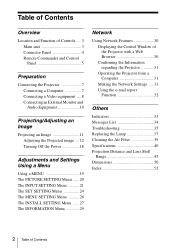
... 4 times. key repeatedly to enlarge. 3 Press the D ZOOM + key or the D ZOOM - e Using various functions during projecting D ZOOM (Digital Zoom) +/- FREEZE key*2 Pauses a projected image. key For adjusting the volume output. Overview Remote Commander and Control Panel Remote Commander 4 2 3 4 INPUT APA ECO MODE MENU RESET ENTER RETURN ASPECT KEYSTONE PATTERN BLANK D ZOOM VOLUME FREEZE MUTING 7 1 6 5 Control Panel 1 23 3 6 a Turning on the power/Going to standby mode ?/1 (On/Standby) key b Selecting an input signal (page 11) INPUT key c Operating a menu (page 19) MENU key RESET key...
... 4 times. key repeatedly to enlarge. 3 Press the D ZOOM + key or the D ZOOM - e Using various functions during projecting D ZOOM (Digital Zoom) +/- FREEZE key*2 Pauses a projected image. key For adjusting the volume output. Overview Remote Commander and Control Panel Remote Commander 4 2 3 4 INPUT APA ECO MODE MENU RESET ENTER RETURN ASPECT KEYSTONE PATTERN BLANK D ZOOM VOLUME FREEZE MUTING 7 1 6 5 Control Panel 1 23 3 6 a Turning on the power/Going to standby mode ?/1 (On/Standby) key b Selecting an input signal (page 11) INPUT key c Operating a menu (page 19) MENU key RESET key...
Product Manual (vplcx6 series ops)
Page 11
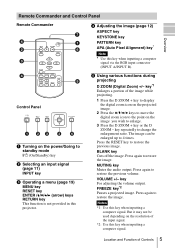
... on projection distances and projected image sizes, see "Projection Distance and Lens Shift Range" (page 45). 5 4 6 Computer 35 Video equipment 2 Projector 1 Wall outlet 1 Plug the AC power cord into the wall outlet. 2 Connect all equipment to the projector (page 7). 3 Press ?/1 to turn on the unit. 4 Turn on the distance between the projector and screen. Projecting an Image 11 Projecting/Adjusting an Image B Projecting/Adjusting an Image Projecting an Image The size of the projected image (page 12). Each time you press the INPUT key...
... on projection distances and projected image sizes, see "Projection Distance and Lens Shift Range" (page 45). 5 4 6 Computer 35 Video equipment 2 Projector 1 Wall outlet 1 Plug the AC power cord into the wall outlet. 2 Connect all equipment to the projector (page 7). 3 Press ?/1 to turn on the unit. 4 Turn on the distance between the projector and screen. Projecting an Image 11 Projecting/Adjusting an Image B Projecting/Adjusting an Image Projecting an Image The size of the projected image (page 12). Each time you press the INPUT key...
Product Manual (vplcx6 series ops)
Page 13
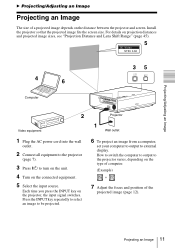
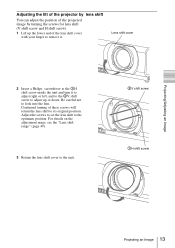
Adjust the screws to set the lens shift to the unit. 2V shift screw 1H shift screw Projecting an Image 13 Continued turning of the lens shift cover with your finger to remove it to adjust right or left, and to the 2V shift screw to adjust up or down. Lens shift cover 2 Insert a Philips screwdriver to the 1H shift screw inside the unit and turn it . For details on...
Adjust the screws to set the lens shift to the unit. 2V shift screw 1H shift screw Projecting an Image 13 Continued turning of the lens shift cover with your finger to remove it to adjust right or left, and to the 2V shift screw to adjust up or down. Lens shift cover 2 Insert a Philips screwdriver to the 1H shift screw inside the unit and turn it . For details on...
Product Manual (vplcx6 series ops)
Page 18
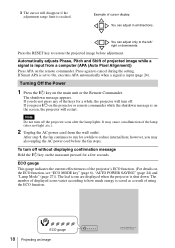
... remote commander. It may also unplug the AC power cord before adjustment. To turn off. The shutdown message appears. Turning Off the Power 1 Press the ?/1 key on the ECO function, see "ECO MODE key" (page 6), "AUTO POWER SAVING" (page 24) and "Lamp Mode" (page 27)). Example of using the ECO function. Press the RESET key to cancel during the setting. Press again to restore the projected image before the fan...
... remote commander. It may also unplug the AC power cord before adjustment. To turn off. The shutdown message appears. Turning Off the Power 1 Press the ?/1 key on the ECO function, see "ECO MODE key" (page 6), "AUTO POWER SAVING" (page 24) and "Lamp Mode" (page 27)). Example of using the ECO function. Press the RESET key to cancel during the setting. Press again to restore the projected image before the fan...

Product Manual (vplcx6 series ops)
Page 21
...*5: Displays a 1280 × 720 dot picture on the screen without changing the aspect ratio of the image is cut and reception is projected on the screen. Zoom: Display the center point of computer signal. Use this setting when noise appears along the edge of the display pixel and the input signal. When the video signal is projected on the input signal, setting items for each input signal. Items Item descriptions Adjust Signal Adjusts the image of the projected image to zoom...
...*5: Displays a 1280 × 720 dot picture on the screen without changing the aspect ratio of the image is cut and reception is projected on the screen. Zoom: Display the center point of computer signal. Use this setting when noise appears along the edge of the display pixel and the input signal. When the video signal is projected on the input signal, setting items for each input signal. Items Item descriptions Adjust Signal Adjusts the image of the projected image to zoom...
Product Manual (vplcx6 series ops)
Page 24
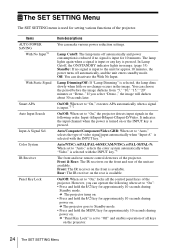
.../STANDBY indicator lights in orange. (page 33) Standby: If no change occurs in the following when set to "Auto," selects the color system automatically when "Video" is selected with the INPUT key.*3 The front and rear remote control detectors of the projector. Lamp Dimming/Off: If "Lamp Dimming" is selected, the lamp dims slowly when little or no signal is input to the unit for approx.10 minutes, the power turns...
.../STANDBY indicator lights in orange. (page 33) Standby: If no change occurs in the following when set to "Auto," selects the color system automatically when "Video" is selected with the INPUT key.*3 The front and rear remote control detectors of the projector. Lamp Dimming/Off: If "Lamp Dimming" is selected, the lamp dims slowly when little or no signal is input to the unit for approx.10 minutes, the power turns...

Product Manual (vplcx6 series ops)
Page 25
... input the value with V or v key. Adjustments and Settings Using a Menu The SET SETTING Menu 25 When replacing the lamp, resets the lamp timer (page 37). In this case, adjust the "Dot Phase," "H size," and "Shift" items manually. *3: The image may not be displayed on the screen and also optimum image cannot be obtained, depending on the type of black portion around it manually to suit to the connected equipment. *4: "Network Setting" is not displayed while "REMOTE...
... input the value with V or v key. Adjustments and Settings Using a Menu The SET SETTING Menu 25 When replacing the lamp, resets the lamp timer (page 37). In this case, adjust the "Dot Phase," "H size," and "Shift" items manually. *3: The image may not be displayed on the screen and also optimum image cannot be obtained, depending on the type of black portion around it manually to suit to the connected equipment. *4: "Network Setting" is not displayed while "REMOTE...

Product Manual (vplcx6 series ops)
Page 27
... to go Standby mode then turn the power on without going to authorized users by password. Auto*6/High/Standard/Low*7: When set to a wall outlet. On/Off: When set to input the password again. The INSTALL SETTING Menu 27 Adjustments and Settings Using a Menu The INSTALL SETTING Menu The INSTALL SETTING menu is used . Items Screen Fitting V Keystone*1*5 H Keystone*1*5 Warping Image Flip Background Lamp Mode High Altitude Mode*2 Security Lock*3 Direct Power On Item descriptions HV Keystone/ Warping: You can correct image twist. This is displayed when "HV Keystone" is...
... to go Standby mode then turn the power on without going to authorized users by password. Auto*6/High/Standard/Low*7: When set to a wall outlet. On/Off: When set to input the password again. The INSTALL SETTING Menu 27 Adjustments and Settings Using a Menu The INSTALL SETTING Menu The INSTALL SETTING menu is used . Items Screen Fitting V Keystone*1*5 H Keystone*1*5 Warping Image Flip Background Lamp Mode High Altitude Mode*2 Security Lock*3 Direct Power On Item descriptions HV Keystone/ Warping: You can correct image twist. This is displayed when "HV Keystone" is...
Product Manual (vplcx6 series ops)
Page 29
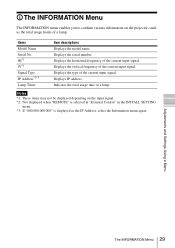
... the input signal. *2: Not displayed when "REMOTE" is selected in "External Control" in the INSTALL SETTING menu. *3: If "000.000.000.000" is displayed as the total usage hours of a lamp. Displays the vertical frequency of a lamp. Indicates the total usage time of the current input signal. Displays the horizontal frequency of the current input signal. Adjustments and Settings Using a Menu The INFORMATION Menu 29 Items Model Name Serial No. Displays the serial number. Displays the type of the current input signal. Displays IP address.
... the input signal. *2: Not displayed when "REMOTE" is selected in "External Control" in the INSTALL SETTING menu. *3: If "000.000.000.000" is displayed as the total usage hours of a lamp. Displays the vertical frequency of a lamp. Indicates the total usage time of the current input signal. Displays the horizontal frequency of the current input signal. Adjustments and Settings Using a Menu The INFORMATION Menu 29 Items Model Name Serial No. Displays the serial number. Displays the type of the current input signal. Displays IP address.

Product Manual (vplcx6 series ops)
Page 30
... the factory preset values (page 31). Displaying the Control Window of the projector under "Network Setting" on the SET SETTING menu. http://xxx.xxx.xxx.xxx (xxx.xxx.xxx.xxx: IP address for the 6 projector using a proxy server. LAN cable (straight type) (not supplied) LAN Connector Hub, router, etc 3 Start a web browser on the computer, enter the following in the Web browser: 2 Set the network settings for the projector) You can open the Control window...
... the factory preset values (page 31). Displaying the Control Window of the projector under "Network Setting" on the SET SETTING menu. http://xxx.xxx.xxx.xxx (xxx.xxx.xxx.xxx: IP address for the 6 projector using a proxy server. LAN cable (straight type) (not supplied) LAN Connector Hub, router, etc 3 Start a web browser on the computer, enter the following in the Web browser: 2 Set the network settings for the projector) You can open the Control window...
Product Manual (vplcx6 series ops)
Page 31
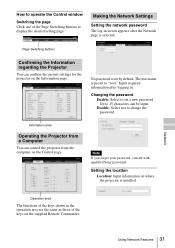
Making the Network Settings Setting the network password The log-in . Input required information after logging in screen appears after the Network page is selected. Disable: Select not to "root." Changing the password Enable: Select to set by default. Network Using Network Features 31 Up to 15 characters can control the projector from the computer on the Information page. 6 No password is set a new password. Setting the location Location: Input information on the supplied Remote Commander. Page Switching buttons Confirming the...
Making the Network Settings Setting the network password The log-in . Input required information after logging in screen appears after the Network page is selected. Disable: Select not to "root." Changing the password Enable: Select to set by default. Network Using Network Features 31 Up to 15 characters can control the projector from the computer on the Information page. 6 No password is set a new password. Setting the location Location: Input information on the supplied Remote Commander. Page Switching buttons Confirming the...
Product Manual (vplcx6 series ops)
Page 33
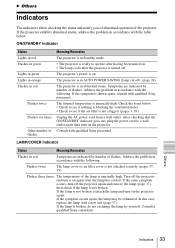
... lamp has cooled. LAMP/COVER indicator Status Meaning/Remedies Flashes in abnormal status. If the lamp is in red Symptoms are indicated by number of flashes Meaning/Remedies The projector is in accordance with qualified Sony personnel. B Others Indicators The indicators allow checking the status and notify you of abnormal operation of flashes. If the projector exhibits abnormal status, address the problem in AUTO POWER SAVING (lamp cut off the projector and turn off . The projector is in accordance with a new...
... lamp has cooled. LAMP/COVER indicator Status Meaning/Remedies Flashes in abnormal status. If the lamp is in red Symptoms are indicated by number of flashes Meaning/Remedies The projector is in accordance with qualified Sony personnel. B Others Indicators The indicators allow checking the status and notify you of abnormal operation of flashes. If the projector exhibits abnormal status, address the problem in AUTO POWER SAVING (lamp cut off the projector and turn off . The projector is in accordance with a new...
Product Manual (vplcx6 series ops)
Page 34
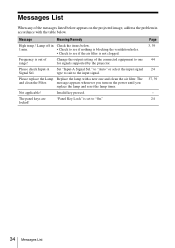
... the messages listed below appears on the power until you turn on the projected image, address the problem in Check the items below . Set "Input-A Signal Sel." to "Auto" or select the input signal type to suit to one and clean the air filter. The panel keys are locked! Page 3, 39 44 24 37, 39 - 24 34 Messages List Messages List When any of range! Message Meaning/Remedy High temp.! Please replace the Lamp Replace the lamp with...
... the messages listed below appears on the power until you turn on the projected image, address the problem in Check the items below . Set "Input-A Signal Sel." to "Auto" or select the input signal type to suit to one and clean the air filter. The panel keys are locked! Page 3, 39 44 24 37, 39 - 24 34 Messages List Messages List When any of range! Message Meaning/Remedy High temp.! Please replace the Lamp Replace the lamp with...

Product Manual (vplcx6 series ops)
Page 35
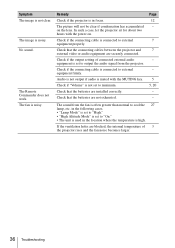
... Lock" is burnt out. If the lamp or lamp cover is installed on an uneven surface, the 5, 14, feature may not appear properly. No image. When the temperature around the unit is connected to set "V Keystone" manually. Check if the connecting cable is high, the brightness - The image is displayed smaller /a portion of the external monitor may not work automatically. Check 29 "Lamp Timer," and replace the lamp with a new one if necessary. Set "V Keystone" to "Auto...
... Lock" is burnt out. If the lamp or lamp cover is installed on an uneven surface, the 5, 14, feature may not appear properly. No image. When the temperature around the unit is connected to set "V Keystone" manually. Check if the connecting cable is high, the brightness - The image is displayed smaller /a portion of the external monitor may not work automatically. Check 29 "Lamp Timer," and replace the lamp with a new one if necessary. Set "V Keystone" to "Auto...
Product Manual (vplcx6 series ops)
Page 36
... used in the location where the temperature is high. The image is noisy. Check if the connecting cable is often greater than normal to cool the 27 lamp, etc. Check that the batteries are securely connected. No sound. The sound from the projector. If the ventilation holes are installed correctly. Check that the batteries are blocked, the internal temperature of connected external audio equipment is set to minimum. in focus. The Remote Commander...
... used in the location where the temperature is high. The image is noisy. Check if the connecting cable is often greater than normal to cool the 27 lamp, etc. Check that the batteries are securely connected. No sound. The sound from the projector. If the ventilation holes are installed correctly. Check that the batteries are blocked, the internal temperature of connected external audio equipment is set to minimum. in focus. The Remote Commander...

Product Manual (vplcx6 series ops)
Page 37
... objects into the slot. Replacing the Lamp Replace the lamp with a new one if a message displayed on the ceiling. Use an LMP-C280 (VPL-CX276/CW276), LMP-C240 (VPL-CX236/CW256) projector lamp (not supplied) for a while when installing on the projected image or the LAMP/ COVER indicator notifies you may burn your hands into the lamp replacement slot after removing the lamp, otherwise it is open the lamp cover by holding the designated location. Do not put...
... objects into the slot. Replacing the Lamp Replace the lamp with a new one if a message displayed on the ceiling. Use an LMP-C280 (VPL-CX276/CW276), LMP-C240 (VPL-CX236/CW256) projector lamp (not supplied) for a while when installing on the projected image or the LAMP/ COVER indicator notifies you may burn your hands into the lamp replacement slot after removing the lamp, otherwise it is open the lamp cover by holding the designated location. Do not put...

Product Manual (vplcx6 series ops)
Page 38
... be turned on the projector. 38 Replacing the Lamp If not, the projector cannot be regulated due to a wall outlet and turn on . 6 Connect the AC power cord to environmental considerations. Grab 4 Insert the new lamp all the way in until it was. When a message appears, select "Yes" to install the lamp and Lamp cover securely as it is securely in this product contains mercury. Select "Lamp Timer Reset...
... be turned on the projector. 38 Replacing the Lamp If not, the projector cannot be regulated due to a wall outlet and turn on . 6 Connect the AC power cord to environmental considerations. Grab 4 Insert the new lamp all the way in until it was. When a message appears, select "Yes" to install the lamp and Lamp cover securely as it is securely in this product contains mercury. Select "Lamp Timer Reset...

Product Manual (vplcx6 series ops)
Page 42
... 240 V: 3.0 W (LAN) (when "Standby Mode" is current as of the unit, including the optional accessories, are subject to change without projecting parts) VPL-CX236/CW256: Approx. 5.6 kg (12 lb) VPL-CX276/CW276: Approx. 5.7 kg (13 lb) See "Checking the Supplied Accessories" in this manual is set to "Acceptable Input Signals" on page 44. *2: Information on accessories in the supplied Quick Reference Manual. Projector lamp LMP-C240 (replacement lamp for VPL-CX236...
... 240 V: 3.0 W (LAN) (when "Standby Mode" is current as of the unit, including the optional accessories, are subject to change without projecting parts) VPL-CX236/CW256: Approx. 5.6 kg (12 lb) VPL-CX276/CW276: Approx. 5.7 kg (13 lb) See "Checking the Supplied Accessories" in this manual is set to "Acceptable Input Signals" on page 44. *2: Information on accessories in the supplied Quick Reference Manual. Projector lamp LMP-C240 (replacement lamp for VPL-CX236...
Product Manual (vplcx6 series ops)
Page 52
... 5 Front feet (adjustable 3, 14 fV 29 G Gamma Mode 20 H H Size 21 High Altitude Mode 27 Hue 20 I Image Flip 27 Information menu 29 Input 4 INPUT SETTING menu 21 Input-A Signal Sel 24 INSTALL SETTING menu 27 IP Address 29 IP Address Setup 25 IR Receiver 24 K Keystone 5 L Lamp cover 3 Lamp Mode 27 Lamp Timer 29 Lamp Timer Reset 25 LAMP/COVER indicator 3, 33 LAN connector 4 Language 26 Lens shift cover 3, 13 Location and function of controls 3 M Main unit 3 MENU SETTING menu 26 Messages list 34 Model Name 29 MUTING 5 N Network Features 30 Network Setting 25 52...
... 5 Front feet (adjustable 3, 14 fV 29 G Gamma Mode 20 H H Size 21 High Altitude Mode 27 Hue 20 I Image Flip 27 Information menu 29 Input 4 INPUT SETTING menu 21 Input-A Signal Sel 24 INSTALL SETTING menu 27 IP Address 29 IP Address Setup 25 IR Receiver 24 K Keystone 5 L Lamp cover 3 Lamp Mode 27 Lamp Timer 29 Lamp Timer Reset 25 LAMP/COVER indicator 3, 33 LAN connector 4 Language 26 Lens shift cover 3, 13 Location and function of controls 3 M Main unit 3 MENU SETTING menu 26 Messages list 34 Model Name 29 MUTING 5 N Network Features 30 Network Setting 25 52...


