Product Manual (E series Operation manual)
Page 2
...9 Connecting a Video equipment 11 Connecting a microphone .......... 13 Connecting a USB memory device 13 Connecting an External Monitor and Audio Equipment 14 Projecting/Adjusting an Image Projecting an Image 15 Adjusting the Projected image ... 16 Turning Off the Power 19 Adjustments and Settings Using a Menu Using a MENU 20 The Picture Menu 21 The Screen Menu 22 The Function Menu 26 The Operation Menu 27 The Connection/Power Menu .......... 28 The Installation Menu 30 2 Table of Contents The Information Menu 31 Network Using Network Features 32 Displaying the Control Window of...
...9 Connecting a Video equipment 11 Connecting a microphone .......... 13 Connecting a USB memory device 13 Connecting an External Monitor and Audio Equipment 14 Projecting/Adjusting an Image Projecting an Image 15 Adjusting the Projected image ... 16 Turning Off the Power 19 Adjustments and Settings Using a Menu Using a MENU 20 The Picture Menu 21 The Screen Menu 22 The Function Menu 26 The Operation Menu 27 The Connection/Power Menu .......... 28 The Installation Menu 30 2 Table of Contents The Information Menu 31 Network Using Network Features 32 Displaying the Control Window of...

Product Manual (E series Operation manual)
Page 7
.... Location and Function of the ECO Mode menu as the input. Overview e Using various functions during projecting D ZOOM (Digital Zoom) +/- The image can be set easily. But it may not be enlarged up to the optimum energy-saving value. f Setting the energy-saving mode easily ECO MODE key Energy-saving mode can be used depending on the Connection/Power menu (page 28). Lamp Mode: Low With No Input: Standby With Static Signal: Lamp Dimming Standby Mode: Low User: Sets...
.... Location and Function of the ECO Mode menu as the input. Overview e Using various functions during projecting D ZOOM (Digital Zoom) +/- The image can be set easily. But it may not be enlarged up to the optimum energy-saving value. f Setting the energy-saving mode easily ECO MODE key Energy-saving mode can be used depending on the Connection/Power menu (page 28). Lamp Mode: Low With No Input: Standby With Static Signal: Lamp Dimming Standby Mode: Low User: Sets...
Product Manual (E series Operation manual)
Page 15
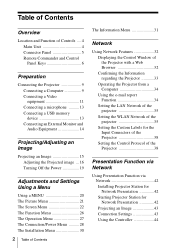
... "USB Media Viewer" (page 48). For details on projection distances and projected image sizes, see "Projection Distance" (page 66). 35 Projecting/Adjusting an Image Projector 4 2 Video equipment 1 Wall outlet 6 1 Plug the AC power cord into the wall outlet. 2 Connect all equipment to the projector (page 9). 3 Press the ?/1 key to display the menu for switching input signal on the connected equipment. 5 Select the input source. Press the INPUT key on the projector to turn on the unit. 4 Turn on the screen...
... "USB Media Viewer" (page 48). For details on projection distances and projected image sizes, see "Projection Distance" (page 66). 35 Projecting/Adjusting an Image Projector 4 2 Video equipment 1 Wall outlet 6 1 Plug the AC power cord into the wall outlet. 2 Connect all equipment to the projector (page 9). 3 Press the ?/1 key to display the menu for switching input signal on the connected equipment. 5 Select the input source. Press the INPUT key on the projector to turn on the unit. 4 Turn on the screen...

Product Manual (E series Operation manual)
Page 18
... Keystone feature automatically adjusts the projected image. You can use this case, set the value. Note You cannot use a grid pattern as the input. If Smart APA in the Function menu is set APA in the Installation menu. 2 Use the V/v/B/b keys to "On", executes APA automatically when a signal is input from a computer (APA (Auto Pixel Alignment)) Press the APA key on the remote commander or select V Keystone in the Screen Menu...
... Keystone feature automatically adjusts the projected image. You can use this case, set the value. Note You cannot use a grid pattern as the input. If Smart APA in the Function menu is set APA in the Installation menu. 2 Use the V/v/B/b keys to "On", executes APA automatically when a signal is input from a computer (APA (Auto Pixel Alignment)) Press the APA key on the remote commander or select V Keystone in the Screen Menu...
Product Manual (E series Operation manual)
Page 19
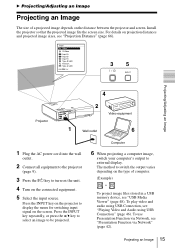
... not turn off without displaying confirmation message Press and hold the ?/1 key on the unit or the remote commander. The number of displayed icons varies according to how much energy is saved as a result of the lamp (does not light ,etc.). 2 Unplug the AC power cord from the wall outlet. It may cause a malfunction of using the ECO function. To turn off . Projecting/Adjusting an Image Turning...
... not turn off without displaying confirmation message Press and hold the ?/1 key on the unit or the remote commander. The number of displayed icons varies according to how much energy is saved as a result of the lamp (does not light ,etc.). 2 Unplug the AC power cord from the wall outlet. It may cause a malfunction of using the ECO function. To turn off . Projecting/Adjusting an Image Turning...

Product Manual (E series Operation manual)
Page 26
... CC Display Lamp Timer Reset Start Up Image Item descriptions The higher the value, the louder an audio volume and the lower the value, the lower the audio volume. Notes *1: APA functions when a computer signal is input via the RGB input connector (INPUT A/INPUT B). *2: The maximum available mic volume is powered on the screen when the projector is set by the value of the projector. To not output sound...
... CC Display Lamp Timer Reset Start Up Image Item descriptions The higher the value, the louder an audio volume and the lower the value, the lower the audio volume. Notes *1: APA functions when a computer signal is input via the RGB input connector (INPUT A/INPUT B). *2: The maximum available mic volume is powered on the screen when the projector is set by the value of the projector. To not output sound...

Product Manual (E series Operation manual)
Page 27
... the control panel keys of the projector to verify the projector's serial number and your password. Note *1: You will be asked to authorized users by using the menu or the remote commander. When it is set to "Off," you can operate the following when set to use the projector if you turn on . In this case, press the ?/1 key to go Standby mode then turn on the projector after three consecutive times, the projector...
... the control panel keys of the projector to verify the projector's serial number and your password. Note *1: You will be asked to authorized users by using the menu or the remote commander. When it is set to "Off," you can operate the following when set to use the projector if you turn on . In this case, press the ?/1 key to go Standby mode then turn on the projector after three consecutive times, the projector...
Product Manual (E series Operation manual)
Page 28
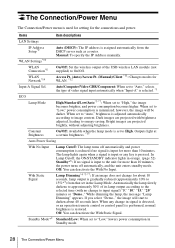
... operation (remote control or control panel) is performed, normal brightness is selected. *1 ECO Lamp Mode High/Standard/Low/Auto*5 *7: When set to On/Off. Automatically the lamp slowly darkens to approximately 30% of the USB wireless LAN module (not supplied) to "High," the image becomes brighter, and power consumption becomes higher. Items Item descriptions LAN Settings IP Address Setup*9 WLAN Settings*10 Auto (DHCP): The IP address is used for setting for WLAN. *12 Input-A Signal Sel. WLAN Connection*8 WLAN Network...
... operation (remote control or control panel) is performed, normal brightness is selected. *1 ECO Lamp Mode High/Standard/Low/Auto*5 *7: When set to On/Off. Automatically the lamp slowly darkens to approximately 30% of the USB wireless LAN module (not supplied) to "High," the image becomes brighter, and power consumption becomes higher. Items Item descriptions LAN Settings IP Address Setup*9 WLAN Settings*10 Auto (DHCP): The IP address is used for setting for WLAN. *12 Input-A Signal Sel. WLAN Connection*8 WLAN Network...

Product Manual (E series Operation manual)
Page 29
... a change . A change the settings for "Access Pt. (Manual)", use a Web browser. Adjustments and Settings Using a Menu The Connection/Power Menu 29 Items Direct Power On Item descriptions On/Off: When set "WLAN Network" to "Access Pt. (Auto)" or "Access Pt. (Manual)," to use USB wireless LAN module IFU-WLM3 (not supplied) as a wireless access point. *11: The factory default settings for "Access Pt. (Manual)" are as the input. Notes *1: This may not be enabled for about 2,000 hours after...
... a change . A change the settings for "Access Pt. (Manual)", use a Web browser. Adjustments and Settings Using a Menu The Connection/Power Menu 29 Items Direct Power On Item descriptions On/Off: When set "WLAN Network" to "Access Pt. (Auto)" or "Access Pt. (Manual)," to use USB wireless LAN module IFU-WLM3 (not supplied) as a wireless access point. *11: The factory default settings for "Access Pt. (Manual)" are as the input. Notes *1: This may not be enabled for about 2,000 hours after...
Product Manual (E series Operation manual)
Page 32
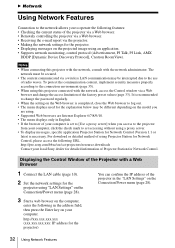
.../cat-projectors/resource.downloads Contact your local Sony dealer for Network Control (Version 1.1 or later) is completed, close the Web browser to [Use a proxy server] when you are using. • Supported Web browsers are Internet Explorer 6/7/8/9/10. • The menu displays only in the "LAN Settings" on the model you access to the projector from your computer is set accessing without using "LAN Settings" on the Connection/Power menu (page 28). 3 Start...
.../cat-projectors/resource.downloads Contact your local Sony dealer for Network Control (Version 1.1 or later) is completed, close the Web browser to [Use a proxy server] when you are using. • Supported Web browsers are Internet Explorer 6/7/8/9/10. • The menu displays only in the "LAN Settings" on the model you access to the projector from your computer is set accessing without using "LAN Settings" on the Connection/Power menu (page 28). 3 Start...

Product Manual (E series Operation manual)
Page 36
... set to "Access Pt. (Auto)." Encyption Type Descriptions Open Sets the security method of the access point to open the WLAN Setting page. 2 WLAN Setting button 3-(a) 2 Enable or disable the radio wave output of the access point if "WLAN Network" is selected. Channel Setting: Displays the channel of USB wireless LAN module. WEP 64bit Input 5 ASCII characters for USB wireless LAN module. To use the wireless LAN network, a USB wireless LAN module IFU-WLM3 (not supplied...
... set to "Access Pt. (Auto)." Encyption Type Descriptions Open Sets the security method of the access point to open the WLAN Setting page. 2 WLAN Setting button 3-(a) 2 Enable or disable the radio wave output of the access point if "WLAN Network" is selected. Channel Setting: Displays the channel of USB wireless LAN module. WEP 64bit Input 5 ASCII characters for USB wireless LAN module. To use the wireless LAN network, a USB wireless LAN module IFU-WLM3 (not supplied...
Product Manual (E series Operation manual)
Page 40
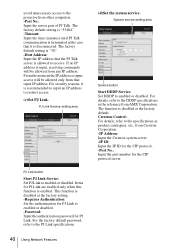
..., refer to the PJ Link specifications. 40 Using Network Features (d)Set the system service. If no IP address is recommended to input an IP address to restrict access. (c)Set PJ Link. For the factory default password, refer to the specifications in the case that it is input, receiving commands will be allowed from any IP address. The factory default setting is "53484." -Timeout: Input the time (minutes) until PJ Talk communication...
..., refer to the PJ Link specifications. 40 Using Network Features (d)Set the system service. If no IP address is recommended to input an IP address to restrict access. (c)Set PJ Link. For the factory default password, refer to the specifications in the case that it is input, receiving commands will be allowed from any IP address. The factory default setting is "53484." -Timeout: Input the time (minutes) until PJ Talk communication...
Product Manual (E series Operation manual)
Page 42
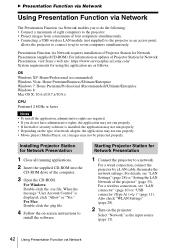
... Windows: Double-click the .exe file. When the message "User Account Control" is installed, the application may not run properly. • Depending on the type of network adapter, the application may not run properly. • Movie player (Media Player, etc.) images may not be projected properly. Also check "WLAN Settings" (page 28). 2 Turn on -screen instructions to install the software. Select "Network" as the input source (page 15). 42 Using...
... Windows: Double-click the .exe file. When the message "User Account Control" is installed, the application may not run properly. • Depending on the type of network adapter, the application may not run properly. • Movie player (Media Player, etc.) images may not be projected properly. Also check "WLAN Settings" (page 28). 2 Turn on -screen instructions to install the software. Select "Network" as the input source (page 15). 42 Using...
Product Manual (E series Operation manual)
Page 44
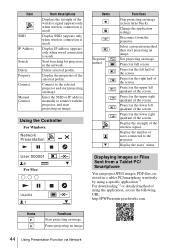
... then start projecting an image. Project in the lower right quadrant of users connected to the projector. stored in the left half of the selected profile. Pause projecting an image. 44 Using Presentation Function via Network Display the properties of the screen. Using the Controller For Windows: Network Presentation Items Projection method Functions Stop projecting an image (screen turns black). Display the users' status. Change the application settings. Project in a tablet PC/smartphone wirelessly by using a specific application.*1 For downloading*2 or...
... then start projecting an image. Project in the lower right quadrant of users connected to the projector. stored in the left half of the selected profile. Pause projecting an image. 44 Using Presentation Function via Network Display the properties of the screen. Using the Controller For Windows: Network Presentation Items Projection method Functions Stop projecting an image (screen turns black). Display the users' status. Change the application settings. Project in a tablet PC/smartphone wirelessly by using a specific application.*1 For downloading*2 or...
Product Manual (E series Operation manual)
Page 52
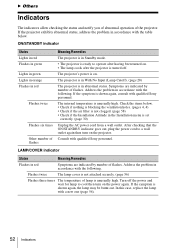
... in abnormal status. Flashes twice The lamp cover is not attached securely. (page 56) Flashes three times The temperature of flashes. Symptoms are indicated by number of lamp is on the power again. Consult with a new one (page 56). 52 Indicators ON/STANDBY indicator Status Lights in red Flashes in green Lights in green Lights in orange Flashes in red Flashes twice Flashes six times Other number of the projector. Check the items below . If the projector exhibits abnormal status, address the problem in the Installation menu is not...
... in abnormal status. Flashes twice The lamp cover is not attached securely. (page 56) Flashes three times The temperature of flashes. Symptoms are indicated by number of lamp is on the power again. Consult with a new one (page 56). 52 Indicators ON/STANDBY indicator Status Lights in red Flashes in green Lights in green Lights in orange Flashes in red Flashes twice Flashes six times Other number of the projector. Check the items below . If the projector exhibits abnormal status, address the problem in the Installation menu is not...
Product Manual (E series Operation manual)
Page 53
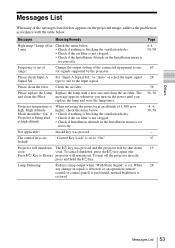
... the projected image, address the problem in signal is detected, or an operation (remote control or control panel) is performed, normal brightness is restored. Change the output setting of the messages listed below . • Check if nothing is blocking the ventilation holes. • Check if the air filter is not clogged. • Check if Installation Attitude in the Installation menu is set correctly. Please clean the filter. The and clean the Filter. When not using the projector at high...
... the projected image, address the problem in signal is detected, or an operation (remote control or control panel) is performed, normal brightness is restored. Change the output setting of the messages listed below . • Check if nothing is blocking the ventilation holes. • Check if the air filter is not clogged. • Check if Installation Attitude in the Installation menu is set correctly. Please clean the filter. The and clean the Filter. When not using the projector at high...
Product Manual (E series Operation manual)
Page 54
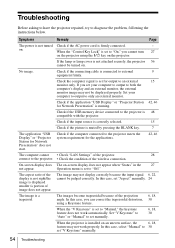
... work properly. Troubleshooting Before asking to have the projector repaired, try to the projector. • Check the condition of the wireless connection. No image. Operation menu is 48 compatible with the projector. In this case, you can correct the trapezoidal distortion, 30 using the ?/1 key on an uneven surface, the 6, 18, feature may not work automatically. When the "Control Key Lock" is a trapezoid. Set "V Keystone" to "Auto" or "Manual" to set...
... work properly. Troubleshooting Before asking to have the projector repaired, try to the projector. • Check the condition of the wireless connection. No image. Operation menu is 48 compatible with the projector. In this case, you can correct the trapezoidal distortion, 30 using the ?/1 key on an uneven surface, the 6, 18, feature may not work automatically. When the "Control Key Lock" is a trapezoid. Set "V Keystone" to "Auto" or "Manual" to set...
Product Manual (E series Operation manual)
Page 55
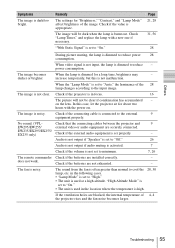
... video signal is not input, the lamp is often greater than normal to "High." • The unit is dimmed for about two hours with a new one if necessary. Check if the projector is in the following cases. • "Lamp Mode" is set to reduce - No sound. (VPL- The sound from the fan is dimmed to "On." • The unit is used at a high altitude. in focus. 16 The picture will...
... video signal is not input, the lamp is often greater than normal to "High." • The unit is dimmed for about two hours with a new one if necessary. Check if the projector is in the following cases. • "Lamp Mode" is set to reduce - No sound. (VPL- The sound from the fan is dimmed to "On." • The unit is used at a high altitude. in focus. 16 The picture will...
Product Manual (E series Operation manual)
Page 56
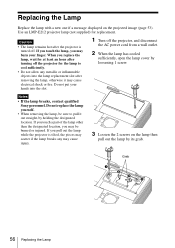
... may cause injury. 3 Loosen the 2 screws on the projected image (page 53). Use an LMP-E212 projector lamp (not supplied) for the lamp to pull it may burn your hands into the lamp replacement slot after the projector is turned off the projector, and disconnect the AC power cord from a wall outlet. 2 When the lamp has cooled sufficiently, open the lamp cover by loosening 1 screw. If you may scatter if...
... may cause injury. 3 Loosen the 2 screws on the projected image (page 53). Use an LMP-E212 projector lamp (not supplied) for the lamp to pull it may burn your hands into the lamp replacement slot after the projector is turned off the projector, and disconnect the AC power cord from a wall outlet. 2 When the lamp has cooled sufficiently, open the lamp cover by loosening 1 screw. If you may scatter if...

Product Manual (E series Operation manual)
Page 92
... 6 Acceptable input signal 65 Adjust Signal 23 Air filter 58 Air filter cover/Ventilation holes (intake 4 APA 6 Aspect 6, 22, 24 B BLANK 7 Brightness 21 C CC Display 26 Color 21 Color Temp 21 Connecting a computer 9 Connecting a Video equipment 11 Connecting an external monitor and audio equipment 14 Connector panel 4, 5 Constant Brightness 28 Contrast 21 Control Key Lock 27 Control Panel Keys 6 Correcting trapezoidal distortion of the projected image (Keystone feature 6, 18 D Digital Zoom 7 E ECO MODE (Energy-saving mode) ......... 7 F fH 31 Focus 16 Focus ring...
... 6 Acceptable input signal 65 Adjust Signal 23 Air filter 58 Air filter cover/Ventilation holes (intake 4 APA 6 Aspect 6, 22, 24 B BLANK 7 Brightness 21 C CC Display 26 Color 21 Color Temp 21 Connecting a computer 9 Connecting a Video equipment 11 Connecting an external monitor and audio equipment 14 Connector panel 4, 5 Constant Brightness 28 Contrast 21 Control Key Lock 27 Control Panel Keys 6 Correcting trapezoidal distortion of the projected image (Keystone feature 6, 18 D Digital Zoom 7 E ECO MODE (Energy-saving mode) ......... 7 F fH 31 Focus 16 Focus ring...


