
Brochure MK11181V2_l
Page 2
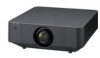
... low fan noise, these projectors have immediate full brightness. The laser projectors (VPL-FHZ65 and VPL-FHZ60) pack all the video, audio, control, and IP signals up -scaled image. A laser light source means avoiding lamp-related problems: lamps need to refine detail, clarity, and sharpness for naturally up to suit specific installation requirements. Turn it off . It's the total convenience that blends in discreetly when the projector is ceiling mounted. In...
... low fan noise, these projectors have immediate full brightness. The laser projectors (VPL-FHZ65 and VPL-FHZ60) pack all the video, audio, control, and IP signals up -scaled image. A laser light source means avoiding lamp-related problems: lamps need to refine detail, clarity, and sharpness for naturally up to suit specific installation requirements. Turn it off . It's the total convenience that blends in discreetly when the projector is ceiling mounted. In...

Brochure MK11181V2_l
Page 5
... laser light source with control technology, long‑life LCD panel, and advanced filter system, the laser projectors (VPL-FHZ65 and VPL-FHZ60) offer up to 20,000 hours* of original brightness to significantly reduce energy consumption. A new automated filter cleaning system removes dust every 100 hours. If the VPL-FHZ65 and VPL-FHZ60 are left powered on usage environment. VPL-FHZ65/FHZ60 VPL-FH65/FH60 Hassle-free Automatic Filter Cleaning Now you can focus...
... laser light source with control technology, long‑life LCD panel, and advanced filter system, the laser projectors (VPL-FHZ65 and VPL-FHZ60) offer up to 20,000 hours* of original brightness to significantly reduce energy consumption. A new automated filter cleaning system removes dust every 100 hours. If the VPL-FHZ65 and VPL-FHZ60 are left powered on usage environment. VPL-FHZ65/FHZ60 VPL-FH65/FH60 Hassle-free Automatic Filter Cleaning Now you can focus...

Brochure MK11181V2_l
Page 7
.... Brightness 100% Time Long Time Power Lamp ON ON Brightness 100% Quick Start Time Power Light ON Source ON Conventional lamp model VPL-FHZ65/FHZ60 Simulated images VPL-FHZ65/FHZ60 VPL-FH65/FH60 Picture Mode New modes ensure great-looking pictures in any source and in every room. Select Standard, Dynamic, Brightness Priority, or Multi-screen Picture mode for red, green and blue, tweak the images according to installation condition. Low fan noise*2 ensures discreet, unobtrusive operation in the number or duration...
.... Brightness 100% Time Long Time Power Lamp ON ON Brightness 100% Quick Start Time Power Light ON Source ON Conventional lamp model VPL-FHZ65/FHZ60 Simulated images VPL-FHZ65/FHZ60 VPL-FH65/FH60 Picture Mode New modes ensure great-looking pictures in any source and in every room. Select Standard, Dynamic, Brightness Priority, or Multi-screen Picture mode for red, green and blue, tweak the images according to installation condition. Low fan noise*2 ensures discreet, unobtrusive operation in the number or duration...

Brochure MK11181V2_l
Page 10
... HDMI Licensing LLC in Japan, the United States of America and other countries and areas. All rights reserved. SPECIFICATIONS Display system Display device Projection lens*1 Light source Size of effective display area Number of pixels Zoom Focus Lens shift Throw ratio Recommended lamp replacement time*2 Filter cleaning / replacement cycle (Max.)*2 Screen size Light output (Mode: High / Standard) Color light output (Mode: High / Standard) Contrast ratio*3 (full white / full black) Displayable scanning frequency Horizontal Vertical Display resolution Computer signal input Video...
... HDMI Licensing LLC in Japan, the United States of America and other countries and areas. All rights reserved. SPECIFICATIONS Display system Display device Projection lens*1 Light source Size of effective display area Number of pixels Zoom Focus Lens shift Throw ratio Recommended lamp replacement time*2 Filter cleaning / replacement cycle (Max.)*2 Screen size Light output (Mode: High / Standard) Color light output (Mode: High / Standard) Contrast ratio*3 (full white / full black) Displayable scanning frequency Horizontal Vertical Display resolution Computer signal input Video...

Product Manual VPL_FH60-&-65--Operation-manual
Page 2
... Location and Function of Controls .... 4 Main Unit 4 Terminals 5 Remote Commander and Control Panel 6 Preparation Connecting the Projector 9 Connecting a Computer 9 Connecting Video Equipment .... 10 Connecting an External Monitor and Audio Equipment 12 Connecting Network Equipment 13 Connecting to HDBaseT™ Equipment 14 Attaching the terminal cover ...... 16 Projecting/Adjusting an Image Projecting an Image 17 Adjusting the Focus, Size, and Position of the Projected Image 18 Correcting for Trapezoidal Distortion of the Projected Image (Keystone Adjustment 19 Correcting Image...
... Location and Function of Controls .... 4 Main Unit 4 Terminals 5 Remote Commander and Control Panel 6 Preparation Connecting the Projector 9 Connecting a Computer 9 Connecting Video Equipment .... 10 Connecting an External Monitor and Audio Equipment 12 Connecting Network Equipment 13 Connecting to HDBaseT™ Equipment 14 Attaching the terminal cover ...... 16 Projecting/Adjusting an Image Projecting an Image 17 Adjusting the Focus, Size, and Position of the Projected Image 18 Correcting for Trapezoidal Distortion of the Projected Image (Keystone Adjustment 19 Correcting Image...

Product Manual VPL_FH60-&-65--Operation-manual
Page 8
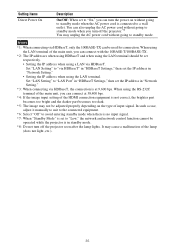
...; Standby Mode: Low User: Sets each projector when multiple projectors are used, you set "Standby Mode" (in standby mode. i CONTROL S output terminal Connects to the CONTROL S input terminal on the Connection/Power menu (page 34). You do not set "ECO Mode" to select "ECO" or "User" mode. About Remote Commander operation • Direct the Remote Commander toward the remote control receiver. • The shorter the distance between the Remote Commander and the remote control receiver on the projector, the projector may not be disabled in "User") to receive signals...
...; Standby Mode: Low User: Sets each projector when multiple projectors are used, you set "Standby Mode" (in standby mode. i CONTROL S output terminal Connects to the CONTROL S input terminal on the Connection/Power menu (page 34). You do not set "ECO Mode" to select "ECO" or "User" mode. About Remote Commander operation • Direct the Remote Commander toward the remote control receiver. • The shorter the distance between the Remote Commander and the remote control receiver on the projector, the projector may not be disabled in "User") to receive signals...
Product Manual VPL_FH60-&-65--Operation-manual
Page 21
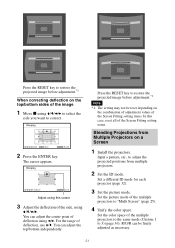
.... Set the picture mode of the multiple projectors to the same mode (Custom 1 to "Multi Screen" (page 25). 4 Unify the color space. Set the color space of the multiple projectors to 3) (page 36). You can be reset depending on a Screen 1 Install the projectors. You can adjust the center point of deflection, use V/v. Set a different ID mode for each projector (page 32). 3 Set the picture mode. Press the RESET key to restore the projected image before adjustment...
.... Set the picture mode of the multiple projectors to the same mode (Custom 1 to "Multi Screen" (page 25). 4 Unify the color space. Set the color space of the multiple projectors to 3) (page 36). You can be reset depending on a Screen 1 Install the projectors. You can adjust the center point of deflection, use V/v. Set a different ID mode for each projector (page 32). 3 Set the picture mode. Press the RESET key to restore the projected image before adjustment...

Product Manual VPL_FH60-&-65--Operation-manual
Page 22
... start position or the blending width, the menu may overlap with qualified Sony personnel. In this adjustment, a black image is turned on, the confirmation message will be displayed and may vary according to the situation. • When multiple projectors are set "Edge Blending" to exhaust vent proximity, and an error indication may cause a malfunction of the lamp (does not light ,etc.). 2 Unplug the AC power cord...
... start position or the blending width, the menu may overlap with qualified Sony personnel. In this adjustment, a black image is turned on, the confirmation message will be displayed and may vary according to the situation. • When multiple projectors are set "Edge Blending" to exhaust vent proximity, and an error indication may cause a malfunction of the lamp (does not light ,etc.). 2 Unplug the AC power cord...

Product Manual VPL_FH60-&-65--Operation-manual
Page 32
... projector. c The projector turns on the projector after three consecutive times, the projector cannot be used in the menu and on the projected image. c "Control Key Lock" is set to "On," locks all control panel keys on . Note *1: When "All Off" is selected, warning message for high temperature is not displayed. *2: Note that Sony is not liable for approximately 10 seconds during standby mode. Setting items Description Language Selects the language used . The Operation Menu The Operation menu is used for setting...
... projector. c The projector turns on the projector after three consecutive times, the projector cannot be used in the menu and on the projected image. c "Control Key Lock" is set to "On," locks all control panel keys on . Note *1: When "All Off" is selected, warning message for high temperature is not displayed. *2: Note that Sony is not liable for approximately 10 seconds during standby mode. Setting items Description Language Selects the language used . The Operation Menu The Operation menu is used for setting...

Product Manual VPL_FH60-&-65--Operation-manual
Page 34
... ON/STANDBY indicator lights in standby mode. 34 Standard/Low: When set it from the DHCP server such as a router. When all items are entered, select "Apply" then press the ENTER key. Input-A Signal Sel. The lamp lights again when a signal is input or any key is disturbed or not projected. Setting items Description Network Setting IPv4 Setting IP Address Setup Auto(DHCP): The IP address is used for setting for "IP Address Setup," select...
... ON/STANDBY indicator lights in standby mode. 34 Standard/Low: When set it from the DHCP server such as a router. When all items are entered, select "Apply" then press the ENTER key. Input-A Signal Sel. The lamp lights again when a signal is input or any key is disturbed or not projected. Setting items Description Network Setting IPv4 Setting IP Address Setup Auto(DHCP): The IP address is used for setting for "IP Address Setup," select...
Product Manual VPL_FH60-&-65--Operation-manual
Page 35
... input signal. *7: When "Standby Mode" is set to "Low," the network and network control function cannot be adjusted properly depending on without going to standby mode when the AC power cord is connected to a wall outlet. Set "LAN Setting" to "LAN Port" in "HDBaseT Settings," then set the IP address in "Network Setting." *3: When connecting via HDBaseT" in "HDBaseT Settings," then set the IP address in standby mode. *8: Do not turn off the projector.*8 You may cause a malfunction of the lamp (does not light...
... input signal. *7: When "Standby Mode" is set to "Low," the network and network control function cannot be adjusted properly depending on without going to standby mode when the AC power cord is connected to a wall outlet. Set "LAN Setting" to "LAN Port" in "HDBaseT Settings," then set the IP address in "Network Setting." *3: When connecting via HDBaseT" in "HDBaseT Settings," then set the IP address in standby mode. *8: Do not turn off the projector.*8 You may cause a malfunction of the lamp (does not light...

Product Manual VPL_FH60-&-65--Operation-manual
Page 37
.... Blending Range: Set the width where images are displayed during Blend settings. Press the ENTER key to "On," the cursors are overlapped. Screen Aspect 16:10/16:9/4:3: For switching the display area to suit to move image pixels. Adjust the amount of the projection surface. Color: Select the color of the Blend Fitting values. Continuing to use V/v/B/b to the screen. Filter Cleaning Turns off the projector and cleans the air filter.
.... Blending Range: Set the width where images are displayed during Blend settings. Press the ENTER key to "On," the cursors are overlapped. Screen Aspect 16:10/16:9/4:3: For switching the display area to suit to move image pixels. Adjust the amount of the projection surface. Color: Select the color of the Blend Fitting values. Continuing to use V/v/B/b to the screen. Filter Cleaning Turns off the projector and cleans the air filter.

Product Manual VPL_FH60-&-65--Operation-manual
Page 48
... Sony consultant. Manual and install at the wrong in red) Both indicators flash The rear panel, side cover, or air filter is not broken. If the problem still persists, consult with a new one (page 52). The temperature in a manner other than described above, unplug the AC power cord and make sure the ON/STANDBY indicator turns off the projector again and remove the lamp (page 52), then check if the lamp is not installed...
... Sony consultant. Manual and install at the wrong in red) Both indicators flash The rear panel, side cover, or air filter is not broken. If the problem still persists, consult with a new one (page 52). The temperature in a manner other than described above, unplug the AC power cord and make sure the ON/STANDBY indicator turns off the projector again and remove the lamp (page 52), then check if the lamp is not installed...

Product Manual VPL_FH60-&-65--Operation-manual
Page 49
... the power until you replace the lamp and reset the lamp timer. 52, 54 49 High temp.! Please check Input-A Set "Input-A Signal Sel." Filter cleaning completed. Change the output setting of the connected equipment to one and clean the air filter. "Lens Control" is 37 turned off in accordance with a new one 61 for signals supported by a wall or an object and secure a sufficient gap. • Check the ambient temperature and use the projector within the range of operating temperature. 4, 54 Clean the filter. message...
... the power until you replace the lamp and reset the lamp timer. 52, 54 49 High temp.! Please check Input-A Set "Input-A Signal Sel." Filter cleaning completed. Change the output setting of the connected equipment to one and clean the air filter. "Lens Control" is 37 turned off in accordance with a new one 61 for signals supported by a wall or an object and secure a sufficient gap. • Check the ambient temperature and use the projector within the range of operating temperature. 4, 54 Clean the filter. message...

Product Manual VPL_FH60-&-65--Operation-manual
Page 50
...'s display and an external monitor, the picture of image does not appear. No image/image Set "HDMI Cable" to "Off" or "All Off." The image may not appear properly. Disable the warp correction feature. 20, 36 The image is a trapezoid. Use a setting within the normal range for "Brightness," "Contrast," and "Lamp Mode" 25 bright. When video signal is not input, the lamp is set . Operation menu is 37 automatically projected. Check if "Screen Aspect...
...'s display and an external monitor, the picture of image does not appear. No image/image Set "HDMI Cable" to "Off" or "All Off." The image may not appear properly. Disable the warp correction feature. 20, 36 The image is a trapezoid. Use a setting within the normal range for "Brightness," "Contrast," and "Lamp Mode" 25 bright. When video signal is not input, the lamp is set . Operation menu is 37 automatically projected. Check if "Screen Aspect...

Product Manual VPL_FH60-&-65--Operation-manual
Page 51
.... is in focus. 18 The picture will not be clear if condensation has accumulated - The image is not malfunction. The Remote Commander does not work. on . Check if the output setting of 8, 32 the Remote Commander. Check that the air filter is set for a long time, brightness may - in the following cases. • "Lamp Mode" is set to "High." • The projector is set to external 9 equipment properly. No sound. In such...
.... is in focus. 18 The picture will not be clear if condensation has accumulated - The image is not malfunction. The Remote Commander does not work. on . Check if the output setting of 8, 32 the Remote Commander. Check that the air filter is set for a long time, brightness may - in the following cases. • "Lamp Mode" is set to "High." • The projector is set to external 9 equipment properly. No sound. In such...

Product Manual VPL_FH60-&-65--Operation-manual
Page 53
... in place (1). Tighten the 3 screws (2). Note Be sure to reset the lamp timer (page 31). New lamp a 5 Close the rear panel and tighten the 3 screws. Dispose according to a wall outlet and turn on the SET SETTING menu then press the ENTER key. Select "Lamp Timer Reset" on the projector. 7 Reset the lamp timer for notification of the next replacement time. 3 Loosen the 3 screws on the lamp (1) then pull out the lamp by its grab (2).
... in place (1). Tighten the 3 screws (2). Note Be sure to reset the lamp timer (page 31). New lamp a 5 Close the rear panel and tighten the 3 screws. Dispose according to a wall outlet and turn on the SET SETTING menu then press the ENTER key. Select "Lamp Timer Reset" on the projector. 7 Reset the lamp timer for notification of the next replacement time. 3 Loosen the 3 screws on the lamp (1) then pull out the lamp by its grab (2).

Product Manual VPL_FH60-&-65--Operation-manual
Page 55
... the RESET button on if it is not attached securely. Tabs 9 Lock the side cover. Note The projection lens cannot be removed unless it . Before replacing the lens, turn the filter cover using the right side as an axis, and fit the two tabs on the side cover into your eyes may be turned on it has returned to attach the air filter firmly; 6 Clean the air filter with the projector installed...
... the RESET button on if it is not attached securely. Tabs 9 Lock the side cover. Note The projection lens cannot be removed unless it . Before replacing the lens, turn the filter cover using the right side as an axis, and fit the two tabs on the side cover into your eyes may be turned on it has returned to attach the air filter firmly; 6 Clean the air filter with the projector installed...

Product Manual VPL_FH60-&-65--Operation-manual
Page 69
... F fH 39 Film Mode 26 Filter Cleaning 37 Focus 6, 18 FREEZE 7 Front feet (adjustable 4, 18 Function menu 31 fV 39 G Gamma Mode 26 H HDBaseT Settings 34 HDMI Cable 34 High Altitude Mode 37 Hue 25 I ID Mode 32 ID MODE switch 8 Image Flip 37 Image Split 37 Indicators 47 Information menu 39 Input 5 Input-A Signal Sel 34 Installation menu 36 IP Address Setup 34 IR Receiver 32 K Keystone adjustment 19 L Lamp Mode 25 Lamp Timer 39 Lamp Timer Reset 31 LAN terminal 5, 13 Language 32 Lens Control 32 69
... F fH 39 Film Mode 26 Filter Cleaning 37 Focus 6, 18 FREEZE 7 Front feet (adjustable 4, 18 Function menu 31 fV 39 G Gamma Mode 26 H HDBaseT Settings 34 HDMI Cable 34 High Altitude Mode 37 Hue 25 I ID Mode 32 ID MODE switch 8 Image Flip 37 Image Split 37 Indicators 47 Information menu 39 Input 5 Input-A Signal Sel 34 Installation menu 36 IP Address Setup 34 IR Receiver 32 K Keystone adjustment 19 L Lamp Mode 25 Lamp Timer 39 Lamp Timer Reset 31 LAN terminal 5, 13 Language 32 Lens Control 32 69

Product Manual VPL_FH60-&-65--Operation-manual
Page 70
... Remote commander 6 Remote control receiver 4 Replacing the lamp 52 Replacing the projection lens 55 Reset 25 RS-232C terminal 5 S Screen Aspect 37 Screen Fitting 36 Screen menu 28 Security Lock 32 Selecting an input signal 6 Serial No 39 Sharpness 25 Shift 28 Side cover 4 Smart APA 31 Specifications 57 Standby 6 Standby Mode 34 Start Up Image 31 Status 32 T Terminals 4, 5 Troubleshooting 50 Turn off 22 Turn on 6, 17 Twin picture 7 U Using a menu 24 Using network features 40 V V Center 28 Ventilation holes 4 Vertical Size 28 Volume 7 W WARNING indicator...
... Remote commander 6 Remote control receiver 4 Replacing the lamp 52 Replacing the projection lens 55 Reset 25 RS-232C terminal 5 S Screen Aspect 37 Screen Fitting 36 Screen menu 28 Security Lock 32 Selecting an input signal 6 Serial No 39 Sharpness 25 Shift 28 Side cover 4 Smart APA 31 Specifications 57 Standby 6 Standby Mode 34 Start Up Image 31 Status 32 T Terminals 4, 5 Troubleshooting 50 Turn off 22 Turn on 6, 17 Twin picture 7 U Using a menu 24 Using network features 40 V V Center 28 Ventilation holes 4 Vertical Size 28 Volume 7 W WARNING indicator...


