
Operating Instructions
Page 3
... the Menus 27 Menu Lists 29 Menu Configurations 29 Menu Items 29 About the Preset Memory No 32 Adjusting Picture Quality of a Signal from the Computer 33 Others Troubleshooting 34 Replacing the Lamp 36 Replacing the Air Filter 38 Specifications 39 Location of Controls 45 Front 45 Rear 46 Bottom 46 Remote Control 47 Index 48 Projecting Projecting the Picture on the Screen .. 22 Selecting the Wide Screen Mode ........ 24 Selecting the Picture Viewing Mode ... 26 3 GB
... the Menus 27 Menu Lists 29 Menu Configurations 29 Menu Items 29 About the Preset Memory No 32 Adjusting Picture Quality of a Signal from the Computer 33 Others Troubleshooting 34 Replacing the Lamp 36 Replacing the Air Filter 38 Specifications 39 Location of Controls 45 Front 45 Rear 46 Bottom 46 Remote Control 47 Index 48 Projecting Projecting the Picture on the Screen .. 22 Selecting the Wide Screen Mode ........ 24 Selecting the Picture Viewing Mode ... 26 3 GB
Operating Instructions
Page 8
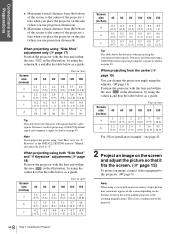
... image, connect video equipment to "0." This is not a malfunction of the projector's lens when you place the projector on the side (when you project the picture using "Side Shot" only, set "V Keystone" in the INSTALL SETTING menu to "Manual," and adjust the level to the projector. (1 page 9) Note When using a screen with the lens end within the area in the illustration, by using the values a and b in the table below as a guide. Distances used...
... image, connect video equipment to "0." This is not a malfunction of the projector's lens when you place the projector on the side (when you project the picture using "Side Shot" only, set "V Keystone" in the INSTALL SETTING menu to "Manual," and adjust the level to the projector. (1 page 9) Note When using a screen with the lens end within the area in the illustration, by using the values a and b in the table below as a guide. Distances used...

Operating Instructions
Page 15
Ajuster lock lever Front remote control detector 4 2 M/m/ Connections and Preparations Step 3: Adjusting the Picture Size and Position 5,7 5,8 Rear remote control detector LIGHT INPUT DYNAMIC STANDARD CINEMA PICTURE MODE USER 1 USER 2 USER 3 ENTER APA DDE MENU WIDE MODE MUTING RESET VOLUME SIDE SHOT ++ --
Ajuster lock lever Front remote control detector 4 2 M/m/ Connections and Preparations Step 3: Adjusting the Picture Size and Position 5,7 5,8 Rear remote control detector LIGHT INPUT DYNAMIC STANDARD CINEMA PICTURE MODE USER 1 USER 2 USER 3 ENTER APA DDE MENU WIDE MODE MUTING RESET VOLUME SIDE SHOT ++ --

Operating Instructions
Page 17
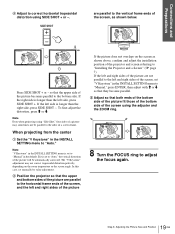
... the screen frame. Connections and Preparations 7 Adjust the picture size and position. 3 Move the projector vertically so that one side of the picture fits the inside end of the screen frame, make adjustments using the current input signal, set "Test Pattern" in the INSTALL SETTING menu to "Off." (1 page 32) When projecting using "Side Shot" adjustment only When projecting using "Side Shot" adjustment only, you can adjust to correct horizontal trapezoidal distortion using the...
... the screen frame. Connections and Preparations 7 Adjust the picture size and position. 3 Move the projector vertically so that one side of the picture fits the inside end of the screen frame, make adjustments using the current input signal, set "Test Pattern" in the INSTALL SETTING menu to "Off." (1 page 32) When projecting using "Side Shot" adjustment only When projecting using "Side Shot" adjustment only, you can adjust to correct horizontal trapezoidal distortion using the...

Operating Instructions
Page 18
... the INSTALL SETTING menu to "Manual," then press ENTER and adjust the distortion with M or m so that they are parallel to the vertical sides of the projector and screen referring to the vertical sides of the screen frame. To fine-adjust the distortion, press M or m. In this case, set "V Keystone" in the default. Check that the vertical sides of the picture are not parallel, set manually...
... the INSTALL SETTING menu to "Manual," then press ENTER and adjust the distortion with M or m so that they are parallel to the vertical sides of the projector and screen referring to the vertical sides of the screen frame. To fine-adjust the distortion, press M or m. In this case, set "V Keystone" in the default. Check that the vertical sides of the picture are not parallel, set manually...
Operating Instructions
Page 19
... 1 Set the "V Keystone" in the default. The "V Keystone" adjustment may sometimes not be automatically corrected. In this case, set to "Auto," the vertical distortion of the picture will be parallel to the horizontal frame ends of a screen frame. SIDE SHOT are not parallel to "Manual" in the INSTALL SETTING menu to correct horizontal trapezoidal distortion using SIDE SHOT + or -. Note "V Keystone" in the INSTALL SETTING menu to "Manual," press...
... 1 Set the "V Keystone" in the default. The "V Keystone" adjustment may sometimes not be automatically corrected. In this case, set to "Auto," the vertical distortion of the picture will be parallel to the horizontal frame ends of a screen frame. SIDE SHOT are not parallel to "Manual" in the INSTALL SETTING menu to correct horizontal trapezoidal distortion using SIDE SHOT + or -. Note "V Keystone" in the INSTALL SETTING menu to "Manual," press...

Operating Instructions
Page 20
The factory default setting is shown as a yellow button. STANDBY 2 Press the [/1 (on/standby) switch to turn on the side panel of the projector instead of thirteen languages for displaying the menu and other on-screen displays. The menu appears. The ON/STANDBY indicator lights in green. ON/ Lights in red and the projector goes into a wall outlet. ON/ Lights in green. Vo l u m e : 30 Input A Tip You can select one of the M/m/ LIGHT INPUT DYNAMIC STANDARD CINEMA PICTURE MODE USER 1 USER 2 USER 3 ENTER APA...
The factory default setting is shown as a yellow button. STANDBY 2 Press the [/1 (on/standby) switch to turn on the side panel of the projector instead of thirteen languages for displaying the menu and other on-screen displays. The menu appears. The ON/STANDBY indicator lights in green. ON/ Lights in red and the projector goes into a wall outlet. ON/ Lights in green. Vo l u m e : 30 Input A Tip You can select one of the M/m/ LIGHT INPUT DYNAMIC STANDARD CINEMA PICTURE MODE USER 1 USER 2 USER 3 ENTER APA...

Operating Instructions
Page 24
.... Projecting Cutting off the projector by holding the [/1 (on/ standby) switch for about one second, instead of performing the above steps. A message "POWER OFF?" WIDE MODE button Press WIDE MODE. To turn off the sound Press MUTING on the remote control. appears on /standby) switch. Selecting the Wide Screen Mode You can also select it using the menu. (1 page 30) LIGHT INPUT DYNAMIC STANDARD CINEMA PICTURE MODE USER 1 USER 2 USER 3 ENTER APA DDE MENU WIDE MODE MUTING RESET VOLUME...
.... Projecting Cutting off the projector by holding the [/1 (on/ standby) switch for about one second, instead of performing the above steps. A message "POWER OFF?" WIDE MODE button Press WIDE MODE. To turn off the sound Press MUTING on the remote control. appears on /standby) switch. Selecting the Wide Screen Mode You can also select it using the menu. (1 page 30) LIGHT INPUT DYNAMIC STANDARD CINEMA PICTURE MODE USER 1 USER 2 USER 3 ENTER APA DDE MENU WIDE MODE MUTING RESET VOLUME...

Operating Instructions
Page 26
... 3 You can view the picture with DYNAMIC. The settings are stored, and you can adjust the quality of the picture to reduce roughness when viewing the picture with the adjusted picture quality by using the menus. LIGHT INPUT DYNAMIC STANDARD CINEMA PICTURE MODE USER 1 USER 2 USER 3 ENTER APA DDE MENU WIDE MODE MUTING RESET VOLUME SIDE SHOT ++ -- Projecting Selecting the Picture Viewing Mode You can select the picture viewing mode that best suits the type of the projector.
... 3 You can view the picture with DYNAMIC. The settings are stored, and you can adjust the quality of the picture to reduce roughness when viewing the picture with the adjusted picture quality by using the menus. LIGHT INPUT DYNAMIC STANDARD CINEMA PICTURE MODE USER 1 USER 2 USER 3 ENTER APA DDE MENU WIDE MODE MUTING RESET VOLUME SIDE SHOT ++ -- Projecting Selecting the Picture Viewing Mode You can select the picture viewing mode that best suits the type of the projector.
Operating Instructions
Page 27
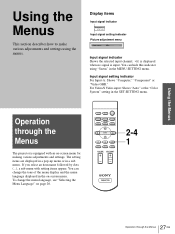
...DDE MENU WIDE MODE MUTING RESET VOLUME SIDE SHOT ++ -- 2-4 1 27 Operation through the Menus The projector is input. To change the tone of the menu display and the menu language displayed in the on -screen menu for making various adjustments and settings. Display items Input signal indicator Video 1 NTSC 3.58 Input signal setting indicator Picture adjustment menu Contrast: Min Input signal indicator Shows the selected input channel. For Video/S Video input: Shows "Auto" or the "Color System" setting in a sub menu. Operation through the Menus GB Using the Menus Using the...
...DDE MENU WIDE MODE MUTING RESET VOLUME SIDE SHOT ++ -- 2-4 1 27 Operation through the Menus The projector is input. To change the tone of the menu display and the menu language displayed in the on -screen menu for making various adjustments and settings. Display items Input signal indicator Video 1 NTSC 3.58 Input signal setting indicator Picture adjustment menu Contrast: Min Input signal indicator Shows the selected input channel. For Video/S Video input: Shows "Auto" or the "Color System" setting in a sub menu. Operation through the Menus GB Using the Menus Using the...
Operating Instructions
Page 28
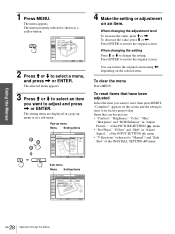
MENU SET SETTING Input A Smar t APA: On Auto Input Search: Off Input-A Signal Sel.: Computer Color System: Auto Power Saving: Off Illumination: Off 2 Press M or m to adjust and press , or ENTER. To decrease the value, press m or Using the Menus 1 Press MENU. The menu appears. When changing the adjustment level To increase the value, press M or ,. The selected menu appears. 3 Press M or m to select an item you want to...
MENU SET SETTING Input A Smar t APA: On Auto Input Search: Off Input-A Signal Sel.: Computer Color System: Auto Power Saving: Off Illumination: Off 2 Press M or m to adjust and press , or ENTER. To decrease the value, press m or Using the Menus 1 Press MENU. The menu appears. When changing the adjustment level To increase the value, press M or ,. The selected menu appears. 3 Press M or m to select an item you want to...

Operating Instructions
Page 29
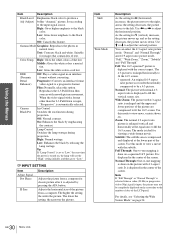
... and store the settings. SET SETTING menu The SET SETTING menu is used for changing the settings of the picture. INSTALL SETTING menu The INSTALL SETTING menu is used for correcting distortion of the projector. INFORMATION menu The INFORMATION menu is used to display the horizontal and vertical frequencies of the input signal and the used to 32. Items that cannot be adjusted are not displayed in the menu. (1 page 43) PICTURE SETTING Item Description Picture Mode You can select picture viewing mode that can be...
... and store the settings. SET SETTING menu The SET SETTING menu is used for changing the settings of the picture. INSTALL SETTING menu The INSTALL SETTING menu is used for correcting distortion of the projector. INFORMATION menu The INFORMATION menu is used to display the horizontal and vertical frequencies of the input signal and the used to 32. Items that cannot be adjusted are not displayed in the menu. (1 page 43) PICTURE SETTING Item Description Picture Mode You can select picture viewing mode that can be...
Operating Instructions
Page 30
..., see "Selecting the Wide Screen Mode" on , the lamp will use the "High" setting initially, and then go to the left. Text: Contrasts black and white. High: Gives the white colors a blue tint. Low: Gives the white colors a red tint. DDE (Dynamic Detail Enhancer) Off: Plays a video signal in natural tones. Off: Normal contrast. Wide Zoom: The picture with 4:3 aspect ratio is ideal for images that contain lots of...
..., see "Selecting the Wide Screen Mode" on , the lamp will use the "High" setting initially, and then go to the left. Text: Contrasts black and white. High: Gives the white colors a blue tint. Low: Gives the white colors a red tint. DDE (Dynamic Detail Enhancer) Off: Plays a video signal in natural tones. Off: Normal contrast. Wide Zoom: The picture with 4:3 aspect ratio is ideal for images that contain lots of...
Operating Instructions
Page 31
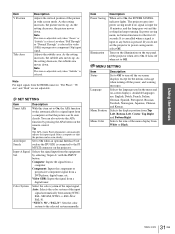
... a digital tuner. Auto Input Search Set to On when an optional Interface Unit such as the IFU-HS1 is input for the menus, message when turning off the on-screen displays except for 10 minutes, and the lamp goes out and the cooling fan keeps running. Auto: Selects the color system of the input signal automatically from White or Black. 31 Menu Lists GB In power saving mode, no signal is connected...
... a digital tuner. Auto Input Search Set to On when an optional Interface Unit such as the IFU-HS1 is input for the menus, message when turning off the on-screen displays except for 10 minutes, and the lamp goes out and the cooling fan keeps running. Auto: Selects the color system of the input signal automatically from White or Black. 31 Menu Lists GB In power saving mode, no signal is connected...

Operating Instructions
Page 32
... picture does not flip. Note When using "V Keystone" only. INFORMATION Item fH fV Lamp Timer Description Displays the horizontal frequency of the signal in black. 32 GB Menu Lists Signal type You can select "Black" or "Blue." When you adjust the picture using the projector at normal altitudes. See the chart on the screen when adjusting using the projector at an altitude of preset data for the first time, a memory number is...
... picture does not flip. Note When using "V Keystone" only. INFORMATION Item fH fV Lamp Timer Description Displays the horizontal frequency of the signal in black. 32 GB Menu Lists Signal type You can select "Black" or "Blue." When you adjust the picture using the projector at normal altitudes. See the chart on the screen when adjusting using the projector at an altitude of preset data for the first time, a memory number is...
Operating Instructions
Page 34
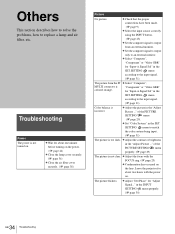
... Troubleshooting for "Input-A Signal Sel" in the SET SETTING menu to the input signal. (1 page 31) Color balance is incorrect. The picture flickers. c Set "Color System" in the SET SETTING menu according to match the color system being input. (1 page 31) The picture is not clear. c Adjust the focus with the power on the lens. c Adjust "Dot Phase" for "Input-A Signal Sel" in the "Adjust Picture ..." c Check that the proper connections have been made. (1 page 9) c Select the input source correctly using the INPUT button. (1 page 23) c Set...
... Troubleshooting for "Input-A Signal Sel" in the SET SETTING menu to the input signal. (1 page 31) Color balance is incorrect. The picture flickers. c Set "Color System" in the SET SETTING menu according to match the color system being input. (1 page 31) The picture is not clear. c Adjust the focus with the power on the lens. c Adjust "Dot Phase" for "Input-A Signal Sel" in the "Adjust Picture ..." c Check that the proper connections have been made. (1 page 9) c Select the input source correctly using the INPUT button. (1 page 23) c Set...

Operating Instructions
Page 35
... messages displayed on the screen. Replace the lamp. (1 page 36) c The lamp becomes a high temperature. LAMP/COVER c The electrical system breaks down the lamp and turn on the remote control. c Check to replace the air filter. in the PICTURE SETTING menu (1 page 29), or press VOLUME + on the power again. (1 page 24) c The fan is any trouble with qualified Sony light up . Not applicable! c Press the appropriate button. c Check that is time to see if nothing is unusually high. TEMP/FAN flashes. personnel. c Turn...
... messages displayed on the screen. Replace the lamp. (1 page 36) c The lamp becomes a high temperature. LAMP/COVER c The electrical system breaks down the lamp and turn on the remote control. c Check to replace the air filter. in the PICTURE SETTING menu (1 page 29), or press VOLUME + on the power again. (1 page 24) c The fan is any trouble with qualified Sony light up . Not applicable! c Press the appropriate button. c Check that is time to see if nothing is unusually high. TEMP/FAN flashes. personnel. c Turn...

Operating Instructions
Page 36
... of the projector turned inward with a coin or a slotted screwdriver, open the projector cover with your finger. Replace the lamp with the [/1 (on the lamp unit with a Philips screwdriver. Use LMP-H150 Projector Lamp as the replacement lamp. When replacing the lamp after turning off the projector, then unplug the power cord. Caution The lamp becomes a high temperature after using the projector Turn off the projector with a new one (not supplied). Tighten the screw, and fold down the adjuster lock lever...
... of the projector turned inward with a coin or a slotted screwdriver, open the projector cover with your finger. Replace the lamp with the [/1 (on the lamp unit with a Philips screwdriver. Use LMP-H150 Projector Lamp as the replacement lamp. When replacing the lamp after turning off the projector, then unplug the power cord. Caution The lamp becomes a high temperature after using the projector Turn off the projector with a new one (not supplied). Tighten the screw, and fold down the adjuster lock lever...

Operating Instructions
Page 37
6 While pushing the projector cover toward you by holding both sides of the cover on the lens side, close the cover until it clicks. 2 1 7 Connect the power cord and set the projector to standby mode. 8 Press the following buttons on the remote control in the following order for less than five seconds each: RESET,
6 While pushing the projector cover toward you by holding both sides of the cover on the lens side, close the cover until it clicks. 2 1 7 Connect the power cord and set the projector to standby mode. 8 Press the following buttons on the remote control in the following order for less than five seconds each: RESET,
Operating Instructions
Page 48
...29 I Image Flip 32 Indicator LAMP/COVER 35 TEMP/FAN 35 INFORMATION menu 32 INPUT SETTING menu 30 Input-A Signal Sel 31 INSTALL SETTING menu 32 Installing the Projector and a Screen 7 L Lamp replacement 36 Lamp Timer 32 Language 31 Location of controls bottom 46 front 45 rear 46 remote control 47 M Menu clearing the menu display ........ 28 operation 27 reset 28 Menu Color 31 Menu Position 31 MENU SETTING menu 31 Message caution 35 warning 35 O Optional accesories 40 P Picture Mode 29 Cinema 29 Dynamic 29 Standard 29 User 1, 2 and 3 29 PICTURE SETTING menu 29 Power...
...29 I Image Flip 32 Indicator LAMP/COVER 35 TEMP/FAN 35 INFORMATION menu 32 INPUT SETTING menu 30 Input-A Signal Sel 31 INSTALL SETTING menu 32 Installing the Projector and a Screen 7 L Lamp replacement 36 Lamp Timer 32 Language 31 Location of controls bottom 46 front 45 rear 46 remote control 47 M Menu clearing the menu display ........ 28 operation 27 reset 28 Menu Color 31 Menu Position 31 MENU SETTING menu 31 Message caution 35 warning 35 O Optional accesories 40 P Picture Mode 29 Cinema 29 Dynamic 29 Standard 29 User 1, 2 and 3 29 PICTURE SETTING menu 29 Power...


