
Operating Instructions
Page 3
Table of Contents Precautions 4 Connections and Preparations Unpacking 5 Step 1: Installing the Projector 6 Before Setting Up the Projector 6 Installing the Projector and a Screen 7 Step 2: Connecting the Projector 9 Connecting to a DVD Player/Digital Tuner . 10 Connecting to Video Equipment 11 Connecting to an AV Amplifier 11 Connecting ... Quality of a Signal from the Computer 33 Others Troubleshooting 34 Replacing the Lamp 36 Replacing the Air Filter 38 Specifications 39 Location of Controls 45 Front 45 Rear 46 Bottom 46 Remote Control 47 Index 48 Projecting Projecting the ...
Table of Contents Precautions 4 Connections and Preparations Unpacking 5 Step 1: Installing the Projector 6 Before Setting Up the Projector 6 Installing the Projector and a Screen 7 Step 2: Connecting the Projector 9 Connecting to a DVD Player/Digital Tuner . 10 Connecting to Video Equipment 11 Connecting to an AV Amplifier 11 Connecting ... Quality of a Signal from the Computer 33 Others Troubleshooting 34 Replacing the Lamp 36 Replacing the Air Filter 38 Specifications 39 Location of Controls 45 Front 45 Rear 46 Bottom 46 Remote Control 47 Index 48 Projecting Projecting the ...
Operating Instructions
Page 4
... wall outlet should be used for several days. • To disconnect the cord, pull it was originally packed at the factory. 4 GB Precautions Caution The projector is hot. On repacking Save the original shipping carton and packing material; they will come in handy if you turn off . • Do not look... your unit is identical with the voltage of your local power supply. • Should any liquid or solid object fall into the lens while the lamp is on / standby) switch, do not disconnect the unit from the wall outlet if it is not to be near the unit and easily accessible...
... wall outlet should be used for several days. • To disconnect the cord, pull it was originally packed at the factory. 4 GB Precautions Caution The projector is hot. On repacking Save the original shipping carton and packing material; they will come in handy if you turn off . • Do not look... your unit is identical with the voltage of your local power supply. • Should any liquid or solid object fall into the lens while the lamp is on / standby) switch, do not disconnect the unit from the wall outlet if it is not to be near the unit and easily accessible...

Operating Instructions
Page 29
You can also adjust the volume. INFORMATION menu The INFORMATION menu is used to 32. Items that best suits the type of the lamp. Once the settings are stored, you want in each menu are limited according to the factory setting, press RESET. items other than... items are described on page 29 to display the horizontal and vertical frequencies of the input signal and the used for correcting distortion of the projector. Standard: Recommended for soft, film-like picture. Adjust Picture... The lower the setting, the softer the picture. Cinema: Select for normal viewing ...
You can also adjust the volume. INFORMATION menu The INFORMATION menu is used to 32. Items that best suits the type of the lamp. Once the settings are stored, you want in each menu are limited according to the factory setting, press RESET. items other than... items are described on page 29 to display the horizontal and vertical frequencies of the input signal and the used for correcting distortion of the projector. Standard: Recommended for soft, film-like picture. Adjust Picture... The lower the setting, the softer the picture. Cinema: Select for normal viewing ...
Operating Instructions
Page 30
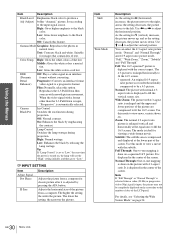
...vertical position. Color Temp. High: Normal wattage. Full: The 16:9 squeezed* picture is enlarged and the upper and lower portions of the LCD panel. Wide Zoom: The picture with 4:3 aspect ratio is diplayed with normal 4:3 aspect ratio is done on the picture with a format other..., etc. Dot Phase H Size Description Adjusts the picture from a computer. For details, see "Selecting the Wide Screen Mode" on , the lamp will use the "High" setting initially, and then go to a progressive format. Set according to the black color. Gamma Mode Graphics: Reproduces the...
...vertical position. Color Temp. High: Normal wattage. Full: The 16:9 squeezed* picture is enlarged and the upper and lower portions of the LCD panel. Wide Zoom: The picture with 4:3 aspect ratio is diplayed with normal 4:3 aspect ratio is done on the picture with a format other..., etc. Dot Phase H Size Description Adjusts the picture from a computer. For details, see "Selecting the Wide Screen Mode" on , the lamp will use the "High" setting initially, and then go to a progressive format. Set according to the black color. Gamma Mode Graphics: Reproduces the...
Operating Instructions
Page 31
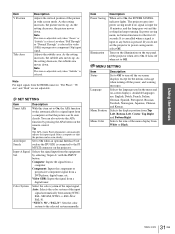
... the setting decreases, the subtitle area moves down . Item Power Saving Illumination Description When set the projector to On, the POWER SAVING indicator lights. Selects the tone of the menu display from a digital tuner. It is cancelled when a signal is input or any button is selected. As the setting...optional Interface Unit such as the IFU-HS1 is input for 10 minutes, and the lamp goes out and the cooling fan keeps running. Turns on the illumination on the top panel of the projector when set to the selected system manually. Using the Menus Item V Position Title ...
... the setting decreases, the subtitle area moves down . Item Power Saving Illumination Description When set the projector to On, the POWER SAVING indicator lights. Selects the tone of the menu display from a digital tuner. It is cancelled when a signal is input or any button is selected. As the setting...optional Interface Unit such as the IFU-HS1 is input for 10 minutes, and the lamp goes out and the cooling fan keeps running. Turns on the illumination on the top panel of the projector when set to the selected system manually. Using the Menus Item V Position Title ...

Operating Instructions
Page 32
... it will be parallel to the sides of a screen frame. I N F O R M AT I O N fH: fV: Lamp Timer: 48.47kHz 60.00Hz No.23 1024x768 0H Input A Memory No. Since the data is input, the projector automatically detects the signal type and recalls the data for Input-A into which you can save...want to display a test pattern, set to this case, adjust the distortion manually. Indicates how long the lamp has been turned on the screen horizontally and/or vertically. This projector also has 20 types of user memories for the signal from the preset memory about the following message may not...
... it will be parallel to the sides of a screen frame. I N F O R M AT I O N fH: fV: Lamp Timer: 48.47kHz 60.00Hz No.23 1024x768 0H Input A Memory No. Since the data is input, the projector automatically detects the signal type and recalls the data for Input-A into which you can save...want to display a test pattern, set to this case, adjust the distortion manually. Indicates how long the lamp has been turned on the screen horizontally and/or vertically. This projector also has 20 types of user memories for the signal from the preset memory about the following message may not...
Operating Instructions
Page 34
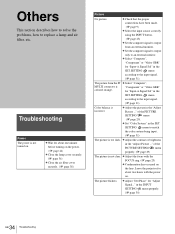
... (1 page 30) 34 GB Troubleshooting c Set "Color System" in the SET SETTING menu according to replace a lamp and air filter, etc. of the PICTURE SETTING menu (1 page 29). Leave the projector for "Adjust Signal..." c Check that the proper connections have been made. (1 page 9) c Select the input ...or "Video GBR" for about two hours with the FOCUS ring. (1 page 23) c Condensation has occurred on the power. (1 page 24) c Close the lamp cover securely. (1 page 36) c Close the air filter cover securely. (1 page 38) Picture No picture. c Adjust the contrast or brightness in the SET...
... (1 page 30) 34 GB Troubleshooting c Set "Color System" in the SET SETTING menu according to replace a lamp and air filter, etc. of the PICTURE SETTING menu (1 page 29). Leave the projector for "Adjust Signal..." c Check that the proper connections have been made. (1 page 9) c Select the input ...or "Video GBR" for about two hours with the FOCUS ring. (1 page 23) c Condensation has occurred on the power. (1 page 24) c Close the lamp cover securely. (1 page 36) c Close the air filter cover securely. (1 page 38) Picture No picture. c Adjust the contrast or brightness in the SET...

Operating Instructions
Page 35
...is out of the frequency. Wait for one minute to cool down . LAMP/COVER c The electrical system breaks down the lamp and turn on the power again. (1 page 24) c The fan is any trouble with qualified Sony personnel. Lamp off the power. Frequency is damaged. c Set the output signal on... Check to replace the lamp. High temp.! the lamp. (1 page 36) Please replace c It is input in the SET SETTING menu to "Computer" when RGB signal is input from the computer. (1 page 31) Please replace c It is time to see whether or not the projector is blocking the ventilation holes...
...is out of the frequency. Wait for one minute to cool down . LAMP/COVER c The electrical system breaks down the lamp and turn on the power again. (1 page 24) c The fan is any trouble with qualified Sony personnel. Lamp off the power. Frequency is damaged. c Set the output signal on... Check to replace the lamp. High temp.! the lamp. (1 page 36) Please replace c It is input in the SET SETTING menu to "Computer" when RGB signal is input from the computer. (1 page 31) Please replace c It is time to see whether or not the projector is blocking the ventilation holes...

Operating Instructions
Page 36
... of the picture becomes strange, or "Please replace the LAMP." Caution The lamp becomes a high temperature after using the projector Turn off the projector with a Philips screwdriver. Others 36 GB Replacing the Lamp When removing the lamp unit, make sure it is exhausted. Replacing the Lamp 2 Open the lamp cover by loosening the screw with a new one (not...
... of the picture becomes strange, or "Please replace the LAMP." Caution The lamp becomes a high temperature after using the projector Turn off the projector with a Philips screwdriver. Others 36 GB Replacing the Lamp When removing the lamp unit, make sure it is exhausted. Replacing the Lamp 2 Open the lamp cover by loosening the screw with a new one (not...

Operating Instructions
Page 37
6 While pushing the projector cover toward you by holding both sides of the cover on the lens side, close the cover until it clicks. 2 1 7 Connect the power cord and set the projector to standby mode. 8 Press the following buttons on the remote control in the following order for less than five seconds each: RESET,
6 While pushing the projector cover toward you by holding both sides of the cover on the lens side, close the cover until it clicks. 2 1 7 Connect the power cord and set the projector to standby mode. 8 Press the following buttons on the remote control in the following order for less than five seconds each: RESET,

Operating Instructions
Page 39
Others 39 Specifications GB Specifications System Projection system 3 LCD panels, 1 lens, projection system LCD panel 0.62-inch TFT LCD panel, 1,245,816 pixels (415,272 pixels × 3) Lens 1.2 times zoom lens (manual) f15.7-20mm/F.2.0-2.3 Lamp 150 W UHP type Projection picture size Range: 40...(PAL) (75 ohms terminated) Audio input AUDIO: stereo phono type 500 mVrms, impedance more than 47 kilohms HDMI Video: Digital RGB/YCB (PB) CR (PR) Audio: Digital PJ MULTI INPUT 32-pin multi connector Composite video: 1 Vp-p±2 dB sync negative (75 ohms terminated) S video:...
Others 39 Specifications GB Specifications System Projection system 3 LCD panels, 1 lens, projection system LCD panel 0.62-inch TFT LCD panel, 1,245,816 pixels (415,272 pixels × 3) Lens 1.2 times zoom lens (manual) f15.7-20mm/F.2.0-2.3 Lamp 150 W UHP type Projection picture size Range: 40...(PAL) (75 ohms terminated) Audio input AUDIO: stereo phono type 500 mVrms, impedance more than 47 kilohms HDMI Video: Digital RGB/YCB (PB) CR (PR) Audio: Digital PJ MULTI INPUT 32-pin multi connector Composite video: 1 Vp-p±2 dB sync negative (75 ohms terminated) S video:...
Operating Instructions
Page 40
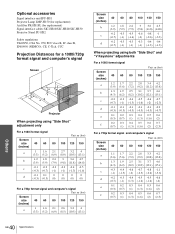
Optional accessories Signal interface unit IFU-HS1 Projector Lamp LMP-H150 (for replacement) Air filter PK-HS1FL (for replacement) Signal interface cables SIC-HS10/SIC-HS20/SIC-HS30 Projector Stand SU-HS2 Safety regulations UL60950, CSA No. 950, FCC... class B, IC class B, EN60950 (NEMCO), CE, C-Tick, CCC Projection Distances for a 1080i/720p format signal and computer's signal Screen dc 8˚ f e 5˚ ab Projector When projecting using "Side Shot" adjustment only For a 1080i format signal Unit: m (feet) Screen size 40 60 80 100 120 150 (inches) a 1 1.6 2.1 2.7 3.2 4 ...
Optional accessories Signal interface unit IFU-HS1 Projector Lamp LMP-H150 (for replacement) Air filter PK-HS1FL (for replacement) Signal interface cables SIC-HS10/SIC-HS20/SIC-HS30 Projector Stand SU-HS2 Safety regulations UL60950, CSA No. 950, FCC... class B, IC class B, EN60950 (NEMCO), CE, C-Tick, CCC Projection Distances for a 1080i/720p format signal and computer's signal Screen dc 8˚ f e 5˚ ab Projector When projecting using "Side Shot" adjustment only For a 1080i format signal Unit: m (feet) Screen size 40 60 80 100 120 150 (inches) a 1 1.6 2.1 2.7 3.2 4 ...
Operating Instructions
Page 43
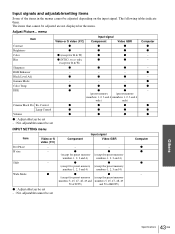
... memory (except for B & W) z z z - - - menu Item Contrast Brightness Color Hue Sharpness RGB Enhancer Black Level Adj Gamma Mode Color Temp DDE Cinema Black Pro Iris Control Lamp Control Volume Input signal Video or S video (Y/C) Component Video GBR z z z z z z z (except for B & W) z z z (NTSC3.58/4.43 only, z z except for preset memory numbers 1, 2, 3 and 4) numbers 1, 2, 3 and 4) Shift...
... memory (except for B & W) z z z - - - menu Item Contrast Brightness Color Hue Sharpness RGB Enhancer Black Level Adj Gamma Mode Color Temp DDE Cinema Black Pro Iris Control Lamp Control Volume Input signal Video or S video (Y/C) Component Video GBR z z z z z z z (except for B & W) z z z (NTSC3.58/4.43 only, z z except for preset memory numbers 1, 2, 3 and 4) numbers 1, 2, 3 and 4) Shift...

Operating Instructions
Page 45
.../ STANDBY LAMP/COVER indicator (1 page 35) TEMP/FAN indicator (1 page 35) POWER SAVING indicator (1 page 31) ON/STANDBY indicator (1 page 15) Others Lens Front remote control detector (1 page 15) Ventilation holes (exhaust) (1 page 7) Ventilation holes (intake) (1 page 7) Security lock* Adjuster lock lever (1 page 16) Adjuster (1 page 16) * Connects to operate the projector. Joystick...
.../ STANDBY LAMP/COVER indicator (1 page 35) TEMP/FAN indicator (1 page 35) POWER SAVING indicator (1 page 31) ON/STANDBY indicator (1 page 15) Others Lens Front remote control detector (1 page 15) Ventilation holes (exhaust) (1 page 7) Ventilation holes (intake) (1 page 7) Security lock* Adjuster lock lever (1 page 16) Adjuster (1 page 16) * Connects to operate the projector. Joystick...
Operating Instructions
Page 48
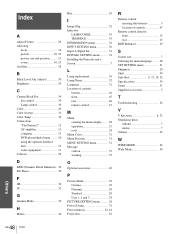
...Adj (Adjust 30 Brightness 29 C Cinema Black Pro 30 Iris control 30 Lamp control 30 Color 29 Color System 31 Color Temp 30 Connections "PlayStation 2 12 AV amplifier 11 computer 13 DVD player/digital tuner .......... 10 using the optional interface unit 14 video equipment 11 Contrast 29...menu 32 INPUT SETTING menu 30 Input-A Signal Sel 31 INSTALL SETTING menu 32 Installing the Projector and a Screen 7 L Lamp replacement 36 Lamp Timer 32 Language 31 Location of controls bottom 46 front 45 rear 46 remote control 47 M Menu clearing the menu display ........ 28 operation 27...
...Adj (Adjust 30 Brightness 29 C Cinema Black Pro 30 Iris control 30 Lamp control 30 Color 29 Color System 31 Color Temp 30 Connections "PlayStation 2 12 AV amplifier 11 computer 13 DVD player/digital tuner .......... 10 using the optional interface unit 14 video equipment 11 Contrast 29...menu 32 INPUT SETTING menu 30 Input-A Signal Sel 31 INSTALL SETTING menu 32 Installing the Projector and a Screen 7 L Lamp replacement 36 Lamp Timer 32 Language 31 Location of controls bottom 46 front 45 rear 46 remote control 47 M Menu clearing the menu display ........ 28 operation 27...


