
Operating Instructions
Page 4
...Bottom 8 Remote Control 9 Connections and Preparations Unpacking 10 Step 1: Installing the Projector ......... 11 Before Setting Up the Projector 11 Positioning the Projector and a screen 13 Step 2: Adjusting the Picture Position 17 Step 3: Connecting the Projector ..... 22 Connecting to a VCR 22 Connecting to a Computer ......... 25 ... Screen 28 Turning Off the Power 29 Operating the BRAVIA Sync Compatible Equipment with the Remote Control of the Projector ......30 Selecting the Wide Screen Mode .....32 Selecting the Picture Viewing Mode 34 Adjusting the Picture Quality ...........35...
...Bottom 8 Remote Control 9 Connections and Preparations Unpacking 10 Step 1: Installing the Projector ......... 11 Before Setting Up the Projector 11 Positioning the Projector and a screen 13 Step 2: Adjusting the Picture Position 17 Step 3: Connecting the Projector ..... 22 Connecting to a VCR 22 Connecting to a Computer ......... 25 ... Screen 28 Turning Off the Power 29 Operating the BRAVIA Sync Compatible Equipment with the Remote Control of the Projector ......30 Selecting the Wide Screen Mode .....32 Selecting the Picture Viewing Mode 34 Adjusting the Picture Quality ...........35...

Operating Instructions
Page 5
...HDMI CEC (Consumer Electronics Control) specification. HDMI, the HDMI logo and High-Definition Multimedia Interface are trademarks or registered trademarks of Sony Computer Entertainment Inc. It also supports HDCP. 5 "Blu-ray Disc" is a registered trademark of HDMI Licensing LLC. Control...Lens Cap 68 Cleaning and the Screen of the Projector 69 Specifications 70 Preset Signals 72 Input Signals and Adjustable/ Setting Items 75 Ceiling Installation 77 Index 81 Trademark Information "PS3" is a trademark. This projector supports DeepColor, x.v.Color, LipSync and computer input ...
...HDMI CEC (Consumer Electronics Control) specification. HDMI, the HDMI logo and High-Definition Multimedia Interface are trademarks or registered trademarks of Sony Computer Entertainment Inc. It also supports HDCP. 5 "Blu-ray Disc" is a registered trademark of HDMI Licensing LLC. Control...Lens Cap 68 Cleaning and the Screen of the Projector 69 Specifications 70 Preset Signals 72 Input Signals and Adjustable/ Setting Items 75 Ceiling Installation 77 Index 81 Trademark Information "PS3" is a trademark. This projector supports DeepColor, x.v.Color, LipSync and computer input ...

Operating Instructions
Page 11
...condensation or rise in temperature. Poorly ventilated location Malfunction of more than 30 cm (11 7/8 inches) around the unit. Locations subject to the projector. Very dusty and extremely smoky locations Leave space of the sensor may cause malfunction or damage to direct cool or warm air from a VCR ... in a location away from walls To maintain the performance and reliability of the unit due to have broader options for placing the projector and viewing pictures easily. Before Setting Up the Projector Installing the projector in the following situations, which may occur.
...condensation or rise in temperature. Poorly ventilated location Malfunction of more than 30 cm (11 7/8 inches) around the unit. Locations subject to the projector. Very dusty and extremely smoky locations Leave space of the sensor may cause malfunction or damage to direct cool or warm air from a VCR ... in a location away from walls To maintain the performance and reliability of the unit due to have broader options for placing the projector and viewing pictures easily. Before Setting Up the Projector Installing the projector in the following situations, which may occur.

Operating Instructions
Page 12
... an angle of the lamp. When installing the unit at altitudes When using the projector at an altitude of 1,500 m or higher, set this mode when using the projector. Installing the projector in such a location may result in the Setup menu to switch the power supply off, or disconnect ... the ceiling. Improper use Do not do any of Controls" (1 page 7). Failing to set "Cooling Setting" in uneven color uniformity or reduce the reliability of the effects of more Avoid using the projector tilted at high altitudes could have adverse effects, such as reducing the reliability of the unit...
... an angle of the lamp. When installing the unit at altitudes When using the projector at an altitude of 1,500 m or higher, set this mode when using the projector. Installing the projector in such a location may result in the Setup menu to switch the power supply off, or disconnect ... the ceiling. Improper use Do not do any of Controls" (1 page 7). Failing to set "Cooling Setting" in uneven color uniformity or reduce the reliability of the effects of more Avoid using the projector tilted at high altitudes could have adverse effects, such as reducing the reliability of the unit...

Operating Instructions
Page 23
...and Preparations Notes • When connecting an HDMI cable to the projector, make sure the V mark on the upper part of the HDMI input of the projector and the v mark on the connector of the cable is set at the same position. • If the picture from equipment ... equipment with component video output connectors : Video signal flow Component video cable (not supplied) 23 To connect to the projector with an HDMI cable is not clear, check the settings of the projector AV amplifier Speakers Equipment with component video output connectors Right side of the connected equipment.
...and Preparations Notes • When connecting an HDMI cable to the projector, make sure the V mark on the upper part of the HDMI input of the projector and the v mark on the connector of the cable is set at the same position. • If the picture from equipment ... equipment with component video output connectors : Video signal flow Component video cable (not supplied) 23 To connect to the projector with an HDMI cable is not clear, check the settings of the projector AV amplifier Speakers Equipment with component video output connectors Right side of the connected equipment.

Operating Instructions
Page 25
... make sure the V mark on the upper part of the HDMI input of the projector and the v mark on the connector of the cable is not clear, check the settings of the connected equipment. 25 For settings of the computer, consult with the manufacturer of the computer. • If the ...connected to the computer's operating instructions supplied with an HDMI cable is set at the same position. • If you set "Input-A Signal Sel." Set your computer to output the signal to "Auto" or "Computer." For details, refer to the projector with your computer, such as a notebook type, to output the ...
... make sure the V mark on the upper part of the HDMI input of the projector and the v mark on the connector of the cable is not clear, check the settings of the connected equipment. 25 For settings of the computer, consult with the manufacturer of the computer. • If the ...connected to the computer's operating instructions supplied with an HDMI cable is set at the same position. • If you set "Input-A Signal Sel." Set your computer to output the signal to "Auto" or "Computer." For details, refer to the projector with your computer, such as a notebook type, to output the ...
Operating Instructions
Page 26
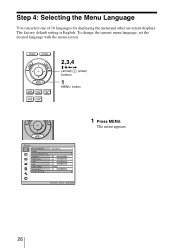
Step 4: Selecting the Menu Language You can select one of 16 languages for displaying the menu and other on-screen displays. The factory default setting is English. To change the current menu language, set the desired language with the menu screen. 2,3,4 M/m/
Step 4: Selecting the Menu Language You can select one of 16 languages for displaying the menu and other on-screen displays. The factory default setting is English. To change the current menu language, set the desired language with the menu screen. 2,3,4 M/m/
Operating Instructions
Page 27
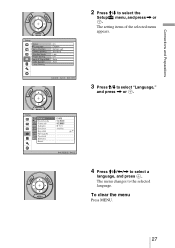
The setting items of the selected menu appears. 3 Press M/m to select the Setup menu, and press , or . Connections and Preparations 2 Press M/m to select "Language," and press , or . 4 Press M/m/
The setting items of the selected menu appears. 3 Press M/m to select the Setup menu, and press , or . Connections and Preparations 2 Press M/m to select "Language," and press , or . 4 Press M/m/

Operating Instructions
Page 28
...) to select the equipment from which to project. setting in the Setup menu, the input palette does not appear. To view the picture from the equipment connected to the projector. Projecting This section describes how to operate the projector to view the picture from Video equipment connected to ... equipment connected to the VIDEO INPUT connector. 1 Power on both the projector and the equipment connected to the projector. 2 Press INPUT to display the input palette on the screen. 3 Select the equipment from which you set it to "Auto," and cannot display the picture properly, select an ...
...) to select the equipment from which to project. setting in the Setup menu, the input palette does not appear. To view the picture from the equipment connected to the projector. Projecting This section describes how to operate the projector to view the picture from Video equipment connected to ... equipment connected to the VIDEO INPUT connector. 1 Power on both the projector and the equipment connected to the projector. 2 Press INPUT to display the input palette on the screen. 3 Select the equipment from which you set it to "Auto," and cannot display the picture properly, select an ...

Operating Instructions
Page 30
... to operate with the Remote Control of the Projector HDMI 1 BRAVIA Sync compatible equipment HDMI 2 By using the remote control of the projector, you can make basic operations such as playback or stop for HDMI setting of the connected equipment currently being viewed Press SYNC... MENU while viewing pictures. Select the menu item to operate the BRAVIA Sync compatible equipment Displaying and operating the menu of the projector. Operating the BRAVIA Sync Compatible Equipment...
... to operate with the Remote Control of the Projector HDMI 1 BRAVIA Sync compatible equipment HDMI 2 By using the remote control of the projector, you can make basic operations such as playback or stop for HDMI setting of the connected equipment currently being viewed Press SYNC... MENU while viewing pictures. Select the menu item to operate the BRAVIA Sync compatible equipment Displaying and operating the menu of the projector. Operating the BRAVIA Sync Compatible Equipment...
Operating Instructions
Page 31
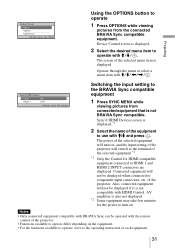
Device Control screen is displayed. The screen of the selected menu item is displayed. 2 Select the desired menu item to operate 1 Press OPTIONS while viewing pictures from the connected BRAVIA Sync compatible equipment. Operate through the menu or select a menu item with M/m/ . Projecting Using the OPTIONS button to operate with M/m/
Device Control screen is displayed. The screen of the selected menu item is displayed. 2 Select the desired menu item to operate 1 Press OPTIONS while viewing pictures from the connected BRAVIA Sync compatible equipment. Operate through the menu or select a menu item with M/m/ . Projecting Using the OPTIONS button to operate with M/m/

Operating Instructions
Page 32
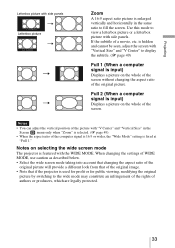
Selecting the Wide Screen Mode You can select the "Wide Mode" setting. When a 4:3 aspect ratio picture is displayed, the picture is input) A picture squeezed to fill the screen vertically. Full (When a video signal is enlarged horizontally to a 4:3 ...
Selecting the Wide Screen Mode You can select the "Wide Mode" setting. When a 4:3 aspect ratio picture is displayed, the picture is input) A picture squeezed to fill the screen vertically. Full (When a video signal is enlarged horizontally to a 4:3 ...
Operating Instructions
Page 33
... movie, etc. Projecting Letterbox picture with side panels Letterbox picture Zoom A 16:9 aspect ratio picture is fixed at "Full 1." When changing the settings of WIDE MODE, use caution as described below. • Select the wide screen mode taking into account that changing the aspect ratio of the ...original picture will provide a different look from that if the projector is featured with side panels. Notes on selecting the wide screen mode The projector is used for profit or for public viewing, modifying the original picture by switching to view a...
... movie, etc. Projecting Letterbox picture with side panels Letterbox picture Zoom A 16:9 aspect ratio picture is fixed at "Full 1." When changing the settings of WIDE MODE, use caution as described below. • Select the wide screen mode taking into account that changing the aspect ratio of the ...original picture will provide a different look from that if the projector is featured with side panels. Notes on selecting the wide screen mode The projector is used for profit or for public viewing, modifying the original picture by switching to view a...
Operating Instructions
Page 34
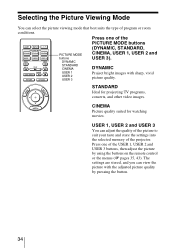
... with sharp, vivid picture quality. USER 1, USER 2 and USER 3 You can adjust the quality of the picture to suit your taste and store the settings into the selected memory of program or room conditions. STANDARD Ideal for watching movies. CINEMA Picture quality suited for projecting TV programs, concerts, and other... video images. Selecting the Picture Viewing Mode You can select the picture viewing mode that best suits the type of the projector. Press one of the USER 1, USER 2 and USER 3 buttons, then adjust the picture by pressing the button. 34
... with sharp, vivid picture quality. USER 1, USER 2 and USER 3 You can adjust the quality of the picture to suit your taste and store the settings into the selected memory of program or room conditions. STANDARD Ideal for watching movies. CINEMA Picture quality suited for projecting TV programs, concerts, and other... video images. Selecting the Picture Viewing Mode You can select the picture viewing mode that best suits the type of the projector. Press one of the USER 1, USER 2 and USER 3 buttons, then adjust the picture by pressing the button. 34
Operating Instructions
Page 36
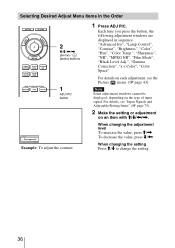
Selecting Desired Adjust Menu Items in the Order 2 M/m/
Selecting Desired Adjust Menu Items in the Order 2 M/m/

Operating Instructions
Page 37
Tip Freeze the scene of the projected picture you are adjusting the picture using Real Color Processing. 2, 3, 4, 5 M/m/ Projecting Adjusting the Picture Using Real Color Processing The Real Color Processing (RCP) feature allows you to your taste. You can thus obtain a picture more suitable to adjust the color and hue of each target of the video source when you specify independently.
Tip Freeze the scene of the projected picture you are adjusting the picture using Real Color Processing. 2, 3, 4, 5 M/m/ Projecting Adjusting the Picture Using Real Color Processing The Real Color Processing (RCP) feature allows you to your taste. You can thus obtain a picture more suitable to adjust the color and hue of each target of the video source when you specify independently.
Operating Instructions
Page 39
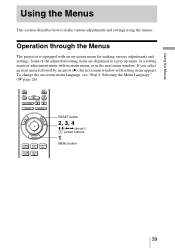
... on -screen menu language, see "Step 4: Selecting the Menu Language." (1 page 26) RESET button 2, 3, 4 M/m/ Operation through the Menus The projector is equipped with setting items appears. Some of the adjustable/setting items are displayed in a pop-up menu, in a setting menu or adjustment menu with no main menu, or in the next menu window.
... on -screen menu language, see "Step 4: Selecting the Menu Language." (1 page 26) RESET button 2, 3, 4 M/m/ Operation through the Menus The projector is equipped with setting items appears. Some of the adjustable/setting items are displayed in a pop-up menu, in a setting menu or adjustment menu with no main menu, or in the next menu window.

Operating Instructions
Page 40
The menu window appears. 2 Press M/m to select a menu item, and press , or . The item presently selected is shown in yellow. 40 1 Press MENU. The items that can be set or adjusted with the selected menu appear.
The menu window appears. 2 Press M/m to select a menu item, and press , or . The item presently selected is shown in yellow. 40 1 Press MENU. The items that can be set or adjusted with the selected menu appear.

Operating Instructions
Page 41
The setting items are displayed in a pop-up menu Setting items 3 Press M/m to select an item you want to set or adjust and press , or . Using the Menus Pop-up menu, in a setting menu, in an adjustment menu or in the next menu window. Setting menu Adjustment menu Next menu window Setting items 41
The setting items are displayed in a pop-up menu Setting items 3 Press M/m to select an item you want to set or adjust and press , or . Using the Menus Pop-up menu, in a setting menu, in an adjustment menu or in the next menu window. Setting menu Adjustment menu Next menu window Setting items 41
Operating Instructions
Page 42
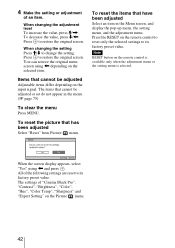
4 Make the setting or adjustment of an item. When changing the adjustment level To increase the value, press M/,. To decrease the value, press m/
4 Make the setting or adjustment of an item. When changing the adjustment level To increase the value, press M/,. To decrease the value, press m/

