
Operating Instructions
Page 5
... 60 Warning Indicators 63 Message Lists 64 Replacing the Lamp and the Air Filter and Cleaning the Ventilation Holes (intake 65 Cleaning the Air Filter 68 Fitting the Lens Cap 68 Cleaning and the Screen of the Projector 69 Specifications 70 Preset Signals 72 Input Signals and ...Adjustable/ Setting Items 75 Ceiling Installation 77 Index 81 Trademark Information "PS3" is a registered trademark of Sony Computer Entertainment Inc. HDMI, the HDMI logo and High-...
... 60 Warning Indicators 63 Message Lists 64 Replacing the Lamp and the Air Filter and Cleaning the Ventilation Holes (intake 65 Cleaning the Air Filter 68 Fitting the Lens Cap 68 Cleaning and the Screen of the Projector 69 Specifications 70 Preset Signals 72 Input Signals and ...Adjustable/ Setting Items 75 Ceiling Installation 77 Index 81 Trademark Information "PS3" is a registered trademark of Sony Computer Entertainment Inc. HDMI, the HDMI logo and High-...

Operating Instructions
Page 6
Caution The projector is hot. For maximum protection, repack your unit as it is connected to ship your unit. Never pull the cord itself has been turned off... your unit is identical with the voltage of your local power supply. • Should any liquid or solid object fall into the lens while the lamp is on. • Do not place your hand or objects near the ventilation holes. The air coming out is equipped with ventilation holes (intake) ...the unit and easily accessible. • The unit is not disconnected to the AC power source (mains) as long as it is not to the projector.
Caution The projector is hot. For maximum protection, repack your unit as it is connected to ship your unit. Never pull the cord itself has been turned off... your unit is identical with the voltage of your local power supply. • Should any liquid or solid object fall into the lens while the lamp is on. • Do not place your hand or objects near the ventilation holes. The air coming out is equipped with ventilation holes (intake) ...the unit and easily accessible. • The unit is not disconnected to the AC power source (mains) as long as it is not to the projector.

Operating Instructions
Page 7
Control panel Lens shift dials (1 page 18) M/m/ Location of Controls Location of Controls Front/Right Side You can use the buttons on the control panel with the same names as those on the remote control to operate the projector.
Control panel Lens shift dials (1 page 18) M/m/ Location of Controls Location of Controls Front/Right Side You can use the buttons on the control panel with the same names as those on the remote control to operate the projector.

Operating Instructions
Page 8
Rear/Bottom Ventilation holes (intake) (1 page 12) Ventilation holes (intake) (1 page 12) Ventilation holes (intake) (1 page 12) Ventilation holes (intake) (1 page 12) Lamp cover (1 page 66) Adjusters (1 page 21) Filter holder (1 page 67) Ventilation holes (intake) (1 page 12) Projector suspension support attaching hole (1 page 77) 8
Rear/Bottom Ventilation holes (intake) (1 page 12) Ventilation holes (intake) (1 page 12) Ventilation holes (intake) (1 page 12) Ventilation holes (intake) (1 page 12) Lamp cover (1 page 66) Adjusters (1 page 21) Filter holder (1 page 67) Ventilation holes (intake) (1 page 12) Projector suspension support attaching hole (1 page 77) 8

Operating Instructions
Page 12
... fault should occur during operation of the unit, operate the disconnect device to "High" (1 page 50). Do not install the projector anywhere other than 15 degrees. Blocking the ventilation holes (intake or exhaust) Ventilation holes (intake) Ventilation holes (exhaust) Tip For ...details on the ceiling. When installing the unit at altitudes When using the projector at high altitudes could have adverse effects, such as reducing the reliability of 1,500 m or higher, set this mode...the location of the ventilation holes (intake or exhaust), see "Location of the lamp.
... fault should occur during operation of the unit, operate the disconnect device to "High" (1 page 50). Do not install the projector anywhere other than 15 degrees. Blocking the ventilation holes (intake or exhaust) Ventilation holes (intake) Ventilation holes (exhaust) Tip For ...details on the ceiling. When installing the unit at altitudes When using the projector at high altitudes could have adverse effects, such as reducing the reliability of 1,500 m or higher, set this mode...the location of the ventilation holes (intake or exhaust), see "Location of the lamp.
Operating Instructions
Page 36
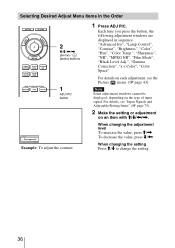
Selecting Desired Adjust Menu Items in the Order 2 M/m/
Selecting Desired Adjust Menu Items in the Order 2 M/m/
Operating Instructions
Page 44
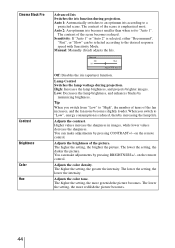
...the more greenish the picture becomes. Contrast Brightness Color Hue Off: Disables the iris (aperture) function. High: Increases the lamp brightness, and projects brighter images. Adjusts the contrast. Adjusts the brightness of the scene is emphasized most. The lower the ... You can make adjustments by minimizing brightness. Sensitivity: If "Auto 1" or "Auto 2" is reduced, thereby increasing the lamp life. Lamp Control Switches the lamp wattage during projection. Higher values increase the sharpness in images, while lower values decrease the sharpness. The higher the setting...
...the more greenish the picture becomes. Contrast Brightness Color Hue Off: Disables the iris (aperture) function. High: Increases the lamp brightness, and projects brighter images. Adjusts the contrast. Adjusts the brightness of the scene is emphasized most. The lower the ... You can make adjustments by minimizing brightness. Sensitivity: If "Auto 1" or "Auto 2" is reduced, thereby increasing the lamp life. Lamp Control Switches the lamp wattage during projection. Higher values increase the sharpness in images, while lower values decrease the sharpness. The higher the setting...

Operating Instructions
Page 51
Computer: Inputs the signal from a TV game or HDTV broadcast. When replacing the lamps, set this item set the projector to "On", the projector goes into power saving mode if no signal is pressed. Using the Menus Power Saving Input-A Signal Sel. At that time, the ON/STANDBY ...displayed correctly with the INPUT button. In power saving mode, the power saving mode is cancelled if a signal is input or any button on the projector or the remote control is input for the input signal. Auto: Selects the color system of signal input from the equipment by selecting "Input-A" ...
Computer: Inputs the signal from a TV game or HDTV broadcast. When replacing the lamps, set this item set the projector to "On", the projector goes into power saving mode if no signal is pressed. Using the Menus Power Saving Input-A Signal Sel. At that time, the ON/STANDBY ...displayed correctly with the INPUT button. In power saving mode, the power saving mode is cancelled if a signal is input or any button on the projector or the remote control is input for the input signal. Auto: Selects the color system of signal input from the equipment by selecting "Input-A" ...

Operating Instructions
Page 56
Memory No. Displays the horizontal frequency of the input signal. Indicates how long the lamp has been turned on the projector. • You cannot change the displays listed above. 56 Displays the vertical frequency of the input signal. fH (horizontal frequency) fV (vertical frequency) ...fV(vertical frequency) may not be displayed depending on the input signal used on (total usage). Signal type Model name Serial No. Signal type Lamp Timer Displays the model name (VPL-HW15). Model name: VPL-HW15 Serial No. Displays the preset memory number of the input signal. Information Menu...
Memory No. Displays the horizontal frequency of the input signal. Indicates how long the lamp has been turned on the projector. • You cannot change the displays listed above. 56 Displays the vertical frequency of the input signal. fH (horizontal frequency) fV (vertical frequency) ...fV(vertical frequency) may not be displayed depending on the input signal used on (total usage). Signal type Model name Serial No. Signal type Lamp Timer Displays the model name (VPL-HW15). Model name: VPL-HW15 Serial No. Displays the preset memory number of the input signal. Information Menu...

Operating Instructions
Page 58
... an HDMI cable, the equipment connected will synchronize with the TV or the projector when either is available by using the remote control of the connected equipment will also change to replace the lamp and air filter, etc. Others This section describes about the other functions, how to... solve the problems, how to the same language automatically. to a Control for HDMI function setting of the projector. • By turning on or playing back...
... an HDMI cable, the equipment connected will synchronize with the TV or the projector when either is available by using the remote control of the connected equipment will also change to replace the lamp and air filter, etc. Others This section describes about the other functions, how to... solve the problems, how to the same language automatically. to a Control for HDMI function setting of the projector. • By turning on or playing back...
Operating Instructions
Page 60
on . c Close the lamp cover securely, then tighten the screws securely. (1 page 66) c Close the filter holder securely... (1 page 29) Adjust "Sharpness" in the Picture menu. (1 page 44) 60 Troubleshooting If the projector appears to be operating erratically, try to an external monitor. After about 1 minute, turn it on again in the...on . If this adjustment is colored strange. c The power may not turn on if you turn the power off with qualified Sony personnel. c Check that the proper connections have been made. (1 page 22) c Select the input source correctly using the following ...
on . c Close the lamp cover securely, then tighten the screws securely. (1 page 66) c Close the filter holder securely... (1 page 29) Adjust "Sharpness" in the Picture menu. (1 page 44) 60 Troubleshooting If the projector appears to be operating erratically, try to an external monitor. After about 1 minute, turn it on again in the...on . If this adjustment is colored strange. c The power may not turn on if you turn the power off with qualified Sony personnel. c Check that the proper connections have been made. (1 page 22) c Select the input source correctly using the following ...

Operating Instructions
Page 61
...Condensation has accumulated on the lens. c Adjust "Phase" for about 2 hours with your local dealer or qualified Sony personnel. c Set "Auto Input Search" in "Panel Alignment" of the projector may work . c The display mode of Installation menu (1 page 55). The picture flickers. Cause and Remedy... c Adjust the "Contrast" or "Brightness" of characters or the picture is a fluorescent lamp near the remote control detector, the projector may be weak...
...Condensation has accumulated on the lens. c Adjust "Phase" for about 2 hours with your local dealer or qualified Sony personnel. c Set "Auto Input Search" in "Panel Alignment" of the projector may work . c The display mode of Installation menu (1 page 55). The picture flickers. Cause and Remedy... c Adjust the "Contrast" or "Brightness" of characters or the picture is a fluorescent lamp near the remote control detector, the projector may be weak...

Operating Instructions
Page 63
... carrying out the above methods, consult with qualified Sony personnel. ON/STANDBY flashes in red. (A repetition rate of 4 flashes) c The fan is turned off. If the power is not turned on the projector. Replace the lamp. (1 page 65) c The lamp has reached a high temperature. ON/STANDBY flashes in...any trouble with qualified Sony personnel. After about 10 seconds, reconnect the AC power cord and turn on , disconnect the AC power cord, then confirm the ON/STANDBY lamp is broken. Consult with your projector. Check to turn on the power again. LAMP/COVER indicator ON/STANDBY...
... carrying out the above methods, consult with qualified Sony personnel. ON/STANDBY flashes in red. (A repetition rate of 4 flashes) c The fan is turned off. If the power is not turned on the projector. Replace the lamp. (1 page 65) c The lamp has reached a high temperature. ON/STANDBY flashes in...any trouble with qualified Sony personnel. After about 10 seconds, reconnect the AC power cord and turn on , disconnect the AC power cord, then confirm the ON/STANDBY lamp is broken. Consult with your projector. Check to turn on the power again. LAMP/COVER indicator ON/STANDBY...

Operating Instructions
Page 64
...filter, select "No." Yes No c It is time to be "High" if projector is within the acceptable frequency range of the projector. (1 page 72) Please check Input-A Signal Sel. c The operation to replace the lamp. c Turn off in 1 minute, then the fan speed increases. Restart cleaning the ...unit are not covered. (1 page 12) c When using the projector at high altitude. in the selected input. c It is out of the projector once. Clean the air filter. (1 page 68) c If you replace the lamp and filter, the lamp replacement process is high. Check connections. (1 page 22) c Press...
...filter, select "No." Yes No c It is time to be "High" if projector is within the acceptable frequency range of the projector. (1 page 72) Please check Input-A Signal Sel. c The operation to replace the lamp. c Turn off in 1 minute, then the fan speed increases. Restart cleaning the ...unit are not covered. (1 page 12) c When using the projector at high altitude. in the selected input. c It is out of the projector once. Clean the air filter. (1 page 68) c If you replace the lamp and filter, the lamp replacement process is high. Check connections. (1 page 22) c Press...

Operating Instructions
Page 65
... picture becomes strange, or "Please replace the Lamp/Filter." Caution • The lamp remains hot after the projector is turned off the projector and unplug the AC power cord. 2 When setting the projector on the ceiling. • When removing the lamp unit, make sure it is placed on the... cloth. If you pull out the lamp unit while tilted and if the lamp breaks, the pieces may cause injury. • Be sure that the projector is also time to get started: • Projector Lamp LMP-H201 (optional) • Standard Phillips screwdriver • Cloth...
... picture becomes strange, or "Please replace the Lamp/Filter." Caution • The lamp remains hot after the projector is turned off the projector and unplug the AC power cord. 2 When setting the projector on the ceiling. • When removing the lamp unit, make sure it is placed on the... cloth. If you pull out the lamp unit while tilted and if the lamp breaks, the pieces may cause injury. • Be sure that the projector is also time to get started: • Projector Lamp LMP-H201 (optional) • Standard Phillips screwdriver • Cloth...
Operating Instructions
Page 66
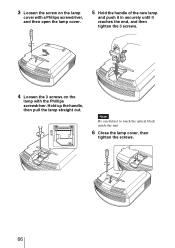
Note Be careful not to touch the optical block inside the unit. 6 Close the lamp cover, then tighten the screws. 66 3 Loosen the screw on the lamp cover with a Philips screwdriver, and then open the lamp cover. 5 Hold the handle of the new lamp and push it in securely until it reaches the end, and then tighten the 3 screws. 4 Loosen the 3 screws on the lamp with the Phillips screwdriver. Hold up the handle, then pull the lamp straight out.
Note Be careful not to touch the optical block inside the unit. 6 Close the lamp cover, then tighten the screws. 66 3 Loosen the screw on the lamp cover with a Philips screwdriver, and then open the lamp cover. 5 Hold the handle of the new lamp and push it in securely until it reaches the end, and then tighten the 3 screws. 4 Loosen the 3 screws on the lamp with the Phillips screwdriver. Hold up the handle, then pull the lamp straight out.

Operating Instructions
Page 67
.... 11 Wipe dust off the ventilation holes (intake) with the shape of the filter holder. Note The projector will be appeared. 9 Attach the new air filter so that is securely closed. 14 Select "Yes". ... each claws (10 positions) on the Setup menu. Caution Do not put your hands into the lamp replacement slot, and do not touch the fan after removing the air filter that it with a ... cloth. The menu screen below will not turn on unless the filter holder is set deep inside the projector. 10 Attach the filter holder. Others 8 Remove the air filter. Claws Ventilation holes (intake) 12 ...
.... 11 Wipe dust off the ventilation holes (intake) with the shape of the filter holder. Note The projector will be appeared. 9 Attach the new air filter so that is securely closed. 14 Select "Yes". ... each claws (10 positions) on the Setup menu. Caution Do not put your hands into the lamp replacement slot, and do not touch the fan after removing the air filter that it with a ... cloth. The menu screen below will not turn on unless the filter holder is set deep inside the projector. 10 Attach the filter holder. Others 8 Remove the air filter. Claws Ventilation holes (intake) 12 ...

Operating Instructions
Page 68
... displayed on the screen, press either the button on the remote control or the one on the control panel on the projector. Lens cap Zoom lever 68 Note The lamp contains mercury. Follow the waste disposal policy in your local authorities or the Electronic Industries Alliance (www.eiae.org). This ...value varies depending on the side of the used fluorescent tubes depend on where you use lamps other than the LMP-H201, the projector may be regulated due to it. If you live. The air filter should clean the air filter. Notes • Be ...
... displayed on the screen, press either the button on the remote control or the one on the control panel on the projector. Lens cap Zoom lever 68 Note The lamp contains mercury. Follow the waste disposal policy in your local authorities or the Electronic Industries Alliance (www.eiae.org). This ...value varies depending on the side of the used fluorescent tubes depend on where you use lamps other than the LMP-H201, the projector may be regulated due to it. If you live. The air filter should clean the air filter. Notes • Be ...
Operating Instructions
Page 70
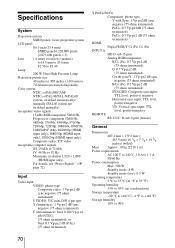
..., 1 lens, projection system LCD panel 0.61-inch (15.4 mm) SXRD panel 6,220,800 pixels (2,073,600 pixels × 3) Lens 1.6 times zoom lens (manual) f=18.5 mm to 29.6 mm F2.50 to F3.40 Lamp 200 W Ultra High Pressure Lamp Projection picture size 40 inches to 300 inches (1,016 mm to 7,620 mm) (measured...
..., 1 lens, projection system LCD panel 0.61-inch (15.4 mm) SXRD panel 6,220,800 pixels (2,073,600 pixels × 3) Lens 1.6 times zoom lens (manual) f=18.5 mm to 29.6 mm F2.50 to F3.40 Lamp 200 W Ultra High Pressure Lamp Projection picture size 40 inches to 300 inches (1,016 mm to 7,620 mm) (measured...

Operating Instructions
Page 71
... 10A/250V VDE DENANHO CCC * Use a rated plug that complies with the regulation of each country/region and the specifications. 71 Optional accessories Projector Lamp LMP-H201 (for replacement) Projector Suspension Support PSS-H10 Warning on power connection Use a proper power cord for your local power supply. Others Supplied accessories Remote control RM...
... 10A/250V VDE DENANHO CCC * Use a rated plug that complies with the regulation of each country/region and the specifications. 71 Optional accessories Projector Lamp LMP-H201 (for replacement) Projector Suspension Support PSS-H10 Warning on power connection Use a proper power cord for your local power supply. Others Supplied accessories Remote control RM...


