
Brochure
Page 3
All rights reserved. Sony, the Sony make.believe logo, SXRD, and Motionflow are subject to change without written permission is a trademark of HDMI Licensing LLC. 1. Simulated 3D image will vary based on source content. © 2011 Sony Electronics Inc. Reproduction in whole or in part without notice. Features and specifications are trademarks of their respective owners. / Updated: September 16, 2011 Requires 3D content, 3D player, 3D glasses, and HDMI® cable (at least 10.2 Gbps). 2. HDMI is prohibited. All other trademarks are trademarks of Sony.
All rights reserved. Sony, the Sony make.believe logo, SXRD, and Motionflow are subject to change without written permission is a trademark of HDMI Licensing LLC. 1. Simulated 3D image will vary based on source content. © 2011 Sony Electronics Inc. Reproduction in whole or in part without notice. Features and specifications are trademarks of their respective owners. / Updated: September 16, 2011 Requires 3D content, 3D player, 3D glasses, and HDMI® cable (at least 10.2 Gbps). 2. HDMI is prohibited. All other trademarks are trademarks of Sony.
User Manual
Page 5
... Menu Language 29 Projecting Projecting the Picture on the Screen 31 Turning Off the Power 32 Selecting the Wide Screen Mode .....33 Watching 3D Video Images 35 Using the Simulated 3D Function 36 Using the 3D Glasses 37 Selecting the Picture Viewing Mode 38 Adjusting the Picture Quality .......... 39 Selecting to...
... Menu Language 29 Projecting Projecting the Picture on the Screen 31 Turning Off the Power 32 Selecting the Wide Screen Mode .....33 Watching 3D Video Images 35 Using the Simulated 3D Function 36 Using the 3D Glasses 37 Selecting the Picture Viewing Mode 38 Adjusting the Picture Quality .......... 39 Selecting to...
User Manual
Page 14
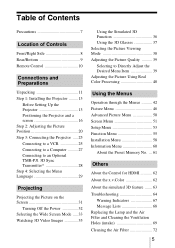
...) Ventilation holes (intake) Ventilation holes (exhaust) Tip For details on the ceiling. Position the projector so that the lens is tilted up or down, the image on the screen may result in the fixed wiring, or connect the power plug to an easily accessible socket-outlet near the unit. Improper use...
...) Ventilation holes (intake) Ventilation holes (exhaust) Tip For details on the ceiling. Position the projector so that the lens is tilted up or down, the image on the screen may result in the fixed wiring, or connect the power plug to an easily accessible socket-outlet near the unit. Improper use...
User Manual
Page 19
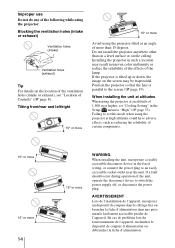
Top view Screen 3 Project an image on the distance between the screen and the projector or the zooming magnifications. Connections and Preparations 2 Position the projector so that it fits the screen. (1 page 20) Note When using a screen with an uneven surface, stripes pattern may rarely appear on the screen depending on the screen and adjust the picture so that the lens is not a malfunction of the projector. 19 This is parallel to the screen.
Top view Screen 3 Project an image on the distance between the screen and the projector or the zooming magnifications. Connections and Preparations 2 Position the projector so that it fits the screen. (1 page 20) Note When using a screen with an uneven surface, stripes pattern may rarely appear on the screen depending on the screen and adjust the picture so that the lens is not a malfunction of the projector. 19 This is parallel to the screen.
User Manual
Page 20
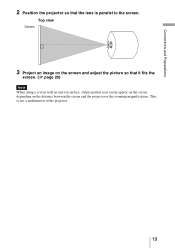
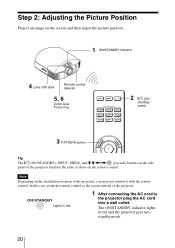
Step 2: Adjusting the Picture Position Project an image on the screen and then adjust the picture position. 1 ON/STANDBY indicator 4 Lens shift dials Remote control detector 5, 6 Zoom lever, Focus ring 2 ?/1 (On/ standby) switch 3 PATTERN button Tip The ?/1 (ON/STANDBY), INPUT, MENU, and M/m/
Step 2: Adjusting the Picture Position Project an image on the screen and then adjust the picture position. 1 ON/STANDBY indicator 4 Lens shift dials Remote control detector 5, 6 Zoom lever, Focus ring 2 ?/1 (On/ standby) switch 3 PATTERN button Tip The ?/1 (ON/STANDBY), INPUT, MENU, and M/m/
User Manual
Page 24
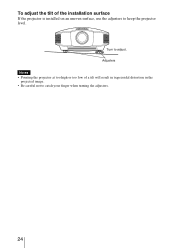
To adjust the tilt of a tilt will result in trapezoidal distortion in the projected image. • Be careful not to catch your finger when turning the adjusters. 24 Turn to keep the projector level. Adjusters Notes • Pointing the projector at too high or too low of the installation surface If the projector is installed on an uneven surface, use the adjusters to adjust.
To adjust the tilt of a tilt will result in trapezoidal distortion in the projected image. • Be careful not to catch your finger when turning the adjusters. 24 Turn to keep the projector level. Adjusters Notes • Pointing the projector at too high or too low of the installation surface If the projector is installed on an uneven surface, use the adjusters to adjust.
User Manual
Page 26
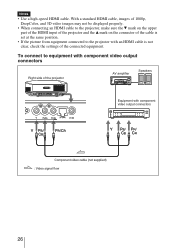
... of the projector AV amplifier Speakers Equipment with component video output connectors Right side of the connected equipment. With a standard HDMI cable, images of 1080p, DeepColor, and 3D video images may not be displayed properly. • When connecting an HDMI cable to the projector, make sure the V mark on the upper part...
... of the projector AV amplifier Speakers Equipment with component video output connectors Right side of the connected equipment. With a standard HDMI cable, images of 1080p, DeepColor, and 3D video images may not be displayed properly. • When connecting an HDMI cable to the projector, make sure the V mark on the upper part...

User Manual
Page 27
With a standard HDMI cable, images of 1080p, DeepColor, and 3D video images may not appear properly. Connections and Preparations Connecting to a Computer Right side of the projector Computer to monitor output HD-Dsub15 pin cable (not supplied) ... cable. Tip When connecting an HD-Dsub15 pin cable, set it to only the external monitor. Set your computer. in the Setup menu to use a Sony HDMI cable or other cable they has the HDMI logo. For settings of the computer, consult with the manufacturer of the equipment may not be...
With a standard HDMI cable, images of 1080p, DeepColor, and 3D video images may not appear properly. Connections and Preparations Connecting to a Computer Right side of the projector Computer to monitor output HD-Dsub15 pin cable (not supplied) ... cable. Tip When connecting an HD-Dsub15 pin cable, set it to only the external monitor. Set your computer. in the Setup menu to use a Sony HDMI cable or other cable they has the HDMI logo. For settings of the computer, consult with the manufacturer of the equipment may not be...
User Manual
Page 28
... units, which may occasionally not work. • Be sure to use other network devices, to avoid malfunction. • Be sure to view projected 3D video images.
... units, which may occasionally not work. • Be sure to use other network devices, to avoid malfunction. • Be sure to view projected 3D video images.
User Manual
Page 31
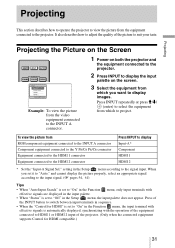
... input terminal with effective signals is automatically displayed, synchronizing with effective signals are displayed in the input palette. • When "Status" is set to display images. When you want to "Off" in the Setup menu, the input palette does not appear. Projecting the Picture on the Screen Example: To view the...
... input terminal with effective signals is automatically displayed, synchronizing with effective signals are displayed in the input palette. • When "Status" is set to display images. When you want to "Off" in the Setup menu, the input palette does not appear. Projecting the Picture on the Screen Example: To view the...

User Manual
Page 33
... (When a video signal is input) A picture squeezed to fill the screen. You can also select it using the menu. (1 page 51) WIDE MODE button Original image Squeezed When the Wide Mode is operated Wide Zoom (When a video signal is input) A 4:3 aspect ratio picture is enlarged naturally to 4:3 aspect ratio is enlarged...
... (When a video signal is input) A picture squeezed to fill the screen. You can also select it using the menu. (1 page 51) WIDE MODE button Original image Squeezed When the Wide Mode is operated Wide Zoom (When a video signal is input) A 4:3 aspect ratio picture is enlarged naturally to 4:3 aspect ratio is enlarged...

User Manual
Page 34
... the wide screen mode taking into account that changing the aspect ratio of the original picture will provide a different look from that of the original image. • Note that if the projector is fixed at "Full 1." Use this mode to fill the screen. Full 2 (When a computer signal is enlarged vertically and...
... the wide screen mode taking into account that changing the aspect ratio of the original picture will provide a different look from that of the original image. • Note that if the projector is fixed at "Full 1." Use this mode to fill the screen. Full 2 (When a computer signal is enlarged vertically and...
User Manual
Page 35
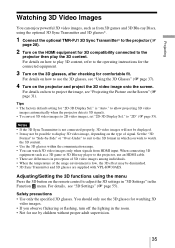
... the lighting in the room. • Not for the connected equipment. 3 Turn on how to play the 3D content. is not connected properly, 3D video images will not be displayed. • It may be possible to "Side-by children without proper adult supervision. 35 For details on how to use the... Discs, using the menu Press the 3D button on the remote control to adjust the 3D settings in "3D Settings" in perception of 3D video images among individuals. • When the temperature of the usage environment is low, the 3D effect may not be diminished. * 3D Sync Transmitter and 3D glasses...
... the lighting in the room. • Not for the connected equipment. 3 Turn on how to play the 3D content. is not connected properly, 3D video images will not be displayed. • It may be possible to "Side-by children without proper adult supervision. 35 For details on how to use the... Discs, using the menu Press the 3D button on the remote control to adjust the 3D settings in "3D Settings" in perception of 3D video images among individuals. • When the temperature of the usage environment is low, the 3D effect may not be diminished. * 3D Sync Transmitter and 3D glasses...

User Manual
Page 36
... Settings." 2 Set "2D-3D Display Sel." Tip For details on the video source. • There are differences in perception of 3D video images converted by the simulated 3D function among individuals. • If the 3D Sync Transmitter is not connected properly, "3D Settings" will not be ...set to 3D video images. Tips • Use the optional 3D glasses*. • The projector automatically returns to 3D video images using the simulated 3D function. returns to "Auto" after approximately one hour when converting 2D video...
... Settings." 2 Set "2D-3D Display Sel." Tip For details on the video source. • There are differences in perception of 3D video images converted by the simulated 3D function among individuals. • If the 3D Sync Transmitter is not connected properly, "3D Settings" will not be ...set to 3D video images. Tips • Use the optional 3D glasses*. • The projector automatically returns to 3D video images using the simulated 3D function. returns to "Auto" after approximately one hour when converting 2D video...

User Manual
Page 37
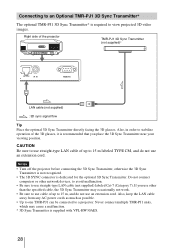
...3D glasses are near other infrared devices (remotely-controlled lights, air conditioners, IR transmitter). • There are differences in perception of 3D video images among individuals. • When the temperature of the usage environment is too great. - Note Connect the optional TMR-PJ1 3D Sync Transmitter* ... and 3D glasses is low, the 3D effect may occur if: - Mis-operation may be diminished. • Be careful not to view 3D images. Power button LED indicator IR sensor 1 Put on the 3D glasses. 2 Press the power button on the 3D glasses. For detailed information, refer...
...3D glasses are near other infrared devices (remotely-controlled lights, air conditioners, IR transmitter). • There are differences in perception of 3D video images among individuals. • When the temperature of the usage environment is too great. - Note Connect the optional TMR-PJ1 3D Sync Transmitter* ... and 3D glasses is low, the 3D effect may occur if: - Mis-operation may be diminished. • Be careful not to view 3D images. Power button LED indicator IR sensor 1 Put on the 3D glasses. 2 Press the power button on the 3D glasses. For detailed information, refer...
User Manual
Page 38
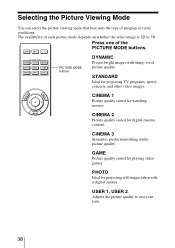
PHOTO Ideal for digital cinema content. CINEMA 2 Picture quality suited for projecting still images taken with sharp, vivid picture quality. USER 1, USER 2 Adjusts the picture quality to suit your taste. 38 The availability of program or room conditions. ...Picture Viewing Mode You can select the picture viewing mode that best suits the type of each picture mode depends on whether the video image is 2D or 3D. PICTURE MODE buttons DYNAMIC Project bright images with a digital camera. GAME Picture quality suited for projecting TV programs, sports, concerts, and other video...
PHOTO Ideal for digital cinema content. CINEMA 2 Picture quality suited for projecting still images taken with sharp, vivid picture quality. USER 1, USER 2 Adjusts the picture quality to suit your taste. 38 The availability of program or room conditions. ...Picture Viewing Mode You can select the picture viewing mode that best suits the type of each picture mode depends on whether the video image is 2D or 3D. PICTURE MODE buttons DYNAMIC Project bright images with a digital camera. GAME Picture quality suited for projecting TV programs, sports, concerts, and other video...

User Manual
Page 40
Adjusting the Picture Using Real Color Processing The Real Color Processing (RCP) feature allows you to your taste. Tip Freeze the scene of the projected picture you are adjusting the picture using Real Color Processing. 2, 3, 4, 5 M/m/ You can thus obtain a picture more suitable to adjust the color, hue, and brightness of each target of the video source when you specify independently.
Adjusting the Picture Using Real Color Processing The Real Color Processing (RCP) feature allows you to your taste. Tip Freeze the scene of the projected picture you are adjusting the picture using Real Color Processing. 2, 3, 4, 5 M/m/ You can thus obtain a picture more suitable to adjust the color, hue, and brightness of each target of the video source when you specify independently.
User Manual
Page 46
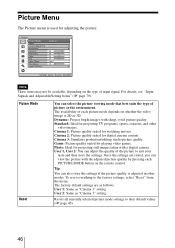
.... Picture Menu The Picture menu is used for digital cinema content. Note These items may not be available, depending on whether the video image is 2D or 3D. For details, see "Input Signals and Adjustable/Setting Items" (1 page 79). Cinema 1: Picture quality suited for projecting still... images taken with sharp, vivid picture quality. Photo: Ideal for watching movies. Standard: Ideal for playing video games. User 1, User 2: You can select...
.... Picture Menu The Picture menu is used for digital cinema content. Note These items may not be available, depending on whether the video image is 2D or 3D. For details, see "Input Signals and Adjustable/Setting Items" (1 page 79). Cinema 1: Picture quality suited for projecting still... images taken with sharp, vivid picture quality. Photo: Ideal for watching movies. Standard: Ideal for playing video games. User 1, User 2: You can select...
User Manual
Page 47
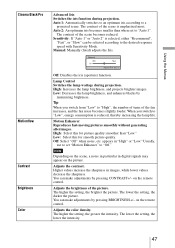
... density. The contrast of the scene is reduced, thereby increasing the lamp life. High: Increases the lamp brightness, and projects brighter images. Motion Enhancer Reproduces fast-moving pictures smoothly without generating afterimages. Off: Select "Off" when noise, etc. Higher values increase the ...sharpness in digital signals may appear on the scene, a noise in particular in images, while lower values decrease the sharpness. The higher the setting, the greater the intensity. The contrast of the scene becomes reduced. Manual:...
... density. The contrast of the scene is reduced, thereby increasing the lamp life. High: Increases the lamp brightness, and projects brighter images. Motion Enhancer Reproduces fast-moving pictures smoothly without generating afterimages. Off: Select "Off" when noise, etc. Higher values increase the ...sharpness in digital signals may appear on the scene, a noise in particular in images, while lower values decrease the sharpness. The higher the setting, the greater the intensity. The contrast of the scene becomes reduced. Manual:...
User Manual
Page 49
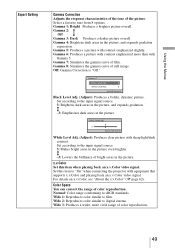
... this item when playing back an x.v.Color video signal. Using the Menus Expert Setting Gamma Correction Adjusts the response characteristics of the tone of still image. Select a favorite tone from 8 options. Gamma 1: Bright Produces a brighter picture overall. Gamma 8: Simulates the gamma curve of the picture. Normal: Color range conforming to "On...
... this item when playing back an x.v.Color video signal. Using the Menus Expert Setting Gamma Correction Adjusts the response characteristics of the tone of still image. Select a favorite tone from 8 options. Gamma 1: Bright Produces a brighter picture overall. Gamma 8: Simulates the gamma curve of the picture. Normal: Color range conforming to "On...


