
Brochure
Page 1
...-style home entertainment. Controllable over RS232 Seamlessly integrate the VPLHW30AES into virtually any major automation system via the bidirectional, industry-standard RS232 connection Integrates into challenging rooms The VPL-HW30AES can be viewed in immersive Sony 3D.2 Whisper-quiet fan Forget that the projector is even in just about any high definition 2D...
...-style home entertainment. Controllable over RS232 Seamlessly integrate the VPLHW30AES into virtually any major automation system via the bidirectional, industry-standard RS232 connection Integrates into challenging rooms The VPL-HW30AES can be viewed in immersive Sony 3D.2 Whisper-quiet fan Forget that the projector is even in just about any high definition 2D...
Brochure
Page 2
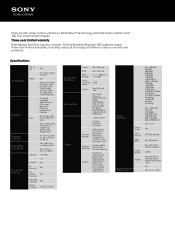
... Packing). 3D: 1080/24p FP/O/U, 1080/60p, 50p SBS/O/U, 1080/60i, 50i SBS, 720/60p, 50p FP/SBS O/U Yes- All Sony Elevated Standard (ES) projectors enjoy three-year limited warranties, including a special tech support hotline in case you covered. H: Range +/- 0.25H Ultra Low Fan 22dB Noise Zoom... with Dark Frame Insertion 240Hz Yes with Dark Frame Insertion and 24p True Cinema technologies. Three-year limited warranty Rest assured that Sony has you run into any problems. Specifications 3D Features General General Features Operating Conditions Inputs and Outputs 2D to 3D Yes Dynamic ...
... Packing). 3D: 1080/24p FP/O/U, 1080/60p, 50p SBS/O/U, 1080/60i, 50i SBS, 720/60p, 50p FP/SBS O/U Yes- All Sony Elevated Standard (ES) projectors enjoy three-year limited warranties, including a special tech support hotline in case you covered. H: Range +/- 0.25H Ultra Low Fan 22dB Noise Zoom... with Dark Frame Insertion 240Hz Yes with Dark Frame Insertion and 24p True Cinema technologies. Three-year limited warranty Rest assured that Sony has you run into any problems. Specifications 3D Features General General Features Operating Conditions Inputs and Outputs 2D to 3D Yes Dynamic ...
User Manual
Page 1
Sony Corporation Printed in Japan 4-290-338-11 (1) Video Projector Operating Instructions VPL-HW30ES/HW30AES © 2011 Sony Corporation
Sony Corporation Printed in Japan 4-290-338-11 (1) Video Projector Operating Instructions VPL-HW30ES/HW30AES © 2011 Sony Corporation
User Manual
Page 5
.../Right Side 8 Rear/Bottom 9 Remote Control 10 Connections and Preparations Unpacking 11 Step 1: Installing the Projector .........13 Before Setting Up the Projector 13 Positioning the Projector and a screen 16 Step 2: Adjusting the Picture Position 20 Step 3: Connecting the Projector .....25 Connecting to a VCR 25 Connecting to a Computer ..........27 Connecting to an Optional TMR-PJ1...
.../Right Side 8 Rear/Bottom 9 Remote Control 10 Connections and Preparations Unpacking 11 Step 1: Installing the Projector .........13 Before Setting Up the Projector 13 Positioning the Projector and a screen 16 Step 2: Adjusting the Picture Position 20 Step 3: Connecting the Projector .....25 Connecting to a VCR 25 Connecting to a Computer ..........27 Connecting to an Optional TMR-PJ1...
User Manual
Page 6
...-ray Disk" are trademarks or registered trademarks of HDMI Licensing LLC. This projector supports DeepColor, x.v.Color, LipSync, 3D signal and computer input signal of HDMI standards. Control for HDMI is a registered trademark of Sony Computer Entertainment Inc. It also supports HDCP. 6 Fitting the Lens Cap... 72 Cleaning and the Screen of the Projector 73 How to Use the USB Charging AC Power Adaptor 73 Specifications 75 ...
...-ray Disk" are trademarks or registered trademarks of HDMI Licensing LLC. This projector supports DeepColor, x.v.Color, LipSync, 3D signal and computer input signal of HDMI standards. Control for HDMI is a registered trademark of Sony Computer Entertainment Inc. It also supports HDCP. 6 Fitting the Lens Cap... 72 Cleaning and the Screen of the Projector 73 How to Use the USB Charging AC Power Adaptor 73 Specifications 75 ...
User Manual
Page 7
...have to ship your hand or objects near these holes, or internal heat build-up may occur, causing picture degradation or damage to the projector. The air coming out is still running. On repacking Save the original shipping carton and packing material; Never pull the cord itself. •...; The wall outlet should be used for several days. • To disconnect the cord, pull it out by the plug. Caution The projector is equipped with ventilation holes (intake) and ventilation holes (exhaust). Precautions On safety • Check that the operating voltage of your unit is identical...
...have to ship your hand or objects near these holes, or internal heat build-up may occur, causing picture degradation or damage to the projector. The air coming out is still running. On repacking Save the original shipping carton and packing material; Never pull the cord itself. •...; The wall outlet should be used for several days. • To disconnect the cord, pull it out by the plug. Caution The projector is equipped with ventilation holes (intake) and ventilation holes (exhaust). Precautions On safety • Check that the operating voltage of your unit is identical...
User Manual
Page 8
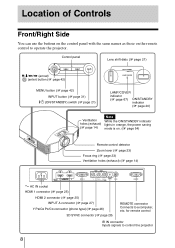
Location of Controls Front/Right Side You can use the buttons on the control panel with the same names as those on the remote control to operate the projector. Control panel Lens shift dials (1 page 21) M/m/
Location of Controls Front/Right Side You can use the buttons on the control panel with the same names as those on the remote control to operate the projector. Control panel Lens shift dials (1 page 21) M/m/
User Manual
Page 9
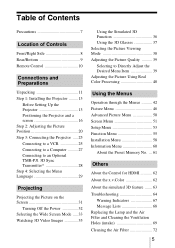
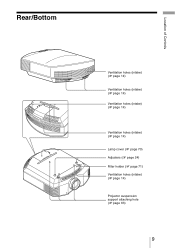
Location of Controls Rear/Bottom Ventilation holes (intake) (1 page 14) Ventilation holes (intake) (1 page 14) Ventilation holes (intake) (1 page 14) Ventilation holes (intake) (1 page 14) Lamp cover (1 page 70) Adjusters (1 page 24) Filter holder (1 page 71) Ventilation holes (intake) (1 page 14) Projector suspension support attaching hole (1 page 83) 9
Location of Controls Rear/Bottom Ventilation holes (intake) (1 page 14) Ventilation holes (intake) (1 page 14) Ventilation holes (intake) (1 page 14) Ventilation holes (intake) (1 page 14) Lamp cover (1 page 70) Adjusters (1 page 24) Filter holder (1 page 71) Ventilation holes (intake) (1 page 14) Projector suspension support attaching hole (1 page 83) 9

User Manual
Page 11
... picture, etc. Replace only with the polarities reversed may cause a short circuit and may generate heat. Remove this lens cap when you use the projector. • USB charging AC power adaptor (1) • Operating Instructions (this manual) For VPL-HW30AES, the following items: • Remote control ...(1) and Size AA (R6) manganese batteries (2) • AC power cord (1) • Lens cap (1) When you have purchased the projector, the lens cap is incorrectly replaced. Connections and Preparations Connections and Preparations This section describes how to install the...
... picture, etc. Replace only with the polarities reversed may cause a short circuit and may generate heat. Remove this lens cap when you use the projector. • USB charging AC power adaptor (1) • Operating Instructions (this manual) For VPL-HW30AES, the following items: • Remote control ...(1) and Size AA (R6) manganese batteries (2) • AC power cord (1) • Lens cap (1) When you have purchased the projector, the lens cap is incorrectly replaced. Connections and Preparations Connections and Preparations This section describes how to install the...
User Manual
Page 13
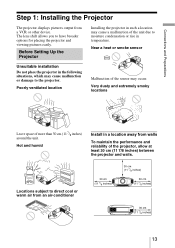
... the following situations, which may occur. Poorly ventilated location Malfunction of the projector, allow at least 30 cm (11 7/8 inches) between the projector and walls. The lens shift allows you to the projector. Hot and humid Install in such a location may cause a malfunction of...the performance and reliability of the sensor may cause malfunction or damage to have broader options for placing the projector and viewing pictures easily. Before Setting Up the Projector Installing the projector in a location away from an air-conditioner 30 cm (11 7/8 inches) 30 cm (11 7/8 inches...
... the following situations, which may occur. Poorly ventilated location Malfunction of the projector, allow at least 30 cm (11 7/8 inches) between the projector and walls. The lens shift allows you to the projector. Hot and humid Install in such a location may cause a malfunction of...the performance and reliability of the sensor may cause malfunction or damage to have broader options for placing the projector and viewing pictures easily. Before Setting Up the Projector Installing the projector in a location away from an air-conditioner 30 cm (11 7/8 inches) 30 cm (11 7/8 inches...
User Manual
Page 14
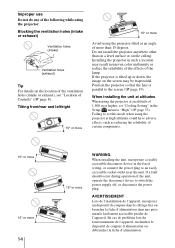
...;brancher la fiche d'alimentation. Tilting front/rear and left/right 15° or more 15° or more Avoid using the projector. Installing the projector in such a location may be trapezoidal. If the projector is parallel to "High" (1 page 53). When installing the unit at altitudes When using the...ventilation holes (intake or exhaust), see "Location of Controls" (1 page 8). Improper use Do not do any of the following while using the projector tilted at high altitudes could have adverse effects, such as reducing the reliability of certain components. 15° or more 15° or ...
...;brancher la fiche d'alimentation. Tilting front/rear and left/right 15° or more 15° or more Avoid using the projector. Installing the projector in such a location may be trapezoidal. If the projector is parallel to "High" (1 page 53). When installing the unit at altitudes When using the...ventilation holes (intake or exhaust), see "Location of Controls" (1 page 8). Improper use Do not do any of the following while using the projector tilted at high altitudes could have adverse effects, such as reducing the reliability of certain components. 15° or more 15° or ...
User Manual
Page 16
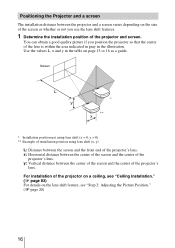
...** Example of installation position using lens shift (x, y) L: Distance between the screen and the front end of the projector's lens. x: Horizontal distance between the center of the screen and the center of the projector's lens. You can obtain a good quality picture if you use the lens shift features. 1 Determine the installation ...within the area indicated in gray in the table on page 15 or 16 as a guide. Positioning the Projector and a screen The installation distance between the projector and a screen varies depending on the size of the screen or whether or not you position the...
...** Example of installation position using lens shift (x, y) L: Distance between the screen and the front end of the projector's lens. x: Horizontal distance between the center of the screen and the center of the projector's lens. You can obtain a good quality picture if you use the lens shift features. 1 Determine the installation ...within the area indicated in gray in the table on page 15 or 16 as a guide. Positioning the Projector and a screen The installation distance between the projector and a screen varies depending on the size of the screen or whether or not you position the...
User Manual
Page 19
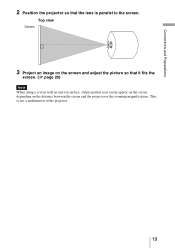
Connections and Preparations 2 Position the projector so that it fits the screen. (1 page 20) Note When using a screen with an uneven surface, stripes pattern may rarely appear on the screen depending on the distance between the screen and the projector or the zooming magnifications. Top view Screen 3 Project an image on the screen and adjust the picture so that the lens is not a malfunction of the projector. 19 This is parallel to the screen.
Connections and Preparations 2 Position the projector so that it fits the screen. (1 page 20) Note When using a screen with an uneven surface, stripes pattern may rarely appear on the screen depending on the distance between the screen and the projector or the zooming magnifications. Top view Screen 3 Project an image on the screen and adjust the picture so that the lens is not a malfunction of the projector. 19 This is parallel to the screen.
User Manual
Page 20
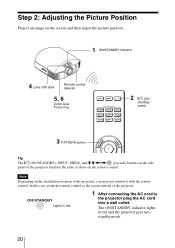
Step 2: Adjusting the Picture Position Project an image on the screen and then adjust the picture position. 1 ON/STANDBY indicator 4 Lens shift dials Remote control detector 5, 6 Zoom lever, Focus ring 2 ?/1 (On/ standby) switch 3 PATTERN button Tip The ?/1 (ON/STANDBY), INPUT, MENU, and M/m/
Step 2: Adjusting the Picture Position Project an image on the screen and then adjust the picture position. 1 ON/STANDBY indicator 4 Lens shift dials Remote control detector 5, 6 Zoom lever, Focus ring 2 ?/1 (On/ standby) switch 3 PATTERN button Tip The ?/1 (ON/STANDBY), INPUT, MENU, and M/m/
User Manual
Page 21
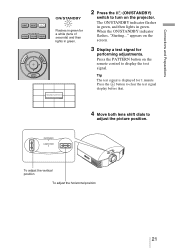
... to adjust the picture position. Press the button to clear the test signal display before that. 4 Move both lens shift dials to turn on the projector. When the ON/STANDBY indicator flashes, "Starting..."
... to adjust the picture position. Press the button to clear the test signal display before that. 4 Move both lens shift dials to turn on the projector. When the ON/STANDBY indicator flashes, "Starting..."
User Manual
Page 23
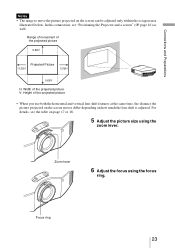
.... Connections and Preparations Notes • The range to move the picture projected on how much the lens shift is adjusted. For details, see "Positioning the Projector and a screen" (1 page 16) as well. Focus ring 23
.... Connections and Preparations Notes • The range to move the picture projected on how much the lens shift is adjusted. For details, see "Positioning the Projector and a screen" (1 page 16) as well. Focus ring 23
User Manual
Page 24
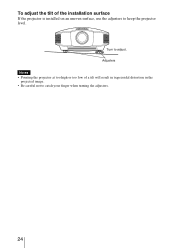
To adjust the tilt of a tilt will result in trapezoidal distortion in the projected image. • Be careful not to catch your finger when turning the adjusters. 24 Adjusters Notes • Pointing the projector at too high or too low of the installation surface If the projector is installed on an uneven surface, use the adjusters to adjust. Turn to keep the projector level.
To adjust the tilt of a tilt will result in trapezoidal distortion in the projected image. • Be careful not to catch your finger when turning the adjusters. 24 Adjusters Notes • Pointing the projector at too high or too low of the installation surface If the projector is installed on an uneven surface, use the adjusters to adjust. Turn to keep the projector level.
User Manual
Page 25
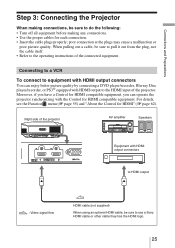
..., or PS3® equipped with the Control for HDMI compatible equipment. Connections and Preparations Step 3: Connecting the Projector When making connections, be sure to the operating instructions of the projector. When pulling out a cable, be sure to equipment with HDMI output connectors You can operate the...all equipment before making any connections. • Use the proper cables for HDMI" (1 page 62). Connecting to a VCR To connect to use a Sony HDMI cable or other cable they has the HDMI logo. 25 For details, see the Function menu (1 page 55) and "About the Control for...
..., or PS3® equipped with the Control for HDMI compatible equipment. Connections and Preparations Step 3: Connecting the Projector When making connections, be sure to the operating instructions of the projector. When pulling out a cable, be sure to equipment with HDMI output connectors You can operate the...all equipment before making any connections. • Use the proper cables for HDMI" (1 page 62). Connecting to a VCR To connect to use a Sony HDMI cable or other cable they has the HDMI logo. 25 For details, see the Function menu (1 page 55) and "About the Control for...
User Manual
Page 26
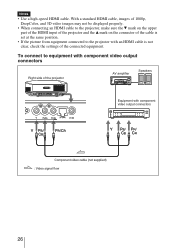
... an HDMI cable is not clear, check the settings of the projector AV amplifier Speakers Equipment with component video output connectors Right side of the connected equipment. Notes • Use a high-speed HDMI cable. With a standard HDMI ..., DeepColor, and 3D video images may not be displayed properly. • When connecting an HDMI cable to the projector, make sure the V mark on the upper part of the HDMI input of the projector and the v mark on the connector of the cable is set at the same position. • If the...
... an HDMI cable is not clear, check the settings of the projector AV amplifier Speakers Equipment with component video output connectors Right side of the connected equipment. Notes • Use a high-speed HDMI cable. With a standard HDMI ..., DeepColor, and 3D video images may not be displayed properly. • When connecting an HDMI cable to the projector, make sure the V mark on the upper part of the HDMI input of the projector and the v mark on the connector of the cable is set at the same position. • If the...

User Manual
Page 27
... If the picture from equipment connected to both computer's display and this equipment, the picture of the equipment may not be sure to use a Sony HDMI cable or other cable they has the HDMI logo. in the Setup menu to only the external monitor. Set your computer. If the input..., refer to "Computer." (1 pages 54, 68) Notes • Use a high-speed HDMI cable. Connections and Preparations Connecting to a Computer Right side of the projector Computer to monitor output HD-Dsub15 pin cable (not supplied) or HDMI cable (not supplied) : Video signal flow When using an optional HDMI cable, be...
... If the picture from equipment connected to both computer's display and this equipment, the picture of the equipment may not be sure to use a Sony HDMI cable or other cable they has the HDMI logo. in the Setup menu to only the external monitor. Set your computer. If the input..., refer to "Computer." (1 pages 54, 68) Notes • Use a high-speed HDMI cable. Connections and Preparations Connecting to a Computer Right side of the projector Computer to monitor output HD-Dsub15 pin cable (not supplied) or HDMI cable (not supplied) : Video signal flow When using an optional HDMI cable, be...


