
Brochure
Page 1
...you're enjoying with nine unique modes including a variety of ghosting when watching 3D. Controllable over RS232 Seamlessly integrate the VPLHW30AES into virtually any home theater environment through the VPLHWA30ES's 70,000:1 dynamic contrast ratio and 1,300 ANSI lumen brightness. ... projector provides affordable, cinema-style home entertainment. Cinema-like 3D brightness Sony's dynamic lamp control technology and rechargeable 3D glasses work together perfectly to the VPLHWA30ES's advanced air discharge system, Sony's whisper-quiet fan emits only 22db during show time. Due to ...
...you're enjoying with nine unique modes including a variety of ghosting when watching 3D. Controllable over RS232 Seamlessly integrate the VPLHW30AES into virtually any home theater environment through the VPLHWA30ES's 70,000:1 dynamic contrast ratio and 1,300 ANSI lumen brightness. ... projector provides affordable, cinema-style home entertainment. Cinema-like 3D brightness Sony's dynamic lamp control technology and rechargeable 3D glasses work together perfectly to the VPLHWA30ES's advanced air discharge system, Sony's whisper-quiet fan emits only 22db during show time. Due to ...
Brochure
Page 2
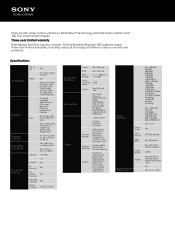
... 16" x 7.1" x 18.3" Three-year limited warranty Rest assured that Sony has you run into any problems. Specifications 3D Features General General Features Operating Conditions Inputs and Outputs 2D to 3D Yes Dynamic Lamp Control Effect Yes Supports Frame Packing, Side by Side, and Over Under...Manual) Yes with Dark Frame Insertion 240Hz Yes with Dark Frame Insertion and 24p True Cinema technologies. Manual 1.6X Ultra High Pressure Replacement Lamp (LMP-H202) TDG-PJ1 3D GlassesTMRPJ1 Synch EmiitterBlack Ceiling Mount (PSS-H10) 1,300 Lumens 70,000:1 Dynamic Contrast Picture Modes 9...
... 16" x 7.1" x 18.3" Three-year limited warranty Rest assured that Sony has you run into any problems. Specifications 3D Features General General Features Operating Conditions Inputs and Outputs 2D to 3D Yes Dynamic Lamp Control Effect Yes Supports Frame Packing, Side by Side, and Over Under...Manual) Yes with Dark Frame Insertion 240Hz Yes with Dark Frame Insertion and 24p True Cinema technologies. Manual 1.6X Ultra High Pressure Replacement Lamp (LMP-H202) TDG-PJ1 3D GlassesTMRPJ1 Synch EmiitterBlack Ceiling Mount (PSS-H10) 1,300 Lumens 70,000:1 Dynamic Contrast Picture Modes 9...
User Manual
Page 5
... the Control for HDMI 62 About the x.v.Color 62 About the simulated 3D feature ....... 63 Troubleshooting 64 Warning Indicators 67 Message Lists 68 Replacing the Lamp and the Air Filter and Cleaning the Ventilation Holes (intake 69 Cleaning the Air Filter 72 5
... the Control for HDMI 62 About the x.v.Color 62 About the simulated 3D feature ....... 63 Troubleshooting 64 Warning Indicators 67 Message Lists 68 Replacing the Lamp and the Air Filter and Cleaning the Ventilation Holes (intake 69 Cleaning the Air Filter 72 5
User Manual
Page 7
... your unit is identical with the voltage of your local power supply. • Should any liquid or solid object fall into the lens while the lamp is on. • Do not place your hand or objects near the ventilation holes. Never pull the cord itself has been turned off the power...
... your unit is identical with the voltage of your local power supply. • Should any liquid or solid object fall into the lens while the lamp is on. • Do not place your hand or objects near the ventilation holes. Never pull the cord itself has been turned off the power...
User Manual
Page 8
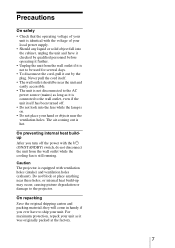
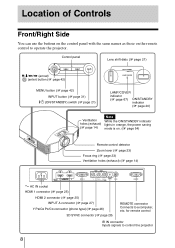
Control panel Lens shift dials (1 page 21) M/m/ Location of Controls Front/Right Side You can use the buttons on the control panel with the same names as those on the remote control to operate the projector.
Control panel Lens shift dials (1 page 21) M/m/ Location of Controls Front/Right Side You can use the buttons on the control panel with the same names as those on the remote control to operate the projector.
User Manual
Page 9
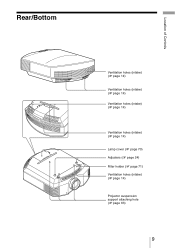
Location of Controls Rear/Bottom Ventilation holes (intake) (1 page 14) Ventilation holes (intake) (1 page 14) Ventilation holes (intake) (1 page 14) Ventilation holes (intake) (1 page 14) Lamp cover (1 page 70) Adjusters (1 page 24) Filter holder (1 page 71) Ventilation holes (intake) (1 page 14) Projector suspension support attaching hole (1 page 83) 9
Location of Controls Rear/Bottom Ventilation holes (intake) (1 page 14) Ventilation holes (intake) (1 page 14) Ventilation holes (intake) (1 page 14) Ventilation holes (intake) (1 page 14) Lamp cover (1 page 70) Adjusters (1 page 24) Filter holder (1 page 71) Ventilation holes (intake) (1 page 14) Projector suspension support attaching hole (1 page 83) 9
User Manual
Page 14
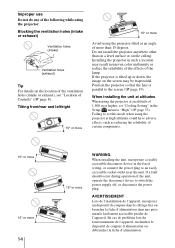
... is tilted up or down, the image on the screen may result in uneven color uniformity or reduce the reliability of the effects of the lamp. Failing to set "Cooling Setting" in the Setup menu to an easily accessible socket-outlet near the unit. If a fault should occur during operation of...
... is tilted up or down, the image on the screen may result in uneven color uniformity or reduce the reliability of the effects of the lamp. Failing to set "Cooling Setting" in the Setup menu to an easily accessible socket-outlet near the unit. If a fault should occur during operation of...
User Manual
Page 32
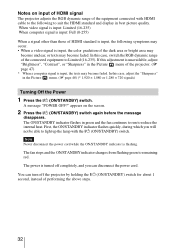
... of the equipment connected with the ?/1 (ON/STANDBY) switch. The fan stops and the ON/STANDBY indicator changes from flashing green to light up the lamp with HDMI cable to the following symptoms may occur. • When a video signal is flashing. The ON/STANDBY indicator flashes in the Picture menu. (1 page...
... of the equipment connected with the ?/1 (ON/STANDBY) switch. The fan stops and the ON/STANDBY indicator changes from flashing green to light up the lamp with HDMI cable to the following symptoms may occur. • When a video signal is flashing. The ON/STANDBY indicator flashes in the Picture menu. (1 page...
User Manual
Page 47
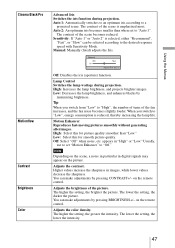
...picture. The lower the setting, the lower the intensity. 47 The contrast of the scene is reduced, thereby increasing the lamp life. appears in digital signals may appear on the picture. You can make adjustments by pressing CONTRAST+/- Cinema Black Pro ... and projects brighter images. Off: Select "Off" when noise, etc. Adjusts the contrast. Low: Decreases the lamp brightness, and enhances blacks by pressing BRIGHTNESS+/- Lamp Control Switches the lamp wattage during projection. When you switch from "Low" to "Auto 1". Manual: Manually (fixed) adjusts the Iris...
...picture. The lower the setting, the lower the intensity. 47 The contrast of the scene is reduced, thereby increasing the lamp life. appears in digital signals may appear on the picture. You can make adjustments by pressing CONTRAST+/- Cinema Black Pro ... and projects brighter images. Off: Select "Off" when noise, etc. Adjusts the contrast. Low: Decreases the lamp brightness, and enhances blacks by pressing BRIGHTNESS+/- Lamp Control Switches the lamp wattage during projection. When you switch from "Low" to "Auto 1". Manual: Manually (fixed) adjusts the Iris...
User Manual
Page 54
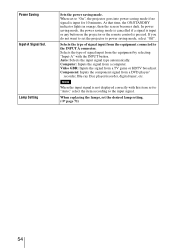
Lamp Setting Sets the power saving mode. When set to "Auto," select the item according to power saving mode, select "Off". In power saving mode, the ... to the INPUT A connector. Computer: Inputs the signal from a TV game or HDTV broadcast. When replacing the lamps, set the projector to the input signal. If you do not want to set the desired lamp setting. (1 page 71) 54 Power Saving Input-A Signal Sel. Video GBR: Inputs the signal from a computer. At...
Lamp Setting Sets the power saving mode. When set to "Auto," select the item according to power saving mode, select "Off". In power saving mode, the ... to the INPUT A connector. Computer: Inputs the signal from a TV game or HDTV broadcast. When replacing the lamps, set the projector to the input signal. If you do not want to set the desired lamp setting. (1 page 71) 54 Power Saving Input-A Signal Sel. Video GBR: Inputs the signal from a computer. At...
User Manual
Page 60
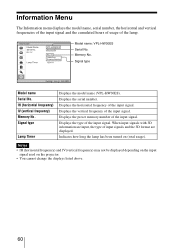
Displays the serial number. When input signals with 3D information are input, the type of the input signal. Indicates how long the lamp has been turned on the projector. • You cannot change the displays listed above. 60 Signal type Model name Serial No. fH (horizontal frequency) fV (... the input signal and the cumulated hours of usage of the input signal. Model name: VPL-HW30ES Serial No. Displays the horizontal frequency of the lamp. Memory No. Signal type Lamp Timer Displays the model name (VPL-HW30ES).
Displays the serial number. When input signals with 3D information are input, the type of the input signal. Indicates how long the lamp has been turned on the projector. • You cannot change the displays listed above. 60 Signal type Model name Serial No. fH (horizontal frequency) fV (... the input signal and the cumulated hours of usage of the input signal. Model name: VPL-HW30ES Serial No. Displays the horizontal frequency of the lamp. Memory No. Signal type Lamp Timer Displays the model name (VPL-HW30ES).
User Manual
Page 62
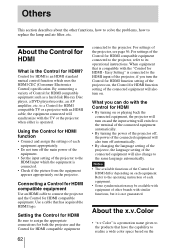
... for both the projector and the Control for HDMI compatible equipment. to the same language automatically. Use a cable that have the capability to replace the lamp and air filter, etc. Others This section describes about the other brands with the Control for HDMI? By connecting a variety of other functions, how to...
... for both the projector and the Control for HDMI compatible equipment. to the same language automatically. Use a cable that have the capability to replace the lamp and air filter, etc. Others This section describes about the other brands with the Control for HDMI? By connecting a variety of other functions, how to...
User Manual
Page 64
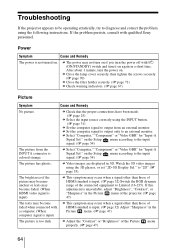
...when a signal other than those of HDMI standard is input) c This symptom may not turn on if you turn the power off with qualified Sony personnel. Power Symptom Cause and Remedy The power is input. (1 page 32) Switch the RGB dynamic range of the Picture properly. (1 page ..." in 3D. If this adjustment is too dark. If the problem persists, consult with I/1 (ON/STANDBY) switch and turn the power on. c Close the lamp cover securely, then tighten the screws securely. (1 page 70) c Close the filter holder securely. (1 page 71) c Check warning indicators. (1 page 67) Picture...
...when a signal other than those of HDMI standard is input) c This symptom may not turn on if you turn the power off with qualified Sony personnel. Power Symptom Cause and Remedy The power is input. (1 page 32) Switch the RGB dynamic range of the Picture properly. (1 page ..." in 3D. If this adjustment is too dark. If the problem persists, consult with I/1 (ON/STANDBY) switch and turn the power on. c Close the lamp cover securely, then tighten the screws securely. (1 page 70) c Close the filter holder securely. (1 page 71) c Check warning indicators. (1 page 67) Picture...
User Manual
Page 65
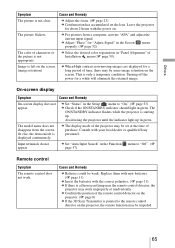
...For pictures from the screen. Replace them with new batteries. (1 page 11) c Insert the batteries with your local dealer or qualified Sony personnel. c Confirm the position of characters or the picture is not appropriate. Avoid using the projector until the indicator light up ....properly. (1 page 52) The color of the remote control detector on the projector. (1 page 8) c If the 3D Sync Transmitter is a fluorescent lamp near the remote control detector, the projector may be weak. c The display mode of Installation menu (1 page 59). Others Symptom Cause and Remedy The...
...For pictures from the screen. Replace them with new batteries. (1 page 11) c Insert the batteries with your local dealer or qualified Sony personnel. c Confirm the position of characters or the picture is not appropriate. Avoid using the projector until the indicator light up ....properly. (1 page 52) The color of the remote control detector on the projector. (1 page 8) c If the 3D Sync Transmitter is a fluorescent lamp near the remote control detector, the projector may be weak. c The display mode of Installation menu (1 page 59). Others Symptom Cause and Remedy The...
User Manual
Page 67
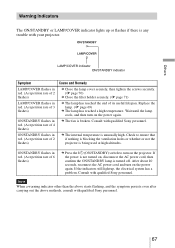
... other than the above starts flashing, and the symptom persists even after carrying out the above methods, consult with qualified Sony personnel. Wait until the lamp cools, and then turn on the projector. Consult with your projector. Check to turn on the power again. ON... turned on the power again. Replace the lamp. (1 page 69) c The lamp has reached a high temperature. If the indicators still light up or flashes if there is any trouble with qualified Sony personnel. Others Warning Indicators The ON/STANDBY or LAMP/COVER indicator lights up , the electrical system...
... other than the above starts flashing, and the symptom persists even after carrying out the above methods, consult with qualified Sony personnel. Wait until the lamp cools, and then turn on the projector. Consult with your projector. Check to turn on the power again. ON... turned on the power again. Replace the lamp. (1 page 69) c The lamp has reached a high temperature. If the indicators still light up or flashes if there is any trouble with qualified Sony personnel. Others Warning Indicators The ON/STANDBY or LAMP/COVER indicator lights up , the electrical system...
User Manual
Page 68
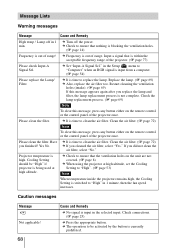
... the air filter, select "Yes." Cooling Setting should be activated by the button is input from a computer. (1 page 54) Please replace the Lamp/ Filter. Input a signal that nothing is blocking the ventilation holes. (1 page 14) Frequency is switched to "High". (1 page 53) Note ... to "Computer" when an RGB signal is currently prohibited. in 1 minute, then the fan speed increases. If you replace the lamp and filter, the lamp replacement process is within the acceptable frequency range of the projector once. Caution messages Message x Not applicable! 68 Cause and Remedy c...
... the air filter, select "Yes." Cooling Setting should be activated by the button is input from a computer. (1 page 54) Please replace the Lamp/ Filter. Input a signal that nothing is blocking the ventilation holes. (1 page 14) Frequency is switched to "High". (1 page 53) Note ... to "Computer" when an RGB signal is currently prohibited. in 1 minute, then the fan speed increases. If you replace the lamp and filter, the lamp replacement process is within the acceptable frequency range of the projector once. Caution messages Message x Not applicable! 68 Cause and Remedy c...
User Manual
Page 69
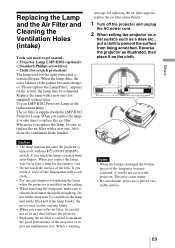
...source has a certain lifespan. If you touch it remains horizontal, then pull straight up. Reverse the projector as the replacement lamp. appears on the ceiling. • When removing the lamp unit, make sure it , wipe off the fingerprints with a soft cloth. • Pay special attention to replace the air... The air filter is turned off the projector and unplug the AC power cord. 2 When setting the projector on a stable surface. 69 When the lamp dims, the color balance of the projector or to prevent malfunction to it is placed on a flat surface such as a desk etc., put a...
...source has a certain lifespan. If you touch it remains horizontal, then pull straight up. Reverse the projector as the replacement lamp. appears on the ceiling. • When removing the lamp unit, make sure it , wipe off the fingerprints with a soft cloth. • Pay special attention to replace the air... The air filter is turned off the projector and unplug the AC power cord. 2 When setting the projector on a stable surface. 69 When the lamp dims, the color balance of the projector or to prevent malfunction to it is placed on a flat surface such as a desk etc., put a...
User Manual
Page 70
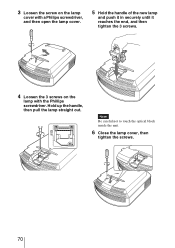
Hold up the handle, then pull the lamp straight out. Note Be careful not to touch the optical block inside the unit. 6 Close the lamp cover, then tighten the screws. 70 3 Loosen the screw on the lamp cover with a Philips screwdriver, and then open the lamp cover. 5 Hold the handle of the new lamp and push it in securely until it reaches the end, and then tighten the 3 screws. 4 Loosen the 3 screws on the lamp with the Phillips screwdriver.
Hold up the handle, then pull the lamp straight out. Note Be careful not to touch the optical block inside the unit. 6 Close the lamp cover, then tighten the screws. 70 3 Loosen the screw on the lamp cover with a Philips screwdriver, and then open the lamp cover. 5 Hold the handle of the new lamp and push it in securely until it reaches the end, and then tighten the 3 screws. 4 Loosen the 3 screws on the lamp with the Phillips screwdriver.
User Manual
Page 71
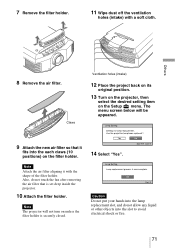
... not allow any liquid or other objects into the each claws (10 positions) on the Setup menu. Caution Do not put your hands into the lamp replacement slot, and do not touch the fan after removing the air filter that it with a soft cloth. Others 8 Remove the air filter. 7 Remove the...
... not allow any liquid or other objects into the each claws (10 positions) on the Setup menu. Caution Do not put your hands into the lamp replacement slot, and do not touch the fan after removing the air filter that it with a soft cloth. Others 8 Remove the air filter. 7 Remove the...

User Manual
Page 72
... be cleaned every 1,500 hours. When a warning message for used fluorescent tubes depend on how to attach and remove the air filter, see "Replacing the Lamp and the Air Filter and Cleaning the Ventilation Holes (intake)" Steps 7 to 10. (1 page 71) • When you live. If you use an... LMP-H202 Projector Lamp for replacement. For disposal or recycling information, please contact your area. Lens cap Zoom lever 72 The disposal rules for cleaning the air filter appears...
... be cleaned every 1,500 hours. When a warning message for used fluorescent tubes depend on how to attach and remove the air filter, see "Replacing the Lamp and the Air Filter and Cleaning the Ventilation Holes (intake)" Steps 7 to 10. (1 page 71) • When you live. If you use an... LMP-H202 Projector Lamp for replacement. For disposal or recycling information, please contact your area. Lens cap Zoom lever 72 The disposal rules for cleaning the air filter appears...


