Specification Sheet (VPLSW526M Spec Sheet)
Page 1
... (Lamp mode: High) 2100 lumens (Lamp mode: Standard) 1800 lumens (Lamp mode: Low) 0.75"x3 BrightEra LCD Panel Panel Display Resolution Contrast Ratio WXGA (1280x800 dots) 2,500:1 (Full white/full black)*1 Light Source Ultra high-pressure mercury lamp 210 W type Recommended Lamp Replacement Time*2 3000H (Lamp mode: High) 4500H (Lamp mode: Standard) 6000H (Lamp mode: Low) Filter Cleaning Cycle*2 Max. 6000H Sreacmoemtmimeendaesdthe lamp replacement is average with lamp dimming - 4 lamp mode (High, Std, Low, Auto*) *Auto lamp control by picture brightness - Output from INPUT A and INPUT...
... (Lamp mode: High) 2100 lumens (Lamp mode: Standard) 1800 lumens (Lamp mode: Low) 0.75"x3 BrightEra LCD Panel Panel Display Resolution Contrast Ratio WXGA (1280x800 dots) 2,500:1 (Full white/full black)*1 Light Source Ultra high-pressure mercury lamp 210 W type Recommended Lamp Replacement Time*2 3000H (Lamp mode: High) 4500H (Lamp mode: Standard) 6000H (Lamp mode: Low) Filter Cleaning Cycle*2 Max. 6000H Sreacmoemtmimeendaesdthe lamp replacement is average with lamp dimming - 4 lamp mode (High, Std, Low, Auto*) *Auto lamp control by picture brightness - Output from INPUT A and INPUT...
User Manual (VPLSW536&526 operation)
Page 2
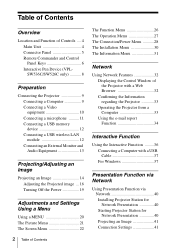
... 11 Connecting a USB memory device 12 Connecting a USB wireless LAN module 12 Connecting an External Monitor and Audio Equipment 13 Projecting/Adjusting an Image Projecting an Image 14 Adjusting the Projected image ... 16 Turning Off the Power 19 Adjustments and Settings Using a Menu Using a MENU 20 The Picture Menu 21 The Screen Menu 22 2 Table of Contents The Function Menu 26 The Operation Menu 27 The Connection/Power Menu ...........28 The Installation Menu 30 The Information Menu 31 Network Using Network Features 32 Displaying the Control Window of the Projector with...
... 11 Connecting a USB memory device 12 Connecting a USB wireless LAN module 12 Connecting an External Monitor and Audio Equipment 13 Projecting/Adjusting an Image Projecting an Image 14 Adjusting the Projected image ... 16 Turning Off the Power 19 Adjustments and Settings Using a Menu Using a MENU 20 The Picture Menu 21 The Screen Menu 22 2 Table of Contents The Function Menu 26 The Operation Menu 27 The Connection/Power Menu ...........28 The Installation Menu 30 The Information Menu 31 Network Using Network Features 32 Displaying the Control Window of the Projector with...
User Manual (VPLSW536&526 operation)
Page 7
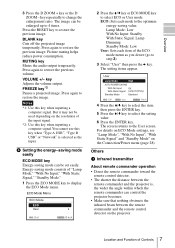
... to display the ECO Mode menu. BLANK key Cuts off the projected image temporarily. Location and Function of "Lamp Mode," "With No Input," "With Static Signal," "Standby Mode." 1 Press the ECO MODE key to step 3). 3 Select "User" then press the b key. Overview 3 Press the D ZOOM + key or the D ZOOM - Lamp Mode: Low With No Input: Standby With Static Signal: Lamp Dimming Standby Mode: Low User: Sets each mode to 4 times. Notes *1: Use this key when "Type A USB", "Type B USB" or "Network" is...
... to display the ECO Mode menu. BLANK key Cuts off the projected image temporarily. Location and Function of "Lamp Mode," "With No Input," "With Static Signal," "Standby Mode." 1 Press the ECO MODE key to step 3). 3 Select "User" then press the b key. Overview 3 Press the D ZOOM + key or the D ZOOM - Lamp Mode: Low With No Input: Standby With Static Signal: Lamp Dimming Standby Mode: Low User: Sets each mode to 4 times. Notes *1: Use this key when "Type A USB", "Type B USB" or "Network" is...
User Manual (VPLSW536&526 operation)
Page 14
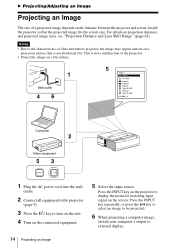
.... B Projecting/Adjusting an Image Projecting an Image The size of a projected image depends on projection distances and projected image sizes, see "Projection Distance and Lens Shift Range" (page 62). For details on the distance between the projector and screen. Install the projector so that is not a malfunction of ultra short throw projector, the image may appear uneven on the screen. Notes • Due to display the menu for switching input signal on a projection surface that the projected image fits the screen size. Press the INPUT...
.... B Projecting/Adjusting an Image Projecting an Image The size of a projected image depends on projection distances and projected image sizes, see "Projection Distance and Lens Shift Range" (page 62). For details on the distance between the projector and screen. Install the projector so that is not a malfunction of ultra short throw projector, the image may appear uneven on the screen. Notes • Due to display the menu for switching input signal on a projection surface that the projected image fits the screen size. Press the INPUT...

User Manual (VPLSW536&526 operation)
Page 18
... adjusters, you can adjust the height of the projector using the adjusters. You can also change the setting in the Installation menu. 2 Use the V/v/B/b keys to change from the original or projected image may be distorted with Keystone adjustment. Increase the number towards plus Notes • Since the Keystone adjustment is an electronic correction, the image may be deteriorated. • Depending on the remote commander or select V Keystone in Aspect of the Screen menu...
... adjusters, you can adjust the height of the projector using the adjusters. You can also change the setting in the Installation menu. 2 Use the V/v/B/b keys to change from the original or projected image may be distorted with Keystone adjustment. Increase the number towards plus Notes • Since the Keystone adjustment is an electronic correction, the image may be deteriorated. • Depending on the remote commander or select V Keystone in Aspect of the Screen menu...
User Manual (VPLSW536&526 operation)
Page 20
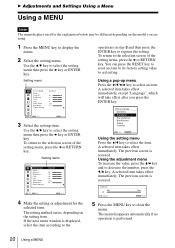
... selection screen of the setting menu, press the B or RETURN key. B Adjustments and Settings Using a Menu Using a MENU Note The menu displays used for the selected item. Setting items Picture Picture Mode Reset Contrast Brightness Color Hue Color Temp. You can press the RESET key to reset an item to its factory setting value to select the setting menu then press the b key or ENTER key. Picture Mode Dynamic Standard Presentation Blackboard Game Cinema :Sel RETURN :Back Using the setting menu...
... selection screen of the setting menu, press the B or RETURN key. B Adjustments and Settings Using a Menu Using a MENU Note The menu displays used for the selected item. Setting items Picture Picture Mode Reset Contrast Brightness Color Hue Color Temp. You can press the RESET key to reset an item to its factory setting value to select the setting menu then press the b key or ENTER key. Picture Mode Dynamic Standard Presentation Blackboard Game Cinema :Sel RETURN :Back Using the setting menu...
User Manual (VPLSW536&526 operation)
Page 21
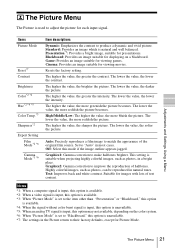
... projecting highly colorful images, such as photos, can be reproduced in natural tones. Notes *1: When a computer signal is input, this option is available. *2: When a video signal is input, this option is available. *3: When "Picture Mode" is set to "Blackboard," this option is unavailable. *7: The settings in the Picture return to "Auto" in a bright place. Blackboard: Provides an image suitable for viewing movies. Resets the factory setting. Set to their factory defaults, except for Picture Mode...
... projecting highly colorful images, such as photos, can be reproduced in natural tones. Notes *1: When a computer signal is input, this option is available. *2: When a video signal is input, this option is available. *3: When "Picture Mode" is set to "Blackboard," this option is unavailable. *7: The settings in the Picture return to "Auto" in a bright place. Blackboard: Provides an image suitable for viewing movies. Resets the factory setting. Set to their factory defaults, except for Picture Mode...
User Manual (VPLSW536&526 operation)
Page 26
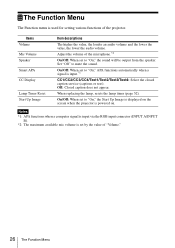
... automatically when a signal is used for setting various functions of the microphone.*2 On/Off: When set to mute the sound. On/Off: When set to "On," the Start Up Image is displayed on the screen when the projector is powered on. Items Volume Mic Volume Speaker Smart APA CC Display Lamp Timer Reset Start Up Image Item descriptions The higher the value, the louder an audio volume and the...
... automatically when a signal is used for setting various functions of the microphone.*2 On/Off: When set to mute the sound. On/Off: When set to "On," the Start Up Image is displayed on the screen when the projector is powered on. Items Volume Mic Volume Speaker Smart APA CC Display Lamp Timer Reset Start Up Image Item descriptions The higher the value, the louder an audio volume and the...
User Manual (VPLSW536&526 operation)
Page 27
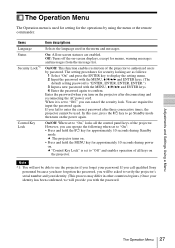
..., warning messages and messages from the message list. If you call qualified Sony personnel because you have forgotten the password, you will provide you fail to authorized users by using the menu or the remote commander. Adjustments and Settings Using a Menu The Operation Menu 27 Enter the password when you can cancel the security lock. The Operation Menu The Operation menu is used for setting for approximately 10 seconds during Standby mode. Items Language Status Security Lock*1 Control Key Lock Item...
..., warning messages and messages from the message list. If you call qualified Sony personnel because you have forgotten the password, you will provide you fail to authorized users by using the menu or the remote commander. Adjustments and Settings Using a Menu The Operation Menu 27 Enter the password when you can cancel the security lock. The Operation Menu The Operation menu is used for setting for approximately 10 seconds during Standby mode. Items Language Status Security Lock*1 Control Key Lock Item...
User Manual (VPLSW536&526 operation)
Page 28
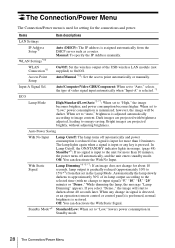
... images are projected with no change to input signal) "5," "10," "15," "20" minutes or "Demo.," While dimming the lamp, the message "Lamp Dimming" appears. In Lamp Cutoff, the ON/STANDBY indicator lights in orange. (page 48) Standby*6: If no signal is adjusted automatically according to image content. Off: You can deactivate the With No Input. Standard/Low: When set to "Auto," brightness is input for more than 10 minutes. The Connection/Power Menu The Connection/Power menu...
... images are projected with no change to input signal) "5," "10," "15," "20" minutes or "Demo.," While dimming the lamp, the message "Lamp Dimming" appears. In Lamp Cutoff, the ON/STANDBY indicator lights in orange. (page 48) Standby*6: If no signal is adjusted automatically according to image content. Off: You can deactivate the With No Input. Standard/Low: When set to "Auto," brightness is input for more than 10 minutes. The Connection/Power Menu The Connection/Power menu...

User Manual (VPLSW536&526 operation)
Page 29
... entering standby mode when there is no input signal. *7: Does not function when "Type A USB", "Type B USB" or "Network" is set , when you can be operated while the projector is a change in brightness. In this case, it takes priority. *6: Select "Off" to "Low," the network and network control function cannot be used as the input. Adjustments and Settings Using a Menu The Connection/Power Menu 29 With the projector turned off, you use a web browser. SSID: VPL + MAC address for...
... entering standby mode when there is no input signal. *7: Does not function when "Type A USB", "Type B USB" or "Network" is set , when you can be operated while the projector is a change in brightness. In this case, it takes priority. *6: Select "Off" to "Low," the network and network control function cannot be used as the input. Adjustments and Settings Using a Menu The Connection/Power Menu 29 With the projector turned off, you use a web browser. SSID: VPL + MAC address for...
User Manual (VPLSW536&526 operation)
Page 32
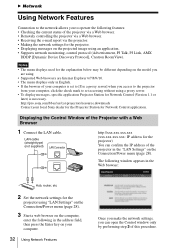
... the model you are using. • Supported Web browsers are Internet Explorer 6/7/8/9/10. • The menu displays only in English. • If the browser of the Projector with a Web Browser 1 Connect the LAN cable. http://pro.sony.com/bbsc/ssr/cat-projectors/resource.downloads Contact your computer, click the check mark to set to [Use a proxy server] when you access to operate the following in the address field...
... the model you are using. • Supported Web browsers are Internet Explorer 6/7/8/9/10. • The menu displays only in English. • If the browser of the Projector with a Web Browser 1 Connect the LAN cable. http://pro.sony.com/bbsc/ssr/cat-projectors/resource.downloads Contact your computer, click the check mark to set to [Use a proxy server] when you access to operate the following in the address field...
User Manual (VPLSW536&526 operation)
Page 42
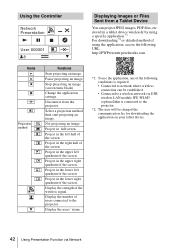
... the screen. Using the Controller Network Presentation User 000001 8 Displaying Images or Files Sent from the projector. Project in the lower right quadrant of the wireless signal. Display the number of the screen. Select a projection method then start projecting an image. Project in the upper right quadrant of users connected to the projector. Project in the right half of the screen. Disconnect from a Tablet Device You can be established. • Connected to a wireless network via Network Change the application settings. Project...
... the screen. Using the Controller Network Presentation User 000001 8 Displaying Images or Files Sent from the projector. Project in the lower right quadrant of the wireless signal. Display the number of the screen. Select a projection method then start projecting an image. Project in the upper right quadrant of users connected to the projector. Project in the right half of the screen. Disconnect from a Tablet Device You can be established. • Connected to a wireless network via Network Change the application settings. Project...

User Manual (VPLSW536&526 operation)
Page 48
... been turned on the power again. ON/STANDBY indicator Status Lights in red Flashes in green Lights in green Lights in orange Flashes in red Flashes twice Flashes six times Other number of flashes. Address the problem in Standby mode. • The projector is ready to operate after the projector is in accordance with a new one (page 52). 48 Indicators Symptoms are indicated by number of the projector. The projector's power is shown again, the lamp may be burnt out. Turn off . After checking that the ON/STANDBY indicator...
... been turned on the power again. ON/STANDBY indicator Status Lights in red Flashes in green Lights in green Lights in orange Flashes in red Flashes twice Flashes six times Other number of flashes. Address the problem in Standby mode. • The projector is ready to operate after the projector is in accordance with a new one (page 52). 48 Indicators Symptoms are indicated by number of the projector. The projector's power is shown again, the lamp may be burnt out. Turn off . After checking that the ON/STANDBY indicator...

User Manual (VPLSW536&526 operation)
Page 49
... Installation menu is set to one and clean the air filter. Check the items below . Clean the air filter. Messages List When any change in 1 min. Messages Meaning/Remedy High temp.! Change the output setting of range! message appears whenever you turn off in signal is detected, or an operation (remote control or control panel) is performed, normal brightness is restored. Not applicable! The control keys are locked! "Control Key Lock" is high. soon. To turn on the power until you replace the lamp...
... Installation menu is set to one and clean the air filter. Check the items below . Clean the air filter. Messages List When any change in 1 min. Messages Meaning/Remedy High temp.! Change the output setting of range! message appears whenever you turn off in signal is detected, or an operation (remote control or control panel) is performed, normal brightness is restored. Not applicable! The control keys are locked! "Control Key Lock" is high. soon. To turn on the power until you replace the lamp...
User Manual (VPLSW536&526 operation)
Page 50
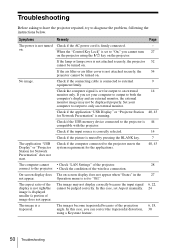
When the "Control Key Lock" is set for Network Presentation" is connected to external 9 equipment firmly. Check if the application "USB Display" or "Projector Station 40, 43 for output to "On," you can correct the trapezoidal distortion, 30 using the ?/1 key on . Operation menu is set to an external 14 monitor only. Check if the connecting cable is running. Check the computer signal is a trapezoid. On-screen display does The on...
When the "Control Key Lock" is set for Network Presentation" is connected to external 9 equipment firmly. Check if the application "USB Display" or "Projector Station 40, 43 for output to "On," you can correct the trapezoidal distortion, 30 using the ?/1 key on . Operation menu is set to an external 14 monitor only. Check if the connecting cable is running. Check the computer signal is a trapezoid. On-screen display does The on...
User Manual (VPLSW536&526 operation)
Page 51
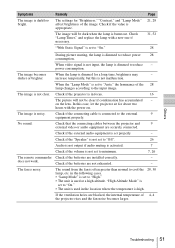
... lamp is high. When the "Lamp Mode" is not malfunction. In this is set properly. - Check that the connecting cables between the projector and 9 external video or audio equipment are not exhausted. - Check if the external audio equipment is set to "On." "High Altitude Mode" is set to "Auto," the luminance of the 28 lamp changes according to the input image. Others Troubleshooting 51 Check "Lamp Timer," and replace the lamp with the power on the lens. "With Static Signal" is set...
... lamp is high. When the "Lamp Mode" is not malfunction. In this is set properly. - Check that the connecting cables between the projector and 9 external video or audio equipment are not exhausted. - Check if the external audio equipment is set to "On." "High Altitude Mode" is set to "Auto," the luminance of the 28 lamp changes according to the input image. Others Troubleshooting 51 Check "Lamp Timer," and replace the lamp with the power on the lens. "With Static Signal" is set...
User Manual (VPLSW536&526 operation)
Page 52
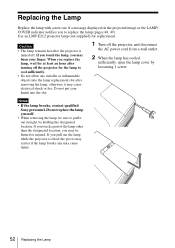
... location, you may be sure to replace the lamp (pages 48, 49). Do not replace the lamp yourself. • When removing the lamp, be burned or injured. If you touch the lamp, you may cause injury. 52 Replacing the Lamp If you pull out the lamp while the projector is turned off the projector for replacement. Replacing the Lamp Replace the lamp with a new one if a message displayed on the projected image or the LAMP/ COVER indicator...
... location, you may be sure to replace the lamp (pages 48, 49). Do not replace the lamp yourself. • When removing the lamp, be burned or injured. If you touch the lamp, you may cause injury. 52 Replacing the Lamp If you pull out the lamp while the projector is turned off the projector for replacement. Replacing the Lamp Replace the lamp with a new one if a message displayed on the projected image or the LAMP/ COVER indicator...
User Manual (VPLSW536&526 operation)
Page 53
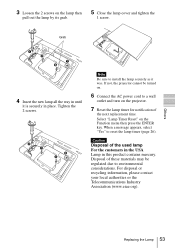
... lamp cover and tighten the 1 screw. Caution Disposal of the next replacement time. For disposal or recycling information, please contact your local authorities or the Telecommunications Industry Association (www.eiae.org). Disposal of these materials may be turned on the projector. 7 Reset the lamp timer for notification of the used lamp For the customers in the USA Lamp in place. Tighten the 2 screws. When a message...
... lamp cover and tighten the 1 screw. Caution Disposal of the next replacement time. For disposal or recycling information, please contact your local authorities or the Telecommunications Industry Association (www.eiae.org). Disposal of these materials may be turned on the projector. 7 Reset the lamp timer for notification of the used lamp For the customers in the USA Lamp in place. Tighten the 2 screws. When a message...
User Manual (VPLSW536&526 operation)
Page 68
... Control Panel Keys 6 Control Window 32 D Digital Zoom 6 E ECO MODE (Energy-saving mode) ......... 7 F fH 31 Focus 16 Focus ring 4 Freeze 7 fV 31 G Gamma Mode 21 H H (Horizontal 23 High Altitude Mode 30 Hue 21 I Image Flip 30 Information menu 31 Input 5 Installation menu 30 Interactive Function 36 Interactive Pen detector 4 Interactive Pen Device 8 K Keystone 6, 18 L Lamp cover 4 Lamp Timer 31 Lamp Timer Reset 26 LAMP/COVER indicator 4, 48 LAN connector 5 Language 27 Link to Image Flip 30 Location and function of controls 4 M Main unit 4 Messages list 49 Model...
... Control Panel Keys 6 Control Window 32 D Digital Zoom 6 E ECO MODE (Energy-saving mode) ......... 7 F fH 31 Focus 16 Focus ring 4 Freeze 7 fV 31 G Gamma Mode 21 H H (Horizontal 23 High Altitude Mode 30 Hue 21 I Image Flip 30 Information menu 31 Input 5 Installation menu 30 Interactive Function 36 Interactive Pen detector 4 Interactive Pen Device 8 K Keystone 6, 18 L Lamp cover 4 Lamp Timer 31 Lamp Timer Reset 26 LAMP/COVER indicator 4, 48 LAN connector 5 Language 27 Link to Image Flip 30 Location and function of controls 4 M Main unit 4 Messages list 49 Model...


