
Operating Instructions
Page 14
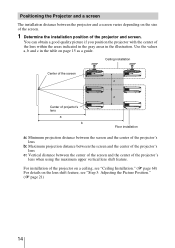
... b and c in the illustration. You can obtain a good quality picture if you position the projector with the center of the lens within the areas indicated in the gray areas in the table on the lens shift feature, see "Ceiling Installation." (1 page 68) For details on page 15 as a guide. Positioning ...the Projector and a screen The installation distance between the center of the screen and the center of the...
... b and c in the illustration. You can obtain a good quality picture if you position the projector with the center of the lens within the areas indicated in the gray areas in the table on the lens shift feature, see "Ceiling Installation." (1 page 68) For details on page 15 as a guide. Positioning ...the Projector and a screen The installation distance between the center of the screen and the center of the...
Operating Instructions
Page 30
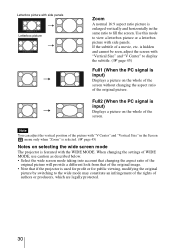
... account that changing the aspect ratio of the original picture will provide a different look from that of the original image. • Note that if the projector is input) Displays a picture on the whole of authors or producers, which are legally protected. 30 Letterbox picture with side panels Letterbox picture Zoom A normal... picture is enlarged vertically and horizontally in the Screen menu only when "Zoom" is selected. (1 page 45) Notes on selecting the wide screen mode The projector is featured with the WIDE MODE. Note You can adjust the vertical position of a movie, etc.
... account that changing the aspect ratio of the original picture will provide a different look from that of the original image. • Note that if the projector is input) Displays a picture on the whole of authors or producers, which are legally protected. 30 Letterbox picture with side panels Letterbox picture Zoom A normal... picture is enlarged vertically and horizontally in the Screen menu only when "Zoom" is selected. (1 page 45) Notes on selecting the wide screen mode The projector is featured with the WIDE MODE. Note You can adjust the vertical position of a movie, etc.

Operating Instructions
Page 34
... 2 described below to specify the target color. 1 Reference palette 1 Press M/m to your taste. Adjusting the Picture Using Real Color Processing The Real Color Processing (RCP) feature allows you to adjust the color and hue of each target of the video source when you are adjusting the picture using Real Color Processing...
... 2 described below to specify the target color. 1 Reference palette 1 Press M/m to your taste. Adjusting the Picture Using Real Color Processing The Real Color Processing (RCP) feature allows you to adjust the color and hue of each target of the video source when you are adjusting the picture using Real Color Processing...

Operating Instructions
Page 42
Film: Normally, select this feature. Gamma Correction Adjusts the response characteristics of the tone of the picture. DDE (Dynamic Detail Enhancer) According to the film source you to adjust, set, ...
Film: Normally, select this feature. Gamma Correction Adjusts the response characteristics of the tone of the picture. DDE (Dynamic Detail Enhancer) According to the film source you to adjust, set, ...

Operating Instructions
Page 43
... Picture is used for adjusting the picture more natural color tones in a wider range of color reproduction, compared to Hi-Vision color. Off: Cancels this feature. RCP (Real Color Processing) Color Space You can adjust the picture using Real Color Processing and store the settings. User1, User2, User3: You can adjust...
... Picture is used for adjusting the picture more natural color tones in a wider range of color reproduction, compared to Hi-Vision color. Off: Cancels this feature. RCP (Real Color Processing) Color Space You can adjust the picture using Real Color Processing and store the settings. User1, User2, User3: You can adjust...

Operating Instructions
Page 49
... screen horizontally and/or vertically. When the bottom of the picture may change from the original or picture distortion may occur with the lens shift feature, the aspect ratio of the trapezoid is longer than the top ( ): Sets a lower value (- Flips the picture on the front and rear of... the projector. Avoids any operation of the lens such as "Lens Focus," "Lens Zoom," and "Lens Shift," by mistake. Rear: Activates the rear detector only. 49 ...
... screen horizontally and/or vertically. When the bottom of the picture may change from the original or picture distortion may occur with the lens shift feature, the aspect ratio of the trapezoid is longer than the top ( ): Sets a lower value (- Flips the picture on the front and rear of... the projector. Avoids any operation of the lens such as "Lens Focus," "Lens Zoom," and "Lens Shift," by mistake. Rear: Activates the rear detector only. 49 ...

Operating Instructions
Page 50
Adjust the desired Blanking value with M / m buttons. Note When both the "Blanking" and the "V Keystone" are adjusted at the same time, the "Blanking" cannot be adjusted correctly. When using the "Blanking", make sure that you to "0". 50 Select each screen edge "Left / Right / Top / Bottom" on the Blanking adjustment screen with < / , button. Blanking This feature allows you set the "V Keystone" to adjust the displayable region within the four directions of the screen.
Adjust the desired Blanking value with M / m buttons. Note When both the "Blanking" and the "V Keystone" are adjusted at the same time, the "Blanking" cannot be adjusted correctly. When using the "Blanking", make sure that you to "0". 50 Select each screen edge "Left / Right / Top / Bottom" on the Blanking adjustment screen with < / , button. Blanking This feature allows you set the "V Keystone" to adjust the displayable region within the four directions of the screen.

Operating Instructions
Page 74
4 After you use the horizontal and vertical lens shift features at the locations of the four screws around the border of its original position. 74 Note When you have decided the lens position, insert the Philips screwdriver at the same time and adjust the horizontal lens shift to the maximum, the picture moves up to a maximum of 53% of the lens in turn and tighten them to fix the lens in place. 5 Attach the ring (washer) by turning it clockwise.
4 After you use the horizontal and vertical lens shift features at the locations of the four screws around the border of its original position. 74 Note When you have decided the lens position, insert the Philips screwdriver at the same time and adjust the horizontal lens shift to the maximum, the picture moves up to a maximum of 53% of the lens in turn and tighten them to fix the lens in place. 5 Attach the ring (washer) by turning it clockwise.