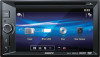

Operating Instructions
Page 2
.... Sony does not bear any changes or modifications not expressly approved in these sorts of the following measures: Reorient or relocate the receiving antenna. Increase the separation between the equipment and receiver. Connect the equipment into an outlet on the unit until the display disappears. POUR LES CONSOMMATEURS AUX ÉTATSUNIS. Refer servicing to the supplied "Installation/Connections" guide...
.... Sony does not bear any changes or modifications not expressly approved in these sorts of the following measures: Reorient or relocate the receiving antenna. Increase the separation between the equipment and receiver. Connect the equipment into an outlet on the unit until the display disappears. POUR LES CONSOMMATEURS AUX ÉTATSUNIS. Refer servicing to the supplied "Installation/Connections" guide...
Operating Instructions
Page 3
... 6 Listening to the Radio Listening to the Radio 7 Storing and Receiving Stations 7 Using Radio Data System (RDS 8 Playback Playing a Disc 9 Playing an iPod/USB Device 10 Searching and Playing Tracks 10 Available Options 11 Picture EQ 11 Aspect 11 DVD Audio Level 11 Settings General Settings 12 Touch Panel Adjust 12 Sound Settings 13 Sound Adjust 13 Screen Settings 13 Visual Settings 14 Additional Information Auxiliary Audio/Video Equipment 15 Rear View Camera 15 Precautions 15 Maintenance 18 Specifications 19 Troubleshooting 20 Language Code List...
... 6 Listening to the Radio Listening to the Radio 7 Storing and Receiving Stations 7 Using Radio Data System (RDS 8 Playback Playing a Disc 9 Playing an iPod/USB Device 10 Searching and Playing Tracks 10 Available Options 11 Picture EQ 11 Aspect 11 DVD Audio Level 11 Settings General Settings 12 Touch Panel Adjust 12 Sound Settings 13 Sound Adjust 13 Screen Settings 13 Visual Settings 14 Additional Information Auxiliary Audio/Video Equipment 15 Rear View Camera 15 Precautions 15 Maintenance 18 Specifications 19 Troubleshooting 20 Language Code List...

Operating Instructions
Page 4
... there is set on the display to exit the source. Touch anywhere on the display menu. Change the source. Volume control dial Rotate to Parts and Controls Main unit SOURCE Turn on the current display. -OFF Press and hold to connect a USB device. AUX terminal Reset button Display/touch panel 4GB The monitor off the unit. Guide to adjust the volume. HOME Open the HOME menu. Each press displays a selectable source in a popup on the power. To...
... there is set on the display to exit the source. Touch anywhere on the display menu. Change the source. Volume control dial Rotate to Parts and Controls Main unit SOURCE Turn on the current display. -OFF Press and hold to connect a USB device. AUX terminal Reset button Display/touch panel 4GB The monitor off the unit. Guide to adjust the volume. HOME Open the HOME menu. Each press displays a selectable source in a popup on the power. To...
Operating Instructions
Page 5
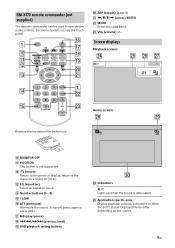
... the sound. Screen displays Playback screen: Remove the insulation film before use the touch panel. ZAP (zappin) (page 8 cursor)/ENTER MODE Select the radio band. VOL (volume) +/- To cancel, press again or press VOL +. (play/pause previous/next) DVD playback setting buttons Indications Lights up when the sound is not supported. (return) Return to the previous display/return to operate the audio controls. Home screen: MONITOR...
... the sound. Screen displays Playback screen: Remove the insulation film before use the touch panel. ZAP (zappin) (page 8 cursor)/ENTER MODE Select the radio band. VOL (volume) +/- To cancel, press again or press VOL +. (play/pause previous/next) DVD playback setting buttons Indications Lights up when the sound is not supported. (return) Return to the previous display/return to operate the audio controls. Home screen: MONITOR...

Operating Instructions
Page 6
... playback screen. (option) Open the HOME option menu. Common area Accesses the Sound Adjust settings menu directly (page 13). (option) Open the option menu. Getting Started Resetting the Unit Before operating the unit for the first time, or after replacing the car battery or changing connections, you must reset the unit. 1 Press the reset button on the source. Clock (page 6) When the source selects [AUX Front], [AUX Rear] or [Rear...
... playback screen. (option) Open the HOME option menu. Common area Accesses the Sound Adjust settings menu directly (page 13). (option) Open the option menu. Getting Started Resetting the Unit Before operating the unit for the first time, or after replacing the car battery or changing connections, you must reset the unit. 1 Press the reset button on the source. Clock (page 6) When the source selects [AUX Front], [AUX Rear] or [Rear...

Operating Instructions
Page 8
... listening to preset stations for a designated program type. CT (Clock Time) The CT data from preset stations (Tuner Preset ZAPPIN) Tuner Preset ZAPPIN helps you to find a desired station by listening to radio, touch [ZAP]. Tuner Preset ZAPPIN starts, and subsequent stations are received in countries/regions where no PTY data is received. The unit searches for a station broadcasting the selected program type. To close the PTY list, touch . 8GB Using Radio Data System (RDS) Display...
... listening to preset stations for a designated program type. CT (Clock Time) The CT data from preset stations (Tuner Preset ZAPPIN) Tuner Preset ZAPPIN helps you to find a desired station by listening to radio, touch [ZAP]. Tuner Preset ZAPPIN starts, and subsequent stations are received in countries/regions where no PTY data is received. The unit searches for a station broadcasting the selected program type. To close the PTY list, touch . 8GB Using Radio Data System (RDS) Display...
Operating Instructions
Page 9
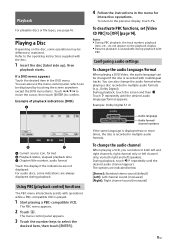
... audio formats (e.g., Dolby Digital). Refer to both left and right channels, right channel only or left channel only, via both right and left speakers. For audio discs, some operations may be displayed by touching the screen anywhere except the DVD menu items. Touch to move the cursor, then touch [ENTER] to select the desired item, then touch [ENTER]. 4 Follow the instructions in the DVD menu. Configuring audio settings To change...
... audio formats (e.g., Dolby Digital). Refer to both left and right channels, right channel only or left channel only, via both right and left speakers. For audio discs, some operations may be displayed by touching the screen anywhere except the DVD menu items. Touch to move the cursor, then touch [ENTER] to select the desired item, then touch [ENTER]. 4 Follow the instructions in the DVD menu. Configuring audio settings To change...
Operating Instructions
Page 10
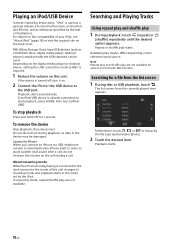
...) or (shuffle) repeatedly until the desired option appears. Playing an iPod/USB Device In these Operating Instructions, "iPod" is used . For details on the compatibility of this unit. Playback starts automatically. Do not disconnect during a call , do not increase the volume on the digital media player or Android phone, setting the USB connection mode to resuming mode and playback starts in the device may be...
...) or (shuffle) repeatedly until the desired option appears. Playing an iPod/USB Device In these Operating Instructions, "iPod" is used . For details on the compatibility of this unit. Playback starts automatically. Do not disconnect during a call , do not increase the volume on the digital media player or Android phone, setting the USB connection mode to resuming mode and playback starts in the device may be...

Operating Instructions
Page 11
Available Options Various settings are available in Dolby Digital format, to balance the volume level between -10 and +10 for a DVD recorded in each source by touching . Picture EQ Adjusts the picture to suit the interior brightness of the top and bottom cut off to [Video] or [Auto].) Option Purpose Dynamic (), To select the picture quality. Standard, Theater, Sepia Aspect This setting is available only when the...
Available Options Various settings are available in Dolby Digital format, to balance the volume level between -10 and +10 for a DVD recorded in each source by touching . Picture EQ Adjusts the picture to suit the interior brightness of the top and bottom cut off to [Video] or [Auto].) Option Purpose Dynamic (), To select the picture quality. Standard, Theater, Sepia Aspect This setting is available only when the...
Operating Instructions
Page 12
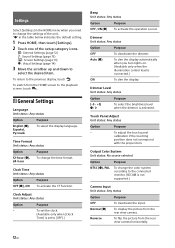
...: No source selected Option NTSC (), PAL Purpose To change the time format. Settings Select [Settings] in the table below indicates the default setting. 1 Press HOME, then touch [Settings]. 2 Touch one of the unit. Dimmer Unit status: Any status Option OFF Auto () Purpose To deactivate the dimmer. Reverse To flip the picture from the rear view camera. Purpose To adjust the touch panel calibration if...
...: No source selected Option NTSC (), PAL Purpose To change the time format. Settings Select [Settings] in the table below indicates the default setting. 1 Press HOME, then touch [Settings]. 2 Touch one of the unit. Dimmer Unit status: Any status Option OFF Auto () Purpose To deactivate the dimmer. Reverse To flip the picture from the rear view camera. Purpose To adjust the touch panel calibration if...

Operating Instructions
Page 13
... To display the instruction and control panel. R 15) between the rear speakers and subwoofer. Note This function may not be assigned to [User]. Unit status: Any status Option Purpose Rear To output audio signals to the subwoofer. customize the equalizer curve. Press and hold the respective button on the steering wheel. Rear 15) : 0 To adjust the sound balance between front and rear speakers. HPF: 80 Hz, To select the cut-off frequency of...
... To display the instruction and control panel. R 15) between the rear speakers and subwoofer. Note This function may not be assigned to [User]. Unit status: Any status Option Purpose Rear To output audio signals to the subwoofer. customize the equalizer curve. Press and hold the respective button on the steering wheel. Rear 15) : 0 To adjust the sound balance between front and rear speakers. HPF: 80 Hz, To select the cut-off frequency of...

Operating Instructions
Page 14
... the disc's menu. Letterbox To display a wide picture with bands on the disc, [Letterbox] may be selected automatically instead of the screen. Video CD PBC Unit status: No source selected Option OFF, ON () Purpose To play a VCD with a wide mode function. Unit status: No source selected Option 16:9 () Purpose To display a wide picture. Suitable when connecting to a 4:3 screen monitor. Visual Settings DVD Menu Language Unit status: No source selected Option Purpose...
... the disc's menu. Letterbox To display a wide picture with bands on the disc, [Letterbox] may be selected automatically instead of the screen. Video CD PBC Unit status: No source selected Option OFF, ON () Purpose To play a VCD with a wide mode function. Unit status: No source selected Option 16:9 () Purpose To display a wide picture. Suitable when connecting to a 4:3 screen monitor. Visual Settings DVD Menu Language Unit status: No source selected Option Purpose...
Operating Instructions
Page 15
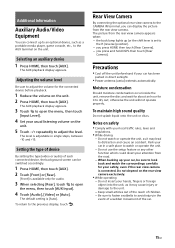
...; Do not insert your car in direct sunlight. Power antenna (aerial) extends automatically. Rear View Camera By connecting the optional rear view camera to the previous display, touch . The picture from the rear view camera. Additional Information Auxiliary Audio/Video Equipment You can connect up (or the shift lever is connected. The level is [Auto]. To maintain high sound quality Do not splash liquid onto...
...; Do not insert your car in direct sunlight. Power antenna (aerial) extends automatically. Rear View Camera By connecting the optional rear view camera to the previous display, touch . The picture from the rear view camera. Additional Information Auxiliary Audio/Video Equipment You can connect up (or the shift lever is connected. The level is [Auto]. To maintain high sound quality Do not splash liquid onto...
Operating Instructions
Page 16
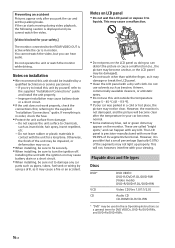
... not use this unit should be damaged). Do not touch other than 99.99% of the segments may damage or break the LCD panel. Clean the LCD panel with your safety.] The monitor connected to the supplied "Installation/Connections" guide. Playable discs and file types Discs DVD* VCD CD DVD VIDEO DVD-R/DVD-R DL/DVD-RW (Video mode) DVD+R/DVD+R DL/DVD+RW Video CD (Ver. 1.0/1.1/2.0) Audio CD CD...
... not use this unit should be damaged). Do not touch other than 99.99% of the segments may damage or break the LCD panel. Clean the LCD panel with your safety.] The monitor connected to the supplied "Installation/Connections" guide. Playable discs and file types Discs DVD* VCD CD DVD VIDEO DVD-R/DVD-R DL/DVD-RW (Video mode) DVD+R/DVD+R DL/DVD+RW Video CD (Ver. 1.0/1.1/2.0) Audio CD CD...

Operating Instructions
Page 17
... DVDs (depending on discs Do not expose discs to the manual supplied with a cleaning cloth from the center out. Audio MP3 file, WMA file Video Xvid file Photo jpeg file (.jpg) Notes on the equipment used for its recording, or the disc condition) may not be played without finalization. For details, refer to direct sunlight or heat sources...
... DVDs (depending on discs Do not expose discs to the manual supplied with a cleaning cloth from the center out. Audio MP3 file, WMA file Video Xvid file Photo jpeg file (.jpg) Notes on the equipment used for its recording, or the disc condition) may not be played without finalization. For details, refer to direct sunlight or heat sources...
Operating Instructions
Page 18
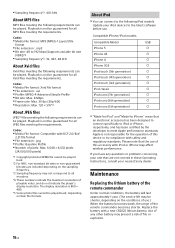
... standards. Compatible Model USB iPhone 5 iPhone 4S iPhone 4 iPhone 3GS iPod touch (5th generation) iPod touch (4th generation) iPod touch (3rd generation) iPod classic iPod nano (7th generation) iPod nano (6th generation) iPod nano (5th generation) "Made for iPod" and "Made for iPhone" mean that the use . Maintenance Replacing the lithium...
... standards. Compatible Model USB iPhone 5 iPhone 4S iPhone 4 iPhone 3GS iPod touch (5th generation) iPod touch (4th generation) iPod touch (3rd generation) iPod classic iPod nano (7th generation) iPod nano (6th generation) iPod nano (5th generation) "Made for iPod" and "Made for iPhone" mean that the use . Maintenance Replacing the lithium...
Operating Instructions
Page 19
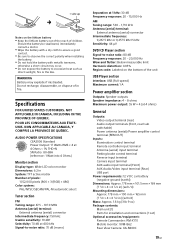
...connector Intermediate frequency: 150 kHz Usable sensitivity: 10 dBf Selectivity: 70 dB at 400 kHz Signal-to-noise ratio: 70 dB (mono) Separation at 4 ohms) General Outputs: Video output terminal (rear) Audio output terminals (front, rear/sub switchable) Power antenna (aerial)/Power amplifier control terminal (REM OUT) Inputs: Illumination control terminal Remote controller input terminal Antenna (aerial) input terminal Parking brake control terminal Reverse input terminal Camera input terminal AUX audio input terminal (Front) AUX Audio/Video input terminal (Rear) USB port Power requirements...
...connector Intermediate frequency: 150 kHz Usable sensitivity: 10 dBf Selectivity: 70 dB at 400 kHz Signal-to-noise ratio: 70 dB (mono) Separation at 4 ohms) General Outputs: Video output terminal (rear) Audio output terminals (front, rear/sub switchable) Power antenna (aerial)/Power amplifier control terminal (REM OUT) Inputs: Illumination control terminal Remote controller input terminal Antenna (aerial) input terminal Parking brake control terminal Reverse input terminal Camera input terminal AUX audio input terminal (Front) AUX Audio/Video input terminal (Rear) USB port Power requirements...
Operating Instructions
Page 20
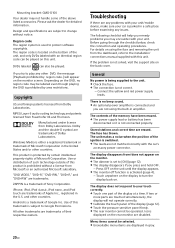
... the installation/ connections manual supplied with this unit. All other DVD, the message [Playback prohibited by area restrictions. Troubleshooting If there are not using the fuse and removing the unit from Dolby Laboratories. The unit makes a noise when the position of the ignition is either a registered trademark or trademark of Sony Corporation. Menu items cannot be played. Design and specifications are displayed in...
... the installation/ connections manual supplied with this unit. All other DVD, the message [Playback prohibited by area restrictions. Troubleshooting If there are not using the fuse and removing the unit from Dolby Laboratories. The unit makes a noise when the position of the ignition is either a registered trademark or trademark of Sony Corporation. Menu items cannot be played. Design and specifications are displayed in...
Operating Instructions
Page 21
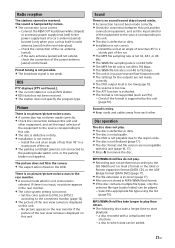
... using the list (page 10). Preset tuning is not possible. The broadcast signal is not an RDS station. RDS data has not been received. The station does not specify the program type. If there is no input, no picture/picture noise occurs. A connection has not been made correctly. The DVD output level is too low (page 11). The volume is too low...
... using the list (page 10). Preset tuning is not possible. The broadcast signal is not an RDS station. RDS data has not been received. The station does not specify the program type. If there is no input, no picture/picture noise occurs. A connection has not been made correctly. The DVD output level is too low (page 11). The volume is too low...
Operating Instructions
Page 22
... Disc Error The unit cannot read the data due to remove the disc. The sound in DTS format are not playable on this unit without USB hub. The soundtrack/subtitle language or angle cannot be changed. Use the DVD menu instead of the direct selection button on the remote commander (page 9). Multilingual tracks, multilingual subtitles, or multi-angles are not supported...
... Disc Error The unit cannot read the data due to remove the disc. The sound in DTS format are not playable on this unit without USB hub. The soundtrack/subtitle language or angle cannot be changed. Use the DVD menu instead of the direct selection button on the remote commander (page 9). Multilingual tracks, multilingual subtitles, or multi-angles are not supported...


