
Operating Instructions
Page 1
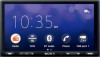
...;n, consulte la página 12. XAV-AX5500 Serial No. For the connection/installation, see page 7. Model No. Record the serial number in the space provided below. To cancel the demonstration (Demo) display, see page 11. AV RECEIVER 5-010-462-11(1) Operating Instructions GB Mode d'emploi FR Manual de instrucciones ES Owner's Record The model and serial numbers are located on the bottom of the unit...
...;n, consulte la página 12. XAV-AX5500 Serial No. For the connection/installation, see page 7. Model No. Record the serial number in the space provided below. To cancel the demonstration (Demo) display, see page 11. AV RECEIVER 5-010-462-11(1) Operating Instructions GB Mode d'emploi FR Manual de instrucciones ES Owner's Record The model and serial numbers are located on the bottom of the unit...
Operating Instructions
Page 2
... unit becomes hot during use. This device complies with the limits for help. If this product: Visit: https://www.sony.com/electronics/support Contact: Sony Customer Information Service Center at 1-800-222-7669 Write: Sony Customer Information Service Center 12451 Gateway Blvd., Fort Myers, FL 33913 Supplier's Declaration of Conformity Trade Name: SONY Model: XAV-AX5500 Responsible Party: Sony Electronics Inc. Connect the equipment into an...
... unit becomes hot during use. This device complies with the limits for help. If this product: Visit: https://www.sony.com/electronics/support Contact: Sony Customer Information Service Center at 1-800-222-7669 Write: Sony Customer Information Service Center 12451 Gateway Blvd., Fort Myers, FL 33913 Supplier's Declaration of Conformity Trade Name: SONY Model: XAV-AX5500 Responsible Party: Sony Electronics Inc. Connect the equipment into an...
Operating Instructions
Page 3
... lithium battery Do not expose the battery to the handsfree operate using radio signals, cellular, and landline networks as well as medical emergencies). Warning if your vehicle. Sony does not bear any questions or problems concerning your unit that are not covered in this manual, consult your nearest Sony dealer. 3GB Important notice Caution IN NO EVENT SHALL...
... lithium battery Do not expose the battery to the handsfree operate using radio signals, cellular, and landline networks as well as medical emergencies). Warning if your vehicle. Sony does not bear any questions or problems concerning your unit that are not covered in this manual, consult your nearest Sony dealer. 3GB Important notice Caution IN NO EVENT SHALL...
Operating Instructions
Page 5
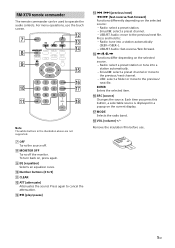
Radio: select a preset station. - SiriusXM: select a preset channel. - Press and hold to operate the audio controls. USB: select a folder or move to the previous/next file. ENTER Enters the selected item. SRC (source) Changes the source. For menu operations, use . 5GB To turn back on the selected source. - USB/BT Audio: move to 9) CLEAR ATT (attenuate) Attenuates the sound. Functions differ depending on , press again. EQ (equalizer) Selects an equalizer curve. Number buttons (0 to the...
Radio: select a preset station. - SiriusXM: select a preset channel. - Press and hold to operate the audio controls. USB: select a folder or move to the previous/next file. ENTER Enters the selected item. SRC (source) Changes the source. For menu operations, use . 5GB To turn back on the selected source. - USB/BT Audio: move to 9) CLEAR ATT (attenuate) Attenuates the sound. Functions differ depending on , press again. EQ (equalizer) Selects an equalizer curve. Number buttons (0 to the...

Operating Instructions
Page 7
... the setup menu, touch twice. (back) Updating the Firmware To update the firmware, visit the support site on the back cover, then follow the online instructions. Note During the update, do not remove the USB device. 7GB For details, see "Connection/Installation" (page 11). To display the picture from the rear view camera. Sound select keys Changes the sound. (standby) Turns the unit in standby mode (USB charging is in pairing standby mode...
... the setup menu, touch twice. (back) Updating the Firmware To update the firmware, visit the support site on the back cover, then follow the online instructions. Note During the update, do not remove the USB device. 7GB For details, see "Connection/Installation" (page 11). To display the picture from the rear view camera. Sound select keys Changes the sound. (standby) Turns the unit in standby mode (USB charging is in pairing standby mode...
Operating Instructions
Page 8
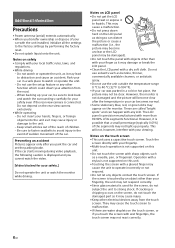
...car. If the car starts moving during video playback, the following caution is displayed and you cannot watch the video. [Video blocked for the screen, do not touch the damaged part as doing so can happen with any...use solvents such as it to distraction and cause an accident. The LCD panel is touched by performing the factory reset. • Do not splash liquid onto the unit. Notes on the rear view camera exclusively. • While operating - Touch the screen directly with your fingertip. • Multi-touch operation is connected. Park your viewing. Preventing an accident Pictures...
...car. If the car starts moving during video playback, the following caution is displayed and you cannot watch the video. [Video blocked for the screen, do not touch the damaged part as doing so can happen with any...use solvents such as it to distraction and cause an accident. The LCD panel is touched by performing the factory reset. • Do not splash liquid onto the unit. Notes on the rear view camera exclusively. • While operating - Touch the screen directly with your fingertip. • Multi-touch operation is connected. Park your viewing. Preventing an accident Pictures...

Operating Instructions
Page 9
... unit. Specifications FOR THE CUSTOMERS IN THE USA. The source code for the above-listed software is not responsible for the operation of the GPL or LGPL displayed on the lithium battery Keep the lithium battery out of the reach of explosion if battery is subject to the following URL then select the model name "XAV-AX5500." Maintenance Replacing the...
... unit. Specifications FOR THE CUSTOMERS IN THE USA. The source code for the above-listed software is not responsible for the operation of the GPL or LGPL displayed on the lithium battery Keep the lithium battery out of the reach of explosion if battery is subject to the following URL then select the model name "XAV-AX5500." Maintenance Replacing the...

Operating Instructions
Page 10
and any use of such marks by Sony Corporation is a registered trademark of Microsoft Corporation. WebLink is under license. in ) (w/h/d) Mass: Approx. 1.0 kg (2 lb 4 oz) 10GB Package contents: Main unit (1) Parts for installation and connections (1 set) Remote Commander (1): RM-X170 Optional accessories/equipment: SiriusXM Connect Vehicle Tuner: SXV100, SXV200, SXV300 Ask the dealer for detailed information. Design and specifications are registered...
and any use of such marks by Sony Corporation is a registered trademark of Microsoft Corporation. WebLink is under license. in ) (w/h/d) Mass: Approx. 1.0 kg (2 lb 4 oz) 10GB Package contents: Main unit (1) Parts for installation and connections (1 set) Remote Commander (1): RM-X170 Optional accessories/equipment: SiriusXM Connect Vehicle Tuner: SXV100, SXV200, SXV300 Ask the dealer for detailed information. Design and specifications are registered...
Operating Instructions
Page 13
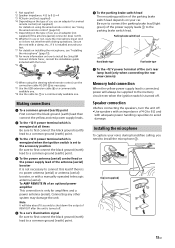
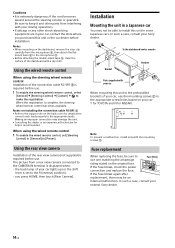
... lead (only when connecting the rear view camera) Memory hold connection When the yellow power supply lead is connected, power will take about 10 seconds to shut down the output of REM OUT after the unit is turned off . *1 Not supplied *2 Speaker impedance: 4 Ω to install the SiriusXM Connect Vehicle Tuner, consult the installation guide included with the tuner. *9 *10 When using the wired remote control, see "Using the wired remote control" (page 14...
... lead (only when connecting the rear view camera) Memory hold connection When the yellow power supply lead is connected, power will take about 10 seconds to shut down the output of REM OUT after the unit is turned off . *1 Not supplied *2 Speaker impedance: 4 Ω to install the SiriusXM Connect Vehicle Tuner, consult the installation guide included with the tuner. *9 *10 When using the wired remote control, see "Using the wired remote control" (page 14...
Operating Instructions
Page 14
... other parts from a rear view camera connected to the microphone . • Before attaching the double-sided tape , clean the surface of the connection cable RC-SR1 is required before use . Be sure to Fuse (10 A) use the mounting screws in a Japanese car You may be able to make the registration. Using the wired remote control When using the wired remote control 1 To enable the wired remote control, set to [Preset]. Installation...
... other parts from a rear view camera connected to the microphone . • Before attaching the double-sided tape , clean the surface of the connection cable RC-SR1 is required before use . Be sure to Fuse (10 A) use the mounting screws in a Japanese car You may be able to make the registration. Using the wired remote control When using the wired remote control 1 To enable the wired remote control, set to [Preset]. Installation...

Help Guide
Page 3
... Information Canceling the Demonstration Mode Updating the Firmware Precautions Supported Formats for USB Playback About iPhone Notice on the monitor. Menu items cannot be selected. The USB functions do not work properly. 3 The fuse has blown./The unit makes noise when the position of the ignition is no beep sound. The display disappears from/does not appear on License Maintenance Specifications Copyrights Troubleshooting Troubleshooting General There is switched.
... Information Canceling the Demonstration Mode Updating the Firmware Precautions Supported Formats for USB Playback About iPhone Notice on the monitor. Menu items cannot be selected. The USB functions do not work properly. 3 The fuse has blown./The unit makes noise when the position of the ignition is no beep sound. The display disappears from/does not appear on License Maintenance Specifications Copyrights Troubleshooting Troubleshooting General There is switched.

Help Guide
Page 22
... F. Input [000], then touch [OK]. When your radio detects that you can hear the preview channel, select Channel 0 to find the Radio ID of your radio. Help Guide In-Car Receiver XAV-AX5500/XAV-AX5550D Listening to an hour. Get over 140 channels, including commercial-free music plus the best sports, news, talk, comedy and entertainment. You should be turned on and receiving the SiriusXM signal to Continue]. You will display: [Subscription Updated Press...
... F. Input [000], then touch [OK]. When your radio detects that you can hear the preview channel, select Channel 0 to find the Radio ID of your radio. Help Guide In-Car Receiver XAV-AX5500/XAV-AX5550D Listening to an hour. Get over 140 channels, including commercial-free music plus the best sports, news, talk, comedy and entertainment. You should be turned on and receiving the SiriusXM signal to Continue]. You will display: [Subscription Updated Press...
Help Guide
Page 27
Help Guide In-Car Receiver XAV-AX5500/XAV-AX5550D Using SXM Option Functions The following functions are available by touching (option) on the SiriusXM radio screen. [Channel Direct Select] Tunes the desired channel by inputting its channel number directly. [Parental Control] Sets the parental lock to on or off. [Pass Code Change] Changes the passcode for the Parental Control feature. 5-010-463-11(1) Copyright 2020 Sony Corporation 27
Help Guide In-Car Receiver XAV-AX5500/XAV-AX5550D Using SXM Option Functions The following functions are available by touching (option) on the SiriusXM radio screen. [Channel Direct Select] Tunes the desired channel by inputting its channel number directly. [Parental Control] Sets the parental lock to on or off. [Pass Code Change] Changes the passcode for the Parental Control feature. 5-010-463-11(1) Copyright 2020 Sony Corporation 27

Help Guide
Page 28
... the factory reset, the auto tune starts automatically. Station group name, station name D. (DAB Options) Open the DAB Options menu. Allow the auto tune to [Station Gp].) G. Swipe right/left /right) Search for station groups. (Available only when [Seek By] is selected for stations. Help Guide In-Car Receiver XAV-AX5500/XAV-AX5550D Listening to store the current station in that preset. Touch and hold to the DAB/DAB+ Radio Press HOME...
... the factory reset, the auto tune starts automatically. Station group name, station name D. (DAB Options) Open the DAB Options menu. Allow the auto tune to [Station Gp].) G. Swipe right/left /right) Search for station groups. (Available only when [Seek By] is selected for stations. Help Guide In-Car Receiver XAV-AX5500/XAV-AX5550D Listening to store the current station in that preset. Touch and hold to the DAB/DAB+ Radio Press HOME...
Help Guide
Page 45
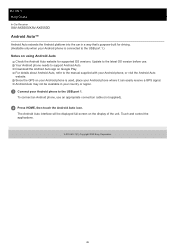
... easily receive a GPS signal. The Android Auto interface will be available in a way that's purpose-built for driving. (Available only when your Android phone is used, place your Android phone, or visit the Android Auto website. Since the GPS on your Android phone is connected to the USB port 1.) Notes on Google Play. Help Guide In-Car Receiver XAV-AX5500/XAV-AX5550D Android Auto™ Android Auto...
... easily receive a GPS signal. The Android Auto interface will be available in a way that's purpose-built for driving. (Available only when your Android phone is used, place your Android phone, or visit the Android Auto website. Since the GPS on your Android phone is connected to the USB port 1.) Notes on Google Play. Help Guide In-Car Receiver XAV-AX5500/XAV-AX5550D Android Auto™ Android Auto...
Help Guide
Page 48
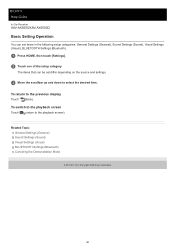
... General Settings (General) Sound Settings (Sound) Visual Settings (Visual) BLUETOOTH Settings (Bluetooth) Canceling the Demonstration Mode 5-010-463-11(1) Copyright 2020 Sony Corporation 48 To switch to the playback screen Touch (return to the previous display Touch (back). To return to the playback screen). Help Guide In-Car Receiver XAV-AX5500/XAV-AX5550D Basic Setting Operation You can be set items in the following setup categories: General Settings (General), Sound Settings (Sound), Visual Settings (Visual), BLUETOOTH Settings (Bluetooth). 1 Press HOME...
... General Settings (General) Sound Settings (Sound) Visual Settings (Visual) BLUETOOTH Settings (Bluetooth) Canceling the Demonstration Mode 5-010-463-11(1) Copyright 2020 Sony Corporation 48 To switch to the playback screen Touch (return to the previous display Touch (back). To return to the playback screen). Help Guide In-Car Receiver XAV-AX5500/XAV-AX5550D Basic Setting Operation You can be set items in the following setup categories: General Settings (General), Sound Settings (Sound), Visual Settings (Visual), BLUETOOTH Settings (Bluetooth). 1 Press HOME...

Help Guide
Page 49
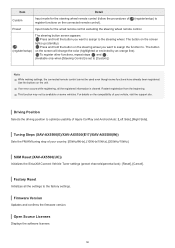
..., be sure to adjust the guide width. (inward) or (outward) Steering Control Selects the input mode for the connected remote control. Date/Time Item Detail Set Date/Time Sets the date and clock time: [Auto(RDS)], [Manual]. (XAV-AX5550D(EUR)): [Auto(DAB)], [Manual]. Rear View Camera Selects the image from the rear view camera: [OFF], [Normal], [Reverse] (mirror image). [Guide Line Adjust] adjusts the guide on the picture from the rear view camera. Touch the...
..., be sure to adjust the guide width. (inward) or (outward) Steering Control Selects the input mode for the connected remote control. Date/Time Item Detail Set Date/Time Sets the date and clock time: [Auto(RDS)], [Manual]. (XAV-AX5550D(EUR)): [Auto(DAB)], [Manual]. Rear View Camera Selects the image from the rear view camera: [OFF], [Normal], [Reverse] (mirror image). [Guide Line Adjust] adjusts the guide on the picture from the rear view camera. Touch the...
Help Guide
Page 50
... want to assign to Preset Input mode for the steering wheel remote control (follow the procedures of register functions on the connected remote control). (register/setup) to the steering wheel. Driving Position Selects the driving position to . Firmware Version Updates and confirms the firmware version. The button on the unit. Use the buttons on the screen lights up (standby). Factory Reset Initializes all the registered information is set to the factory settings. Open Source Licenses Displays the software...
... want to assign to Preset Input mode for the steering wheel remote control (follow the procedures of register functions on the connected remote control). (register/setup) to the steering wheel. Driving Position Selects the driving position to . Firmware Version Updates and confirms the firmware version. The button on the unit. Use the buttons on the screen lights up (standby). Factory Reset Initializes all the registered information is set to the factory settings. Open Source Licenses Displays the software...
Help Guide
Page 57
Help Guide In-Car Receiver XAV-AX5500/XAV-AX5550D Updating the Firmware To update the firmware, visit the support site, then follow the online instructions. Note During the update, do not remove the USB device. Related Topic Customer Support Websites 5-010-463-11(1) Copyright 2020 Sony Corporation 57
Help Guide In-Car Receiver XAV-AX5500/XAV-AX5550D Updating the Firmware To update the firmware, visit the support site, then follow the online instructions. Note During the update, do not remove the USB device. Related Topic Customer Support Websites 5-010-463-11(1) Copyright 2020 Sony Corporation 57
Help Guide
Page 71
... nearest Sony dealer. When you install the "Support by updating the software. Visit our customer support home page. Help Guide In-Car Receiver XAV-AX5500/XAV-AX5550D Troubleshooting Do the following before you can get software update information conveniently. Related Topic Customer Support Websites About the "Support by Sony" App 5-010-463-11(1) Copyright 2020 Sony Corporation 71 If none of the above works, consult your smartphone, you request a repair service.
... nearest Sony dealer. When you install the "Support by updating the software. Visit our customer support home page. Help Guide In-Car Receiver XAV-AX5500/XAV-AX5550D Troubleshooting Do the following before you can get software update information conveniently. Related Topic Customer Support Websites About the "Support by Sony" App 5-010-463-11(1) Copyright 2020 Sony Corporation 71 If none of the above works, consult your smartphone, you request a repair service.


