
Setup Guide (Operating Instructions)
Page 1
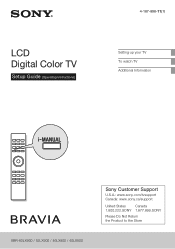
LCD Digital Color TV Setup Guide (Operating Instructions) 4-187-898-11(1) Setting up your TV To watch TV Additional Information XBR-60LX900 / 52LX900 / 46LX900 / 40LX900 Sony Customer Support U.S.A.: www.sony.com/tvsupport Canada: www.sony.ca/support United States Canada 1.800.222.SONY 1.877.899.SONY Please Do Not Return the Product to the Store
LCD Digital Color TV Setup Guide (Operating Instructions) 4-187-898-11(1) Setting up your TV To watch TV Additional Information XBR-60LX900 / 52LX900 / 46LX900 / 40LX900 Sony Customer Support U.S.A.: www.sony.com/tvsupport Canada: www.sony.ca/support United States Canada 1.800.222.SONY 1.877.899.SONY Please Do Not Return the Product to the Store

Setup Guide (Operating Instructions)
Page 2
... the remote control used under a license by this manual are of any damages in connection with the accuracy or availability of the TV. Blu-ray Disc is used in the TV Guide On Screen system. "BRAVIA" and , S-Force, Motionflow, BRAVIA Sync, and are trademarks or registered marks of Sony Corporation. "FACE DETECTION" logo is still under license from Dolby Laboratories. TV Guide, Picture/Sound, Light Sensor, Power...
... the remote control used under a license by this manual are of any damages in connection with the accuracy or availability of the TV. Blu-ray Disc is used in the TV Guide On Screen system. "BRAVIA" and , S-Force, Motionflow, BRAVIA Sync, and are trademarks or registered marks of Sony Corporation. "FACE DETECTION" logo is still under license from Dolby Laboratories. TV Guide, Picture/Sound, Light Sensor, Power...

Setup Guide (Operating Instructions)
Page 3
... To use i-Manual...17 To use 3D Glasses ...18 Additional Information Troubleshooting ...20 Specifications ...22 • Operating instructions are built into the remote control 4 Setting up your TV. 2 Source To experience the stunning detail of your BRAVIA TV, you have made the best selection in a resolution of 1,920 dots × 1,080 lines. 3 Your new BRAVIA® TV opens the door to remove all video input signals in LCD TV technology...
... To use i-Manual...17 To use 3D Glasses ...18 Additional Information Troubleshooting ...20 Specifications ...22 • Operating instructions are built into the remote control 4 Setting up your TV. 2 Source To experience the stunning detail of your BRAVIA TV, you have made the best selection in a resolution of 1,920 dots × 1,080 lines. 3 Your new BRAVIA® TV opens the door to remove all video input signals in LCD TV technology...
Setup Guide (Operating Instructions)
Page 4
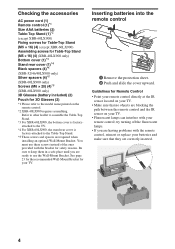
.... 4 You must use the Wall-Mount Bracket. Inserting batteries into the remote control 1 Remove the protection sheet. 2 Push and slide the cover upward. Guidelines for safety reasons. Checking the accessories AC power cord (1) Remote control (1)*1 Size AAA batteries (2) Table-Top Stand (1)*2 (except XBR-60LX900) Fixing screws for Table-Top Stand (M5 × 16) (4) (except XBR-60LX900) Assembling screws for Table-Top Stand (M5 × 16) (4) (XBR-40LX900 only) Bottom cover (1)*3 Stand rear cover (1)*4 Black spacers...
.... 4 You must use the Wall-Mount Bracket. Inserting batteries into the remote control 1 Remove the protection sheet. 2 Push and slide the cover upward. Guidelines for safety reasons. Checking the accessories AC power cord (1) Remote control (1)*1 Size AAA batteries (2) Table-Top Stand (1)*2 (except XBR-60LX900) Fixing screws for Table-Top Stand (M5 × 16) (4) (except XBR-60LX900) Assembling screws for Table-Top Stand (M5 × 16) (4) (XBR-40LX900 only) Bottom cover (1)*3 Stand rear cover (1)*4 Black spacers...
Setup Guide (Operating Instructions)
Page 5
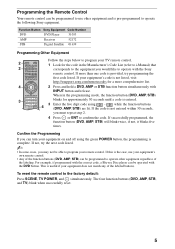
... the five digit code using the green POWER button, the programming is not entered within 30 seconds, you may not be able to program your equipment does not match any of the labeled buttons. To reset the remote control to the factory default: Press SCENE, TV POWER, and simultaneously. The four function buttons (DVD, AMP, STB, and TV) blink when successfully reset. 5 When in the Manufacturer's Code List (refer to i-Manual) that...
... the five digit code using the green POWER button, the programming is not entered within 30 seconds, you may not be able to program your equipment does not match any of the labeled buttons. To reset the remote control to the factory default: Press SCENE, TV POWER, and simultaneously. The four function buttons (DVD, AMP, STB, and TV) blink when successfully reset. 5 When in the Manufacturer's Code List (refer to i-Manual) that...

Setup Guide (Operating Instructions)
Page 6
... the LCD panel or the frame around the screen. • Be careful to not pinch your hands or the AC power cord when you will need to complete the task. You will need a Phillips screwdriver and the supplied screws to attach the TableTop Stand. This may cause moisture condensation. IR Sensor 2 Use the supplied screws to attach the TV unit to the Table-Top Stand. 3D...
... the LCD panel or the frame around the screen. • Be careful to not pinch your hands or the AC power cord when you will need to complete the task. You will need a Phillips screwdriver and the supplied screws to attach the TableTop Stand. This may cause moisture condensation. IR Sensor 2 Use the supplied screws to attach the TV unit to the Table-Top Stand. 3D...
Setup Guide (Operating Instructions)
Page 7
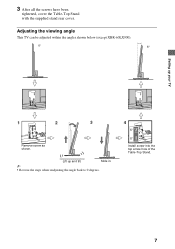
Lift up your TV 1 2 3 4 Remove screw as shown. Adjusting the viewing angle This TV can be adjusted within the angles shown below (except XBR-60LX900). 0° 6° Setting up and tilt. Install screw into the top screw hole of the Table-Top Stand. 7 3 After all the screws have been tightened, cover the Table-Top Stand with the supplied stand rear cover. Slide in. ~ • Reverse the steps when readjusting the angle back to 0 degrees.
Lift up your TV 1 2 3 4 Remove screw as shown. Adjusting the viewing angle This TV can be adjusted within the angles shown below (except XBR-60LX900). 0° 6° Setting up and tilt. Install screw into the top screw hole of the Table-Top Stand. 7 3 After all the screws have been tightened, cover the Table-Top Stand with the supplied stand rear cover. Slide in. ~ • Reverse the steps when readjusting the angle back to 0 degrees.
Setup Guide (Operating Instructions)
Page 11
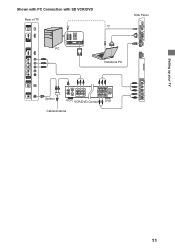
Setting up your TV Shown with PC Connection with SD VCR/DVD Rear of TV or Side Panel PC Notebook PC Splitter VCR VCR/DVD Combo DVD Cable/Antenna 11
Setting up your TV Shown with PC Connection with SD VCR/DVD Rear of TV or Side Panel PC Notebook PC Splitter VCR VCR/DVD Combo DVD Cable/Antenna 11

Setup Guide (Operating Instructions)
Page 12
... that there is with an optional Sony Support Belt Kit. M4 × 16 machine screw (not supplied) Screw hole on : - Preventing the TV from toppling over . • Route all AC power cords and connecting cables so that can adequately support the weight of the angle brace to the wall stud. • Attach the other side to the Stand. slippery, unstable and/or uneven...
... that there is with an optional Sony Support Belt Kit. M4 × 16 machine screw (not supplied) Screw hole on : - Preventing the TV from toppling over . • Route all AC power cords and connecting cables so that can adequately support the weight of the angle brace to the wall stud. • Attach the other side to the Stand. slippery, unstable and/or uneven...
Setup Guide (Operating Instructions)
Page 13
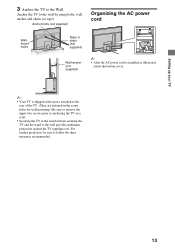
... the wall by using bolts, wall anchor and chain (or rope). Anchor bolts (not supplied) Organizing the AC power cord Wallmount holes Rope or chain (not supplied) Wall-anchor (not supplied) ~ • After the AC power cord is installed as illustrated, attach the bottom cover. ~ • Your TV is shipped with screws attached to the rear of the TV. (They are fastened in the screw holes for wall mounting...
... the wall by using bolts, wall anchor and chain (or rope). Anchor bolts (not supplied) Organizing the AC power cord Wallmount holes Rope or chain (not supplied) Wall-anchor (not supplied) ~ • After the AC power cord is installed as illustrated, attach the bottom cover. ~ • Your TV is shipped with screws attached to the rear of the TV. (They are fastened in the screw holes for wall mounting...
Setup Guide (Operating Instructions)
Page 14
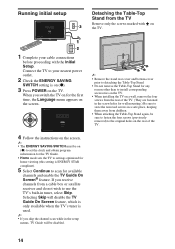
... clock and obtain program information for the TV Guide. • Home mode sets the TV to settings optimized for home viewing (this setting is on (z). 3 Press POWER on the screen. ~ • The ENERGY SAVING SWITCH must be disabled. 14 If you receive channels from children. • When attaching the Table-Top Stand again, be sure to fasten the four screws (previously removed) to your cable connections before proceeding with...
... clock and obtain program information for the TV Guide. • Home mode sets the TV to settings optimized for home viewing (this setting is on (z). 3 Press POWER on the screen. ~ • The ENERGY SAVING SWITCH must be disabled. 14 If you receive channels from children. • When attaching the Table-Top Stand again, be sure to fasten the four screws (previously removed) to your cable connections before proceeding with...

Setup Guide (Operating Instructions)
Page 15
... screws supplied with the Wall-Mount Bracket for the Wall-Mount Bracket before making cable connections. If the Table-Top Stand is blocked. Air circulation is attached to the TV, the TV may result in length when measured from the attaching surface of TV set • Be sure to use the Wall-Mount Bracket designed for additional safety information. Installed with the Wall-mount bracket) Mounting Hook Hook attachment on a wall using a Wall-Mount Bracket (not supplied) out of the box...
... screws supplied with the Wall-Mount Bracket for the Wall-Mount Bracket before making cable connections. If the Table-Top Stand is blocked. Air circulation is attached to the TV, the TV may result in length when measured from the attaching surface of TV set • Be sure to use the Wall-Mount Bracket designed for additional safety information. Installed with the Wall-mount bracket) Mounting Hook Hook attachment on a wall using a Wall-Mount Bracket (not supplied) out of the box...

Setup Guide (Operating Instructions)
Page 16
.... Settings Picture & Display Adjust the picture and screen settings Press for: Picture Adjustments Ambient Sensor Screen Pro Picture Setup Press OPTIONS to access TV Settings and other media and network related content. To use the Guide Press GUIDE to display the TV Guide On Screen to view scheduled programs or to select a program to enter 2.1, press , , , and ENT. Use with 0-9 and ENT to exit the Guide. The Options menu items vary based on the TV. Press again to select digital channels. Picture Adjustments Sound Adjustments 3D Menu...
.... Settings Picture & Display Adjust the picture and screen settings Press for: Picture Adjustments Ambient Sensor Screen Pro Picture Setup Press OPTIONS to access TV Settings and other media and network related content. To use the Guide Press GUIDE to display the TV Guide On Screen to view scheduled programs or to select a program to enter 2.1, press , , , and ENT. Use with 0-9 and ENT to exit the Guide. The Options menu items vary based on the TV. Press again to select digital channels. Picture Adjustments Sound Adjustments 3D Menu...

Setup Guide (Operating Instructions)
Page 17
... Guide, Favorites, etc. x Parts Description x Troubleshooting You can find solutions for your problems. x Index ~ • Images and illustrations may differ from what you can find how to customize your TV settings, etc. To learn more about your TVs features you see on -screen manual. x Using the Home Menu You can access your TV. (Continued) 17 x Fun Features with Connected Equipment Parts Description Troubleshooting...
... Guide, Favorites, etc. x Parts Description x Troubleshooting You can find solutions for your problems. x Index ~ • Images and illustrations may differ from what you can find how to customize your TV settings, etc. To learn more about your TVs features you see on -screen manual. x Using the Home Menu You can access your TV. (Continued) 17 x Fun Features with Connected Equipment Parts Description Troubleshooting...
Setup Guide (Operating Instructions)
Page 18
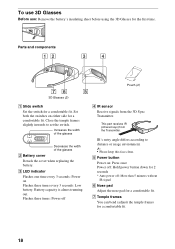
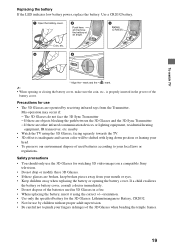
... when replacing the battery. 3 LED indicator Flashes one time every 3 seconds: Power on either side for a comfortable fit. Flashes three times: Power off : More than 5 minutes without IR signal 6 Nose pad Adjust the nose pad for a comfortable fit. 7 Temple frames You can bend (adjust) the temple frames for 2 seconds * Auto power off 4 IR sensor Receive signals from the Transmitter. IR's entry angle differs according to set the switch. Close...
... when replacing the battery. 3 LED indicator Flashes one time every 3 seconds: Power on either side for a comfortable fit. Flashes three times: Power off : More than 5 minutes without IR signal 6 Nose pad Adjust the nose pad for a comfortable fit. 7 Temple frames You can bend (adjust) the temple frames for 2 seconds * Auto power off 4 IR sensor Receive signals from the Transmitter. IR's entry angle differs according to set the switch. Close...
Setup Guide (Operating Instructions)
Page 19
... should only use the 3D Glasses for watching 3D video images on a compatible Sony television. • Do not drop or modify these 3D Glasses. • If these glasses are operated by children without proper adult supervision. • Be careful not to your mouth or eyes. • Keep children away when replacing the battery or opening or closing the...
... should only use the 3D Glasses for watching 3D video images on a compatible Sony television. • Do not drop or modify these 3D Glasses. • If these glasses are operated by children without proper adult supervision. • Be careful not to your mouth or eyes. • Keep children away when replacing the battery or opening or closing the...

Setup Guide (Operating Instructions)
Page 20
... AC power cord, and contact Sony Customer Support (information provided on the front cover) with the STANDBY indicator flashing in red. Check Auto Shut-off automatically (the TV enters standby mode). • Check if the Sleep Timer, Timer, or Idle TV Standby is activated and TV receives no signal, the TV will indicate any problems with how many times the STANDBY indicator flashes between each three second break. The Parental Lock password has...
... AC power cord, and contact Sony Customer Support (information provided on the front cover) with the STANDBY indicator flashing in red. Check Auto Shut-off automatically (the TV enters standby mode). • Check if the Sleep Timer, Timer, or Idle TV Standby is activated and TV receives no signal, the TV will indicate any problems with how many times the STANDBY indicator flashes between each three second break. The Parental Lock password has...

Setup Guide (Operating Instructions)
Page 22
...page 4). Specifications Model name XBRSystem Television system Channel coverage Panel system Speaker output Input/Output jacks CABLE/ANTENNA VIDEO IN 1/2 COMPONENT IN HDMI IN 1/2/3/4 AUDIO OUT DIGITAL AUDIO OUT (OPTICAL) PC IN PC/HDMI 2 AUDIO IN LAN USB/DLNA Power and others Power requirement Power consumption in standby Screen size (inches measured diagonally) Display resolution Speaker Full range with speaker box (2) (mm) (inches) Dimensions with stand (mm) (inches) without stand (mm) (inches) wall-mount hole pattern (mm) wall-mount screw size (mm) Mass with stand (kg)/(lb...
...page 4). Specifications Model name XBRSystem Television system Channel coverage Panel system Speaker output Input/Output jacks CABLE/ANTENNA VIDEO IN 1/2 COMPONENT IN HDMI IN 1/2/3/4 AUDIO OUT DIGITAL AUDIO OUT (OPTICAL) PC IN PC/HDMI 2 AUDIO IN LAN USB/DLNA Power and others Power requirement Power consumption in standby Screen size (inches measured diagonally) Display resolution Speaker Full range with speaker box (2) (mm) (inches) Dimensions with stand (mm) (inches) without stand (mm) (inches) wall-mount hole pattern (mm) wall-mount screw size (mm) Mass with stand (kg)/(lb...

Setup Guide (Operating Instructions)
Page 23
... digital cable television programming via subscription service to this device. Pursuant to which should be co-located or operating with part 15 of Conformity Trade Name: SONY Model: XBR-60LX900/XBR-52LX900/XBR-46LX900/ XBR-40LX900 Responsible Party: Sony Electronics Inc. This device uses 5 GHz band for an uncontrolled environment. SU-WH500 Sony Wall-Mount Bracket Model No. Telephone Number: 858-942-2230 This device complies with any changes...
... digital cable television programming via subscription service to this device. Pursuant to which should be co-located or operating with part 15 of Conformity Trade Name: SONY Model: XBR-60LX900/XBR-52LX900/XBR-46LX900/ XBR-40LX900 Responsible Party: Sony Electronics Inc. This device uses 5 GHz band for an uncontrolled environment. SU-WH500 Sony Wall-Mount Bracket Model No. Telephone Number: 858-942-2230 This device complies with any changes...

Setup Guide (Operating Instructions)
Page 24
... http://www.SonyStyle.ca/registration Your TV is connected to register your TV is capable of receiving software updates. For the latest information about software updates for software updates by selecting Settings, Product Support and then Automatic Software Update. © 2010 Sony Corporation Printed in U.S.A. Online Registration: Software Updates: For Your Convenience Be sure to the Internet, you can check for your TV, visit: United States Canada...
... http://www.SonyStyle.ca/registration Your TV is connected to register your TV is capable of receiving software updates. For the latest information about software updates for software updates by selecting Settings, Product Support and then Automatic Software Update. © 2010 Sony Corporation Printed in U.S.A. Online Registration: Software Updates: For Your Convenience Be sure to the Internet, you can check for your TV, visit: United States Canada...

