
Setup Guide (Operating Instructions)
Page 1
LCD Digital Color TV Setup Guide (Operating Instructions) 4-187-898-11(1) Setting up your TV To watch TV Additional Information XBR-60LX900 / 52LX900 / 46LX900 / 40LX900 Sony Customer Support U.S.A.: www.sony.com/tvsupport Canada: www.sony.ca/support United States Canada 1.800.222.SONY 1.877.899.SONY Please Do Not Return the Product to the Store
LCD Digital Color TV Setup Guide (Operating Instructions) 4-187-898-11(1) Setting up your TV To watch TV Additional Information XBR-60LX900 / 52LX900 / 46LX900 / 40LX900 Sony Customer Support U.S.A.: www.sony.com/tvsupport Canada: www.sony.ca/support United States Canada 1.800.222.SONY 1.877.899.SONY Please Do Not Return the Product to the Store

Setup Guide (Operating Instructions)
Page 2
... system and cannot guarantee service availability in the U.S. Fergason Patent Properties, LLC: U.S. In the United States, TV Guide and TV Guide On Screen are registered trademarks of Sony Corporation. and/or its subsidiaries. and/or its subsidiaries. Blu-ray Disc is modified from Dolby Laboratories. They... the limits required for any other countries. CAUTION To prevent electric shock and blade exposure, do not use this manual are of Sony Corporation. The TV Guide On Screen system is a joint program of the following United States patents 6,498,895; 6,850,693; 6,396,546; ...
... system and cannot guarantee service availability in the U.S. Fergason Patent Properties, LLC: U.S. In the United States, TV Guide and TV Guide On Screen are registered trademarks of Sony Corporation. and/or its subsidiaries. and/or its subsidiaries. Blu-ray Disc is modified from Dolby Laboratories. They... the limits required for any other countries. CAUTION To prevent electric shock and blade exposure, do not use this manual are of Sony Corporation. The TV Guide On Screen system is a joint program of the following United States patents 6,498,895; 6,850,693; 6,396,546; ...

Setup Guide (Operating Instructions)
Page 3
...available on super-high resolution Blu-ray Disc™ player and other Sony HD equipment. 3 Sound Complete the high-definition experience with an HDquality antenna connected directly to the back of your TV. This document will help assure the highest quality for future reference.... Operating instructions are built into the remote control 4 Setting up your TV. 2 Source To experience the stunning detail of 1,920 dots × 1,080 lines. 3 Please take a moment to register your TV at: U.S.A.: http://productregistration.sony.com Canada: http://www.SonyStyle.ca/registration Four Steps to a Full...
...available on super-high resolution Blu-ray Disc™ player and other Sony HD equipment. 3 Sound Complete the high-definition experience with an HDquality antenna connected directly to the back of your TV. This document will help assure the highest quality for future reference.... Operating instructions are built into the remote control 4 Setting up your TV. 2 Source To experience the stunning detail of 1,920 dots × 1,080 lines. 3 Please take a moment to register your TV at: U.S.A.: http://productregistration.sony.com Canada: http://www.SonyStyle.ca/registration Four Steps to a Full...
Setup Guide (Operating Instructions)
Page 4
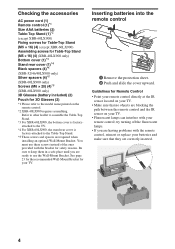
... assemble the Table-Top Stand. *3 For XBR-60LX900, the bottom cover is factoryattached to the TV. *4 For XBR-60LX900, the stand rear cover is factory-attached to the model name printed on your TV. • Fluorescent lamps can interfere with your batteries and make sure that they are correctly inserted.... 4 See page 23 for the recommended Wall-Mount Bracket for your TV. Be sure to keep them in a safe place until you are having problems with the bracket for safety reasons. Checking the accessories AC power...
... assemble the Table-Top Stand. *3 For XBR-60LX900, the bottom cover is factoryattached to the TV. *4 For XBR-60LX900, the stand rear cover is factory-attached to the model name printed on your TV. • Fluorescent lamps can interfere with your batteries and make sure that they are correctly inserted.... 4 See page 23 for the recommended Wall-Mount Bracket for your TV. Be sure to keep them in a safe place until you are having problems with the bracket for safety reasons. Checking the accessories AC power...
Setup Guide (Operating Instructions)
Page 5
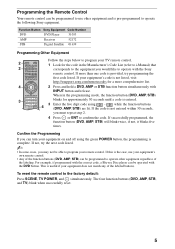
..., you can be operated with INPUT button and release. while the function buttons (DVD, AMP, STB) are lit. Function Button Sony Equipment Code Number DVD DVD Player 31033 AMP Receiver 52172 STB Digital Satellite 01639 Programming Other Equipment Follow the steps below to operate the... following Sony equipment. The four function buttons (DVD, AMP, STB, and TV) blink when successfully reset. 5 If your remote control. Confirm the Programming If you may not...
..., you can be operated with INPUT button and release. while the function buttons (DVD, AMP, STB) are lit. Function Button Sony Equipment Code Number DVD DVD Player 31033 AMP Receiver 52172 STB Digital Satellite 01639 Programming Other Equipment Follow the steps below to operate the... following Sony equipment. The four function buttons (DVD, AMP, STB, and TV) blink when successfully reset. 5 If your remote control. Confirm the Programming If you may not...

Setup Guide (Operating Instructions)
Page 6
...damage. • Do not expose the Intelligent Presence Sensor to show poor picture and/or poor color. Sudden room temperature changes may cause the TV to direct sunlight or other strong light, as malfunction may occur. This may cause moisture condensation. If you are not mounting the...15. • For best picture quality, do not expose the screen to attach the TableTop Stand. IR Sensor 2 Use the supplied screws to attach the TV unit to the Table-Top Stand. 3D Sync Transmitter Intelligent Presence Sensor ~ • If you will need to direct illumination or sunlight. • Avoid...
...damage. • Do not expose the Intelligent Presence Sensor to show poor picture and/or poor color. Sudden room temperature changes may cause the TV to direct sunlight or other strong light, as malfunction may occur. This may cause moisture condensation. If you are not mounting the...15. • For best picture quality, do not expose the screen to attach the TableTop Stand. IR Sensor 2 Use the supplied screws to attach the TV unit to the Table-Top Stand. 3D Sync Transmitter Intelligent Presence Sensor ~ • If you will need to direct illumination or sunlight. • Avoid...
Setup Guide (Operating Instructions)
Page 7
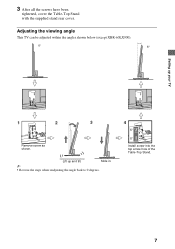
Lift up your TV 1 2 3 4 Remove screw as shown. Install screw into the top screw hole of the Table-Top Stand. 7 3 After all the screws have been tightened, cover the Table-Top Stand with the supplied stand rear cover. Slide in. ~ • Reverse the steps when readjusting the angle back to 0 degrees. Adjusting the viewing angle This TV can be adjusted within the angles shown below (except XBR-60LX900). 0° 6° Setting up and tilt.
Lift up your TV 1 2 3 4 Remove screw as shown. Install screw into the top screw hole of the Table-Top Stand. 7 3 After all the screws have been tightened, cover the Table-Top Stand with the supplied stand rear cover. Slide in. ~ • Reverse the steps when readjusting the angle back to 0 degrees. Adjusting the viewing angle This TV can be adjusted within the angles shown below (except XBR-60LX900). 0° 6° Setting up and tilt.

Setup Guide (Operating Instructions)
Page 8
Detaching the terminal cover ~ • After connecting cables, re-attach the terminal cover to the i-Manual. Connecting the TV The following chart shows the high-definition (HD) and standard-definition (SD) video formats supported by your BRAVIA TV inputs. * For supported PC formats refer to the TV. 8
Detaching the terminal cover ~ • After connecting cables, re-attach the terminal cover to the i-Manual. Connecting the TV The following chart shows the high-definition (HD) and standard-definition (SD) video formats supported by your BRAVIA TV inputs. * For supported PC formats refer to the TV. 8

Setup Guide (Operating Instructions)
Page 9
Setting up your TV Shown with a Set Top Box with HDMI connection Shown with a Set Top Box with COMPONENT connection Set Top Box Set Top Box Cable System or VHF/UHF Antenna System Cable or Antenna (Continued) 9
Setting up your TV Shown with a Set Top Box with HDMI connection Shown with a Set Top Box with COMPONENT connection Set Top Box Set Top Box Cable System or VHF/UHF Antenna System Cable or Antenna (Continued) 9

Setup Guide (Operating Instructions)
Page 10
Shown with Home Theater System Rear of TV *A/V Receiver *Blu-ray Disc SAT (Dish) Cable/ Antenna HD Cable Box or HD Satellite Receiver * Signifies a BRAVIA Sync capable device. Shown with HD Basic Connection with HD BRAVIA® Sync™ Basic Connection *Rear of TV Blu-ray Disc/DVD Side Panel Cable/SAT (Dish) SD Cable Box or SD Satellite Receiver or Cable/ Antenna Home Theater System 10
Shown with Home Theater System Rear of TV *A/V Receiver *Blu-ray Disc SAT (Dish) Cable/ Antenna HD Cable Box or HD Satellite Receiver * Signifies a BRAVIA Sync capable device. Shown with HD Basic Connection with HD BRAVIA® Sync™ Basic Connection *Rear of TV Blu-ray Disc/DVD Side Panel Cable/SAT (Dish) SD Cable Box or SD Satellite Receiver or Cable/ Antenna Home Theater System 10
Setup Guide (Operating Instructions)
Page 11
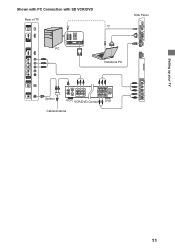
Setting up your TV Shown with PC Connection with SD VCR/DVD Rear of TV or Side Panel PC Notebook PC Splitter VCR VCR/DVD Combo DVD Cable/Antenna 11
Setting up your TV Shown with PC Connection with SD VCR/DVD Rear of TV or Side Panel PC Notebook PC Splitter VCR VCR/DVD Combo DVD Cable/Antenna 11

Setup Guide (Operating Instructions)
Page 12
...Stand) • Rope or chain (strong enough to secure the TV is no excess slack in property damage, serious bodily injury or even death. Securing the TV Sony strongly recommends taking measures to prevent the TV from Toppling • Secure the TV to a wall and/or stand. • Do not allow ...children to play or climb on furniture and TV sets. • Avoid placing or hanging items on ...
...Stand) • Rope or chain (strong enough to secure the TV is no excess slack in property damage, serious bodily injury or even death. Securing the TV Sony strongly recommends taking measures to prevent the TV from Toppling • Secure the TV to a wall and/or stand. • Do not allow ...children to play or climb on furniture and TV sets. • Avoid placing or hanging items on ...
Setup Guide (Operating Instructions)
Page 13
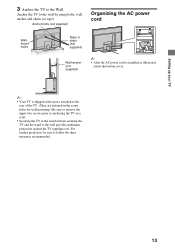
For further protection, be sure to the wall by using bolts, wall anchor and chain (or rope). Anchor the TV to follow the three measures recommended. 13 Anchor bolts (not supplied) Organizing the AC power cord Wallmount holes Rope or chain (not supplied) Wall-anchor (...not supplied) ~ • After the AC power cord is installed as illustrated, attach the bottom cover. ~ • Your TV is shipped with screws attached to the rear of the TV. (They are fastened in the screw holes for wall mounting.) Be sure to remove the upper two screws prior to...
For further protection, be sure to the wall by using bolts, wall anchor and chain (or rope). Anchor the TV to follow the three measures recommended. 13 Anchor bolts (not supplied) Organizing the AC power cord Wallmount holes Rope or chain (not supplied) Wall-anchor (...not supplied) ~ • After the AC power cord is installed as illustrated, attach the bottom cover. ~ • Your TV is shipped with screws attached to the rear of the TV. (They are fastened in the screw holes for wall mounting.) Be sure to remove the upper two screws prior to...
Setup Guide (Operating Instructions)
Page 14
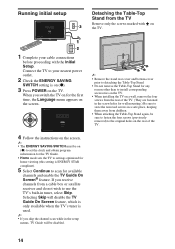
... Do not remove the Table-Top Stand for any reason other than to install corresponding accessories on the TV. • When installing the TV on a wall, remove the four screws from the rear of the TV. 4 Follow the instructions on the screen. ~ • The ENERGY SAVING SWITCH must be disabled.... 14 Selecting Skip will be on (z) to set the clock and obtain program information for the TV Guide. • Home mode sets the TV to settings optimized for home viewing (this setting is ENERGY STAR compliant). 5 Select Continue to your cable connections before proceeding...
... Do not remove the Table-Top Stand for any reason other than to install corresponding accessories on the TV. • When installing the TV on a wall, remove the four screws from the rear of the TV. 4 Follow the instructions on the screen. ~ • The ENERGY SAVING SWITCH must be disabled.... 14 Selecting Skip will be on (z) to set the clock and obtain program information for the TV Guide. • Home mode sets the TV to settings optimized for home viewing (this setting is ENERGY STAR compliant). 5 Select Continue to your cable connections before proceeding...

Setup Guide (Operating Instructions)
Page 15
..., Sony strongly recommends that you are 8 mm to attach the Table-Top Stand. Avoid operating the TV at least this much space around the set. Installed with the Wall-Mount Bracket for additional safety information. Setting up your TV Using a Wall-Mount Bracket Your TV can... hook. Use of screws other than those supplied may require detaching the Table-Top Stand; Wall Wall ~ • Inadequate ventilation can be performed by a Sony dealer or licensed contractor. • Follow the instruction guide provided with stand 4 inches (10 cm) 11 7/8 inches (30 cm) 4 inches (10 ...
..., Sony strongly recommends that you are 8 mm to attach the Table-Top Stand. Avoid operating the TV at least this much space around the set. Installed with the Wall-Mount Bracket for additional safety information. Setting up your TV Using a Wall-Mount Bracket Your TV can... hook. Use of screws other than those supplied may require detaching the Table-Top Stand; Wall Wall ~ • Inadequate ventilation can be performed by a Sony dealer or licensed contractor. • Follow the instruction guide provided with stand 4 inches (10 cm) 11 7/8 inches (30 cm) 4 inches (10 ...

Setup Guide (Operating Instructions)
Page 16
... Press OPTIONS to display a list of the remote control.) 2 Select a TV channel. 2 To use the Guide Press GUIDE to display the TV Guide On Screen to view scheduled programs or to select a program to access TV Settings and other media and network related content. The Options menu items vary ...SAVING SWITCH setting is on (z). 2 Press POWER on the TV or TV POWER on the remote control to turn on the TV. (You may use the TV features Press HOME to display TV Home Menu/ XMB™ to watch programs 1-2 1 Turn on the TV. Picture Adjustments Sound Adjustments 3D Menu Add to select digital ...
... Press OPTIONS to display a list of the remote control.) 2 Select a TV channel. 2 To use the Guide Press GUIDE to display the TV Guide On Screen to view scheduled programs or to select a program to access TV Settings and other media and network related content. The Options menu items vary ...SAVING SWITCH setting is on (z). 2 Press POWER on the TV or TV POWER on the remote control to turn on the TV. (You may use the TV features Press HOME to display TV Home Menu/ XMB™ to watch programs 1-2 1 Turn on the TV. Picture Adjustments Sound Adjustments 3D Menu Add to select digital ...

Setup Guide (Operating Instructions)
Page 17
... you see on -screen manual. x Using the Home Menu You can access your TV settings, etc. x Parts Description x Troubleshooting You can find solutions for your problems. x Index ~ • Images and illustrations ...Press F/f/G/g/ to navigate and select items. i-Manual Welcome to i-Manual "BRAVIA" TV Features Watching TV Using the Home Menu Fun Features with Connected Equipment Introduces how to i-Manual x "BRAVIA" TV Features x Watching TV Introduces convenient features such as TV Guide, Favorites, etc. x Fun Features with Connected Equipment Parts Description Troubleshooting Index ...
... you see on -screen manual. x Using the Home Menu You can access your TV settings, etc. x Parts Description x Troubleshooting You can find solutions for your problems. x Index ~ • Images and illustrations ...Press F/f/G/g/ to navigate and select items. i-Manual Welcome to i-Manual "BRAVIA" TV Features Watching TV Using the Home Menu Fun Features with Connected Equipment Introduces how to i-Manual x "BRAVIA" TV Features x Watching TV Introduces convenient features such as TV Guide, Favorites, etc. x Fun Features with Connected Equipment Parts Description Troubleshooting Index ...
Setup Guide (Operating Instructions)
Page 19
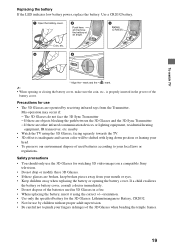
...• mark and the • ( ) mark. ~ • When opening the battery cover. Precautions for watching 3D video images on a compatible Sony television. • Do not drop or modify these 3D Glasses. • If these glasses are operated by children without proper adult supervision. • Be... may occur if: - If there are objects blocking the path between the 3D Glasses and the 3D Sync Transmitter - nearby • Watch the TV using the correct +/- Push here and remove the battery at an angle. Replacing the battery If the LED indicates low battery power, replace the battery...
...• mark and the • ( ) mark. ~ • When opening the battery cover. Precautions for watching 3D video images on a compatible Sony television. • Do not drop or modify these 3D Glasses. • If these glasses are operated by children without proper adult supervision. • Be... may occur if: - If there are objects blocking the path between the 3D Glasses and the 3D Sync Transmitter - nearby • Watch the TV using the correct +/- Push here and remove the battery at an angle. Replacing the battery If the LED indicates low battery power, replace the battery...

Setup Guide (Operating Instructions)
Page 20
... The self-diagnosis function is no signal, the TV will indicate any problems with how many times the STANDBY indicator flashes between each three second break. If Auto Shut-off , disconnect the AC power cord, and contact Sony Customer Support (information provided on the remote control.... in the tables below. (Also refer to "Troubleshooting" in the i-Manual.) 2 If the problem persists, contact Sony Customer Support (information provided on the TV to control the TV. Press SYNC MENU, select TV Control and then select Home (Menu) or Options to turn it off is always accepted.) 20
... The self-diagnosis function is no signal, the TV will indicate any problems with how many times the STANDBY indicator flashes between each three second break. If Auto Shut-off , disconnect the AC power cord, and contact Sony Customer Support (information provided on the remote control.... in the tables below. (Also refer to "Troubleshooting" in the i-Manual.) 2 If the problem persists, contact Sony Customer Support (information provided on the TV to control the TV. Press SYNC MENU, select TV Control and then select Home (Menu) or Options to turn it off is always accepted.) 20

Setup Guide (Operating Instructions)
Page 21
... from cleaning has evaporated. Additional Information How to Care for cleaning. • Do not plug in the TV into the wall outlet until the moisture from toppling over (see page 12). The TV should also be removed with a cloth slightly moistened with a solution of mild soap and warm water. &#...8226; If using a chemically pretreated cloth, please follow the safety documentation (Safety Booklet) separately provided. If you begin cleaning your TV. • Wipe the LCD screen gently with a soft cloth. • Stubborn stains may be placed on a stable surface to insure the...
... from cleaning has evaporated. Additional Information How to Care for cleaning. • Do not plug in the TV into the wall outlet until the moisture from toppling over (see page 12). The TV should also be removed with a cloth slightly moistened with a solution of mild soap and warm water. &#...8226; If using a chemically pretreated cloth, please follow the safety documentation (Safety Booklet) separately provided. If you begin cleaning your TV. • Wipe the LCD screen gently with a soft cloth. • Stubborn stains may be placed on a stable surface to insure the...


