

Users Guide
Page 1
Record the serial number in the space provided below. Refer to these numbers whenever you call upon your Sony dealer regarding this product. XR-CA400 2001 Sony Corporation For installation and connections, see the supplied installation/connections manual. XR-CA400 Serial No. 3-226-699-11 (1) FM/AM Cassette Car Stereo Operating Instructions US Owner's Record The model and serial numbers are located on the bottom of the unit. Model No.
Record the serial number in the space provided below. Refer to these numbers whenever you call upon your Sony dealer regarding this product. XR-CA400 2001 Sony Corporation For installation and connections, see the supplied installation/connections manual. XR-CA400 Serial No. 3-226-699-11 (1) FM/AM Cassette Car Stereo Operating Instructions US Owner's Record The model and serial numbers are located on the bottom of the unit. Model No.
Users Guide
Page 2
.... Increase the separation between the equipment and receiver. - This equipment generates, uses, and can radiate radio frequency energy and, if not installed and used in accordance with the instructions, may cause harmful interference to which can connect a CD changer, an MD changer, a CD player, or an MD player. *2 A CD TEXT disc is an audio CD that includes information such as the...
.... Increase the separation between the equipment and receiver. - This equipment generates, uses, and can radiate radio frequency energy and, if not installed and used in accordance with the instructions, may cause harmful interference to which can connect a CD changer, an MD changer, a CD player, or an MD player. *2 A CD TEXT disc is an audio CD that includes information such as the...
Users Guide
Page 3
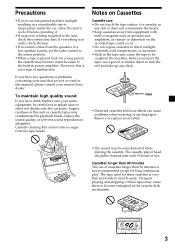
...direct sunlight resulting in a considerable rise in temperature inside the car, allow the unit to cool off before operating it. •If no sound comes from the speakers of a two-speaker system, set the fader control to the center position. •When a tape is played back for these tapes may cause them to be caught in the machine. The cassette player... as speakers and amplifiers, as erasure or distortion on this manual, please consult your nearest Sony dealer. Sugary residues on the recorded tape could occur. • Do not expose cassettes to the unit, check the connections first....
...direct sunlight resulting in a considerable rise in temperature inside the car, allow the unit to cool off before operating it. •If no sound comes from the speakers of a two-speaker system, set the fader control to the center position. •When a tape is played back for these tapes may cause them to be caught in the machine. The cassette player... as speakers and amplifiers, as erasure or distortion on this manual, please consult your nearest Sony dealer. Sugary residues on the recorded tape could occur. • Do not expose cassettes to the unit, check the connections first....

Users Guide
Page 4
... Unit Only Location of controls 5 Getting Started Resetting the unit 6 Detaching the front panel 6 Setting the clock 7 Cassette Player Listening to a tape 7 Playing a tape in random order - Shuffle Play 14 Additional Information Maintenance 14 Removing the unit 15 Specifications 16 Troubleshooting guide 17 4 Best Tuning Memory (BTM 9 Memorizing only the desired stations 9 Receiving the memorized stations 9 Other Functions Adjusting the sound characteristics 10 Attenuating the sound 10 Changing the sound and display settings ..... 11 Boosting the bass sound -
... Unit Only Location of controls 5 Getting Started Resetting the unit 6 Detaching the front panel 6 Setting the clock 7 Cassette Player Listening to a tape 7 Playing a tape in random order - Shuffle Play 14 Additional Information Maintenance 14 Removing the unit 15 Specifications 16 Troubleshooting guide 17 4 Best Tuning Memory (BTM 9 Memorizing only the desired stations 9 Receiving the memorized stations 9 Other Functions Adjusting the sound characteristics 10 Attenuating the sound 10 Changing the sound and display settings ..... 11 Boosting the bass sound -

Users Guide
Page 5
... qf BTM/MTL (Best Tuning Memory/Metal) button 8, 9 qg DSPL (display mode change 7, 8 During radio reception: BAND select 9 During CD/MD playback: CD/MD unit select 12 3 SRC (SOURCE) (TUNER/TAPE/CD/MD) button 7, 9, 12 4 SEL (select) button 7, 10, 11, 12, 13 5 Display window 6 MBP (My Best sound Position) button 12 7 D (D-BASS) button 11 8 Z (eject) button 7 9 RELEASE (front panel release) button 6, 15 q; button 7, 10 2 MODE (o) button During tape playback: Playback direction change ) button 7, 12, 13 qh OFF button* 6, 7 qj SEEK/AMS...
... qf BTM/MTL (Best Tuning Memory/Metal) button 8, 9 qg DSPL (display mode change 7, 8 During radio reception: BAND select 9 During CD/MD playback: CD/MD unit select 12 3 SRC (SOURCE) (TUNER/TAPE/CD/MD) button 7, 9, 12 4 SEL (select) button 7, 10, 11, 12, 13 5 Display window 6 MBP (My Best sound Position) button 12 7 D (D-BASS) button 11 8 Z (eject) button 7 9 RELEASE (front panel release) button 6, 15 q; button 7, 10 2 MODE (o) button During tape playback: Playback direction change ) button 7, 12, 13 qh OFF button* 6, 7 qj SEEK/AMS...

Users Guide
Page 6
... speakers from being stolen. 1 Press (OFF). 2 Press (RELEASE), then slide the front panel a little to direct sunlight or heat sources such as a ballpoint pen. If you connect an optional power amplifier and do not leave it clicks. Remove the front panel and press the RESET button with you turn off without removing the front panel, the caution alarm will erase the clock setting...
... speakers from being stolen. 1 Press (OFF). 2 Press (RELEASE), then slide the front panel a little to direct sunlight or heat sources such as a ballpoint pen. If you connect an optional power amplifier and do not leave it clicks. Remove the front panel and press the RESET button with you turn off without removing the front panel, the caution alarm will erase the clock setting...

Users Guide
Page 7
... of the volume button to set the clock to start playback, press (SRC)repeatedly until "TAPE" appears. Tip To change the tape's playback direction, press (MODE) (o). Setting the clock The clock uses a 12-hour digital indication. If a cassette is played. The side facing down is complete, the display returns to go back 2 Press (SEL). to normal playback mode. 7 to go forward Cassette Player Listening to set the hour...
... of the volume button to set the clock to start playback, press (SRC)repeatedly until "TAPE" appears. Tip To change the tape's playback direction, press (MODE) (o). Setting the clock The clock uses a 12-hour digital indication. If a cassette is played. The side facing down is complete, the display returns to go back 2 Press (SEL). to normal playback mode. 7 to go forward Cassette Player Listening to set the hour...

Users Guide
Page 8
... locate preceding tracks Note The AMS function may not work when: - there are shorter than eight seconds. •ATA (Automatic Tuner Activation) turns on the tuner automatically when fast-winding the tape. • MTL (Metal) lets you want to skip. the blanks between tracks - there is noise between tracks are long sections of low volume or quiet sections. Locating a specific track - Function buttons...
... locate preceding tracks Note The AMS function may not work when: - there are shorter than eight seconds. •ATA (Automatic Tuner Activation) turns on the tuner automatically when fast-winding the tape. • MTL (Metal) lets you want to skip. the blanks between tracks - there is noise between tracks are long sections of low volume or quiet sections. Locating a specific track - Function buttons...
Users Guide
Page 9
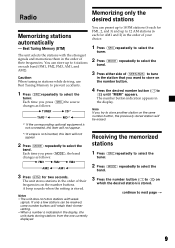
... display. A beep sounds when the setting is stored. You can be erased. *2 If a tape is not inserted, this item will not appear. 2 Press (MODE) repeatedly to store another station on which the desired station is stored. Each time you try to select the band. If only a few stations can store up to select the tuner. The number button indication appears in stations while driving, use Best...
... display. A beep sounds when the setting is stored. You can be erased. *2 If a tape is not inserted, this item will not appear. 2 Press (MODE) repeatedly to store another station on which the desired station is stored. Each time you try to select the band. If only a few stations can store up to select the tuner. The number button indication appears in stations while driving, use Best...
Users Guide
Page 10
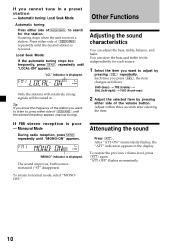
... signals will be tuned in the display. You can adjust the bass, treble, balance, and fader. Adjust within three seconds after selecting the item. "MONO" indicator is displayed. The sound improves, but becomes monaural ("ST" disappears). Tip If you know the frequency of the station you cannot tune in a preset station - To return to , press either side of the volume button. "LCL" indicator is displayed. Attenuating the sound...
... signals will be tuned in the display. You can adjust the bass, treble, balance, and fader. Adjust within three seconds after selecting the item. "MONO" indicator is displayed. The sound improves, but becomes monaural ("ST" disappears). Tip If you know the frequency of the station you cannot tune in a preset station - To return to , press either side of the volume button. "LCL" indicator is displayed. Attenuating the sound...

Users Guide
Page 11
... and powerful bass sound. The D-bass function boosts the low frequency signal and high frequency signal with the D-BASS button. After the mode setting completed, the display returns to turn the beep sound on or off ). •BEEP - GB As the D-BASS number increases so does the effect. Changing the sound and display settings The following items can emphasize and adjust the bass sound easily with a sharper curve than conventional bass boost. the demonstration mode which appears when the tape...
... and powerful bass sound. The D-bass function boosts the low frequency signal and high frequency signal with the D-BASS button. After the mode setting completed, the display returns to turn the beep sound on or off ). •BEEP - GB As the D-BASS number increases so does the effect. Changing the sound and display settings The following items can emphasize and adjust the bass sound easily with a sharper curve than conventional bass boost. the demonstration mode which appears when the tape...
Users Guide
Page 12
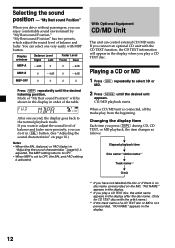
Selecting the sound position - "My Best sound Position" has two presets, which adjust the sound level of balance and fader more precisely, you can select one second, the display goes back to OFF, the BAL and FAD setting is activated. If you play a CD TEXT disc, the artist name appears in "Adjusting the sound characteristics" (page10) is adjusted, the MBP setting returns to OFF. • When MBP is...
Selecting the sound position - "My Best sound Position" has two presets, which adjust the sound level of balance and fader more precisely, you can select one second, the display goes back to OFF, the BAL and FAD setting is activated. If you play a CD TEXT disc, the artist name appears in "Adjusting the sound characteristics" (page10) is adjusted, the MBP setting returns to OFF. • When MBP is...
Users Guide
Page 13
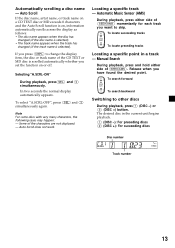
...number Track number 13 If you set the function on , information automatically scrolls across the display as follows: • The disc name appears when the disc has changed (if the disc name is selected). • The track name appears when the track has changed (if the track name is on or off. Locating a specific track - Manual... happen: - Auto Scroll does not work. Automatic Music Sensor (AMS) During playback, press either side of (SEEK/AMS) momentarily for each track you have found the desired point. To search forward SEEK AMS To search backward Switching to skip.
...number Track number 13 If you set the function on , information automatically scrolls across the display as follows: • The disc name appears when the disc has changed (if the disc name is selected). • The track name appears when the track has changed (if the track name is on or off. Locating a specific track - Manual... happen: - Auto Scroll does not work. Automatic Music Sensor (AMS) During playback, press either side of (SEEK/AMS) momentarily for each track you have found the desired point. To search forward SEEK AMS To search backward Switching to skip.

Users Guide
Page 14
... power connection and replace the fuse. In such a case, consult your nearest Sony dealer. B REP-1 B REP-2 REP-OFF b Repeat Play starts. Playing tracks in random order. to play the tracks on the original fuse. During playback, press (4) (SHUF) repeatedly until the desired setting appears. To return to normal playback mode, select "REP-OFF." To return to normal playback mode, select "SHUF-OFF." Additional Information Maintenance Fuse replacement When replacing...
... power connection and replace the fuse. In such a case, consult your nearest Sony dealer. B REP-1 B REP-2 REP-OFF b Repeat Play starts. Playing tracks in random order. to play the tracks on the original fuse. During playback, press (4) (SHUF) repeatedly until the desired setting appears. To return to normal playback mode, select "REP-OFF." To return to normal playback mode, select "SHUF-OFF." Additional Information Maintenance Fuse replacement When replacing...
Users Guide
Page 15
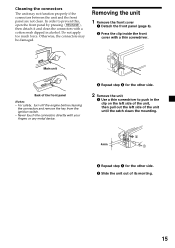
...of the front panel Notes • For safety, turn off the engine before cleaning the connectors and remove the key from the ignition switch. • Never touch the connectors directly with your fingers or any metal device. 3 Repeat step 2 for the other side. 2 Remove the unit 1 Use a thin ...screwdriver to prevent this, open the front panel by pressing (RELEASE), then detach it and clean the connectors with a thin screwdriver. Do not apply too much force. Otherwise, the connectors may not function properly if the connectors between the unit and the front panel are not...
...of the front panel Notes • For safety, turn off the engine before cleaning the connectors and remove the key from the ignition switch. • Never touch the connectors directly with your fingers or any metal device. 3 Repeat step 2 for the other side. 2 Remove the unit 1 Use a thin ...screwdriver to prevent this, open the front panel by pressing (RELEASE), then detach it and clean the connectors with a thin screwdriver. Do not apply too much force. Otherwise, the connectors may not function properly if the connectors between the unit and the front panel are not...

Users Guide
Page 17
... flashes. t Use manual tuning. •The local seek mode is not possible. t Set to OFF (page 10). Troubleshooting guide The following checklist will help you remedy the problems you may encounter with your car has built-in FM/AM antenna in the rear/side glass only.) •Tune in the frequency accurately. •The broadcast signal is distorted. General Problem No sound. Radio reception Problem Preset tuning is set...
... flashes. t Use manual tuning. •The local seek mode is not possible. t Set to OFF (page 10). Troubleshooting guide The following checklist will help you remedy the problems you may encounter with your car has built-in FM/AM antenna in the rear/side glass only.) •Tune in the frequency accurately. •The broadcast signal is distorted. General Problem No sound. Radio reception Problem Preset tuning is set...

Users Guide
Page 18
A CD/MD cannot play because of some problem.*2 Clean or insert the CD correctly. Error displays (when an optional CD/MD unit is inserted in the CD/MD unit. No disc is connected) The following indications will flash for about five seconds, and an alarm sound will be operated Press the reset button of the disc causing the error appears in...
A CD/MD cannot play because of some problem.*2 Clean or insert the CD correctly. Error displays (when an optional CD/MD unit is inserted in the CD/MD unit. No disc is connected) The following indications will flash for about five seconds, and an alarm sound will be operated Press the reset button of the disc causing the error appears in...

Users Guide
Page 20
Sony Corporation Printed in Thailand
Sony Corporation Printed in Thailand


