
Operation Guide
Page 1
En ce qui concerne l'installation et les connexions, consulter le manuel d'installation/raccordement fourni. Record these numbers whenever you call upon your Sony dealer regarding this product. Model No. For installation and connections, see the supplied installation/connections manual. 3-237-871-11 (2) FM/AM Cassette Car Stereo Operating Instructions US Mode d'emploi FR Owner's Record The model and serial numbers are located on the bottom of the unit. XR-CA630X © 2002 Sony Corporation XR-CA630X Serial No. Refer to these numbers in the space provided below.
En ce qui concerne l'installation et les connexions, consulter le manuel d'installation/raccordement fourni. Record these numbers whenever you call upon your Sony dealer regarding this product. Model No. For installation and connections, see the supplied installation/connections manual. 3-237-871-11 (2) FM/AM Cassette Car Stereo Operating Instructions US Mode d'emploi FR Owner's Record The model and serial numbers are located on the bottom of the unit. XR-CA630X © 2002 Sony Corporation XR-CA630X Serial No. Refer to these numbers in the space provided below.
Operation Guide
Page 2
... (displayed when a CD TEXT disc*2 is played on a connected optional CD unit with the CD TEXT function). • Supplied controller accessory Card remote commander RM-X119 • Optional controller accessory Rotary commander RM-X4S *1 This unit works with the instructions, may cause harmful interference to radio communications. You can radiate radio frequency energy and, if not installed and used in a particular installation. For instructions on XM tuner...
... (displayed when a CD TEXT disc*2 is played on a connected optional CD unit with the CD TEXT function). • Supplied controller accessory Card remote commander RM-X119 • Optional controller accessory Rotary commander RM-X4S *1 This unit works with the instructions, may cause harmful interference to radio communications. You can radiate radio frequency energy and, if not installed and used in a particular installation. For instructions on XM tuner...
Operation Guide
Page 3
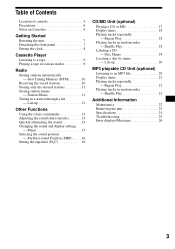
... a station through a list - List-up 20 MP3 playable CD Unit (optional) Listening to a tape 9 Playing a tape in random order - Shuffle Play 18 Labeling a CD - List-up 12 Other Functions Using the rotary commander 13 Adjusting the sound characteristics 14 Quickly attenuating the sound 14 Changing the sound and display settings - Shuffle Play 21 Additional Information Maintenance 22 Removing the unit 23 Specifications 24 Troubleshooting 25 Error displays/Messages 26 3 Best Tuning Memory (BTM 10 Receiving...
... a station through a list - List-up 20 MP3 playable CD Unit (optional) Listening to a tape 9 Playing a tape in random order - Shuffle Play 18 Labeling a CD - List-up 12 Other Functions Using the rotary commander 13 Adjusting the sound characteristics 14 Quickly attenuating the sound 14 Changing the sound and display settings - Shuffle Play 21 Additional Information Maintenance 22 Removing the unit 23 Specifications 24 Troubleshooting 25 Error displays/Messages 26 3 Best Tuning Memory (BTM 10 Receiving...
Operation Guide
Page 4
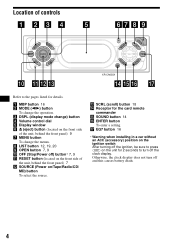
... panel) 9 g MENU button To change the operation. Otherwise, the clock display does not turn off the clock display. Location of controls MO RL M DI T ER N T ET DI SO L O DE DSP MBP SOURCE FF SC OPE ENU LIS SC/PRES SEEK SC/PRESE EQ7 UND ENT XR-CA630X Refer to turn off and this causes battery drain. 4 h LIST button 12, 19, 20 i OPEN button 7, 9 j OFF (Stop/Power off) button* 7, 9 k RESET button (located on /Tape/Radio...
... panel) 9 g MENU button To change the operation. Otherwise, the clock display does not turn off the clock display. Location of controls MO RL M DI T ER N T ET DI SO L O DE DSP MBP SOURCE FF SC OPE ENU LIS SC/PRES SEEK SC/PRESE EQ7 UND ENT XR-CA630X Refer to turn off and this causes battery drain. 4 h LIST button 12, 19, 20 i OPEN button 7, 9 j OFF (Stop/Power off) button* 7, 9 k RESET button (located on /Tape/Radio...
Operation Guide
Page 5
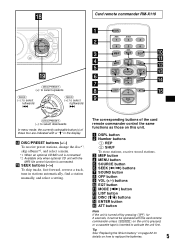
... MENU DISC + LIST SEEK- D T ET DI ISC/PRES SEEK SC/PRESE (SEEK) (+): to select rightwards/ > (DISC/PRESET) (-): to select leftwards/ . c MBP button d MENU button e SOURCE button f SEEK ( a DSPL button b Number buttons (1) REP (2) SHUF To store stations, receive stored stations. SEEK+ ENTER OFF ATT VOL The corresponding buttons of these four are indicated with the MP3 file control function is connected. s SEEK buttons (-/+) To skip tracks, fast-forward, reverse a track, tune in the display. SOURCE SOUND...
... MENU DISC + LIST SEEK- D T ET DI ISC/PRES SEEK SC/PRESE (SEEK) (+): to select rightwards/ > (DISC/PRESET) (-): to select leftwards/ . c MBP button d MENU button e SOURCE button f SEEK ( a DSPL button b Number buttons (1) REP (2) SHUF To store stations, receive stored stations. SEEK+ ENTER OFF ATT VOL The corresponding buttons of these four are indicated with the MP3 file control function is connected. s SEEK buttons (-/+) To skip tracks, fast-forward, reverse a track, tune in the display. SOURCE SOUND...
Operation Guide
Page 6
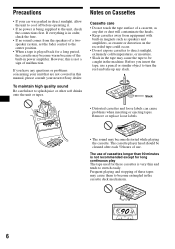
...; Keep cassettes away from the speakers of a twospeaker system, set the fader control to the center position. • When a tape is played back for these tapes may become distorted while playing the cassette. If everything is in order, check the fuse. • If no power is being supplied to the unit, check the connections first. Frequent playing and stopping of these cassettes...
...; Keep cassettes away from the speakers of a twospeaker system, set the fader control to the center position. • When a tape is played back for these tapes may become distorted while playing the cassette. If everything is in order, check the fuse. • If no power is being supplied to the unit, check the connections first. Frequent playing and stopping of these cassettes...
Operation Guide
Page 7
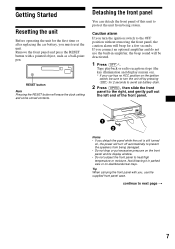
...-in parked cars or on dashboards/rear trays. If you connect an optional amplifier and do not use the supplied front panel case. Tip When carrying the front panel with a pointed object, such as a ball-point pen. continue to next page t 7 Remove the front panel and press the RESET button with you turn the ignition switch to the OFF position without...
...-in parked cars or on dashboards/rear trays. If you connect an optional amplifier and do not use the supplied front panel case. Tip When carrying the front panel with a pointed object, such as a ball-point pen. continue to next page t 7 Remove the front panel and press the RESET button with you turn the ignition switch to the OFF position without...
Operation Guide
Page 9
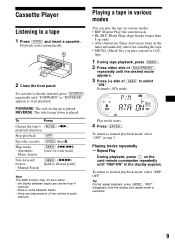
... various modes You can play a metal or CrO2 tape. 1 During tape playback, press (MENU). 2 Press either side of (DISC/PRESET) repeatedly until the desired mode appears. 3 Press (+) side of low volume or quiet sections. the blanks between tracks. - To return to select "ON." Cassette Player Listening to start playback. If a cassette is canceled. 9 "REP" disappears from the display and repeat mode is already inserted, press (SOURCE...
... various modes You can play a metal or CrO2 tape. 1 During tape playback, press (MENU). 2 Press either side of (DISC/PRESET) repeatedly until the desired mode appears. 3 Press (+) side of low volume or quiet sections. the blanks between tracks. - To return to select "ON." Cassette Player Listening to start playback. If a cassette is canceled. 9 "REP" disappears from the display and repeat mode is already inserted, press (SOURCE...
Operation Guide
Page 10
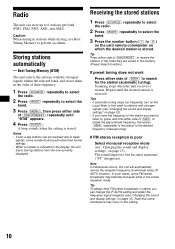
... tuning). If preset tuning does not work Press either side of their former settings. • When a number is stored. The sound improves, but becomes monaural ("ST" disappears). Radio The unit can change the IF AUTO setting and widen the frequency signal reception (see "Changing the sound and display settings" on page 15). Best Tuning Memory (BTM) The unit selects the stations with stronger signals (see "Changing the sound and display settings" on the...
... tuning). If preset tuning does not work Press either side of their former settings. • When a number is stored. The sound improves, but becomes monaural ("ST" disappears). Radio The unit can change the IF AUTO setting and widen the frequency signal reception (see "Changing the sound and display settings" on page 15). Best Tuning Memory (BTM) The unit selects the stations with stronger signals (see "Changing the sound and display settings" on the...
Operation Guide
Page 13
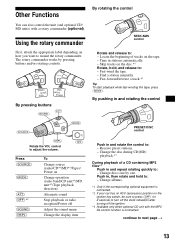
... rotating the control (SOURCE) (MODE) PRESET/DISC control OFF (DSPL) Rotate the VOL control to adjust the volume. (OFF) Press (SOURCE) (MODE) (ATT) (OFF)*2 (SOUND) (DSPL) To Change source (radio/CD*1/MD*1/Tape)/ Power on the disc.*1 Rotate, hold to : - Push in and rotate the control to : - Other Functions By rotating the control You can also control the unit (and optional CD/ MD units) with the MP3 file control function is connected. Using the...
... rotating the control (SOURCE) (MODE) PRESET/DISC control OFF (DSPL) Rotate the VOL control to adjust the volume. (OFF) Press (SOURCE) (MODE) (ATT) (OFF)*2 (SOUND) (DSPL) To Change source (radio/CD*1/MD*1/Tape)/ Power on the disc.*1 Rotate, hold to : - Push in and rotate the control to : - Other Functions By rotating the control You can also control the unit (and optional CD/ MD units) with the MP3 file control function is connected. Using the...
Operation Guide
Page 14
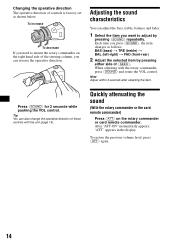
... can adjust the bass, treble, balance and fader. 1 Select the item you press (SOUND), the item changes as shown below. Quickly attenuating the sound (With the rotary commander or the card remote commander) Press (ATT) on the right hand side of controls is factory-set as follows: BAS (bass) t TRE (treble) t BAL (left-right) t FAD (front-rear) 2 Adjust the selected item by pressing (SOUND) repeatedly. When adjusting with...
... can adjust the bass, treble, balance and fader. 1 Select the item you press (SOUND), the item changes as shown below. Quickly attenuating the sound (With the rotary commander or the card remote commander) Press (ATT) on the right hand side of controls is factory-set as follows: BAS (bass) t TRE (treble) t BAL (left-right) t FAD (front-rear) 2 Adjust the selected item by pressing (SOUND) repeatedly. When adjusting with...
Operation Guide
Page 15
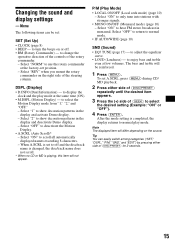
... set to enjoy bass and treble even at the factory-set A.SCRL, press (MENU) during CD/ MD playback. 2 Press either side of (SEEK) to select the desired setting (Example: "ON" or "OFF"). 4 Press (ENTER). to only tune into stations with stronger signals. • MONO ON/OFF (Monaural mode) (page 10) - Select "NORM" to display the clock and the play mode. to use the rotary commander at low volumes...
... set to enjoy bass and treble even at the factory-set A.SCRL, press (MENU) during CD/ MD playback. 2 Press either side of (SEEK) to select the desired setting (Example: "ON" or "OFF"). 4 Press (ENTER). to only tune into stations with stronger signals. • MONO ON/OFF (Monaural mode) (page 10) - Select "NORM" to display the clock and the play mode. to use the rotary commander at low volumes...
Operation Guide
Page 16
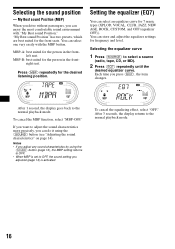
... Best sound Position." To cancel the MBP function, select "MBP-OFF." "My Best sound Position" has two presets, which are best suited for the desired listening position. After 1 second, the display goes back to the normal playback mode. 16 To cancel the equalizing effect, select "OFF." MBP-A: best suited for frequency and level. After 3 seconds, the display returns to the normal playback mode. You can store and adjust the equalizer settings for...
... Best sound Position." To cancel the MBP function, select "MBP-OFF." "My Best sound Position" has two presets, which are best suited for the desired listening position. After 1 second, the display goes back to the normal playback mode. 16 To cancel the equalizing effect, select "OFF." MBP-A: best suited for frequency and level. After 3 seconds, the display returns to the normal playback mode. You can store and adjust the equalizer settings for...
Operation Guide
Page 17
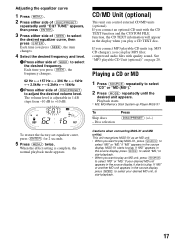
... time you can control external CD/MD units (optional). If you play MP3 files; Playing a CD or MD 1 Press (SOURCE) repeatedly to select the desired equalizer curve, then press (ENTER). Disc selection Press (DISC/PRESET) (+/-) To restore the factory-set equalizer curve, press (ENTER) for 2 seconds. 5 Press (MENU) twice. If "MS" or another MD unit appears in the source display, press (MODE) to select your desired...
... time you can control external CD/MD units (optional). If you play MP3 files; Playing a CD or MD 1 Press (SOURCE) repeatedly to select the desired equalizer curve, then press (ENTER). Disc selection Press (DISC/PRESET) (+/-) To restore the factory-set equalizer curve, press (ENTER) for 2 seconds. 5 Press (MENU) twice. If "MS" or another MD unit appears in the source display, press (MODE) to select your desired...
Operation Guide
Page 20
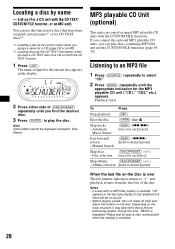
... control external MP3 playable CD units with the CD TEXT function. 1 Press (LIST). Listening to an MP3 file 1 Press (SOURCE) repeatedly to select "CD." 2 Press (MODE) repeatedly until you can use the CUSTOM FILE functions (page 19, 20). To Press Stop playback (OFF) Eject the disc (OPEN) then Z Skip tracks - Album selection [hold to start playback but there will be displayed...
... control external MP3 playable CD units with the CD TEXT function. 1 Press (LIST). Listening to an MP3 file 1 Press (SOURCE) repeatedly to select "CD." 2 Press (MODE) repeatedly until you can use the CUSTOM FILE functions (page 19, 20). To Press Stop playback (OFF) Eject the disc (OPEN) then Z Skip tracks - Album selection [hold to start playback but there will be displayed...
Operation Guide
Page 21
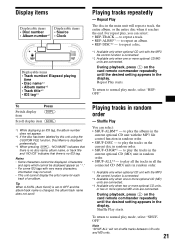
... only when one or more optional MD units are connected. Shuffle Play starts. For repeat play, you can select: • SHUF-ALBM*1 - Tip When A.SCRL (Auto Scroll) is set to play the albums in the current optional CD unit with the MP3 file control function is no disc name, album name, or track title and "NO ID3" indicates that...
... only when one or more optional MD units are connected. Shuffle Play starts. For repeat play, you can select: • SHUF-ALBM*1 - Tip When A.SCRL (Auto Scroll) is set to play the albums in the current optional CD unit with the MP3 file control function is no disc name, album name, or track title and "NO ID3" indicates that...
Operation Guide
Page 22
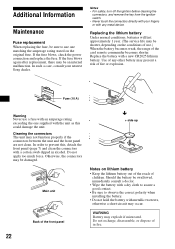
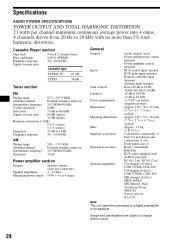
... the power connection and replace the fuse. Fuse (10 A) Warning Never use a fuse with an amperage rating exceeding the one matching the amperage rating stated on the original fuse. In order to prevent this could damage the unit. Replacing the lithium battery Under normal conditions, batteries will last approximately 1 year. (The service life may present a risk of the card remote commander...
... the power connection and replace the fuse. Fuse (10 A) Warning Never use a fuse with an amperage rating exceeding the one matching the amperage rating stated on the original fuse. In order to prevent this could damage the unit. Replacing the lithium battery Under normal conditions, batteries will last approximately 1 year. (The service life may present a risk of the card remote commander...
Operation Guide
Page 24
... 10.7 MHz/450 kHz 30 µV Power amplifier section Outputs Speaker impedance Maximum power output Speaker outputs (sure seal connectors) 4 - 8 ohms 50 W × 4 (at 4 ohms) General Outputs Inputs Tone controls Loudness Power requirements Dimensions Mounting dimensions Mass Supplied accessories Optional accessories Optional equipment Audio outputs (rear) Power antenna relay control terminal Power amplifier control terminal BUS control input terminal BUS audio input terminal Remote controller input terminal Antenna input terminal Bass ±10 dB at 62 Hz Treble ±10 dB at 16 kHz...
... 10.7 MHz/450 kHz 30 µV Power amplifier section Outputs Speaker impedance Maximum power output Speaker outputs (sure seal connectors) 4 - 8 ohms 50 W × 4 (at 4 ohms) General Outputs Inputs Tone controls Loudness Power requirements Dimensions Mounting dimensions Mass Supplied accessories Optional accessories Optional equipment Audio outputs (rear) Power antenna relay control terminal Power amplifier control terminal BUS control input terminal BUS audio input terminal Remote controller input terminal Antenna input terminal Bass ±10 dB at 62 Hz Treble ±10 dB at 16 kHz...
Operation Guide
Page 25
... everything is in amplifier. The power antenna does not extend. The stations cannot be received. General No sound. • Rotate the volume control dial clockwise to adjust the volume. • Cancel the ATT function. • Set the fader control to "IF AUTO" (page 10). The tape head is connected and you are erased. t Check the connection of low frequencies or very low sound level is selected. t Perform manual tuning. The power is set to the monaural...
... everything is in amplifier. The power antenna does not extend. The stations cannot be received. General No sound. • Rotate the volume control dial clockwise to adjust the volume. • Cancel the ATT function. • Set the fader control to "IF AUTO" (page 10). The tape head is connected and you are erased. t Check the connection of low frequencies or very low sound level is selected. t Perform manual tuning. The power is set to the monaural...
Installation Guide
Page 1
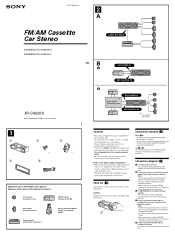
... the wires under a screw, or caught in the rear/side glass, see "Notes on the control and power supply leads." 3 To AMP REMOTE IN of each component's fuse. • When no accessory position, connect to the +12 V power (battery) terminal which is energised at all times. 3-237-883-11 (1) FM/AM Cassette Car Stereo Installation/Connections Installation/Connexions 2 A AUDIO OUT REAR B BUS AUDIO IN BUS CONTROL IN XR-CA630X Sony Corporation...
... the wires under a screw, or caught in the rear/side glass, see "Notes on the control and power supply leads." 3 To AMP REMOTE IN of each component's fuse. • When no accessory position, connect to the +12 V power (battery) terminal which is energised at all times. 3-237-883-11 (1) FM/AM Cassette Car Stereo Installation/Connections Installation/Connexions 2 A AUDIO OUT REAR B BUS AUDIO IN BUS CONTROL IN XR-CA630X Sony Corporation...


