

Limited Warranty (U.S. Only)
Page 1
... workmanship for the time periods and as fuses or batteries). Any parts or product replaced under this Labor Warranty has expired but not limited to product issues due to commercial use ; This Limited Warranty is longer. 3-272-643-01 ® Car Audio LIMITED WARRANTY (U.S. Parts: For a period of one (1) year from the product. Instructions: To obtain warranty service, you . It is...
... workmanship for the time periods and as fuses or batteries). Any parts or product replaced under this Labor Warranty has expired but not limited to product issues due to commercial use ; This Limited Warranty is longer. 3-272-643-01 ® Car Audio LIMITED WARRANTY (U.S. Parts: For a period of one (1) year from the product. Instructions: To obtain warranty service, you . It is...
Installation/Connections Instructions
Page 1
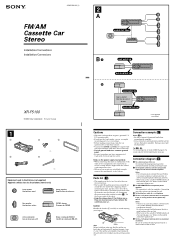
... to the battery. 3-262-935-11 (1) FM/AM Cassette Car Stereo Installation/Connections Installation/Connexions 2 A AUDIO OUT REAR B BUS AUDIO IN BUS CONTROL IN XR-F5100 © 2004 Sony Corporation Printed in Thailand 1 1 2 3 × 4 4 5 × 2 Equipment used in illustrations (not supplied) Appareils utilisés dans les illustrations (non fournis) Front speaker Haut-parleur avant Power amplifier Amplificateur de puissance Rear speaker Haut-parleur arrière CD/MD changer Changeur de CD/MD Active subwoofer Caisson...
... to the battery. 3-262-935-11 (1) FM/AM Cassette Car Stereo Installation/Connections Installation/Connexions 2 A AUDIO OUT REAR B BUS AUDIO IN BUS CONTROL IN XR-F5100 © 2004 Sony Corporation Printed in Thailand 1 1 2 3 × 4 4 5 × 2 Equipment used in illustrations (not supplied) Appareils utilisés dans les illustrations (non fournis) Front speaker Haut-parleur avant Power amplifier Amplificateur de puissance Rear speaker Haut-parleur arrière CD/MD changer Changeur de CD/MD Active subwoofer Caisson...
Operating Instructions (primary manual)
Page 1
Model No. XR-F5100 © 2004 Sony Corporation XR-F5100 Serial No. 3-262-940-11 (1) FM/AM Cassette Car Stereo Operating Instructions US Mode d'emploi FR Owner's Record The model and serial numbers are located on the bottom of the unit. Refer to these numbers in the space provided below. Record these numbers whenever you call upon your Sony dealer regarding this product. For installation and connections, see the supplied installation/connections manual. En ce qui concerne l'installation et les connexions, consulter le manuel d'installation/raccordement fourni.
Model No. XR-F5100 © 2004 Sony Corporation XR-F5100 Serial No. 3-262-940-11 (1) FM/AM Cassette Car Stereo Operating Instructions US Mode d'emploi FR Owner's Record The model and serial numbers are located on the bottom of the unit. Refer to these numbers in the space provided below. Record these numbers whenever you call upon your Sony dealer regarding this product. For installation and connections, see the supplied installation/connections manual. En ce qui concerne l'installation et les connexions, consulter le manuel d'installation/raccordement fourni.
Operating Instructions (primary manual)
Page 2
... remote commander RM-X115 • Optional controller accessory Rotary commander RM-X4S *1 This unit works with the instructions, may cause harmful interference to correct the interference by turning the equipment off and on the disc. Increase the separation between the equipment and receiver. - Welcome ! Thank you for help. Connect the equipment into an outlet on XM tuner operation, please refer to operate this Sony Cassette Player...
... remote commander RM-X115 • Optional controller accessory Rotary commander RM-X4S *1 This unit works with the instructions, may cause harmful interference to correct the interference by turning the equipment off and on the disc. Increase the separation between the equipment and receiver. - Welcome ! Thank you for help. Connect the equipment into an outlet on XM tuner operation, please refer to operate this Sony Cassette Player...
Operating Instructions (primary manual)
Page 3
... functions 9 Radio Storing stations automatically - List-up 21 Additional Information Maintenance 21 Removing the unit 22 Specifications 23 Troubleshooting 24 Error displays/Messages 25 3 Table of Contents Location of controls 4 Precautions 6 Notes on Cassettes 6 Getting Started Resetting the unit 7 Detaching the front panel 7 Setting the clock 8 Cassette Player Listening to a tape 9 Playing a tape in random order - Station Memo 11 Tuning in a station through a list - Shuffle Play 19 Labeling a CD - Best Tuning Memory (BTM 10 Receiving the stored stations...
... functions 9 Radio Storing stations automatically - List-up 21 Additional Information Maintenance 21 Removing the unit 22 Specifications 23 Troubleshooting 24 Error displays/Messages 25 3 Table of Contents Location of controls 4 Precautions 6 Notes on Cassettes 6 Getting Started Resetting the unit 7 Detaching the front panel 7 Setting the clock 8 Cassette Player Listening to a tape 9 Playing a tape in random order - Station Memo 11 Tuning in a station through a list - Shuffle Play 19 Labeling a CD - Best Tuning Memory (BTM 10 Receiving the stored stations...

Operating Instructions (primary manual)
Page 4
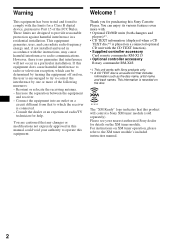
... d Receptor for details. Adjust the volume. - Adjust settings. Select items. k DSPL (display mode change operation. RCE DISC/PRESET PUSH LIS DI AL SOU PL SELECT CAT T DSO SEEK SEEK EQ3 MO DE DS MTL SENS BTM 1 OPEN REP SHUF BBLBSEKIP ATA 2 3 4 5 6 OFF XR-F5100 a DSO button 17 b SOURCE (Power on the unit until the display disappears. j Volume control dial/Select button Rotate to : - Press to : - Otherwise, the display does not turn off the ignition, be...
... d Receptor for details. Adjust the volume. - Adjust settings. Select items. k DSPL (display mode change operation. RCE DISC/PRESET PUSH LIS DI AL SOU PL SELECT CAT T DSO SEEK SEEK EQ3 MO DE DS MTL SENS BTM 1 OPEN REP SHUF BBLBSEKIP ATA 2 3 4 5 6 OFF XR-F5100 a DSO button 17 b SOURCE (Power on the unit until the display disappears. j Volume control dial/Select button Rotate to : - Press to : - Otherwise, the display does not turn off the ignition, be...

Operating Instructions (primary manual)
Page 5
... "Replacing the lithium battery" on this unit. a DSPL button b SOURCE button c SEEK (-/+) buttons d OFF button e VOL (+/-) buttons f MODE button g PRESET (DISC/ALBUM) (+/-) buttons h ATT button Note If the display disappears by pressing (OFF), it cannot be operated with the MP3 file control function is connected, and MP3 file is inserted to activate the unit first. DSPL MODE + PRESET SEEK- SOURCE PRE-SET SEEK+ OFF + ATT VOL - r SEEK buttons (-/+) To skip tracks/fast-forward, reverse a track/ tune in stations automatically, find a station manually/select a setting. Card remote...
... "Replacing the lithium battery" on this unit. a DSPL button b SOURCE button c SEEK (-/+) buttons d OFF button e VOL (+/-) buttons f MODE button g PRESET (DISC/ALBUM) (+/-) buttons h ATT button Note If the display disappears by pressing (OFF), it cannot be operated with the MP3 file control function is connected, and MP3 file is inserted to activate the unit first. DSPL MODE + PRESET SEEK- SOURCE PRE-SET SEEK+ OFF + ATT VOL - r SEEK buttons (-/+) To skip tracks/fast-forward, reverse a track/ tune in stations automatically, find a station manually/select a setting. Card remote...
Operating Instructions (primary manual)
Page 6
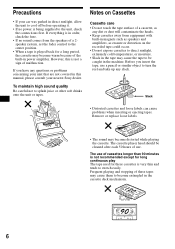
However, this manual, please consult your car was parked in direct sunlight, allow the unit to cool off before operating it. • If no sound comes from equipment with built-in order, check the fuse. • If no power is played back for these tapes may become distorted while playing the cassette. The cassette player head should be caught in the cassette deck mechanism. 6 If you insert...
However, this manual, please consult your car was parked in direct sunlight, allow the unit to cool off before operating it. • If no sound comes from equipment with built-in order, check the fuse. • If no power is played back for these tapes may become distorted while playing the cassette. The cassette player head should be caught in the cassette deck mechanism. 6 If you insert...
Operating Instructions (primary manual)
Page 7
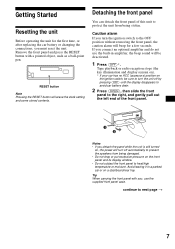
.../rear tray. Detaching the front panel You can detach the front panel of the front panel. 1 2 Notes • If you , use the built-in a parked car or on the ignition switch, be deactivated. 1 Press (OFF)*. RESET button Note Pressing the RESET button will beep for the first time, or after replacing the car battery or changing the connections, you connect an optional amplifier and do not use the supplied front panel...
.../rear tray. Detaching the front panel You can detach the front panel of the front panel. 1 2 Notes • If you , use the built-in a parked car or on the ignition switch, be deactivated. 1 Press (OFF)*. RESET button Note Pressing the RESET button will beep for the first time, or after replacing the car battery or changing the connections, you connect an optional amplifier and do not use the supplied front panel...
Operating Instructions (primary manual)
Page 10
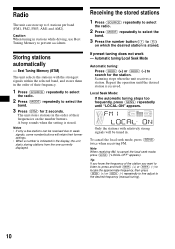
... adjust to select the band. 3 Press (BTM) for the station. The unit stores stations in the order of their former settings. • When a number is stored. Best Tuning Memory (BTM) The unit selects the stations with relatively strong signals will be received due to weak signals, some number buttons will retain their frequency. 1 Press (SOURCE) repeatedly to select the radio. 2 Press (MODE) repeatedly to the desired frequency (manual tuning). 10 Receiving the stored stations 1 Press (SOURCE...
... adjust to select the band. 3 Press (BTM) for the station. The unit stores stations in the order of their former settings. • When a number is stored. Best Tuning Memory (BTM) The unit selects the stations with relatively strong signals will be received due to weak signals, some number buttons will retain their frequency. 1 Press (SOURCE) repeatedly to select the radio. 2 Press (MODE) repeatedly to the desired frequency (manual tuning). 10 Receiving the stored stations 1 Press (SOURCE...
Operating Instructions (primary manual)
Page 11
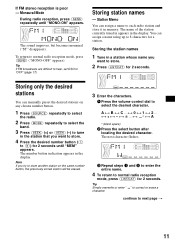
... number button. 1 Press (SOURCE) repeatedly to select the radio. 2 Press (MODE) repeatedly to select the band. 3 Press (SEEK) (+) or (SEEK) (-) to tune in memory. y ... The sound improves, but becomes monaural ("ST" disappears). Station Memo You can assign a name to select the desired character. Storing only the desired stations You can assign a name using up to correct or erase a character. y 0 y 1 y 2 ... * y + y - y * y A * (blank space) 2 Press the select button after locating...
... number button. 1 Press (SOURCE) repeatedly to select the radio. 2 Press (MODE) repeatedly to select the band. 3 Press (SEEK) (+) or (SEEK) (-) to tune in memory. y ... The sound improves, but becomes monaural ("ST" disappears). Station Memo You can assign a name to select the desired character. Storing only the desired stations You can assign a name using up to correct or erase a character. y 0 y 1 y 2 ... * y + y - y * y A * (blank space) 2 Press the select button after locating...
Operating Instructions (primary manual)
Page 13
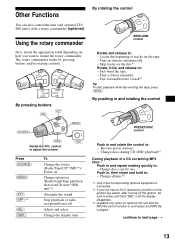
... switch, after turning off Adjust and select Change the display item Push in and rotating the control (SOURCE) (MODE) PRESET/DISC control OFF (DSPL) Rotate the VOL control to adjust the volume. (OFF) Press (SOURCE) (MODE) (ATT) (OFF)*2 (SEL) (DSPL) To Change the source (Radio/Tape/CD*1/MD*1)/ Power on Change operation (Radio band/Tape playback direction/CD unit*1/MD unit*1) Attenuate the sound Stop playback or radio reception/Power off the ignition, be sure to : - Find a station manually. - Fast-forward/reverse a track*1. Change discs...
... switch, after turning off Adjust and select Change the display item Push in and rotating the control (SOURCE) (MODE) PRESET/DISC control OFF (DSPL) Rotate the VOL control to adjust the volume. (OFF) Press (SOURCE) (MODE) (ATT) (OFF)*2 (SEL) (DSPL) To Change the source (Radio/Tape/CD*1/MD*1)/ Power on Change operation (Radio band/Tape playback direction/CD unit*1/MD unit*1) Attenuate the sound Stop playback or radio reception/Power off the ignition, be sure to : - Find a station manually. - Fast-forward/reverse a track*1. Change discs...
Operating Instructions (primary manual)
Page 14
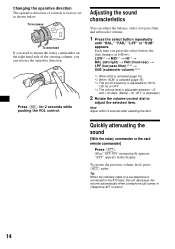
... factory-set as shown below. To restore the previous volume level, press (ATT) again. After "ATT-ON" momentarily appears, "ATT" appears in (Telephone ATT function). 14 Each time you can adjust the balance, fader, low pass filter and subwoofer volume. 1 Press the select button repeatedly until "BAL," "FAD," "LPF" or "SUB" appears. Note Adjust within 3 seconds after selecting the item. Changing the operative direction The operative direction of controls is displayed.) 2 Rotate the volume control dial to adjust the selected...
... factory-set as shown below. To restore the previous volume level, press (ATT) again. After "ATT-ON" momentarily appears, "ATT" appears in (Telephone ATT function). 14 Each time you can adjust the balance, fader, low pass filter and subwoofer volume. 1 Press the select button repeatedly until "BAL," "FAD," "LPF" or "SUB" appears. Note Adjust within 3 seconds after selecting the item. Changing the operative direction The operative direction of controls is displayed.) 2 Rotate the volume control dial to adjust the selected...
Operating Instructions (primary manual)
Page 15
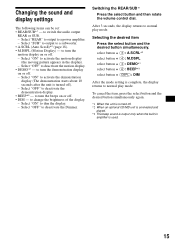
... the Dimmer. Select "OFF" to change the brightness of the display. - to deactivate the motion display. • DEMO*1 - select button + (3): A.SCRL*2 select button + (4): M.DSPL select button + (4): DEMO*1 select button + (6): BEEP*3 select button + (DSPL): DIM After the mode setting is turned off . • DIM - to a subwoofer. • A.SCRL (Auto Scroll)*2 (page 18). • M.DSPL (Motion Display) - Changing the sound and display settings The following items can be set: • REAR/SUB*1 - Select "SUB" to output to switch the audio output REAR or SUB. - Select "OFF" to turn the...
... the Dimmer. Select "OFF" to change the brightness of the display. - to deactivate the motion display. • DEMO*1 - select button + (3): A.SCRL*2 select button + (4): M.DSPL select button + (4): DEMO*1 select button + (6): BEEP*3 select button + (DSPL): DIM After the mode setting is turned off . • DIM - to a subwoofer. • A.SCRL (Auto Scroll)*2 (page 18). • M.DSPL (Motion Display) - Changing the sound and display settings The following items can be set: • REAR/SUB*1 - Select "SUB" to output to switch the audio output REAR or SUB. - Select "OFF" to turn the...
Operating Instructions (primary manual)
Page 17
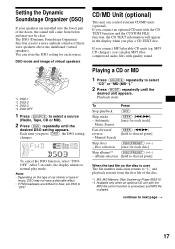
... disc. *1 MS: MG Memory Stick System-up Player MGS-X1 *2 Available only when an optional CD unit with quality sound. compressed audio files with the MP3 file control function is connected, and MP3 file is over The file number indication returns to "1," and playback restarts from below and may not have a desirable effect. • If FM broadcasts are installed into the lower part...
... disc. *1 MS: MG Memory Stick System-up Player MGS-X1 *2 Available only when an optional CD unit with quality sound. compressed audio files with the MP3 file control function is connected, and MP3 file is over The file number indication returns to "1," and playback restarts from below and may not have a desirable effect. • If FM broadcasts are installed into the lower part...
Operating Instructions (primary manual)
Page 18
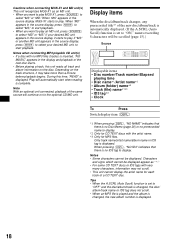
... is automatically displayed. (If the A.SCRL (Auto Scroll) function is set to select "MS" or "MD." When pressing (DSPL), "NO ID3" indicates that there is complete. Only track name/artist name/album name in the display and playback of a CD TEXT disc. Notes • Some characters cannot be scrolled (page 15).) Source Displayable items • Disc number/Track number/Elapsed playing time • Disc name...
... is automatically displayed. (If the A.SCRL (Auto Scroll) function is set to select "MS" or "MD." When pressing (DSPL), "NO ID3" indicates that there is complete. Only track name/artist name/album name in the display and playback of a CD TEXT disc. Notes • Some characters cannot be scrolled (page 15).) Source Displayable items • Disc number/Track number/Elapsed playing time • Disc name...
Operating Instructions (primary manual)
Page 22
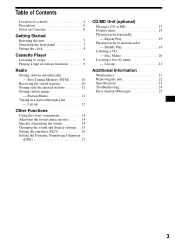
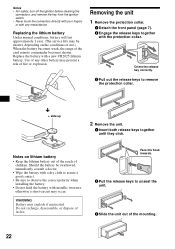
... release keys to unseat the unit. 3 Slide the unit out of the mounting. 22 Face the hook inwards. 2 Pull the release keys to remove the protection collar. WARNING Battery may explode if mistreated. Notes • For safety, turn off the ignition before cleaning the connectors, and remove the key from the ignition switch. • Never touch the connectors directly with your fingers or with...
... release keys to unseat the unit. 3 Slide the unit out of the mounting. 22 Face the hook inwards. 2 Pull the release keys to remove the protection collar. WARNING Battery may explode if mistreated. Notes • For safety, turn off the ignition before cleaning the connectors, and remove the key from the ignition switch. • Never touch the connectors directly with your fingers or with...
Operating Instructions (primary manual)
Page 23
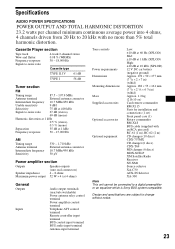
... per channel minimum continuous average power into 4 ohms, 4 channels driven from 20 Hz to 20 kHz with an RCA pin cord) RC-61 (1 m), RC-62 (2 m) CD changer (10 discs) CDX-757MX CD changer (6 discs) CDX-T69 MD changer (6 discs) MDX-66XLP XM Satellite Radio Receiver XT-XM1 Source selector XA-C30 AUX-IN Selector XA-300 Note This unit cannot be connected to a digital preamplifier or an equalizer which is Sony BUS system compatible.
... per channel minimum continuous average power into 4 ohms, 4 channels driven from 20 Hz to 20 kHz with an RCA pin cord) RC-61 (1 m), RC-62 (2 m) CD changer (10 discs) CDX-757MX CD changer (6 discs) CDX-T69 MD changer (6 discs) MDX-66XLP XM Satellite Radio Receiver XT-XM1 Source selector XA-C30 AUX-IN Selector XA-300 Note This unit cannot be connected to a digital preamplifier or an equalizer which is Sony BUS system compatible.

Operating Instructions (primary manual)
Page 24
... sound is heard in monaural reception mode. t Play back with a commercially available dry-tape cleaning cassette. t Press (SOURCE) (or insert a cassette) to the unit. • Check the connection. t Clean the head with a Sony MP3 compatible CD unit, such as a blank space. The sound is incompatible with the car's accessory power connector. t Perform manual tuning. General No sound. • Rotate the volume control dial to adjust the volume. • Cancel the ATT function. • Set the fader control...
... sound is heard in monaural reception mode. t Play back with a commercially available dry-tape cleaning cassette. t Press (SOURCE) (or insert a cassette) to the unit. • Check the connection. t Clean the head with a Sony MP3 compatible CD unit, such as a blank space. The sound is incompatible with the car's accessory power connector. t Perform manual tuning. General No sound. • Rotate the volume control dial to adjust the volume. • Cancel the ATT function. • Set the fader control...
Operating Instructions (primary manual)
Page 25
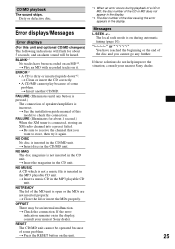
... during automatic tuning (page 10). CD/MD playback The sound skips. t Play an MD with recorded tracks on during playback of a CD or MD, the disc number of the CD or MD does not appear in the CD unit. ERROR*1 • A CD is inserted in the display. NOTREADY The lid of speakers/amplifiers is connected, storing an XM radio channel into a preset failed. FAILURE...
... during automatic tuning (page 10). CD/MD playback The sound skips. t Play an MD with recorded tracks on during playback of a CD or MD, the disc number of the CD or MD does not appear in the CD unit. ERROR*1 • A CD is inserted in the display. NOTREADY The lid of speakers/amplifiers is connected, storing an XM radio channel into a preset failed. FAILURE...


