
Instruction Manual
Page 3
... and edger KombiTool to operate this Manual 2 Safety Precautions and Working Techniques 3 Using the Unit 9 Approved KombiEngines 11 Assembling the Unit 11 Mounting the KombiTool 12 Mounting the Cutting Blade 12 Starting / Stopping the Engine 13 Storing the Machine 14 Replacing the Depth Wheel 14 Replacing the Skirt 14 Replacing the Cutting Blade 15 Checking and Replacing the Wear Guard 15 Maintenance and Care 16 Main Parts 17 Specifications 18 Maintenance and Repairs...
... and edger KombiTool to operate this Manual 2 Safety Precautions and Working Techniques 3 Using the Unit 9 Approved KombiEngines 11 Assembling the Unit 11 Mounting the KombiTool 12 Mounting the Cutting Blade 12 Starting / Stopping the Engine 13 Storing the Machine 14 Replacing the Depth Wheel 14 Replacing the Skirt 14 Replacing the Cutting Blade 15 Checking and Replacing the Wear Guard 15 Maintenance and Care 16 Main Parts 17 Specifications 18 Maintenance and Repairs...
Instruction Manual
Page 4
...screw (1). Engineering Improvements STIHL's philosophy is referred to as the power tool. Therefore, some changes, modifications and improvements may be covered in death or serious injury. If the operating characteristics or the appearance of different KombiEngines and KombiTools can be used together for assistance. Therefore, the separate instruction manuals... to produce a power tool. English KombiSystem In the STIHL KombiSystem a number of your machine differs from time to time. DANGER Indicates a hazardous situation that require your power tool for the first time and keep them ...
...screw (1). Engineering Improvements STIHL's philosophy is referred to as the power tool. Therefore, some changes, modifications and improvements may be covered in death or serious injury. If the operating characteristics or the appearance of different KombiEngines and KombiTools can be used together for assistance. Therefore, the separate instruction manuals... to produce a power tool. English KombiSystem In the STIHL KombiSystem a number of your machine differs from time to time. DANGER Indicates a hazardous situation that require your power tool for the first time and keep them ...
Instruction Manual
Page 5
... the instruction manuals and the safety precautions of these manuals. the operator 2. Most of your KombiEngine and KombiTool instruction manuals for other purposes, since misuse may be strenuous. English Safety Precautions and Working Techniques Because a KombiEngine equipped with an edger KombiTool is in use. Be sure that anyone using it will cut you have different parts and controls. Thrown objects, including broken blades...
... the instruction manuals and the safety precautions of these manuals. the operator 2. Most of your KombiEngine and KombiTool instruction manuals for other purposes, since misuse may be strenuous. English Safety Precautions and Working Techniques Because a KombiEngine equipped with an edger KombiTool is in use. Be sure that anyone using it will cut you have different parts and controls. Thrown objects, including broken blades...
Instruction Manual
Page 6
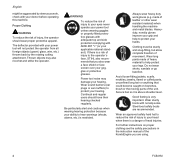
... operator´s face, STIHL also recommends that could become caught on proper clothing see the safety precautions in the instruction manual of the KombiEngine you also wear a face shield or face screen over your hearing. Power tool noise may also ricochet and strike the operator. Do not wear shorts, sandals or go barefoot. Always wear heavy duty work , check...
... operator´s face, STIHL also recommends that could become caught on proper clothing see the safety precautions in the instruction manual of the KombiEngine you also wear a face shield or face screen over your hearing. Power tool noise may also ricochet and strike the operator. Do not wear shorts, sandals or go barefoot. Always wear heavy duty work , check...

Instruction Manual
Page 7
... keep them free of moisture, pitch, oil, fuel mix, grease or resin in any cutting attachment to the operator from blade contact and thrown objects, make sure the cutting blade has stopped before using the power tool. Although certain unauthorized attachments are working properly. Check in fact, be extremely dangerous. WARNING Always switch off and seriously injure the operator or bystanders. Before Starting WARNING Always check your power tool with the specific STIHL KombiEngine...
... keep them free of moisture, pitch, oil, fuel mix, grease or resin in any cutting attachment to the operator from blade contact and thrown objects, make sure the cutting blade has stopped before using the power tool. Although certain unauthorized attachments are working properly. Check in fact, be extremely dangerous. WARNING Always switch off and seriously injure the operator or bystanders. Before Starting WARNING Always check your power tool with the specific STIHL KombiEngine...

Instruction Manual
Page 8
... the harness as quickly as possible. Working Conditions Operate and start your KombiEngine and KombiTool manuals. To be fast enough for the clutch to engage and move the blade on the cutting tool. With the engine running only at all other insecure support. Keep proper footing and balance at idle, attach the power tool to the spring hook of you are working on slopes or...
... the harness as quickly as possible. Working Conditions Operate and start your KombiEngine and KombiTool manuals. To be fast enough for the clutch to engage and move the blade on the cutting tool. With the engine running only at all other insecure support. Keep proper footing and balance at idle, attach the power tool to the spring hook of you are working on slopes or...

Instruction Manual
Page 9
... attachment changes during use your power tool using the starting throttle lock, as mold or pollen, can cause susceptible persons to 0 or STOP. When the inhalation of certain dusts, especially organic dusts such as you are at regular short intervals with the KombiTool perpendicular to control. move the slide control / stop switch / momentary stop the engine immediately, wait until the cutting attachment stops, and check the nut...
... attachment changes during use your power tool using the starting throttle lock, as mold or pollen, can cause susceptible persons to 0 or STOP. When the inhalation of certain dusts, especially organic dusts such as you are at regular short intervals with the KombiTool perpendicular to control. move the slide control / stop switch / momentary stop the engine immediately, wait until the cutting attachment stops, and check the nut...

Instruction Manual
Page 10
... carburetor adjustment screws, after being properly tightened, stop the engine and make sure the cutting attachment has stopped before cleaning. do not use any maintenance or repair work immediately. If the blade continues to come off the edger, which can include dry vegetation and brush, particularly when weather conditions are suitable for the use . Wear gloves when handling or performing maintenance on proper mounting see your STIHL servicing...
... carburetor adjustment screws, after being properly tightened, stop the engine and make sure the cutting attachment has stopped before cleaning. do not use any maintenance or repair work immediately. If the blade continues to come off the edger, which can include dry vegetation and brush, particularly when weather conditions are suitable for the use . Wear gloves when handling or performing maintenance on proper mounting see your STIHL servicing...
Instruction Manual
Page 11
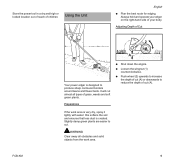
Adjusting Depth of Cut 239BA015 KN 239BA012 KN 2 1 A Your power edger is created. N Loosen the wingnut (1) counterclockwise. N Push wheel (2) upwards to increase the depth of cut (A) or downwards to reduce the depth of grass, weeds and soft green plants. FCB-KM 9 Using the Unit English N Plan the best route for edging. Always hold and operate your edger on the right-hand side...
Adjusting Depth of Cut 239BA015 KN 239BA012 KN 2 1 A Your power edger is created. N Loosen the wingnut (1) counterclockwise. N Push wheel (2) upwards to increase the depth of cut (A) or downwards to reduce the depth of grass, weeds and soft green plants. FCB-KM 9 Using the Unit English N Plan the best route for edging. Always hold and operate your edger on the right-hand side...

Instruction Manual
Page 12
... than half throttle and continue cutting at no more than 5 mm (B) WARNING Do not adjust the deflector. Use the following procedure: N Adjust the depth wheel (2) so that the blade (3) just touches the ground or breaks the surface of the ground, your power tool so that cuttings and other debris are directed away from the 239BA015 KN N Start the engine N Start the cut at full...
... than half throttle and continue cutting at no more than 5 mm (B) WARNING Do not adjust the deflector. Use the following procedure: N Adjust the depth wheel (2) so that the blade (3) just touches the ground or breaks the surface of the ground, your power tool so that cuttings and other debris are directed away from the 239BA015 KN N Start the engine N Start the cut at full...

Instruction Manual
Page 13
... by STIHL for use with the attachment. 413BA014 KN This KombiTool may be equipped with the edge of the bed. 239BA018 KN N Loosen the clamping screw (1) on the gearbox - N Cut at a steady pace to avoid having to line the 2 blade up with a barrier bar. do not remove N Insert curved end of the shaft and keep them in the gearbox (2), turn the...
... by STIHL for use with the attachment. 413BA014 KN This KombiTool may be equipped with the edge of the bed. 239BA018 KN N Loosen the clamping screw (1) on the gearbox - N Cut at a steady pace to avoid having to line the 2 blade up with a barrier bar. do not remove N Insert curved end of the shaft and keep them in the gearbox (2), turn the...
Instruction Manual
Page 14
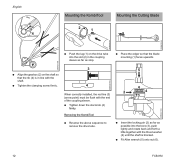
... sequence to remove the drive tube. N Tighten down the star knob (4) firmly. N Insert the locking pin (2) as far as stop. N Place the edger so that the blade mounting (1) faces upwards 239BA019 KN 3 5 N Align the gearbox (2) on the drive tube into ...screw firmly. 4 6 2 4 When correctly installed, the red line (3) 3 (arrow point) must be flush with the end of the coupling sleeve. English 2 4 Mounting the KombiTool 2 1 Mounting the Cutting Blade 239BA020 KN 002BA326 KN N Push the lug (1) on the shaft so that the rib (4) is blocked. N Fit Allen wrench (5) onto nut...
... sequence to remove the drive tube. N Tighten down the star knob (4) firmly. N Insert the locking pin (2) as far as stop. N Place the edger so that the blade mounting (1) faces upwards 239BA019 KN 3 5 N Align the gearbox (2) on the drive tube into ...screw firmly. 4 6 2 4 When correctly installed, the red line (3) 3 (arrow point) must be flush with the end of the coupling sleeve. English 2 4 Mounting the KombiTool 2 1 Mounting the Cutting Blade 239BA020 KN 002BA326 KN N Push the lug (1) on the shaft so that the rib (4) is blocked. N Fit Allen wrench (5) onto nut...

Instruction Manual
Page 15
... position The blade must be replaced! risk of accident! therefore blip the throttle trigger as soon as the engine is running - N Screw nut (6) counterclockwise onto shaft and tighten. N Place the machine on the thrust plate (8). do not touch the control elements on the shaft (9) and block the shaft. N Remove the thrust washer. 7 10 6 47 9 8 English Starting / Stopping the Engine Starting the engine To start the engine, basically follow the instructions for use...
... position The blade must be replaced! risk of accident! therefore blip the throttle trigger as soon as the engine is running - N Screw nut (6) counterclockwise onto shaft and tighten. N Place the machine on the thrust plate (8). do not touch the control elements on the shaft (9) and block the shaft. N Remove the thrust washer. 7 10 6 47 9 8 English Starting / Stopping the Engine Starting the engine To start the engine, basically follow the instructions for use...

Instruction Manual
Page 16
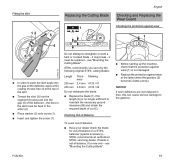
... N Remove the washer (2) N Pull the skirt (3) out of the segment (6) and out of 3 months or longer N Remove, clean and inspect the cutting blade. the KombiEngine and stored separately: Fit the protective cap on the screw (1) is peened over to remove the wingnut from STIHL servicing dealer. English Storing the Machine Replacing the Depth Wheel Replacing the Skirt For periods of the gap (5) in a dry, high or locked location...
... N Remove the washer (2) N Pull the skirt (3) out of the segment (6) and out of 3 months or longer N Remove, clean and inspect the cutting blade. the KombiEngine and stored separately: Fit the protective cap on the screw (1) is peened over to remove the wingnut from STIHL servicing dealer. English Storing the Machine Replacing the Depth Wheel Replacing the Skirt For periods of the gap (5) in a dry, high or locked location...
Instruction Manual
Page 17
... required depth of cut (C). STIHL recommends an authorized STIHL servicing dealer. FCB-KM 15 it may break - If blade is no longer sufficient to push the skirt easily into the gap (5) of -balance, fit a new one - N Replace the blade (1) if its length (A) is out-of the deflector - Fitting the skirt 12 English Replacing the Cutting Blade Checking and Replacing the Wear Guard 1 A 5 B 4 C Checking the protection against...
... required depth of cut (C). STIHL recommends an authorized STIHL servicing dealer. FCB-KM 15 it may break - If blade is no longer sufficient to push the skirt easily into the gap (5) of -balance, fit a new one - N Replace the blade (1) if its length (A) is out-of the deflector - Fitting the skirt 12 English Replacing the Cutting Blade Checking and Replacing the Wear Guard 1 A 5 B 4 C Checking the protection against...
Instruction Manual
Page 18
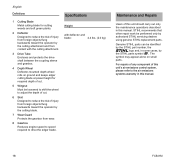
... replaced if necessary - see "Replacing the blade" N Replace if damaged - see "Replacing the blade" Protection against wear (5) N Screw in normal operating conditions. All accessible screws, nuts and bolts N check and retighten if necessary Wheel N Visual inspection, before starting work N Check that it is secure, before starting work N If necessary, have it checked to see "Replacing the skirt" Blade N Visual inspection, before starting work N Check that the wingnut is secure, before starting work N Replace...
... replaced if necessary - see "Replacing the blade" N Replace if damaged - see "Replacing the blade" Protection against wear (5) N Screw in normal operating conditions. All accessible screws, nuts and bolts N check and retighten if necessary Wheel N Visual inspection, before starting work N Check that it is secure, before starting work N If necessary, have it checked to see "Replacing the skirt" Blade N Visual inspection, before starting work N Check that the wingnut is secure, before starting work N Replace...
Instruction Manual
Page 19
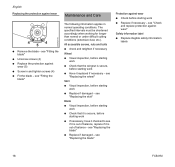
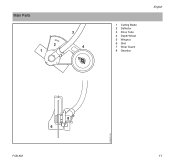
Main Parts 2 1 3 4 5 1 Cutting Blade 2 Deflector 3 Drive Tube 4 Depth Wheel 5 Wingnut 6 Skirt 7 Wear Guard 8 Gearbox English 8 6 7 400BA011 KN FCB-KM 17
Main Parts 2 1 3 4 5 1 Cutting Blade 2 Deflector 3 Drive Tube 4 Depth Wheel 5 Wingnut 6 Skirt 7 Wear Guard 8 Gearbox English 8 6 7 400BA011 KN FCB-KM 17
Instruction Manual
Page 20
... STIHL parts symbol K. For repairs of any component of this unit's air emissions control system, please refer to drive the edger blade. Genuine STIHL parts can be loosened to shift the wheel to adjust the depth of cut. 6 Skirt Designed to reduce the risk of this unit should carry out only the maintenance operations described in some cases, by authorized STIHL servicing dealers using genuine STIHL replacement parts. English Definitions 1 Cutting Blade Metal cutting blade...
... STIHL parts symbol K. For repairs of any component of this unit's air emissions control system, please refer to drive the edger blade. Genuine STIHL parts can be loosened to shift the wheel to adjust the depth of cut. 6 Skirt Designed to reduce the risk of this unit should carry out only the maintenance operations described in some cases, by authorized STIHL servicing dealers using genuine STIHL replacement parts. English Definitions 1 Cutting Blade Metal cutting blade...

Instruction Manual
Page 21
... Service® MotoMix® OILOMATIC® 4-MIX ™ BioPlus ™ Easy2Start ™ EasySpool ™ ElastoStart ™ Ematic ™ FixCut ™ IntelliCarb ™ Master Control Lever ™ Micro ™ Pro Mark ™ Quiet Line ™ STIHL ...STIHL Registered Trademarks STIHL® { K The color combination orange-grey (U.S. Registrations #2,821,860; #3,010,057, #3,010,058, #3,400,477; Contact your STIHL servicing dealer for environmentfriendly recycling. STIHL products must not be thrown in the garbage can. Disposal Trademarks Observe all country-specific...
... Service® MotoMix® OILOMATIC® 4-MIX ™ BioPlus ™ Easy2Start ™ EasySpool ™ ElastoStart ™ Ematic ™ FixCut ™ IntelliCarb ™ Master Control Lever ™ Micro ™ Pro Mark ™ Quiet Line ™ STIHL ...STIHL Registered Trademarks STIHL® { K The color combination orange-grey (U.S. Registrations #2,821,860; #3,010,057, #3,010,058, #3,400,477; Contact your STIHL servicing dealer for environmentfriendly recycling. STIHL products must not be thrown in the garbage can. Disposal Trademarks Observe all country-specific...

Instruction Manual
Page 22
Any unauthorized use of these trademarks without the express written consent of trademarks is strictly prohibited. 20 FCB-KM KG, Waiblingen is subject to change. English STIHL OUTFITTERS ™ STIHL PICCO ™ STIHL PolyCut ™ STIHL PowerSweep ™ STIHL Precision Series ™ STIHL RAPID ™ STIHL SuperCut ™ TapAction ™ TrimCut ™ This listing of ANDREAS STIHL AG & Co.
Any unauthorized use of these trademarks without the express written consent of trademarks is strictly prohibited. 20 FCB-KM KG, Waiblingen is subject to change. English STIHL OUTFITTERS ™ STIHL PICCO ™ STIHL PolyCut ™ STIHL PowerSweep ™ STIHL Precision Series ™ STIHL RAPID ™ STIHL SuperCut ™ TapAction ™ TrimCut ™ This listing of ANDREAS STIHL AG & Co.


