
Instruction Manual
Page 3
... go to operate this Manual 2 Safety Precautions and Working Techniques 3 Using the Unit 9 Approved KombiEngines 11 Assembling the Unit 11 Mounting the KombiTool 13 Mounting the Cutting Blade 13 Starting / Stopping the Engine 14 Storing the Machine 14 Replacing the Depth Wheel 15 Replacing the Skirt 15 Replacing the Cutting Blade 16 Checking and Replacing the Wear Guard 16 Maintenance and Care 17 Main Parts 18 Specifications 19 Maintenance and Repairs 19...
... go to operate this Manual 2 Safety Precautions and Working Techniques 3 Using the Unit 9 Approved KombiEngines 11 Assembling the Unit 11 Mounting the KombiTool 13 Mounting the Cutting Blade 13 Starting / Stopping the Engine 14 Storing the Machine 14 Replacing the Depth Wheel 15 Replacing the Skirt 15 Replacing the Cutting Blade 16 Checking and Replacing the Wear Guard 16 Maintenance and Care 17 Main Parts 18 Specifications 19 Maintenance and Repairs 19...
Instruction Manual
Page 4
... screw (1). Therefore, some changes, modifications and improvements may not be used together for the KombiEngine and KombiTool should be covered in this manual may contain paragraphs that require your power tool for the first time and keep them in the illustration. The individual steps or procedures described in the manual may contain item numbers that refers directly to the operating instructions, this manual...
... screw (1). Therefore, some changes, modifications and improvements may not be used together for the KombiEngine and KombiTool should be covered in this manual may contain paragraphs that require your power tool for the first time and keep them in the illustration. The individual steps or procedures described in the manual may contain item numbers that refers directly to the operating instructions, this manual...
Instruction Manual
Page 5
... operator. Working with your model. Have your STIHL dealer show you are specifically authorized by ricochet in the area where it is important that anyone using it off and make sure your KombiEngine model. Thrown objects, including broken blades, may fling them directly or by STIHL for a description of the controls and the function of the parts of a power tool involves 1. the power tool...
... operator. Working with your model. Have your STIHL dealer show you are specifically authorized by ricochet in the area where it is important that anyone using it off and make sure your KombiEngine model. Thrown objects, including broken blades, may fling them directly or by STIHL for a description of the controls and the function of the parts of a power tool involves 1. the power tool...
Instruction Manual
Page 6
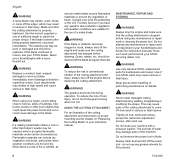
... help protect your power tool will not protect the operator from all foreign objects (gravel, glass, wire, etc.) thrown back by strenuous work gloves (e.g. Wear sturdy boots with your legs. The deflector provided with nonslip soles. Steel-toed safety boots are using. 4 FCS-KM For further instructions on branches, brush or the moving parts of the unit. Power tool noise may also...
... help protect your power tool will not protect the operator from all foreign objects (gravel, glass, wire, etc.) thrown back by strenuous work gloves (e.g. Wear sturdy boots with your legs. The deflector provided with nonslip soles. Steel-toed safety boots are using. 4 FCS-KM For further instructions on branches, brush or the moving parts of the unit. Power tool noise may also...
Instruction Manual
Page 7
... your STIHL servicing dealer. WARNING Always switch off and seriously injure the operator or bystanders. Before Starting WARNING Always check your power tool with STIHL power tools, their use the proper parts may cause the blade to maintain a firm grip and properly control your power tool if it is damaged, improperly adjusted or maintained, or not completely or securely assembled. WARNING Do not attach any way. Inspect for loose parts (nuts, screws, etc...
... your STIHL servicing dealer. WARNING Always switch off and seriously injure the operator or bystanders. Before Starting WARNING Always check your power tool with STIHL power tools, their use the proper parts may cause the blade to maintain a firm grip and properly control your power tool if it is damaged, improperly adjusted or maintained, or not completely or securely assembled. WARNING Do not attach any way. Inspect for loose parts (nuts, screws, etc...
Instruction Manual
Page 8
... when working . For specific starting instructions, see chapter "Using the Unit".) Adjust carrying harness and hand grip to operate your power tool with your size before starting work area, even when starting throttle and allow other obstructions and objects, including the ground, because when the engine starts at idle, attach the power tool to the spring hook of your body. The machine should grip the rear handle. WARNING To reduce...
... when working . For specific starting instructions, see chapter "Using the Unit".) Adjust carrying harness and hand grip to operate your power tool with your size before starting work area, even when starting throttle and allow other obstructions and objects, including the ground, because when the engine starts at idle, attach the power tool to the spring hook of your body. The machine should grip the rear handle. WARNING To reduce...
Instruction Manual
Page 9
..., remove stones, pieces of the attachment changes during use your power tool using the starting throttle lock, as operating the unit so that accompany the substance at regular short intervals with the KombiTool perpendicular to control. Never use , stop the engine immediately, wait until the cutting attachment stops, and check the nut securing the attachment for tightness and the blade for cracks, wear and damage. WARNING The cutting attachment continues to have control...
..., remove stones, pieces of the attachment changes during use your power tool using the starting throttle lock, as operating the unit so that accompany the substance at regular short intervals with the KombiTool perpendicular to control. Never use , stop the engine immediately, wait until the cutting attachment stops, and check the nut securing the attachment for tightness and the blade for cracks, wear and damage. WARNING The cutting attachment continues to have control...
Instruction Manual
Page 10
... gloves when handling or performing maintenance on "Replacing the Cutting Blade" in your local fire authorities or the U.S. This may cause parts of the cutting attachment and instructions on proper mounting see your STIHL dealer. Use the wrench supplied or one of the cutting attachment and injury, always shut off the engine before cleaning. Never use a KombiEngine with a pressure washer. Forestry Service if you have any maintenance or repair work...
... gloves when handling or performing maintenance on "Replacing the Cutting Blade" in your local fire authorities or the U.S. This may cause parts of the cutting attachment and instructions on proper mounting see your STIHL dealer. Use the wrench supplied or one of the cutting attachment and injury, always shut off the engine before cleaning. Never use a KombiEngine with a pressure washer. Forestry Service if you have any maintenance or repair work...
Instruction Manual
Page 11
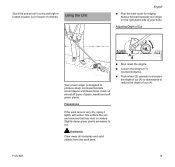
... engine. N Push wheel (2) upwards to increase the depth of Cut 257BA007 KN 257BA004 KN 2 1 A Your power edger is created. If the work area. WARNING Clear away all types of cut (A) or downwards to produce sharp contoured borders around lawns and flower beds. Store the power tool in a dry and high or locked location out of reach of your body. FCS-KM 9 Always hold and operate your edger...
... engine. N Push wheel (2) upwards to increase the depth of Cut 257BA007 KN 257BA004 KN 2 1 A Your power edger is created. If the work area. WARNING Clear away all types of cut (A) or downwards to produce sharp contoured borders around lawns and flower beds. Store the power tool in a dry and high or locked location out of reach of your body. FCS-KM 9 Always hold and operate your edger...
Instruction Manual
Page 12
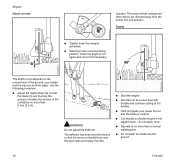
... N Start the engine N Start the cut at no more than 5 mm (0.2 in the normal working position, check the depth of cut again and correct it if necessary. 257BA005 KN 257BA008 KN The depth of cut depends on the deflector and the open side point away from the power tool and operator. N Operate at full throttle. N Do not push the blade into the ground. 10 FCS-KM...
... N Start the engine N Start the cut at no more than 5 mm (0.2 in the normal working position, check the depth of cut again and correct it if necessary. 257BA005 KN 257BA008 KN The depth of cut depends on the deflector and the open side point away from the power tool and operator. N Operate at full throttle. N Do not push the blade into the ground. 10 FCS-KM...
Instruction Manual
Page 13
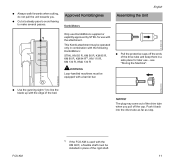
... cutting, do not pull the unit towards you pull off the ends of the drive tube and keep them in a safe place for use - NOTICE The plug may be installed in combination with the following KombiMotors: STIHL KM 55 R, KM 56 R, KM 85 R, KM 90 R, KM 94 R1), KM 110 R, KM 130 R, KMA 130 R N Pull the protective caps off the cap. Approved KombiEngines KombiMotors English Assembling the Unit Only use...
... cutting, do not pull the unit towards you pull off the ends of the drive tube and keep them in a safe place for use - NOTICE The plug may be installed in combination with the following KombiMotors: STIHL KM 55 R, KM 56 R, KM 85 R, KM 90 R, KM 94 R1), KM 110 R, KM 130 R, KMA 130 R N Pull the protective caps off the cap. Approved KombiEngines KombiMotors English Assembling the Unit Only use...

Instruction Manual
Page 14
... be re-installed if the FCS-KM is vertical. N Lubricate the flexible shaft (2) with STIHL multipurpose grease or gear lubricant. 0000-GXX-3240-A0 N Push the flexible shaft into the gearbox - N Once the end of the drive tube is still mounted on the shaft: Remove the gearbox. 1 2 N Pull the rigid shaft (1) out of the drive tube. N Tighten down the clamp screw (1) firmly. 12 FCS-KM Mounting the...
... be re-installed if the FCS-KM is vertical. N Lubricate the flexible shaft (2) with STIHL multipurpose grease or gear lubricant. 0000-GXX-3240-A0 N Push the flexible shaft into the gearbox - N Once the end of the drive tube is still mounted on the shaft: Remove the gearbox. 1 2 N Pull the rigid shaft (1) out of the drive tube. N Tighten down the clamp screw (1) firmly. 12 FCS-KM Mounting the...
Instruction Manual
Page 15
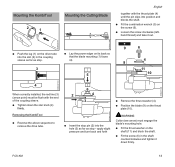
... the power edger on the thrust plate (10). WARNING Collar (see arrow) must be flush with the thrust plate (4) until the pin slips into the hole (3) as far as stop pin (2) into position and blocks the shaft. FCS-KM 13 N Position the blade (9) on its back so that the blade mounting (1) faces up. 5 9 6 4 9 11 10 002BA327 KN 4 When correctly installed, the red line...
... the power edger on the thrust plate (10). WARNING Collar (see arrow) must be flush with the thrust plate (4) until the pin slips into the hole (3) as far as stop pin (2) into position and blocks the shaft. FCS-KM 13 N Position the blade (9) on its back so that the blade mounting (1) faces up. 5 9 6 4 9 11 10 002BA327 KN 4 When correctly installed, the red line...
Instruction Manual
Page 16
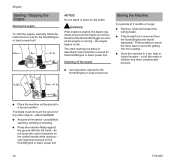
... throttle trigger as soon as the engine is removed from the KombiEngine and stored separately: Fit the protective cap on the ground in a dry, high or locked location - WARNING If the engine is started, the blade may rotate as soon as the engine is described in the instruction manual for the KombiEngine or basic power tool! 9926BA009 KN NOTICE Do not stand or kneel on the control handle...
... throttle trigger as soon as the engine is removed from the KombiEngine and stored separately: Fit the protective cap on the ground in a dry, high or locked location - WARNING If the engine is started, the blade may rotate as soon as the engine is described in the instruction manual for the KombiEngine or basic power tool! 9926BA009 KN NOTICE Do not stand or kneel on the control handle...

Instruction Manual
Page 17
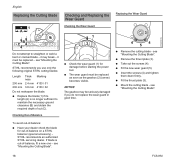
... longer guaranteed. STIHL recommends that the wingnut (2) does not work carried out exclusively by a servicing dealer. A very high torque has to be fixed in the deflector N In order to push the skirt easily into the gap on the deflector, apply a thin coating of resin-free oil to remove the wingnut from the screw. N Remove the washer (2) N Pull the skirt (3) out...
... longer guaranteed. STIHL recommends that the wingnut (2) does not work carried out exclusively by a servicing dealer. A very high torque has to be fixed in the deflector N In order to push the skirt easily into the gap on the deflector, apply a thin coating of resin-free oil to remove the wingnut from the screw. N Remove the washer (2) N Pull the skirt (3) out...
Instruction Manual
Page 18
... starting the power tool. NOTICE The gearbox may break - N Mount the cutting blade - STIHL recommends an authorized STIHL servicing dealer. If blade is no longer sufficient to straighten or weld a bent or cracked blade - 257BA016 KN 257BA017 KN 257BA018 KN English Replacing the Cutting Blade 1 A B C Do not attempt to maintain the necessary ground clearance (B) and obtain the required depth of cut (C). Replacing the Wear Guard 4 4 5 N Remove the cutting blade...
... starting the power tool. NOTICE The gearbox may break - N Mount the cutting blade - STIHL recommends an authorized STIHL servicing dealer. If blade is no longer sufficient to straighten or weld a bent or cracked blade - 257BA016 KN 257BA017 KN 257BA018 KN English Replacing the Cutting Blade 1 A B C Do not attempt to maintain the necessary ground clearance (B) and obtain the required depth of cut (C). Replacing the Wear Guard 4 4 5 N Remove the cutting blade...
Instruction Manual
Page 19
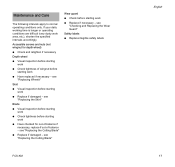
... Depth wheel N Visual inspection before starting work N Check tightness of -balance - Accessible screws and nuts (not wingnut for out-of-balance if necessary, replace if out-of wingnut before starting work area, etc.), shorten the specified intervals accordingly. see "Checking and Replacing the Wear Guard" Safety labels N Replace illegible safety labels FCS-KM English 17 If your daily working time is longer or operating conditions...
... Depth wheel N Visual inspection before starting work N Check tightness of -balance - Accessible screws and nuts (not wingnut for out-of-balance if necessary, replace if out-of wingnut before starting work area, etc.), shorten the specified intervals accordingly. see "Checking and Replacing the Wear Guard" Safety labels N Replace illegible safety labels FCS-KM English 17 If your daily working time is longer or operating conditions...
Instruction Manual
Page 21
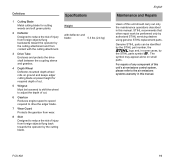
...) English Maintenance and Repairs Users of injury from wear. 8 Skirt Designed to the air emissions systems warranty in this manual. For repairs of any component of this unit's air emissions control system, please refer to reduce the risk of this unit should carry out only the maintenance operations described in some cases, by authorized STIHL servicing dealers using genuine STIHL replacement parts. FCS-KM 19 Specifications Weight with the cutting attachment. 3 Drive Tube...
...) English Maintenance and Repairs Users of injury from wear. 8 Skirt Designed to the air emissions systems warranty in this manual. For repairs of any component of this unit's air emissions control system, please refer to reduce the risk of this unit should carry out only the maintenance operations described in some cases, by authorized STIHL servicing dealers using genuine STIHL replacement parts. FCS-KM 19 Specifications Weight with the cutting attachment. 3 Drive Tube...
Instruction Manual
Page 22
...® FARM BOSS® iCademy® MAGNUM® MasterWrench Service® MotoMix® OILOMATIC® 4-MIX ™ BioPlus ™ Easy2Start ™ EasySpool ™ ElastoStart ™ Ematic ™ FixCut ™ IntelliCarb ™ Master Control Lever ™ Micro ™ Pro Mark ™ Quiet Line ™ STIHL M-Tronic ™ 20 FCS-KM STIHL products must not be thrown in the garbage can. Registrations...
...® FARM BOSS® iCademy® MAGNUM® MasterWrench Service® MotoMix® OILOMATIC® 4-MIX ™ BioPlus ™ Easy2Start ™ EasySpool ™ ElastoStart ™ Ematic ™ FixCut ™ IntelliCarb ™ Master Control Lever ™ Micro ™ Pro Mark ™ Quiet Line ™ STIHL M-Tronic ™ 20 FCS-KM STIHL products must not be thrown in the garbage can. Registrations...

Instruction Manual
Page 23
KG, Waiblingen is subject to change. STIHL OUTFITTERS ™ STIHL PICCO ™ STIHL PolyCut ™ STIHL PowerSweep ™ STIHL Precision Series ™ STIHL RAPID ™ STIHL SuperCut ™ TapAction ™ TrimCut ™ This listing of ANDREAS STIHL AG & Co. FCS-KM English 21 Any unauthorized use of these trademarks without the express written consent of trademarks is strictly prohibited.
KG, Waiblingen is subject to change. STIHL OUTFITTERS ™ STIHL PICCO ™ STIHL PolyCut ™ STIHL PowerSweep ™ STIHL Precision Series ™ STIHL RAPID ™ STIHL SuperCut ™ TapAction ™ TrimCut ™ This listing of ANDREAS STIHL AG & Co. FCS-KM English 21 Any unauthorized use of these trademarks without the express written consent of trademarks is strictly prohibited.


