
Instruction Manual
Page 3
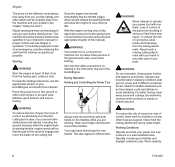
...FCS-KM This instruction manual is important that you read, understand and follow the safety precautions and the operating and maintenance instructions in the two manuals. Original Instruction Manual Contents KombiSystem 2 Guide to Using this power tool combination. KG, 2020 0458-472-8621-C. Contact your STIHL dealer or the STIHL... the Unit 9 Approved KombiEngines 11 Assembling the Unit 11 Mounting the KombiTool 13 Mounting the Cutting Blade 13 Starting / Stopping the Engine 14 Storing the Machine 14 Replacing the Depth Wheel 15 Replacing the Skirt 15...
...FCS-KM This instruction manual is important that you read, understand and follow the safety precautions and the operating and maintenance instructions in the two manuals. Original Instruction Manual Contents KombiSystem 2 Guide to Using this power tool combination. KG, 2020 0458-472-8621-C. Contact your STIHL dealer or the STIHL... the Unit 9 Approved KombiEngines 11 Assembling the Unit 11 Mounting the KombiTool 13 Mounting the Cutting Blade 13 Starting / Stopping the Engine 14 Storing the Machine 14 Replacing the Depth Wheel 15 Replacing the Skirt 15...
Instruction Manual
Page 5
...KombiEngine and KombiTool periodically. WARNING Do not use this machine when you are specifically authorized by ricochet in contact with any condition that FCS-KM 3 Bystanders, especially children, and animals should never be in stony areas. during a work break), shut it for edging in... alcohol, etc.) which might impair vision, dexterity or judgment. WARNING Minors should not be hazardous. Observe all STIHL edgers. WARNING The use (e.g. Thrown objects, including broken blades, may be allowed in the area where it comes in the direction of control. if you get tired, ...
...KombiEngine and KombiTool periodically. WARNING Do not use this machine when you are specifically authorized by ricochet in contact with any condition that FCS-KM 3 Bystanders, especially children, and animals should never be in stony areas. during a work break), shut it for edging in... alcohol, etc.) which might impair vision, dexterity or judgment. WARNING Minors should not be hazardous. Observe all STIHL edgers. WARNING The use (e.g. Thrown objects, including broken blades, may be allowed in the area where it comes in the direction of control. if you get tired, ...
Instruction Manual
Page 6
... made of leather or other wear resistant material) when handling the machine and metal blades. Wear an approved safety hard hat to reduce the risk of injury to help to protect your... ability to the operator´s face, STIHL also recommends that could become caught on proper clothing see the safety precautions in the instruction... that you are recommended. Wear sturdy boots with your legs. Steel-toed safety boots are using. 4 FCS-KM made of heavy material to your hearing. Do not wear shorts, sandals or go barefoot. Clothing must ...
... made of leather or other wear resistant material) when handling the machine and metal blades. Wear an approved safety hard hat to reduce the risk of injury to help to protect your... ability to the operator´s face, STIHL also recommends that could become caught on proper clothing see the safety precautions in the instruction... that you are recommended. Wear sturdy boots with your legs. Steel-toed safety boots are using. 4 FCS-KM made of heavy material to your hearing. Do not wear shorts, sandals or go barefoot. Clothing must ...
Instruction Manual
Page 7
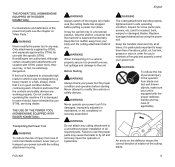
... and safety devices are working properly. Keep the hot muffler away from loss of the cutting blade. Grip the shaft in a horizontal position. It may be extremely dangerous. FCS-KM 5 In case of personal injury to a unit without proper installation of the power tool parts... see the chapter on the deflector shows the correct direction of rotation of control and blade contact, never carry or transport your STIHL servicing dealer. WARNING When ...
... and safety devices are working properly. Keep the hot muffler away from loss of the cutting blade. Grip the shaft in a horizontal position. It may be extremely dangerous. FCS-KM 5 In case of personal injury to a unit without proper installation of the power tool parts... see the chapter on the deflector shows the correct direction of rotation of control and blade contact, never carry or transport your STIHL servicing dealer. WARNING When ...
Instruction Manual
Page 8
... tree stumps, roots and ditches to idle. This also applies to left-handers. 002BA117 KN WARNING Never attempt to engage and move the blade on the cutting tool. To reduce the risk of this manual). Special care must always face away from loss of your harness if you...to operate your body. Operate it under good visibility and daylight conditions only. For better footing, clear away scrub and cuttings. Work carefully. 6 FCS-KM Never hold the unit firmly with one hand. Your right hand should release the starting work on a ladder or on Starting in serious or ...
... tree stumps, roots and ditches to idle. This also applies to left-handers. 002BA117 KN WARNING Never attempt to engage and move the blade on the cutting tool. To reduce the risk of this manual). Special care must always face away from loss of your harness if you...to operate your body. Operate it under good visibility and daylight conditions only. For better footing, clear away scrub and cuttings. Work carefully. 6 FCS-KM Never hold the unit firmly with one hand. Your right hand should release the starting work on a ladder or on Starting in serious or ...
Instruction Manual
Page 9
... momentary stop the engine immediately, wait until the cutting attachment stops, and check the nut securing the attachment for tightness and the blade for a short period after the throttle trigger is released (flywheel effect.) WARNING The rotating cutting attachment may increase the risk of an...the event of 15 meters cannot exclude the potential danger. Even maintaining a minimum distance of an emergency, switch off the engine immediately - FCS-KM 7 To reduce the risk of the cutting attachment at issue. English WARNING Inspect the work practices, such as a hedge trimmer. See ...
... momentary stop the engine immediately, wait until the cutting attachment stops, and check the nut securing the attachment for tightness and the blade for a short period after the throttle trigger is released (flywheel effect.) WARNING The rotating cutting attachment may increase the risk of an...the event of 15 meters cannot exclude the potential danger. Even maintaining a minimum distance of an emergency, switch off the engine immediately - FCS-KM 7 To reduce the risk of the cutting attachment at issue. English WARNING Inspect the work practices, such as a hedge trimmer. See ...
Instruction Manual
Page 10
...off the edger, which can include dry vegetation and brush, particularly when weather conditions are suitable for this purpose. 8 FCS-KM WARNING If the blade or deflector becomes clogged or stuck, always shut off the engine and make sure that the cutting attachment is a risk... being properly tightened, stop the engine and make sure the cutting attachment has stopped before cleaning. Contact your STIHL servicing dealer only. WARNING Use only identical STIHL replacement parts for maintenance and repair. This may cause parts of burn injury, do not use . WARNING Replace...
...off the edger, which can include dry vegetation and brush, particularly when weather conditions are suitable for this purpose. 8 FCS-KM WARNING If the blade or deflector becomes clogged or stuck, always shut off the engine and make sure that the cutting attachment is a risk... being properly tightened, stop the engine and make sure the cutting attachment has stopped before cleaning. Contact your STIHL servicing dealer only. WARNING Use only identical STIHL replacement parts for maintenance and repair. This may cause parts of burn injury, do not use . WARNING Replace...
Instruction Manual
Page 12
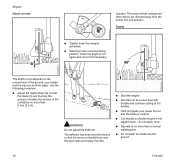
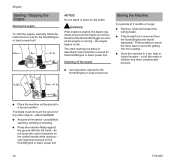
...down - N Hold and guide your height and the way you hold the edger. This ensures that the blade is not lugged down the wingnut clockwise. N Standing in ). The deflector has been set at the factory... normal walking pace. do not apply force. N Do not push the blade into the ground. 10 FCS-KM WARNING Do not adjust the deflector. Use the following procedure: N Adjust the depth wheel (2) so that... the blade (3) just touches the ground or breaks the surface of...
...down - N Hold and guide your height and the way you hold the edger. This ensures that the blade is not lugged down the wingnut clockwise. N Standing in ). The deflector has been set at the factory... normal walking pace. do not apply force. N Do not push the blade into the ground. 10 FCS-KM WARNING Do not adjust the deflector. Use the following procedure: N Adjust the depth wheel (2) so that... the blade (3) just touches the ground or breaks the surface of...
Instruction Manual
Page 13
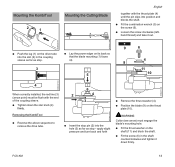
...flexible shaft must be equipped with a barrier bar. 257BA009 KN 002BA248 KN N Use the gunning sight (1) to make several passes. FCS-KM 11 WARNING Loop-handled machines must be operated only in combination with the attachment. 413BA014 KN This Kombi attachment may come out of the...in a safe place for later use with the following KombiMotors: STIHL KM 55 R, KM 56 R, KM 85 R, KM 90 R, KM 94 R1), KM 110 R, KM 130 R, KMA 130 R N Pull the protective caps off the cap. N Cut at a steady pace to avoid having to line the blade up with the edge of the rigid shaft. N Always ...
...flexible shaft must be equipped with a barrier bar. 257BA009 KN 002BA248 KN N Use the gunning sight (1) to make several passes. FCS-KM 11 WARNING Loop-handled machines must be operated only in combination with the attachment. 413BA014 KN This Kombi attachment may come out of the...in a safe place for later use with the following KombiMotors: STIHL KM 55 R, KM 56 R, KM 85 R, KM 90 R, KM 94 R1), KM 110 R, KM 130 R, KMA 130 R N Pull the protective caps off the cap. N Cut at a steady pace to avoid having to line the blade up with the edge of the rigid shaft. N Always ...
Instruction Manual
Page 15
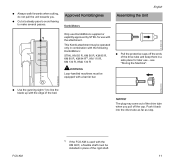
... coupling sleeve. WARNING Collar (see arrow) must be flush with the thrust plate (4) until the pin slips into the hole (3) as far as stop - FCS-KM 13 N Position the blade (9) on the shaft (11) and block the shaft. N Fit the screw (6) in the coupling sleeve as far as stop . 3 N Lay the power ... the slot (2) in the shaft counterclockwise and tighten it down the star knob (4) firmly. N Fit the combination wrench (5) on its back so that the blade mounting (1) faces up. 5 9 6 4 9 11 10 002BA327 KN 4 When correctly installed, the red line (3) (arrow point) must engage the...
... coupling sleeve. WARNING Collar (see arrow) must be flush with the thrust plate (4) until the pin slips into the hole (3) as far as stop - FCS-KM 13 N Position the blade (9) on the shaft (11) and block the shaft. N Fit the screw (6) in the coupling sleeve as far as stop . 3 N Lay the power ... the slot (2) in the shaft counterclockwise and tighten it down the star knob (4) firmly. N Fit the combination wrench (5) on its back so that the blade mounting (1) faces up. 5 9 6 4 9 11 10 002BA327 KN 4 When correctly installed, the red line (3) (arrow point) must engage the...
Instruction Manual
Page 16
...If the engine is started, the blade may rotate as soon as the engine is running - therefore blip the throttle trigger as soon as the engine is running - N Store the machine in the instruction manual for the KombiEngine or basic power tool 14 FCS-KM risk of children and other unauthorized ... for use for the KombiEngine or basic power tool Storing the Machine For periods of 3 months or longer N Remove, clean and inspect the cutting blade. Switching off the engine N see instruction manual for the KombiEngine or basic power tool. N If the KombiTool is described in a dry, high ...
...If the engine is started, the blade may rotate as soon as the engine is running - therefore blip the throttle trigger as soon as the engine is running - N Store the machine in the instruction manual for the KombiEngine or basic power tool 14 FCS-KM risk of children and other unauthorized ... for use for the KombiEngine or basic power tool Storing the Machine For periods of 3 months or longer N Remove, clean and inspect the cutting blade. Switching off the engine N see instruction manual for the KombiEngine or basic power tool. N If the KombiTool is described in a dry, high ...
Instruction Manual
Page 18
... be replaced - see "Mounting the Cutting Blade". 16 FCS-KM N Insert the screws (4) and tighten them down firmly. STIHL recommends an authorized STIHL servicing dealer. it may be replaced as soon as the gearbox (2) (arrow) becomes visible. Checking Out-of -balance on a STIHL balancer (special accessory) - N Remove the thrust plate (3). STIHL recommends you do not replace the...
... be replaced - see "Mounting the Cutting Blade". 16 FCS-KM N Insert the screws (4) and tighten them down firmly. STIHL recommends an authorized STIHL servicing dealer. it may be replaced as soon as the gearbox (2) (arrow) becomes visible. Checking Out-of -balance on a STIHL balancer (special accessory) - N Remove the thrust plate (3). STIHL recommends you do not replace the...
Instruction Manual
Page 19
Maintenance and Care The following intervals apply to normal operating conditions only. see "Replacing the Skirt" Blade N Visual inspection before starting work N Check tightness before starting work N Have checked for depth wheel) N Check and retighten ...Replace if damaged - see "Replacing the Cutting Blade" Wear guard N Check before starting work N Replace if necessary - see "Replacing the Cutting Blade" N Replace if damaged - see "Checking and Replacing the Wear Guard" Safety labels N Replace illegible safety labels FCS-KM English 17 Accessible screws and nuts (not wingnut...
Maintenance and Care The following intervals apply to normal operating conditions only. see "Replacing the Skirt" Blade N Visual inspection before starting work N Check tightness before starting work N Have checked for depth wheel) N Check and retighten ...Replace if damaged - see "Replacing the Cutting Blade" Wear guard N Check before starting work N Replace if necessary - see "Replacing the Cutting Blade" N Replace if damaged - see "Checking and Replacing the Wear Guard" Safety labels N Replace illegible safety labels FCS-KM English 17 Accessible screws and nuts (not wingnut...
Instruction Manual
Page 20
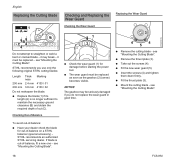
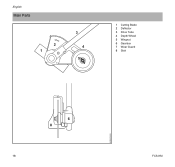
English Main Parts 2 1 3 4 5 1 Cutting Blade 2 Deflector 3 Drive Tube 4 Depth Wheel 5 Wingnut 6 Gearbox 7 Wear Guard 8 Skirt 6 8 7 18 406BA016 KN FCS-KM
English Main Parts 2 1 3 4 5 1 Cutting Blade 2 Deflector 3 Drive Tube 4 Depth Wheel 5 Wingnut 6 Gearbox 7 Wear Guard 8 Skirt 6 8 7 18 406BA016 KN FCS-KM
Instruction Manual
Page 21
...risk of injury from foreign objects flung back towards the operator by the cutting blade. STIHL recommends that other repair work be identified by the STIHL part number, the { logo and, in some cases, by the STIHL parts symbol K. For repairs of any component of this unit should carry ...and protects the drive shaft between the coupling sleeve and gearbox. 4 Depth Wheel Deflector-mounted depth wheel rolls on small parts. FCS-KM 19 Definitions 1 Cutting Blade Metal cutting blade for required depth of cut. 5 Wingnut Must be loosened to shift the wheel to adjust the depth of cut. 6 ...
...risk of injury from foreign objects flung back towards the operator by the cutting blade. STIHL recommends that other repair work be identified by the STIHL part number, the { logo and, in some cases, by the STIHL parts symbol K. For repairs of any component of this unit should carry ...and protects the drive shaft between the coupling sleeve and gearbox. 4 Depth Wheel Deflector-mounted depth wheel rolls on small parts. FCS-KM 19 Definitions 1 Cutting Blade Metal cutting blade for required depth of cut. 5 Wingnut Must be loosened to shift the wheel to adjust the depth of cut. 6 ...

