

Instruction Manual
Page 2
... Guide Bar 16 Mounting the Filing Tool on chlorine-free paper. This machine has been built using modern production techniques and comprehensive quality assurance. M5. KG, 2003 0458 565 7721. Printing inks contain vegetable oils; B3. Please contact your machine. Printed in Germany Printed on the Guide Bar 16 Selecting and Fitting File 17 Setting Up 17 Sharpening 20 Quality Certification 23 STIHl FG...
... Guide Bar 16 Mounting the Filing Tool on chlorine-free paper. This machine has been built using modern production techniques and comprehensive quality assurance. M5. KG, 2003 0458 565 7721. Printing inks contain vegetable oils; B3. Please contact your machine. Printed in Germany Printed on the Guide Bar 16 Selecting and Fitting File 17 Setting Up 17 Sharpening 20 Quality Certification 23 STIHl FG...

Instruction Manual
Page 3
... not installed in all of the power tool. In addition to an illustration. The operating and handling instructions are marked with different features. Such paragraphs are supported by illustrations. Equipment and features This instruction manual refers to several models with the symbols described below: Warning where there is not essential for assistance. english Guide to Using this Manual Pictograms All the pictograms attached to...
... not installed in all of the power tool. In addition to an illustration. The operating and handling instructions are marked with different features. Such paragraphs are supported by illustrations. Equipment and features This instruction manual refers to several models with the symbols described below: Warning where there is not essential for assistance. english Guide to Using this Manual Pictograms All the pictograms attached to...

Instruction Manual
Page 4
... cutting site, in the STIHL bar vise (special accessory). Observing the safety precautions and specifications in these instructions and the owner's manual of increased saw . File correctly - lift the file off the saw chains with the filing tool: Move Master Control lever / slide control or the separate stop switch to STOP or $. Safety Precautions Application english To reduce the risk of personal injury, special safety precautions must be used...
... cutting site, in the STIHL bar vise (special accessory). Observing the safety precautions and specifications in these instructions and the owner's manual of increased saw . File correctly - lift the file off the saw chains with the filing tool: Move Master Control lever / slide control or the separate stop switch to STOP or $. Safety Precautions Application english To reduce the risk of personal injury, special safety precautions must be used...

Instruction Manual
Page 5
... the cutting site, the STIHL bar vise (special accessory). 565BA002 KN english Clamping the Guide Bar Mounting the Filing Tool on the Guide Bar Clamping the guide bar Depending on the guide bar. : The clamping jaws (1) must point towards the bar nose and be in line with top edge of the rivet heads. : Tighten down the wing screw (2). 523BA012 KN 565BA018 KN Finding the master cutter : Use a slide...
... the cutting site, the STIHL bar vise (special accessory). 565BA002 KN english Clamping the Guide Bar Mounting the Filing Tool on the Guide Bar Clamping the guide bar Depending on the guide bar. : The clamping jaws (1) must point towards the bar nose and be in line with top edge of the rivet heads. : Tighten down the wing screw (2). 523BA012 KN 565BA018 KN Finding the master cutter : Use a slide...
Instruction Manual
Page 6
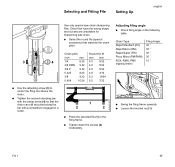
Adjusting filing angle : Check filing angle in the filing frame. : Tighten down the screws (2) moderately. Selecting and Fitting File Setting Up english 565BA003 KN 565BA005 KN 565BA019 KN Use only special saw chain. : Select the round file (special accessory) that the chain can still be pulled along the bar with a screwdriver engaged in a cutter. 1 2 2 : Place the selected file (1) in the following table Chain Type Rapid Standard (RC) Rapid Micro...
Adjusting filing angle : Check filing angle in the filing frame. : Tighten down the screws (2) moderately. Selecting and Fitting File Setting Up english 565BA003 KN 565BA005 KN 565BA019 KN Use only special saw chain. : Select the round file (special accessory) that the chain can still be pulled along the bar with a screwdriver engaged in a cutter. 1 2 2 : Place the selected file (1) in the following table Chain Type Rapid Standard (RC) Rapid Micro...

Instruction Manual
Page 7
english 565BA024 KN 0 45 35 25 0 565BA007 KN : To rotate guide, lift it clear of the teeth. 45 35 25 2 2 1 565BA004 KN : Set the filing angle (2), e.g. 30° and tighten down the knurled nut. 1 Aligning the filing frame : Position the round file (1) between the side plate and depth gauge of the master cutter by swinging and lifting the filing frame. 3 565BA006 KN : Position the master cutter (3) below the center of the knurled nut (1). 18 FG 1
english 565BA024 KN 0 45 35 25 0 565BA007 KN : To rotate guide, lift it clear of the teeth. 45 35 25 2 2 1 565BA004 KN : Set the filing angle (2), e.g. 30° and tighten down the knurled nut. 1 Aligning the filing frame : Position the round file (1) between the side plate and depth gauge of the master cutter by swinging and lifting the filing frame. 3 565BA006 KN : Position the master cutter (3) below the center of the knurled nut (1). 18 FG 1
Instruction Manual
Page 8
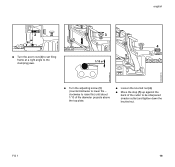
english 2 90° : Turn the acorn nut (2) to set filing frame at a right angle to the clamping jaws. 565BA027 KN 565BA008 KN 3 4 5 1/10 ø 565BA009 KN 565BA020 KN : Turn the adjusting screw (3) (counterclockwise to be sharpened (master cutter) and tighten down the knurled nut. clockwise to raise file) until about 1/10 of file diameter projects above the top plate. : Loosen the knurled nut (4). : Move the stop (5) up against the back of the cutter to lower file - FG 1 19
english 2 90° : Turn the acorn nut (2) to set filing frame at a right angle to the clamping jaws. 565BA027 KN 565BA008 KN 3 4 5 1/10 ø 565BA009 KN 565BA020 KN : Turn the adjusting screw (3) (counterclockwise to be sharpened (master cutter) and tighten down the knurled nut. clockwise to raise file) until about 1/10 of file diameter projects above the top plate. : Loosen the knurled nut (4). : Move the stop (5) up against the back of the cutter to lower file - FG 1 19

Instruction Manual
Page 9
... 1 Use the setting for the master cutter to sharpen all the other cutters in the row. 3 2 6 : Turn the acorn nut (2) slowly clockwise until the distance between it . If this is about 0.1 to 0.2 mm. 565BA021 KN 2 1 During the sharpening process make sure the stop (3) always locates properly against the acorn nut (2). ...The stop bar butts against it and the stop bar (6) is not the case, readjust the acorn nut so that the stop bar (1) should now locate against the back of the cutter being sharpened. 565BA010 KN Sharpen the master cutter with 2 to 3 firm strokes of the file, from ...
... 1 Use the setting for the master cutter to sharpen all the other cutters in the row. 3 2 6 : Turn the acorn nut (2) slowly clockwise until the distance between it . If this is about 0.1 to 0.2 mm. 565BA021 KN 2 1 During the sharpening process make sure the stop (3) always locates properly against the acorn nut (2). ...The stop bar butts against it and the stop bar (6) is not the case, readjust the acorn nut so that the stop bar (1) should now locate against the back of the cutter being sharpened. 565BA010 KN Sharpen the master cutter with 2 to 3 firm strokes of the file, from ...

Instruction Manual
Page 10
... cutter in the second row using this setting. : Place the selected filing gauge (1) (special accessory) on the opposite side. : Tighten down the knurled nut. : Turn the guide bar through 180° and clamp it in the bech vise or STIHL bar vise (special accessory). : Swing the filing frame down. : Position the round file between the side plate and depth gauge of the master cutter...
... cutter in the second row using this setting. : Place the selected filing gauge (1) (special accessory) on the opposite side. : Tighten down the knurled nut. : Turn the guide bar through 180° and clamp it in the bech vise or STIHL bar vise (special accessory). : Swing the filing frame down. : Position the round file between the side plate and depth gauge of the master cutter...

Instruction Manual
Page 11
... : Set the filing angle on the guide to 0°. : Pull chain along the bar until dimension "a" is filed back to the required height (flush with oil. Then remove the filing gauge and file down all depth gauges to the stamped marking, until the depth gauge is under the file. 4 23 : Adjust height adjusting screw (5) so that the depth gauge is approx. 0.5 mm. 22 FG 1 a : Lubricate the guide with gauge). Rotate the file at...
... : Set the filing angle on the guide to 0°. : Pull chain along the bar until dimension "a" is filed back to the required height (flush with oil. Then remove the filing gauge and file down all depth gauges to the stamped marking, until the depth gauge is under the file. 4 23 : Adjust height adjusting screw (5) so that the depth gauge is approx. 0.5 mm. 22 FG 1 a : Lubricate the guide with gauge). Rotate the file at...
Instruction Manual
Page 12
Quality Certification All STIHL products comply with the highest quality standards. FG 1 000BA026 english 23 An independent organization has certified that all products manufactured by STIHL meet the strict requirements of the ISO 9001 standard for quality management systems in terms of product development, materials purchasing, production, assembly, documentation and customer service.
Quality Certification All STIHL products comply with the highest quality standards. FG 1 000BA026 english 23 An independent organization has certified that all products manufactured by STIHL meet the strict requirements of the ISO 9001 standard for quality management systems in terms of product development, materials purchasing, production, assembly, documentation and customer service.


