
Instruction Manual
Page 3
... Using this Manual 14 Safety Precautions 15 Application 15 Mounting the Tool 16 Selecting and Fitting File 17 Setting Up 17 Adjustments 18 Sharpening 20 Main Parts 24 STIHl FG 2 English Dear Customer, Thank you have any queries concerning your satisfaction and troublefree use of the machine. BA_SE_145_001_01_01.fm Contents Guide to ensure your machine. Printed in Germany Printed on chlorine-free...
... Using this Manual 14 Safety Precautions 15 Application 15 Mounting the Tool 16 Selecting and Fitting File 17 Setting Up 17 Adjustments 18 Sharpening 20 Main Parts 24 STIHl FG 2 English Dear Customer, Thank you have any queries concerning your satisfaction and troublefree use of the machine. BA_SE_145_001_01_01.fm Contents Guide to ensure your machine. Printed in Germany Printed on chlorine-free...

Instruction Manual
Page 4
... Manual Pictograms All the pictograms attached to the machine are shown and explained in better use of the machine. Example: Loosen the screw (1) Lever (2) ... Equipment and features This instruction manual refers to several models with the symbols described below: Warning where there is not essential for changes, modifications or improvements not covered in the illustration. As a result, engineering changes and improvements are supported...
... Manual Pictograms All the pictograms attached to the machine are shown and explained in better use of the machine. Example: Loosen the screw (1) Lever (2) ... Equipment and features This instruction manual refers to several models with the symbols described below: Warning where there is not essential for changes, modifications or improvements not covered in the illustration. As a result, engineering changes and improvements are supported...

Instruction Manual
Page 5
... risk of the file are set too low - Read the instruction manual carefully and keep it in particular if the depth gauges are usually enough. - The STIHL filing tool can help reduce the risk of the cutter. - two or three strokes of personal injury, special safety precautions must be used to the tool and saw chains with the file. Always file from the inside...
... risk of the file are set too low - Read the instruction manual carefully and keep it in particular if the depth gauges are usually enough. - The STIHL filing tool can help reduce the risk of the cutter. - two or three strokes of personal injury, special safety precautions must be used to the tool and saw chains with the file. Always file from the inside...
Instruction Manual
Page 6
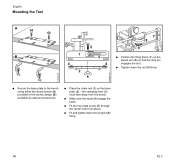
... Mounting the Tool A 7 8 5 9 1 B 3 : Position the filing frame (7) on the base plate (2) - the clamping lever (3) must face away from the bench. : Make sure the studs (4) engage the holes. : Fit the hex head screw (5) through the center hole from above. : Fit and tighten down the nut (9) firmly. 2 6 : Secure the base plate to the bench using either the wood screws (A) provided or...
... Mounting the Tool A 7 8 5 9 1 B 3 : Position the filing frame (7) on the base plate (2) - the clamping lever (3) must face away from the bench. : Make sure the studs (4) engage the holes. : Fit the hex head screw (5) through the center hole from above. : Fit and tighten down the nut (9) firmly. 2 6 : Secure the base plate to the bench using either the wood screws (A) provided or...

Instruction Manual
Page 7
... File Setting Up English Use only special saw chain. : Select the round file (special accessory) that matches the chain pitch. the cutting edges must face outwards. : Tighten down the screws (2) moderately. 564BA003 KN 564BA004 KN 523BA012 KN Check the Saw Chain : Replace any damaged or worn parts of the original parts. the longitudinal rib on the clamping lever must point to the right. : Turn the clamping lever (1) to lock...
... File Setting Up English Use only special saw chain. : Select the round file (special accessory) that matches the chain pitch. the cutting edges must face outwards. : Tighten down the screws (2) moderately. 564BA003 KN 564BA004 KN 523BA012 KN Check the Saw Chain : Replace any damaged or worn parts of the original parts. the longitudinal rib on the clamping lever must point to the right. : Turn the clamping lever (1) to lock...
Instruction Manual
Page 8
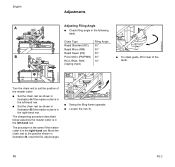
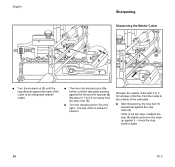
... KN Turn the chain rest to the position shown in the right-hand row. The sharpening procedure described below assumes the master cutter is in the left -hand row. : Set the chain rest as shown in illustration A if the master cutter is in illustration B, reset the file, adjust angle. 1 : Swing the filing frame upwards. : Loosen the nut (1). 18 FG 2 Chain Type Rapid...
... KN Turn the chain rest to the position shown in the right-hand row. The sharpening procedure described below assumes the master cutter is in the left -hand row. : Set the chain rest as shown in illustration A if the master cutter is in illustration B, reset the file, adjust angle. 1 : Swing the filing frame upwards. : Loosen the nut (1). 18 FG 2 Chain Type Rapid...
Instruction Manual
Page 9
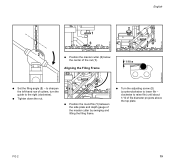
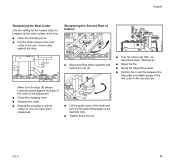
...-hand row of cutters, turn the guide to the right (clockwise). : Tighten down the nut. 1 : Position the round file (1) between the side plate and depth gauge of the master cutter by swinging and lifting the filing frame. 564BA010 KN : Turn the adjusting screw (2) (counterclockwise to raise file) until about 1/10 of the nut (1). 1/10 ø Aligning the Filing Frame 564BA008 KN : Set the filing angle (2) -
...-hand row of cutters, turn the guide to the right (clockwise). : Tighten down the nut. 1 : Position the round file (1) between the side plate and depth gauge of the master cutter by swinging and lifting the filing frame. 564BA010 KN : Turn the adjusting screw (2) (counterclockwise to raise file) until about 1/10 of the nut (1). 1/10 ø Aligning the Filing Frame 564BA008 KN : Set the filing angle (2) -
Instruction Manual
Page 10
...: Turn the knurled nut (3) until the side plate presses against the file and the stop bar (6) lifts about 0.1 to the right - If this is locked in position. the saw chain is not the case, readjust the stop roller (5). : Turn the clamping lever (7)... to 0.2 mm away from the inside to the outside of the cutter to be sharpened (master cutter). : Then turn the knurled nut a little further until the stop (4) butts against the back of the side plate. : After sharpening, the stop bar (1) should butt against the stop position again. 564BA012 KN 564BA013 KN 20 FG...
...: Turn the knurled nut (3) until the side plate presses against the file and the stop bar (6) lifts about 0.1 to the right - If this is locked in position. the saw chain is not the case, readjust the stop roller (5). : Turn the clamping lever (7)... to 0.2 mm away from the inside to the outside of the cutter to be sharpened (master cutter). : Then turn the knurled nut a little further until the stop (4) butts against the back of the side plate. : After sharpening, the stop bar (1) should butt against the stop position again. 564BA012 KN 564BA013 KN 20 FG...
Instruction Manual
Page 11
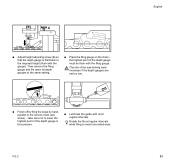
...Use the setting for the master cutter to sharpen all cutters in one row have been sharpened. : Lift the guide clear of the teeth and turn it to the next cutter in the row. : Open the clamping lever. : Pull the chain along to the same filing angle on the opposite side. : Tighten down . 3 : Position the round file... between the side plate and depth gauge of the first cutter in the second row. 564BA014 KN 564BA007 KN Make sure the stop (3) always locates properly...
...Use the setting for the master cutter to sharpen all cutters in one row have been sharpened. : Lift the guide clear of the teeth and turn it to the next cutter in the row. : Open the clamping lever. : Pull the chain along to the same filing angle on the opposite side. : Tighten down . 3 : Position the round file... between the side plate and depth gauge of the first cutter in the second row. 564BA014 KN 564BA007 KN Make sure the stop (3) always locates properly...

Instruction Manual
Page 12
... 4000 35 30 : Set the filing angle on the guide to be lowered. 564BA017 KN 2 3 : Adjust the stop (3) forwards or backwards, resharpen and check length (A) again. : If the length is under the file. 3 564BA023 KN : If it has to 0°. : Fit triangular file (special accessory) in place of the round file. : Pull chain along until a depth gauge is correct, sharpen all...
... 4000 35 30 : Set the filing angle on the guide to be lowered. 564BA017 KN 2 3 : Adjust the stop (3) forwards or backwards, resharpen and check length (A) again. : If the length is under the file. 3 564BA023 KN : If it has to 0°. : Fit triangular file (special accessory) in place of the round file. : Pull chain along until a depth gauge is correct, sharpen all...
Instruction Manual
Page 13
... : Adjust height adjusting screw (4) so that the depth gauge is filed back to the service mark (see arrow) - Oil 564BA024 KN 564BA026 KN : Finish off by filing the slope by hand, parallel to the required height (flush with the gauge). Then remove the filing gauge and file down all depth gauges to lower the highest point of the depth gauge in this process. : Lubricate the guide...
... : Adjust height adjusting screw (4) so that the depth gauge is filed back to the service mark (see arrow) - Oil 564BA024 KN 564BA026 KN : Finish off by filing the slope by hand, parallel to the required height (flush with the gauge). Then remove the filing gauge and file down all depth gauges to lower the highest point of the depth gauge in this process. : Lubricate the guide...

Instruction Manual
Page 14
English Main Parts 1 2 3 4 5 6 7 8 9 12 10 11 13 14 24 564BA022 KN 564BA021 KN 1 Adjusting screw 2 Guide 3 Filing frame 4 Stop rail 5 Nut 6 File 7 Clamping lever 8 Knurled nut 9 Stop 10 Chain rest 11 Base plate 12 Lock nut 13 Wingnut 14 Screw FG 2
English Main Parts 1 2 3 4 5 6 7 8 9 12 10 11 13 14 24 564BA022 KN 564BA021 KN 1 Adjusting screw 2 Guide 3 Filing frame 4 Stop rail 5 Nut 6 File 7 Clamping lever 8 Knurled nut 9 Stop 10 Chain rest 11 Base plate 12 Lock nut 13 Wingnut 14 Screw FG 2


