
Product Instruction Manual
Page 3
... STIHL AG & Co. M8.L10.FST. 0000003591_002_GB Printed on Charger 18 Switching On 18 Switching Off 19 Storing the Machine 20 Replacing Nylon Line 21 Maintenance and Care 23 Main Parts 24 Specifications 25 Special Accessories 26 Troubleshooting 27 Maintenance and Repairs 29 Battery Recycling 29 Disposal 29 Trademarks 30 Addresses 31 { FSA 65, FSA 85...
... STIHL AG & Co. M8.L10.FST. 0000003591_002_GB Printed on Charger 18 Switching On 18 Switching Off 19 Storing the Machine 20 Replacing Nylon Line 21 Maintenance and Care 23 Main Parts 24 Specifications 25 Special Accessories 26 Troubleshooting 27 Maintenance and Repairs 29 Battery Recycling 29 Disposal 29 Trademarks 30 Addresses 31 { FSA 65, FSA 85...

Product Instruction Manual
Page 5
...! Use only cutting attachments that it will do the job better and with a nylon line head. 8. Don't Overreach - Keep proper footing and balance at the rate for changing...replaced by STIHL for use , trimmer should be mounted on ƒ - Read the instruction manual and the safety precautions periodically. When not in these Safety Precautions, to reduce the risk of control, never attempt to designate an FSA...all times. 10. Keep Guards In Place And In Working Order 15. FSA 65, FSA 85 3 It will operate properly and perform its operation. As more fully explained ...
...! Use only cutting attachments that it will do the job better and with a nylon line head. 8. Don't Overreach - Keep proper footing and balance at the rate for changing...replaced by STIHL for use , trimmer should be mounted on ƒ - Read the instruction manual and the safety precautions periodically. When not in these Safety Precautions, to reduce the risk of control, never attempt to designate an FSA...all times. 10. Keep Guards In Place And In Working Order 15. FSA 65, FSA 85 3 It will operate properly and perform its operation. As more fully explained ...
Product Instruction Manual
Page 6
...original STIHL replacement parts. Bystanders, especially children, and animals should wear proper protective apparel. When it is not in the direction of all applicable local safety regulations, standards and ordinances. Different models may also ricochet and strike the operator. 4 FSA 65, FSA 85 ...may have any power tool can be restricted to ƒ before operating this manual. English Have your STIHL dealer show you . Warning! If the rotating line comes in this machine. Striking such objects could damage the cutting attachment. Warning! Do not use ...
...original STIHL replacement parts. Bystanders, especially children, and animals should wear proper protective apparel. When it is not in the direction of all applicable local safety regulations, standards and ordinances. Different models may also ricochet and strike the operator. 4 FSA 65, FSA 85 ...may have any power tool can be restricted to ƒ before operating this manual. English Have your STIHL dealer show you . Warning! If the rotating line comes in this machine. Striking such objects could damage the cutting attachment. Warning! Do not use ...

Product Instruction Manual
Page 10
3905BA026 KN English or resin in order for you are working on slopes or uneven ground. 8 FSA 65, FSA 85 To reduce the risk of personal injury to the operator from line contact and thrown objects, make sure your unit is a one hand. Wrap your instruction manual.) Adjust the ... tightness of the power tool resulting in the general work area, even when starting work on a ladder or on the loop handle. Replace damaged cutting attachments before starting . Do not allow other insecure support. For specific starting instructions, see chapter on "Mounting the Deflector" ...
3905BA026 KN English or resin in order for you are working on slopes or uneven ground. 8 FSA 65, FSA 85 To reduce the risk of personal injury to the operator from line contact and thrown objects, make sure your unit is a one hand. Wrap your instruction manual.) Adjust the ... tightness of the power tool resulting in the general work area, even when starting work on a ladder or on the loop handle. Replace damaged cutting attachments before starting . Do not allow other insecure support. For specific starting instructions, see chapter on "Mounting the Deflector" ...
Product Instruction Manual
Page 12
.... Do not rely on trimmers equipped with a line-limiting blade in the deflector in order to superficial cracks. The drive motor is limited to keep the line at regular intervals. This results in the rain. STIHL AutoCut mowing head Nylon cutting cord advances automatically when...this purpose. 10 FSA 65, FSA 85 Mowing heads are to important components (e.g. Such attachments may result in the vicinity of the cutting attachment and injury, always switch off the motor, remove the battery and make sure the cutting attachment has stopped before replacing the cutting attachment...
.... Do not rely on trimmers equipped with a line-limiting blade in the deflector in order to superficial cracks. The drive motor is limited to keep the line at regular intervals. This results in the rain. STIHL AutoCut mowing head Nylon cutting cord advances automatically when...this purpose. 10 FSA 65, FSA 85 Mowing heads are to important components (e.g. Such attachments may result in the vicinity of the cutting attachment and injury, always switch off the motor, remove the battery and make sure the cutting attachment has stopped before replacing the cutting attachment...
Product Instruction Manual
Page 16
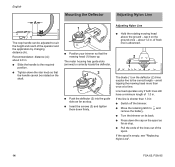
...than 1.0 in N Slide the handle to ƒ and remove the battery. If the line is empty, see "Replacing Nylon Line". 14 FSA 65, FSA 85 N Move the retaining latch to the required position. N Pull the ends of the lines out of the spool. N Press down the cap on the spool as far as stop... (A): about 1.2 in . tap it on its back. N Turn the trimmer on the ground once - 3905BA010 KN English Mounting the Deflector Adjusting Nylon Line A The loop handle can be rotated on the shaft. 3905BA007 KN 1 3905BA008 KN N Position your trimmer so that the handle cannot be adjusted to suit...
...than 1.0 in N Slide the handle to ƒ and remove the battery. If the line is empty, see "Replacing Nylon Line". 14 FSA 65, FSA 85 N Move the retaining latch to the required position. N Pull the ends of the lines out of the spool. N Press down the cap on the spool as far as stop... (A): about 1.2 in . tap it on its back. N Turn the trimmer on the ground once - 3905BA010 KN English Mounting the Deflector Adjusting Nylon Line A The loop handle can be rotated on the shaft. 3905BA007 KN 1 3905BA008 KN N Position your trimmer so that the handle cannot be adjusted to suit...

Product Instruction Manual
Page 23
N Remove the mowing head. FSA 65, FSA 85 21 N Remove the battery N Put the power tool on the ground with the mowing head facing up almost completely. 2 3 N Hold the mowing head steady and ... it can be removed. If the spring (4) has popped out: N Push the spring into the spool (2) as far as stop. Preparations N Switch off the trimmer. Replacing Nylon Line STIHL AutoCut C 4-2 English Assembling the mowing head 1 3905BA017 KN 3905BA018 KN Always check the mowing head for signs of serious wear...
N Remove the mowing head. FSA 65, FSA 85 21 N Remove the battery N Put the power tool on the ground with the mowing head facing up almost completely. 2 3 N Hold the mowing head steady and ... it can be removed. If the spring (4) has popped out: N Push the spring into the spool (2) as far as stop. Preparations N Switch off the trimmer. Replacing Nylon Line STIHL AutoCut C 4-2 English Assembling the mowing head 1 3905BA017 KN 3905BA018 KN Always check the mowing head for signs of serious wear...

Product Instruction Manual
Page 30
...light emitting diode on the charger glows green Light emitting diode on battery glows Battery is faulty and must be replaced. Remedy Charge the battery Replace nylon line Check battery1) and replace Carefully clean the guides / contacts Allow battery to 70°F (15°C-20°C). Remove the battery ...No electrical contact between 40°F (5°C) and 105°F (5°C- 40°C). Have charger checked by servicing dealer1) 28 FSA 65, FSA 85 English Always remove the battery before carrying out any work on the power tool - if the light emitting diodes still flash, the ...
...light emitting diode on the charger glows green Light emitting diode on battery glows Battery is faulty and must be replaced. Remedy Charge the battery Replace nylon line Check battery1) and replace Carefully clean the guides / contacts Allow battery to 70°F (15°C-20°C). Remove the battery ...No electrical contact between 40°F (5°C) and 105°F (5°C- 40°C). Have charger checked by servicing dealer1) 28 FSA 65, FSA 85 English Always remove the battery before carrying out any work on the power tool - if the light emitting diodes still flash, the ...


